

一天入门React学习心得

阅读前必读
本文写的仓促,算是一个学习笔记吧,算是一个入门级的学习文章。如果你刚刚入门,那么可能一些入门的视频可能更加适合你。但如果具备一些知识,比如Vue,那么视频就不适合了。建议看完本篇文章在脑海中过一遍映像,在去官网深读,和一些深入文章,想来会有非常好的提升。
“一个框架不是看几篇文章,写写Demo就能说自己会,熟悉。需要不断实践,踩坑,学习原理。多想才能掌握。我只是结合
- - QAQVue进行的React学习,只是冰山一角罢了。充其量只是API的搬运工。
初始化项目
新手还是推荐官方的脚手架,通过npx来进行项目的初始化一个demo项目。
npx create-react-app 项目名称
默认生成的目录情况下,项目的解构就是这样的。
Mode                LastWriteTime         Length Name
----                -------------         ------ ----
d-----          20.6.15     14:21                public
d-----          20.6.15     16:41                src
-a----          20.6.15     14:21            310 .gitignore
-a----          20.6.15     14:22            746 package.json
-a----          20.6.15     14:21           2884 README.md
-a----          20.6.15     14:22         526017 yarn.lock
随后通过npm 或者 yarn 来将项目跑起来。执行shell后会自动打开一个浏览器,当看到localhost:3000渲染后。那么就可以开启React大门了
#  npm shell 命令
npm run start

# yarn shell 命令
yarn start
React元素渲染-JSX
在Vue中template模板得到大量的使用,只要你会写HTML那么应该难不倒你这个小机灵鬼。而React则是使用了在函数中直接返回DOM。看起来非常的神奇,也导致了一些小伙伴在入门的时候会有点摸不着头脑,但是如果有一定基础,在Vue中写过了Render 函数的话,我想上手起来还是非常容易的。它看起来是下面这个样子的。其本质上就是一个createElement的过程。所以,将这种模板的渲染方式称之为JSX。
import React from 'react';
import './App.css';
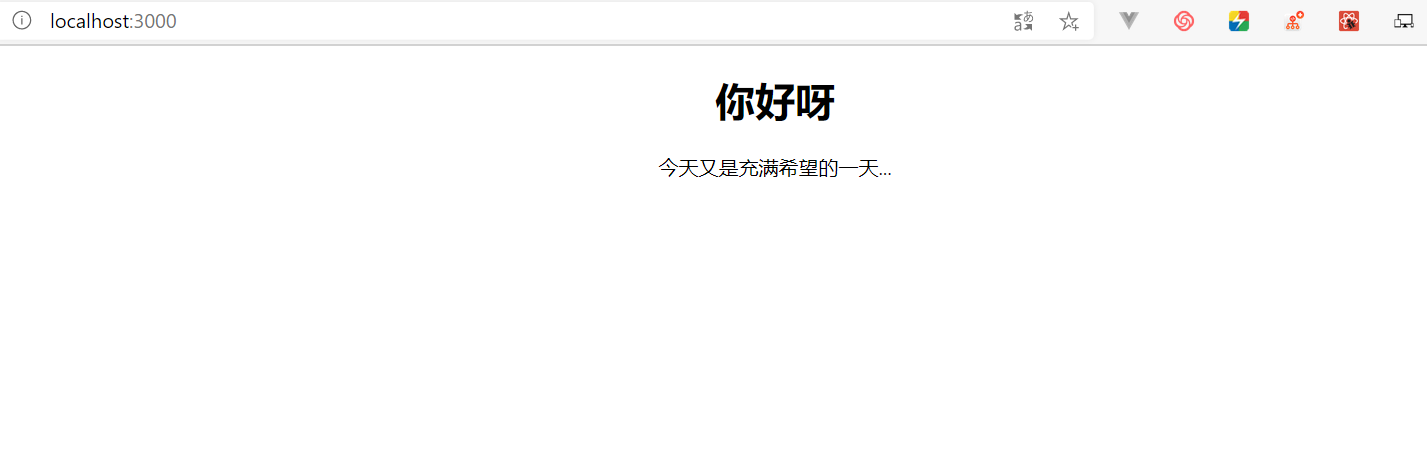
function App() {
return (
<div className="App">
<h1>你好呀</h1>
<p>今天又是充满希望的一天...</p>
</div>
);
}
export default App;
通过React的JSX模板引擎,最终将其渲染到DOM上
变量绑定
在Vue的模板中,通过{{}}两个花括号来声明约束,表示这个声明中的字段是一个js的值,而不是一个文本。在React则是使用了{}一个花括号来做约定。那么就可以在DOM中使用js了。下面是一个Class组件,将state的text值绑定在DOM的。
class App extends React.Component {
  constructor (props) {
    super(props)
    this.state = {
      text: '我是wangly19'
    }
  }

  updateText () {
    this.setState({
      text: '我是帅气的wangly19'
    })
  }

  render () {
    return (
      <div className="App">
        <p>我是一个动态的数据: {this.state.text}</p>
        <button onClick={ this.updateText.bind(this) }>更换</button>
      </div>
    )
  }
}

条件渲染
在Vue中,如果需要动态的渲染一个节点,是通过v-if指令来实现的,在React中呢,可以使用运算符来渲染元素。通过Vue来做一个对比吧。
“通过
- - QAQ&&(或)运算符来达到v-if的一样效果。
render () {
  return (
    <div className="App">
      <p>我是一个动态的数据: {this.state.text}</p>
      {/* { <p v-if="true">2</p> } */}
      {true && <p>2</p>}
    </div>
  )
}
“通过三元运算符可以来达到
- - QAQv-if和v-else一样的效果。
render () {
  return (
    <div className="App">
      <p>我是一个动态的数据: {this.state.text}</p>
      {/* { <p v-if="true">2</p> } */}
      {true ? <p>true</p> : <p>false</p>}
    </div>
  )
}
列表渲染
通过map方法来遍历一些基本数据结构的节点。
“通过数据结构自带的map可以遍历出
- - QAQvalue,index,key在return中返回节点信息。

事件处理
在JavaScript中,通过onClick来绑定一个事件。
<button onclick="activeBuff">激活按钮</button>
而在jsx中,则是通过onClick属性,且后面加一个jsx渲染模板的方式。
“需要注意的是,
- - QAQClass组件下的this是不存在的,需要用户手动为方法绑定this,在调用的点击事件方法。
<button onClick={ this.activeBuff.bind(this) }>激活按钮</button>
组件
众所周知,Vue和React都是组件化解决方案,那么在React中是如何创建一个组件的呢?在React新版本中,推出了React Hooks方案。所以现在主流的还是Class组件和Function组件。
Class组件
Class组件的创建方式非常的简单,只需要创建一个Class类并且让它继承React.Component,在Render方法中return出JSX的模板。
同时通过构造函数,处理Props。并且声明state状态初始化一个对象,将Props挂载到super上。
class App extends React.Component {
  constructor (props) {
    super(props)
    this.state = {
    }
  }
  // render函数
  render () {
    return (
      <div className="App">
        <p>我是Class组件</p>
      </div>
    )
  }
}
Function组件
随着React Hooks发布,开发的主流也渐渐的转入了函数组件,不过Class组件在旧项目中还是会用的。所以都学习一下。对比Class组件,函数组件就非常的简单了。在函数内部返回一个render模板就OK了。如下:
import React from 'react'

function FunctionDemo () {
  return (
    <div>
      我是函数组件
    </div>
  )
}

export default FunctionDemo
Class组件State状态
这里着重的开个单章,主要是Class组件中的State值更改,因为函数组件最好使用的是hooks,所以单拎出来主要解一下Class组件下State状态。在React不建议直接修改State的值,而是使用setState的方式更新状态。
this.setState({
  default: '修改后的文件'
})
同样的,setState后当前的值并不会直接改变。它是一个异步函数,在异步函数中可以拿到最新的状态。

如果需要进行计算值的累加,推荐使用的是通过函数的返回值形式。
“这里的原理类似
- - QAQVue的组件data的函数return方式。 如果使用对象方式的话,在多个setState使用的话会被后面的任务覆盖,从而直接执行一次
// no
this.setState({ index: this.state.index + 1 });
this.setState({ index: this.state.index + 1 });

// yes
this.setState({ index: this.state.index + 1 });
    this.setState({ index: this.state.index + 1 });
this.setState((prevState, props) => {
  return {quantity: prevState.quantity + 1};
});


组件通信
组件通信是开发中经常用到的功能,可谓是灵魂之一了。那么React的组件通信是如何完成的呢?
子组件获取父组件的值 Props
通过Props可以使子组件非常快捷的拿到父组件的传递过去的内容。
- 1.在子组件上添加属性名称和数据
<ClassDemo name="wangly19"></ClassDemo>
- 2.在Class中使用Props
constructor (props) {
  super(props)
  this.state = {
    defaultText: '我是默认的文字'
  }
}
- 3.使用
通过this.props.父组件绑定的属性名称
<p>{ this.props.name }</p>
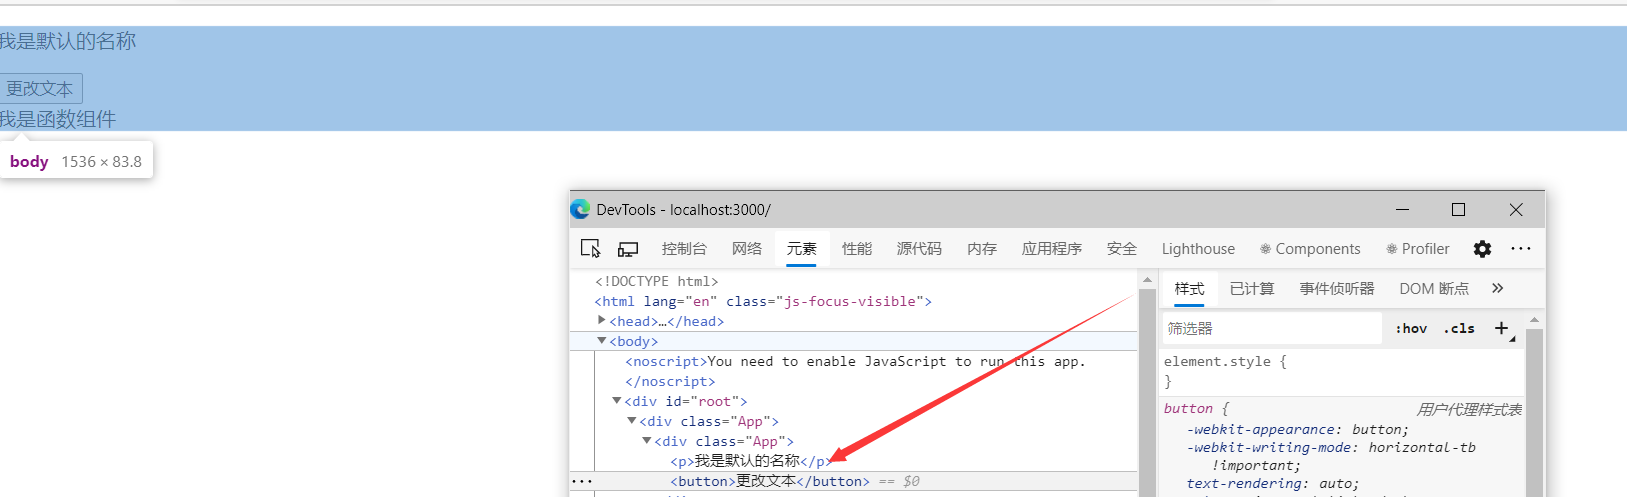
定义默认的Props属性
在Vue中可以定义Props的默认值,哪怕用户没有传递,就会显示默认Props中定义的内容。
ClassDemo.defaultProps = {
  name: '我是默认的名称'
  // ... 参数列表
}
子组件传递父组件
通过Props传递一个函数,当子组件需要改变父组件的值时,通过this.props.[函数]执行回调。
// 父组件
class App extends React.Component {
  constructor (props) {
    super(props)
    this.state = {
      childMessage: '2222222222222222'
    }
  }

  onPropChange (newVal) {
    this.setState({
      childMessage: newVal
    })
  }

  render () {
    return (
      <div className="App">
        <p>{ this.state.childMessage }</p>
        <ClassDemo onPropChange={ this.onPropChange.bind(this) }></ClassDemo>
        {/* <FunctionDemo></FunctionDemo> */}
      </div>
    )
  }
}
import React from 'react';

class ClassDemo extends React.Component {
  constructor (props) {
    super(props)
    this.state = {
      defaultText: '我是默认的文字'
    }
  }

  changeText () {
    this.props.onPropChange('111111111111111')
  }

  render () {
    return (
      <div className="App">
        <button onClick={ this.changeText.bind(this) }>更改文本</button>
      </div>
    )
  }
}
export default ClassDemo;

生命周期
看了官方的生命周期介绍,挺简洁的。分别是组件模板选然后,已经准备就绪的时候,可以做组件加载后的一些逻辑操作,镇楼神图。
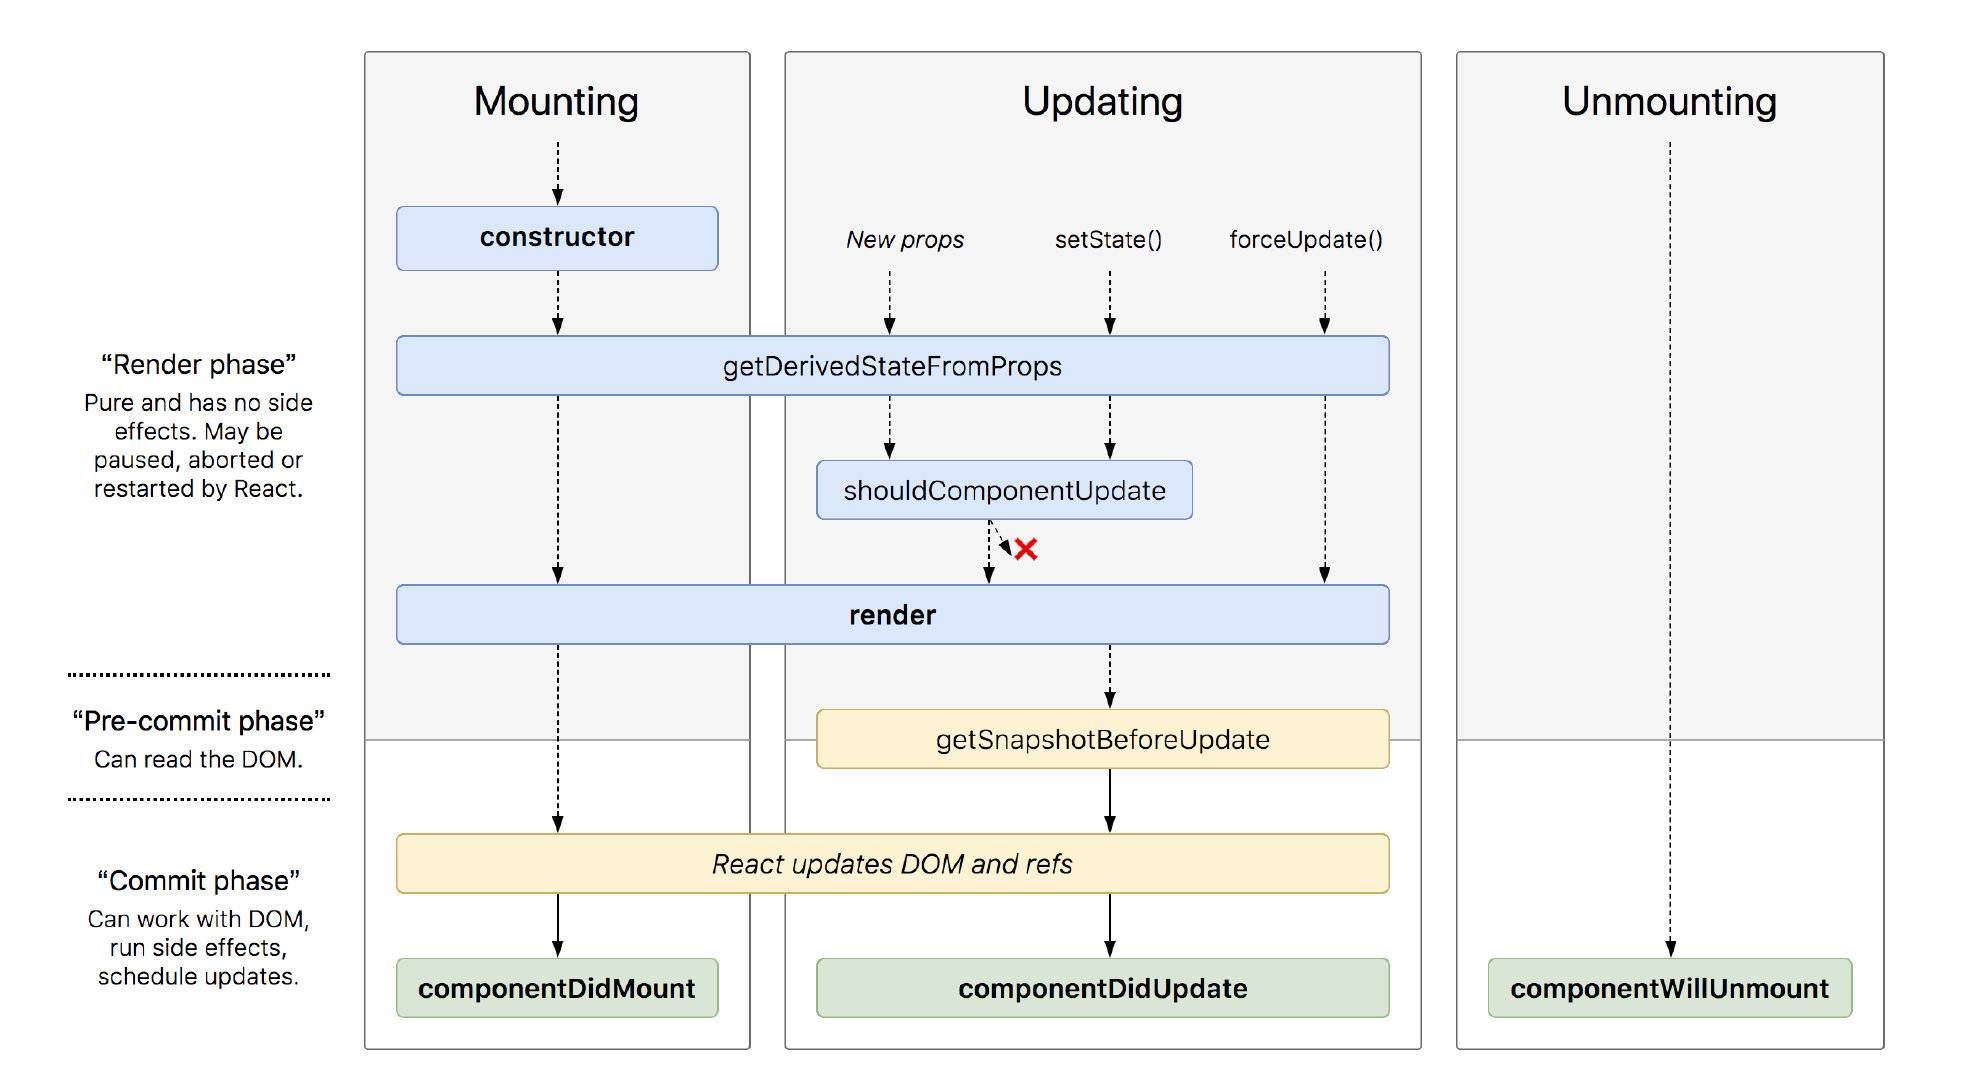
挂载
constructor
构造函数初始化,最先被执行,初始化State等等。
getDerivedStateFromProps
这是一个静态方法,需要在前面增加static的属性
render
渲染函数,返回渲染的内容,当页面产生更新也会触发该方法。
componentDidMount
组件挂载之后,这个时候组件已经挂载完毕了
更新
getDerivedStateFromProps
组件即将被更新,这里参数分别对应前后被修改的内容,通过返回一个布尔值告知是否需要更新视图。
render
当视图更新,那么Render也会重新更新
getSnapshotBeforeUpdate
getSnapshotBeforeUpdate在render之后componentDidUpdate之前输出,类似于中间件用来做一些捕获操作。
componentDidUpdate
getSnapshotBeforeUpdate,有三个参数prevProps,prevState,snapshot,表示之前的props,之前的state,和snapshot。snapshot是getSnapshotBeforeUpdate返回的值
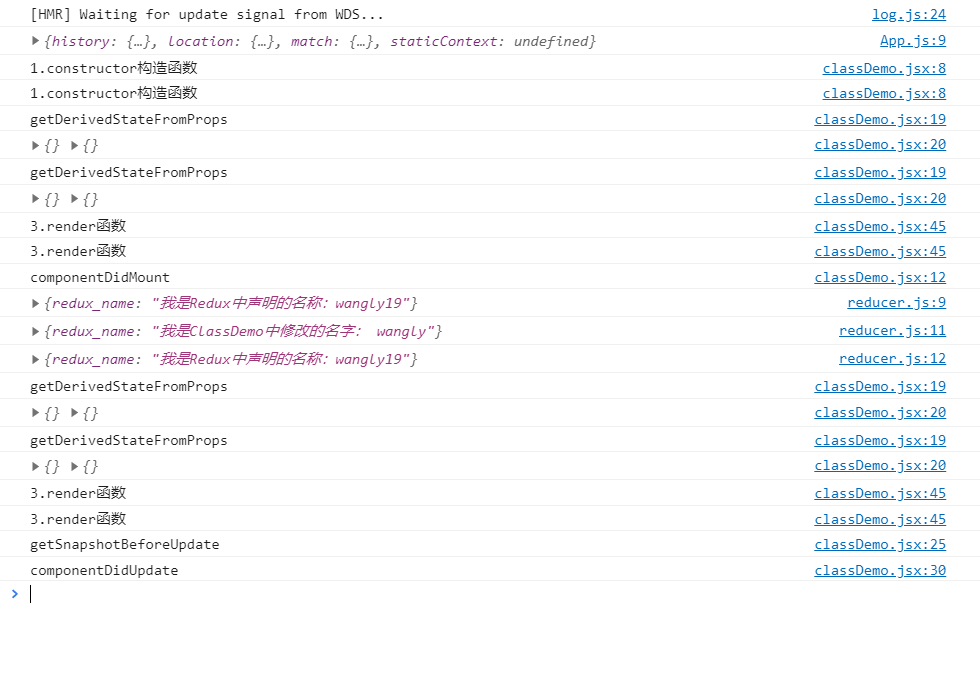
constructor (props) {
  super(props)
  this.state = {}
  console.log('1.constructor构造函数')
}

componentDidMount () {
  console.log('componentDidMount')
  Store.subscribe(() => {
    this.setState({})
  })
}

static getDerivedStateFromProps (nextProps, prevState) {
  console.log('getDerivedStateFromProps')
  console.log(nextProps, prevState)
  return true
}

getSnapshotBeforeUpdate (prevProps, prevState) {
  console.log(prevProps, prevState)
  return 'top: 200'
}

componentDidUpdate (prevProps, prevState, snapshot) {
  console.log(prevProps, prevState, snapshot)
}

componentWillUnmount () {
  console.log('componentWillUnmount')
}

changeText () {
  Store.dispatch({
    type: 'changeName',
    value: '我是ClassDemo中修改的名字: wangly'
  })
}

render () {
  console.log('3.render函数')
  return (
    <div className="App">
      <p>{ Store.getState().redux_name }</p>
      { this.state.redux_name }
      <button onClick={ this.changeText.bind(this) }>更改文本</button>
    </div>
  )
}
卸载
componentWillUnmount
组件卸载,我们可以清除一些定时器,取消网络请求。
组件插槽
插槽对于Vue来说并不是很陌生,在React中插入的节点会以Props的方式传递。可以通过pro1ps.children找到并且渲染出来。
// 父亲组件
<ClassDemo onPropChange={this.onPropChange.bind(this)}>
  <h1>插入的元素 </h1>
</ClassDemo>

// 子组件
<div className="App">
  {this.props.children}
  <button onClick={this.changeText.bind(this)}>更改文本</button>
</div>
Router路由
路由对于SPA应用来讲可谓是重中之重,没有它的话,那么这个页面也就不能成为应用,只能称之为页面。两者可谓天差地别。
安装react-router-dom --save
# shell
npm install react-router-dom --save
创建路由模式
在Vue中都知道路由的mode有两种,一种是hash一种是history模式。分别如下,通过引入不同的包来创建不同的Router。
// histoty
import { BrowserRouter as Router, Link, Route } from 'react-router-dom';
// hash
import { Link, Route, HashRouter as Router } from 'react-router-dom';
创建一个简单的路由
通过as出来的Router包裹路由快,通过Link作为跳转的行为容器。这样一个基本的路由容器就完成。
“需要通过使
- - QAQRoute进行对组件的声明配置,才能被Link找到哦。
import React from 'react';
// histoty
import { BrowserRouter as Router, Link, Route } from 'react-router-dom';
// hash
// import { Link, Route, HashRouter as Router } from 'react-router-dom';

function Page1 () {
  return (
    <h1>我是Page1</h1>
  )
}

function Page2 () {
  return (
    <h1>我是Page2</h1>
  )
}

function Page3 () {
  return (
    <h1>我是Page3</h1>
  )
}

class App extends React.Component {
  constructor (props) {
    super(props)
    this.state = {
    }
  }

  render () {
    return (
      <div className="App">
        <Router>
          <ul>
            <li>
              <Link to="page1">Page1</Link>
            </li>
            <li>
              <Link to="page2">Page2</Link>
            </li>
            <li>
              <Link to="page3">Page3</Link>
            </li>
          </ul>
          <Route exact path="/page1" component={ Page1 }></Route>
          <Route exact path="/page2" component={ Page2 }></Route>
          <Route exact path="/page3" component={ Page3 }></Route>
        </Router>
      </div>
    )
  }
}
export default App;
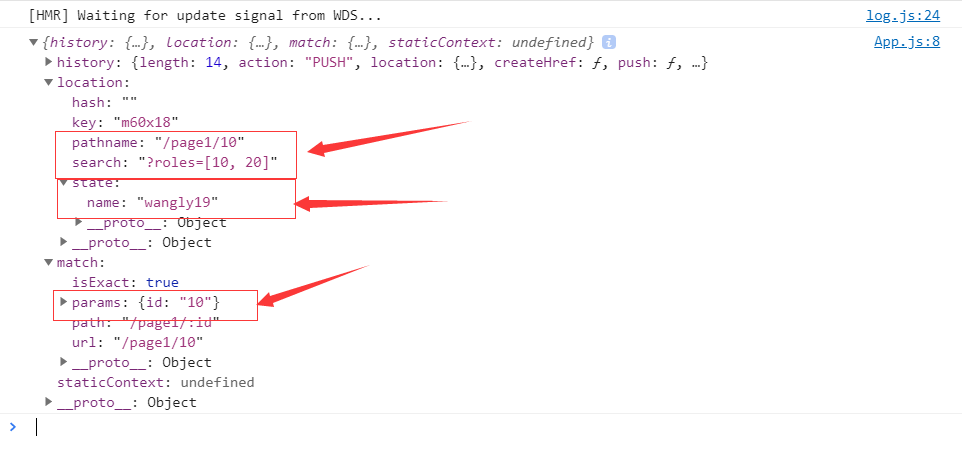
路由传值
路由传递参数一般使用param和query参数。通过给to传递一个对象的方式来进行数据的传递。可以看到,向page1的路由上添加了一个:id表示需要传递param的id的值,同时声明了search的文本和state对象多种方式传递了参数。以便根据不同的场景使用。
;<div className="App">
  <Router>
    <ul>
      <li>
        <Link
          to={{
            pathname: '/page1/10',
            search: '?roles=[10, 20]',
            state: { name: 'wangly19' },
          }}
        >
          Page1
        </Link>
      </li>
      <li>
        <Link to="page2">Page2</Link>
      </li>
      <li>
        <Link to="page3">Page3</Link>
      </li>
    </ul>
    <Route exact path="/page1/:id" component={Page1}></Route>
    <Route exact path="/page2" component={Page2}></Route>
    <Route exact path="/page3" component={Page3}></Route>
  </Router>
</div>
手动跳转
当你使用History路由的时候,某些时候需要主动的跳转道某个路由,这个时候又不能去触发节点行为,所以这个时候就可以通过API的方式,进行跳转。使用方式和Vue大差不差。
// 跳转页面
this.props.history.push(参数和to的内容像素)
this.props.history.push('page1')

// 重定向页面
this.props.history.replace('page2')
当然还有hash的go方法。
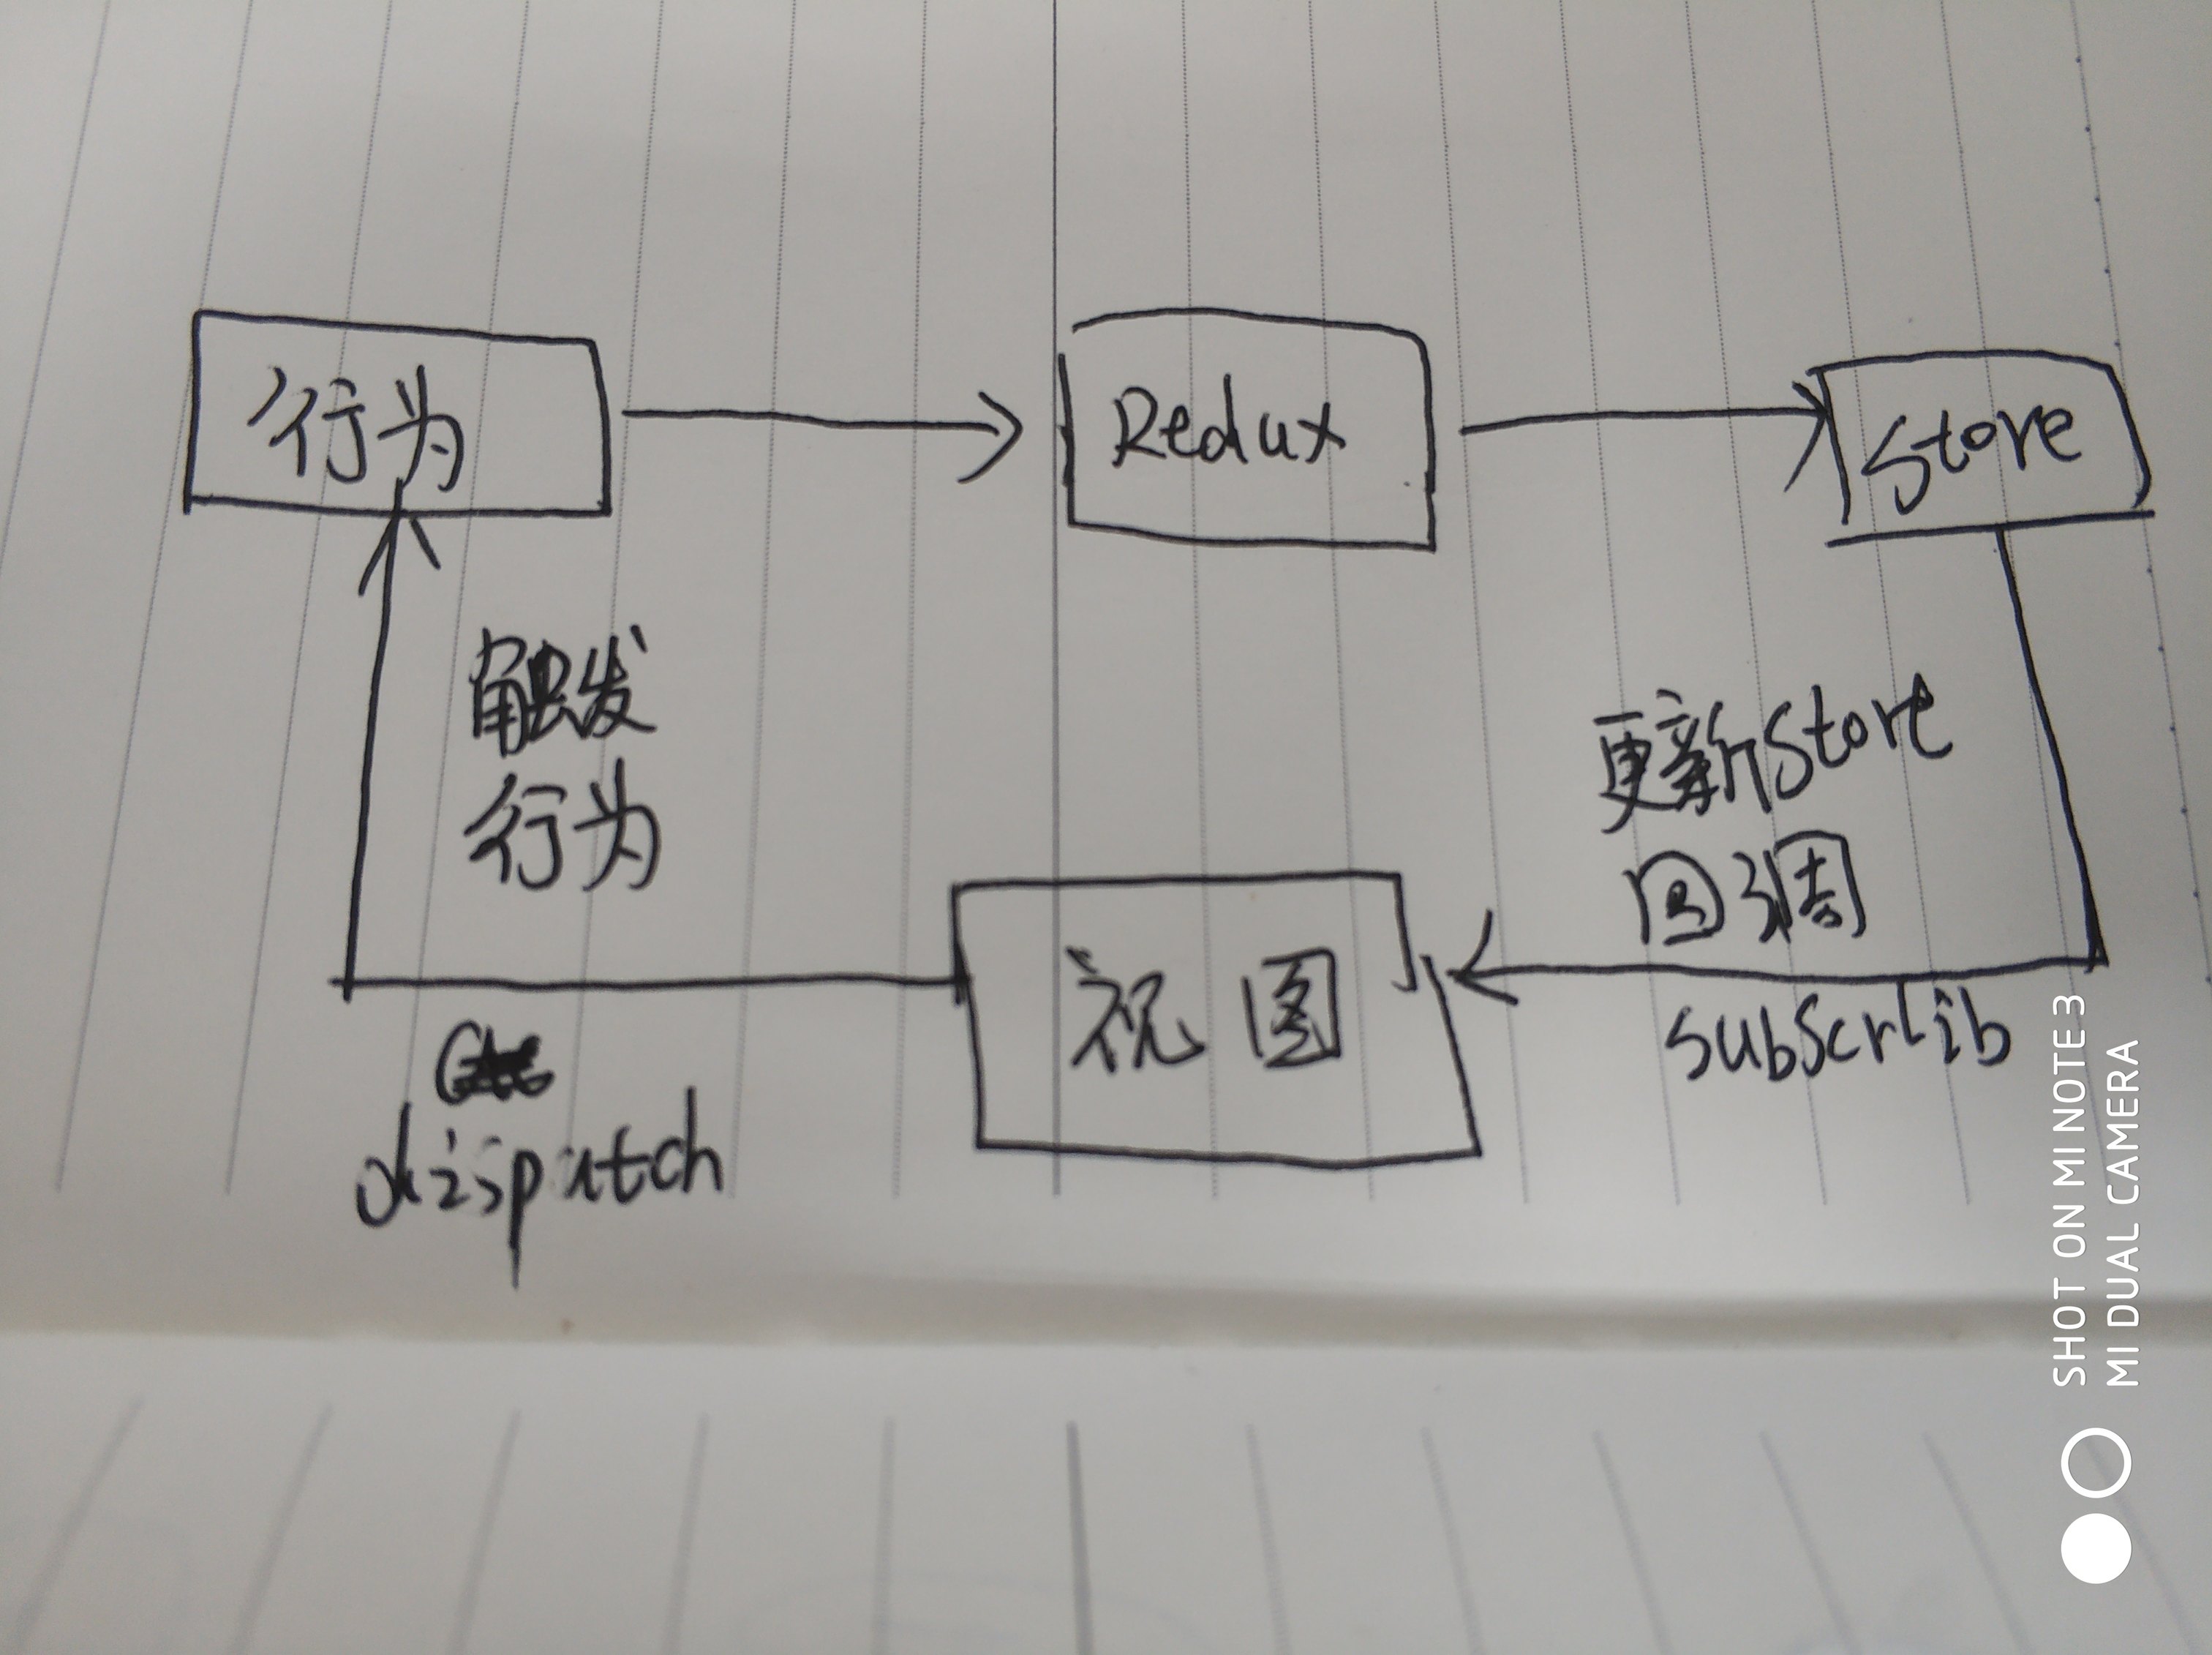
Redux状态管理
Redux是类似于Vuex的一个全局状态解决方案,它的功能主要是用来存储公有全局状态。来方便管理一些共有配置参数,解决业务体积大,结构复杂的项目提供好的状态管理。
“如果项目不是特别需要,尽量不去使用它。
- - QAQ
安装Redux
# shell
npm install redux --save
创建Store State
看到官方的Demo,是非常容易懂的。下面是官方的代码,一眼就能看出流程。
import { createStore } from 'redux'

/**
 * This is a reducer, a pure function with (state, action) => state signature.
 * It describes how an action transforms the state into the next state.
 *
 * The shape of the state is up to you: it can be a primitive, an array, an object,
 * or even an Immutable.js data structure. The only important part is that you should
 * not mutate the state object, but return a new object if the state changes.
 *
 * In this example, we use a `switch` statement and strings, but you can use a helper that
 * follows a different convention (such as function maps) if it makes sense for your
 * project.
 */
function counter(state = 0, action) {
  switch (action.type) {
    case 'INCREMENT':
      return state + 1
    case 'DECREMENT':
      return state - 1
    default:
      return state
  }
}

// Create a Redux store holding the state of your app.
// Its API is { subscribe, dispatch, getState }.
let store = createStore(counter)

// You can use subscribe() to update the UI in response to state changes.
// Normally you'd use a view binding library (e.g. React Redux) rather than subscribe() directly.
// However it can also be handy to persist the current state in the localStorage.

store.subscribe(() => console.log(store.getState()))

// The only way to mutate the internal state is to dispatch an action.
// The actions can be serialized, logged or stored and later replayed.
store.dispatch({ type: 'INCREMENT' })
// 1
store.dispatch({ type: 'INCREMENT' })
// 2
store.dispatch({ type: 'DECREMENT' })
// 1
- 创建Stoge
// 声明默认的State状态值
const modeStore = {
  redux_name: '我是Redux中声明的名称:wangly19'
}
// 声明Reducer
const reducer = (state = modeStore, action) => {
  return state
}
// createStore
import { createStore } from 'redux';
import reducer from './reducer'
const store = createStore(reducer)
export default store
- 视图渲染
import Store from './index'
<p>{ Store.getState().redux_name }</p>
- 触发更新行为dispatch
<button onClick={ this.changeText.bind(this) }>更改文本</button>

// dispatch
changeText () {
  Store.dispatch({
    type: 'changeName',
    value: '我是ClassDemo中修改的名字: wangly'
  })
}
前提是,需要对action的方法做一个声明。类似于Vuex的Action。
const reducer = (state = modeStore, action) => {
  switch (action.type) {
    case 'changeName':
      const newState = {...state}
      console.log(state)
      newState.redux_name = action.value
      console.log(newState)
      console.log(state)
      return newState

    default:
      return state;
  }
}
- 监听变化。
“作为行为触发行为后更新视图的凭证。在组件注销时,注意销毁它哦。
- - QAQ
componentDidMount () {
  /**
   * 回调函数
   */
  Store.subscribe(() => {
    console.log(Store.getState().redux_name)
    this.setState({})
  })
}
Hooks
“Hooks我准备写新的文章。
- - QAQ
总结
学习React很多都是以Vue的思路先入个门,不至于一问三不知。也明白了知其一而知其三。如果有基础那么学习起来其实并不是很困难。但是它的文档并不如Vue的全面,且对于某些方面来说。花了一天时间整理一些基本的学习东西
“如果觉得对你有帮助,不妨点个赞哦。
- - QAQ
参考资料
