

本篇文章主要讲解在SwiftUI中如何安全的更新View,能够让大家明白SwiftUI中View的刷新相关的原理。
View的State是什么?
View状态的定义并没有一个标准的答案,我们暂时把它定义为:**在某一时刻,View中所有用@State修饰的变量的瞬时值。**我用瞬时值这一说法,只是想表达那一时刻的值。
struct ContentView: View {
  	@State var show = false
    var body: some View {
        Example4()
    }
}
可以看出,body是一个计算属性,当我们需要在body中更新show时,就有可能会发生未知的后果,这个我们在下边详细讲解。
Updating the State View
先给大家看一个简单的例子:
struct MyView: View {
    @State private var flag = false

    var body: some View {
        Button("Toggle Flag") {
            self.flag.toggle()
        }
    }
}
大家对这段代码太熟悉了,我们知道view在计算body的时候,不能修改view中的状态,那么这种写法为什么没问题呢?
答案非常简单,修改状态的代码self.flag.toggle()在一个闭包中,当计算body的时候,并不会执行该闭包,也就是说,在计算body的时候,并没有修改状态,只有点击了按钮后,view的状态才被修改,再次触发body的计算。
一旦我们修改状态的方式改变了,就会产生问题,看下边的代码:
struct OutOfControlView: View {
    @State private var count: Int = 0

    var body: some View {
        self.count += 1

        return Text("计算次数:\(self.count)")
            .multilineTextAlignment(.center)
    }
}
运行程序后,我们会得到一个运行时的提示信息:
[SwiftUI] Modifying state during view update, this will cause undefined behavior.
这句话说明当我们在计算body的同时改变了状态,会产生未知的后果。按照我们的经验,我们只需要把self.count += 1放到DispatchQueue闭包中就可以了:
DispatchQueue.main.async {
		self.count += 1
}
这么做,就不会产生运行时的提醒信息,但仍然有很大的问题,为了让大家看到OutOfControlView刷新view对CPU的严重消耗,我们写一个能够显示CPU使用百分比的View,效果如下:
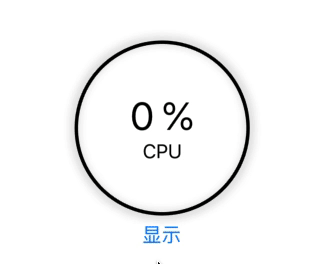
可以看到,计数器不断的增加,CPU使用率很高,说明OutOfControlView一直不断的刷新,上边效果的实现代码:
struct Example1: View {
    @State private var show = false

    var body: some View {
        VStack {
            CPUWheel()
                .frame(height: 150)

            if show {
                OutOfControlView()
            }

            Button(self.show ? "隐藏" : "显示") {
                self.show.toggle()
            }
        }
    }
}

struct OutOfControlView: View {
    @State private var count: Int = 0

    var body: some View {
        DispatchQueue.main.async {
            self.count += 1
        }

        return Text("计算次数:\(self.count)")
            .multilineTextAlignment(.center)
    }
}
上边代码中的CPUWheel并没有给出,大家可以在这里https://gist.github.com/agelessman/ed514f2d6dc3378375faf0e64006048e下载完整代码。
那么为什么我们已经使用了DispatchQueue.main.async{},还有问题呢?原因在于:
DispatchQueue.main.async是一个异步函数,就跟按钮的点击事件一样,在计算body的时候,并不会直接执行- 当body计算完成后才会执行
DispatchQueue.main.async中的代码,这时候状态修改了,又触发了View的刷新 - 一直重复循环上边两个过程
如何打破上边的死循环呢?
我们不再用上边的这个例子演示,大家先看下边这个效果:
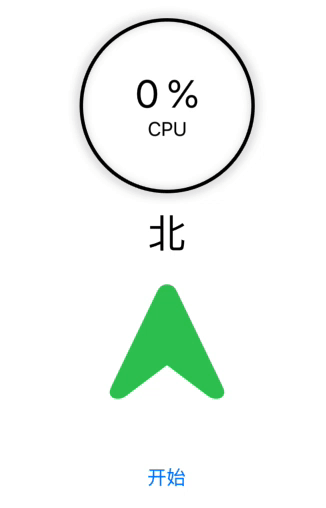
- 随着箭头的旋转,箭头上方的方向文字也随着更新
- CPU的使用率并不高
- 在body的计算过程中实时修改状态
源码如下:
struct Example2: View {
    @State private var show = false
    @State private var direction = ""

    var body: some View {
        print("更新body direction = \(self.direction) ")
        return VStack {
            CPUWheel()
                .frame(height: 150)

            Text("\(self.direction)")
                .font(.largeTitle)

            Image(systemName: "location.north.fill")
                .resizable()
                .frame(width: 100, height: 100)
                .foregroundColor(.green)
                .modifier(RotateEffect(direction: self.$direction, angle: self.show ? 360 : 0))

            Button("开始") {
                withAnimation(.easeInOut(duration: 3.0)) {
                    self.show.toggle()
                }
            }
            .padding(.top, 50)
        }
    }
}

struct RotateEffect: GeometryEffect {
    @Binding var direction: String
    var angle: Double

    var animatableData: Double {
        get {
            angle
        }
        set {
            angle = newValue
        }
    }

    func effectValue(size: CGSize) -> ProjectionTransform {
        DispatchQueue.main.async {
            self.direction = self.getDirection(self.angle)
            print("更新effectValue direction = \(self.direction) ")
        }

        let rotation = CGAffineTransform(rotationAngle: CGFloat(angle * (Double.pi / 180.0)))
        let offset1 = CGAffineTransform(translationX: size.width / 2.0, y: size.height / 2.0)
        let offset2 = CGAffineTransform(translationX: -size.width / 2.0, y: -size.height / 2.0)
        return ProjectionTransform(offset2.concatenating(rotation).concatenating(offset1))
    }

    func getDirection(_ angle: Double) -> String {
        switch angle {
        case 0..<45:
            return "北"
        case 45..<135:
            return "东"
        case 135..<225:
            return "南"
        case 225..<315:
            return "西"
        default:
            return "北"
        }
    }
}
关于上边的代码,大家需要注意以下几点:
@Binding var direction: String: 在RotateEffect中,我们通过Binding的方式直接修改状态- 通过getDirection来计算某个角度下的方向
当进行旋转的时候,self.direction一直都在改变,但为什么没有造成CPU的过度消耗呢?我们在上边代码中的两个地方加了打印函数:
print("更新body direction = \(self.direction) ")
print("更新effectValue direction = \(self.direction) ")
打印结果如下:
更新effectValue direction = 北
更新body direction = 北
更新effectValue direction = 北
...
更新effectValue direction = 北
更新effectValue direction = 东
更新body direction = 东
更新effectValue direction = 东
...
更新effectValue direction = 东
更新effectValue direction = 南
更新body direction = 南
更新effectValue direction = 南
...
更新effectValue direction = 南
更新effectValue direction = 西
更新body direction = 西
更新effectValue direction = 西
...
更新effectValue direction = 西
更新effectValue direction = 北
更新body direction = 北
更新effectValue direction = 北
...
更新effectValue direction = 北
通过仔细分析上边的打印结果,我们得到如下结论:
更新body direction = X: 系统并不是每次direction改变就更新body,而是非常聪明的知道什么时候需要更新body- 正常情况下,系统已经帮我们规避了很多重复刷新的风险,我们需要理解其背后的刷新原理,才能写出更好性能的view
另一种死循环
即便系统在处理更新问题上已经足够聪明了,但我们在编码的时候,还是要十分小心。每当在body中更新数据的时候,都需要仔细分析整个更新过程,下边演示另一个会产生死循环的例子:

代码如下:
struct Example3: View {
    @State private var width: CGFloat = 0.0

    var body: some View {
        Text("Width = \(self.width)")
            .font(.largeTitle)
            .background(WidthGetter(width: self.$width))
    }

    struct WidthGetter: View {
        @Binding var width: CGFloat

        var body: some View {
            GeometryReader { proxy -> AnyView in
                DispatchQueue.main.async {
                    self.width = proxy.frame(in: .local).width
                    print(self.width)
                }
                return AnyView(Color.clear)
            }
        }
    }
}
当我们在WidthGetter中修改状态width的时候,Example3都需要重新刷新body,由于数字的宽度都不一样,造成了死循环,我们看一下打印结果:
278.66666666666663
314.0
315.3333333333333
311.66666666666663
305.66666666666663
317.0
309.66666666666663
316.66666666666663
311.66666666666663
305.66666666666663
317.0
309.66666666666663
316.66666666666663
311.66666666666663
305.66666666666663
317.0
可以看到,width在这几个数值之间不断切换,如果我们固定死每个数字的宽度,就能解决这个问题:
    var body: some View {
        Text("Width = \(self.width)")
            .font(.custom("Cochin", size: 30))
            .background(WidthGetter(width: self.$width))
    }
总结
- 尽可能避免一边更新body,一边修改状态
- 使用
DispatchQueue.main.async{},这样可以把状态的修改时机放到body计算完成之后 - 即便使用
DispatchQueue.main.async{},也有可能会存在问题
注:上边的内容参考了网站https://swiftui-lab.com/state-changes/,如有侵权,立即删除。
