

从设置圆角开始
我们知道,一般圆角效果会开启离屏渲染,但是并非所用的圆角都会开启离屏渲染。那么问题来了:什么情况下的圆角效果才会开启离屏渲染呢?
先来看一下,苹果官方文档对圆角(cornerRadius)的说明:
Setting the radius to a value greater than 0.0 causes the layer to begin drawing
rounded corners on its background. By default, the corner radius does not apply to
the image in the layer’s contents property; it applies only to the background color
and border of the layer. However, setting the masksToBounds property to YES causes
the content to be clipped to the rounded corners.
The default value of this property is 0.0.
意思大概是:在cornerRadius设置的值大于 0.0 的时候会使 layer 在背景上绘制圆角,默认情况下,圆角效果并不会影响到 layer 的 contents 属性中的 image;它只会影响 layer 的背景颜色和边框。但是设置 masksToBounds 属性为 YES 会导致 content 被剪裁出圆角。
一般在设置了圆角之后,我们会设置 clipsToBounds 或者 masksToBounds 来剪裁掉多余的部分。clipsToBounds 指视图上的子视图,如果超出父视图的部分就截取掉;masksToBounds 是指视图的图层上的子图层,如果超出父图层的部分就截取掉。
tips:在模拟器打开离屏渲染颜色标记
注:本例中海绵宝宝图片(btn.png)尺寸为557 × 409 pixels;皮卡丘图片(testIcon.png)尺寸为64 × 64 pixels
先看下面的代码:
    //1.按钮存在背景图片
    UIButton *btn1 = [UIButton buttonWithType:UIButtonTypeCustom];
    btn1.frame = CGRectMake(50, 100, 100, 100);
    btn1.layer.cornerRadius = 50;
    [self.view addSubview:btn1];
    [btn1 setImage:[UIImage imageNamed:@"btn.png"] forState:UIControlStateNormal];
    btn1.clipsToBounds = YES;

    //2.按钮不存在背景图片
    UIButton *btn2 = [UIButton buttonWithType:UIButtonTypeCustom];
    btn2.frame = CGRectMake(50, 250, 100, 100);
    btn2.layer.cornerRadius = 50;
    btn2.backgroundColor = [UIColor blueColor];
    [self.view addSubview:btn2];
    btn2.clipsToBounds = YES;


    //3.UIImageView 设置了图片+背景色;
    UIImageView *img3 = [[UIImageView alloc]init];
    img3.frame = CGRectMake(50, 400, 100, 100);
    img3.backgroundColor = [UIColor blueColor];
    [self.view addSubview:img3];
    img3.layer.cornerRadius = 50;
    img3.layer.masksToBounds = YES;
    img3.image = [UIImage imageNamed:@"btn.png"];


    //4.UIImageView 只设置了图片,无背景色;
    UIImageView *img4 = [[UIImageView alloc]init];
    img4.frame = CGRectMake(50, 550, 100, 100);
    [self.view addSubview:img4];
    img4.layer.cornerRadius = 50;
    img4.layer.masksToBounds = YES;
    img4.image = [UIImage imageNamed:@"btn.png"];
代码运行效果如下:
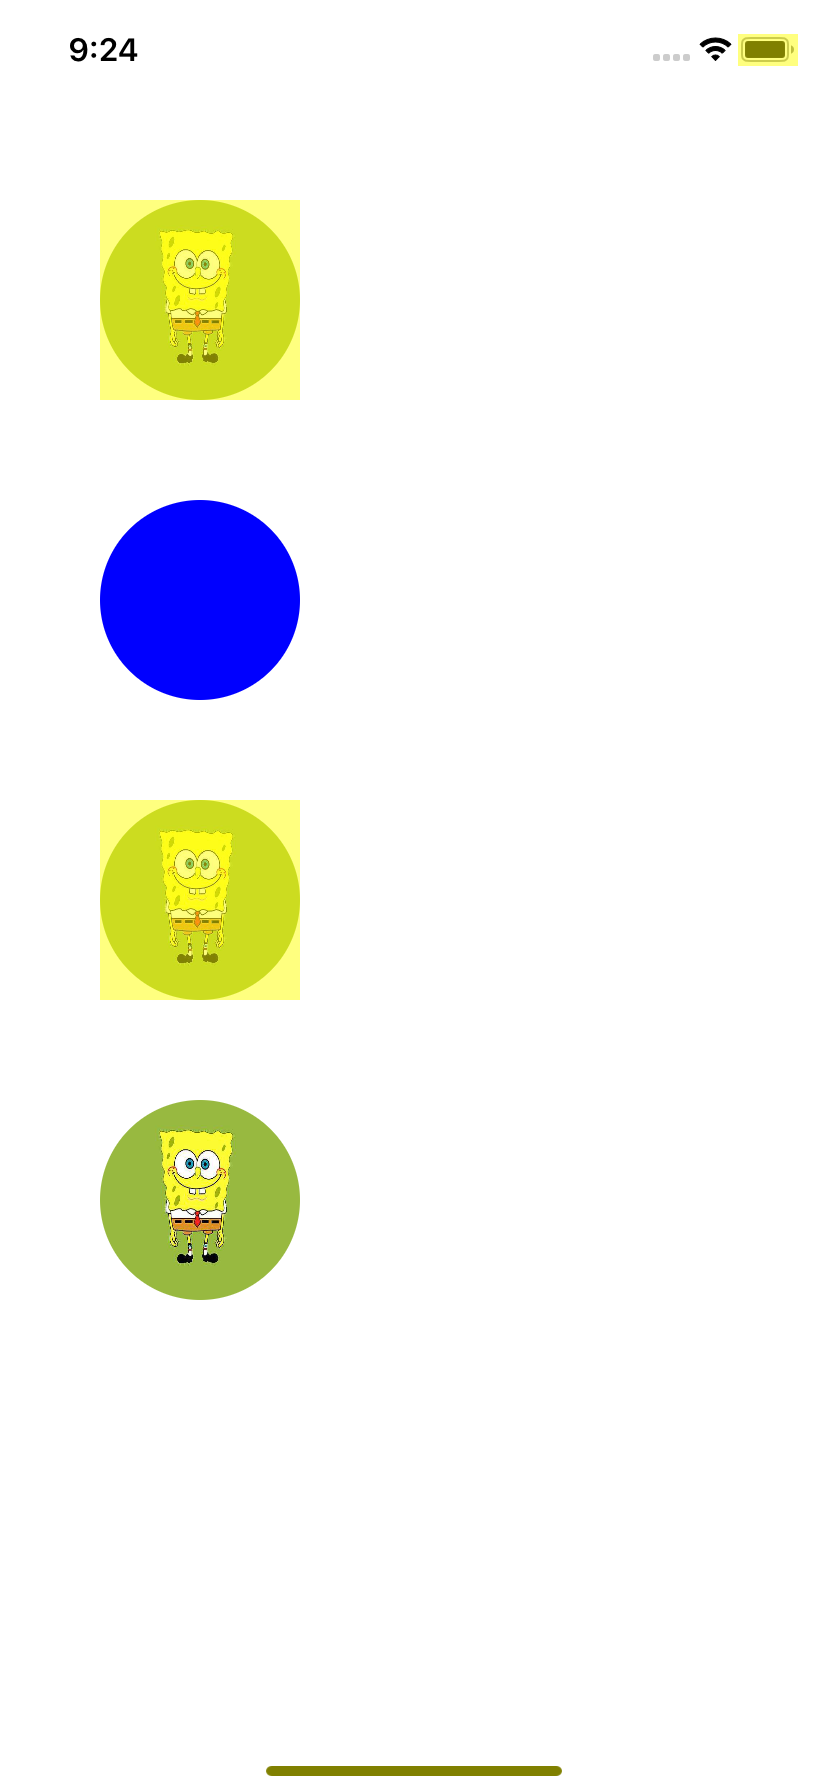
从图上可以看到第一个和第三个海绵宝宝都触发了离屏渲染。
那么再来看下面的代码:
    //1.按钮存在背景图片
    UIButton *btn1 = [UIButton buttonWithType:UIButtonTypeCustom];
    btn1.frame = CGRectMake(50, 100, 100, 100);
    btn1.layer.cornerRadius = 50;
    [self.view addSubview:btn1];
    [btn1 setImage:[UIImage imageNamed:@"btn.png"] forState:UIControlStateNormal];
    btn1.clipsToBounds = YES;

    //1.按钮存在背景图片
    UIButton *btn11 = [UIButton buttonWithType:UIButtonTypeCustom];
    btn11.frame = CGRectMake(200, 100, 100, 100);
    btn11.layer.cornerRadius = 50;
    [self.view addSubview:btn11];
    [btn11 setImage:[UIImage imageNamed:@"testIcon.png"] forState:UIControlStateNormal];
    btn11.clipsToBounds = YES;
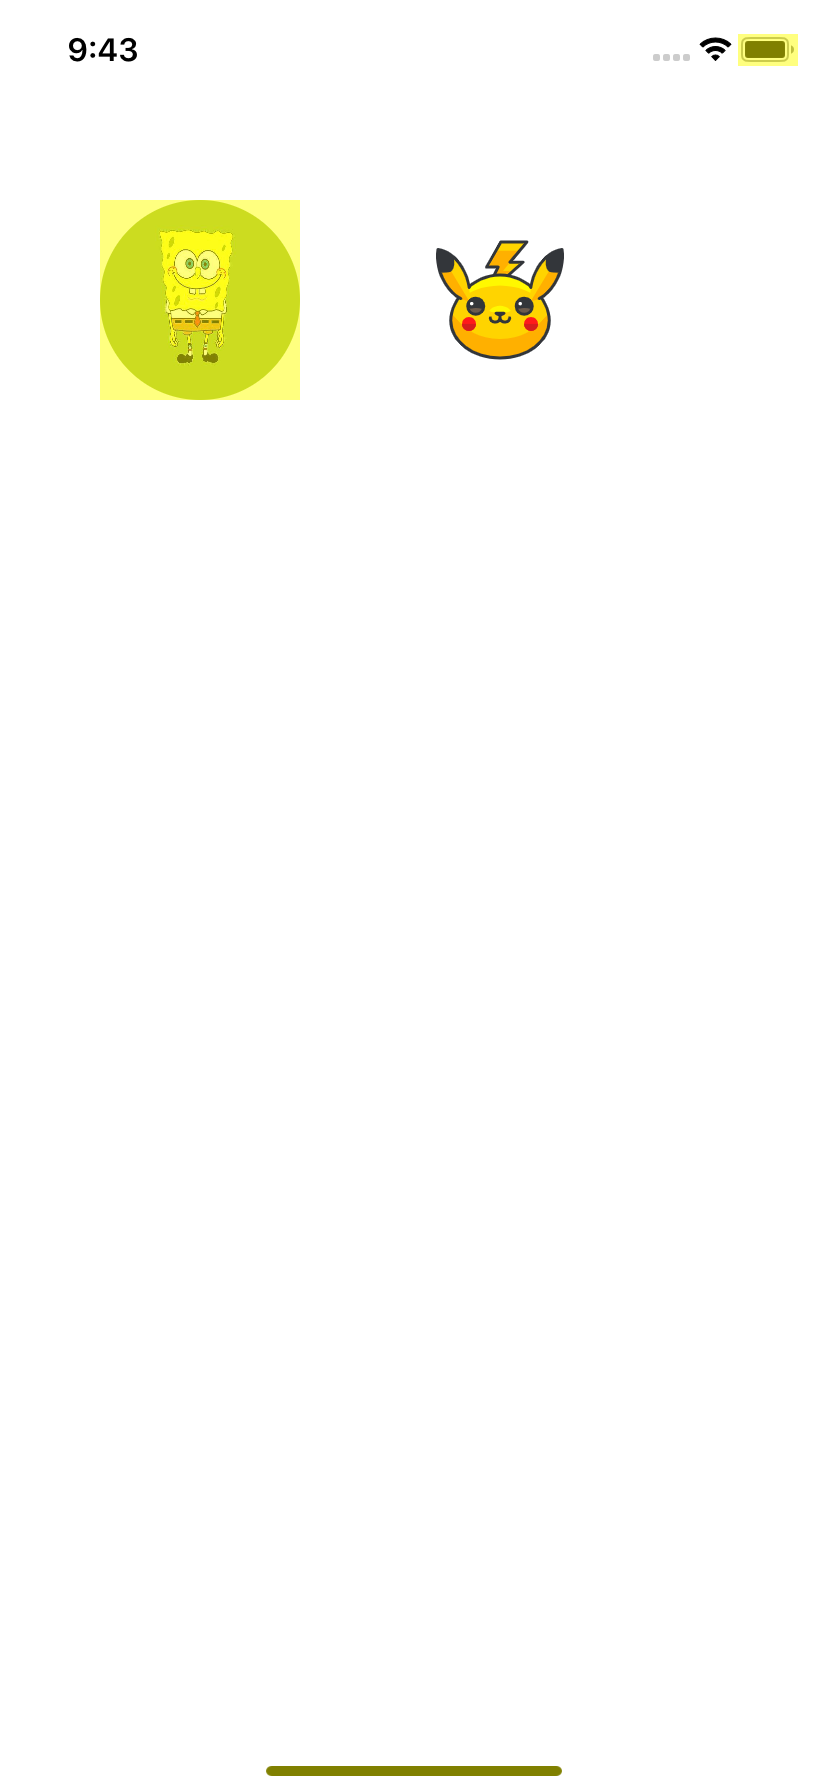
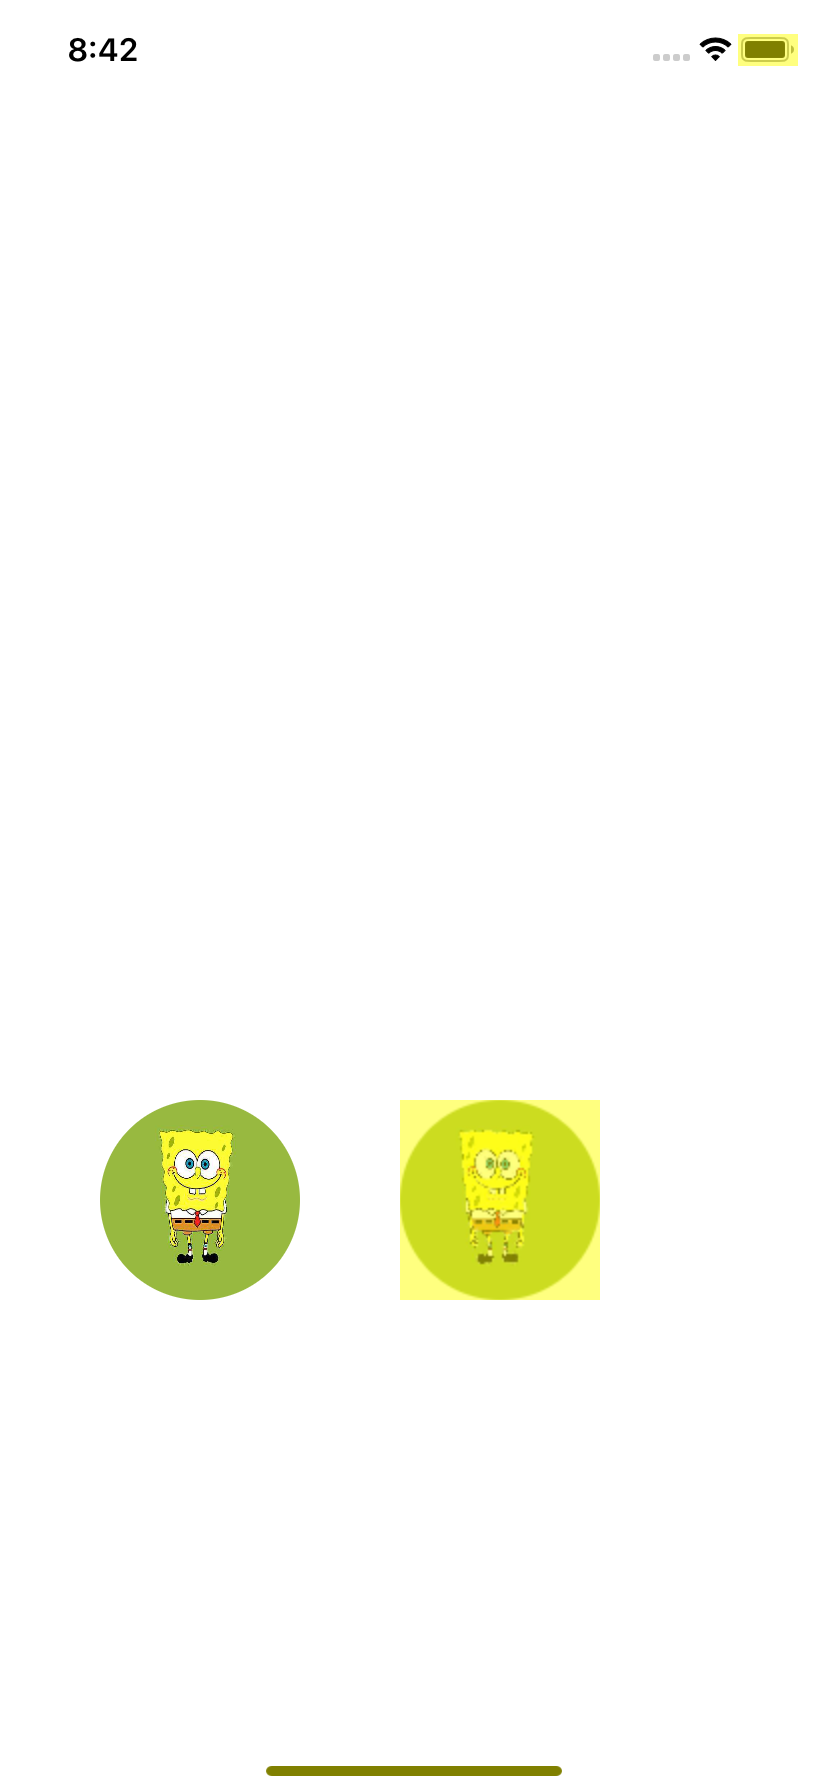
代码运行效果如下:
最后再来一段代码:
    //1.按钮存在背景图片
    UIButton *btn1 = [UIButton buttonWithType:UIButtonTypeCustom];
    btn1.frame = CGRectMake(50, 100, 100, 100);
    btn1.layer.cornerRadius = 50;
    [self.view addSubview:btn1];
    [btn1 setImage:[UIImage imageNamed:@"btn.png"] forState:UIControlStateNormal];
    btn1.clipsToBounds = YES;

    //1.按钮存在背景图片
    UIButton *btn11 = [UIButton buttonWithType:UIButtonTypeCustom];
    btn11.frame = CGRectMake(200, 100, 100, 100);
    btn11.layer.cornerRadius = 50;
    [self.view addSubview:btn11];
    [btn11 setImage:[UIImage imageNamed:@"testIcon.png"] forState:UIControlStateNormal];
    btn11.clipsToBounds = YES;
    [btn11 sizeToFit];
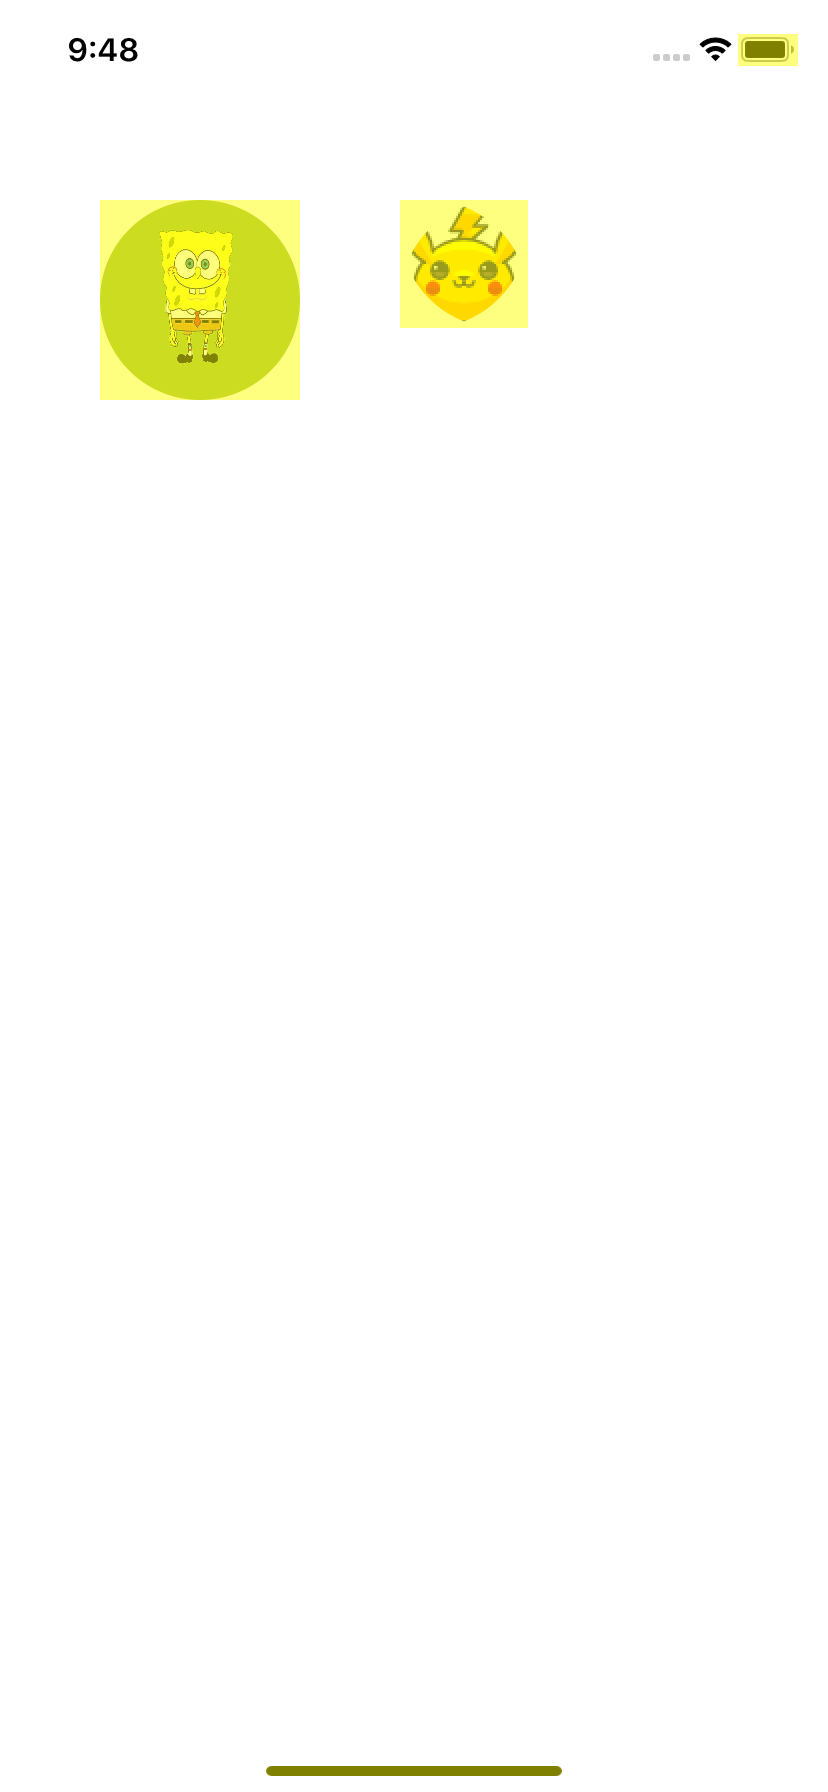
代码运行效果如下:
比较上面三段代码和三张图片,绘制圆角的时候什么情况下回触发离屏渲染。
为什么需要离屏渲染
有些渲染效果无法一次完成,需要将渲染的中间结果保存在离屏缓冲区,等到最后将所有的保存的渲染结果一起合成为最终的渲染效果。
对于可以复用的一些渲染效果,可以保存在离屏缓冲区已提高性能。
无法一次完成的渲染效果
比如圆角这样的效果,当有多个图层时,每个图层都需要做圆角、剪裁时,就需要分别对每个图层做处理,从最底层的图层开始,一直到最顶层的图层。
前面我们说了只有在设置圆角后开启了clipsToBounds或者masksToBounds的时候才会触发离屏渲染。
在离屏渲染展示图1中:前两个控件是 UIButton(注意:UIButton是有多个图层的),后两个控件是 UIImageView。第一个控件先要对背景颜色和边框做圆角处理,然后再对图片做圆角处理;第二个控件没有设置图片,只需要对背景颜色和边框做圆角处理就好了;第三个控件设置了背景颜色和图片,同样的也先要对背景颜色和边框做圆角处理,然后对图片做圆角处理;最后一个空间只只设置了背景颜色,也只需要对背景颜色和边框做圆角处理。
再看离屏渲染展示图2中:两个空间都是 UIButton。两个 UIButton 除了设置的图片不一样以外,其他设置都是一样的。可以看到皮卡丘这个按钮并没有触发离屏渲染。控件添加的图片尺寸小于控件的 frame,这时候不需要对图片进行剪裁,也不会触发离屏渲染。
最后我们看一看离屏渲染展示图2中,对皮卡丘这个按钮运行了sizeToFit方法后,发现又触发了离屏渲染。是不是很神奇。这个时候皮卡丘这个按钮的 frame 被 重置了,适应了图片的大小。这个时候再设置圆角就要处理背景颜色和边框以及图片了。
复用的渲染效果
看下面的代码
    //4.UIImageView 只设置了图片,无背景色;
    UIImageView *img4 = [[UIImageView alloc]init];
    img4.frame = CGRectMake(50, 550, 100, 100);
    [self.view addSubview:img4];
    img4.layer.cornerRadius = 50;
    img4.layer.masksToBounds = YES;
    img4.image = [UIImage imageNamed:@"btn.png"];

    //4.UIImageView 只设置了图片,无背景色;
    UIImageView *img44 = [[UIImageView alloc]init];
    img44.frame = CGRectMake(200, 550, 100, 100);
    [self.view addSubview:img44];
    img44.layer.cornerRadius = 50;
    img44.layer.masksToBounds = YES;
    img44.image = [UIImage imageNamed:@"btn.png"];
    img44.layer.shouldRasterize = YES;
代码执行效果如下:
从代码里,我们可以看到两个海绵宝宝的唯一区别就是第二个海绵宝宝设置了光栅化(shouldRasterize)。我们俩看看那苹果对光栅化是怎么说的:
When the value of this property is YES, the layer is rendered as a bitmap in its
local coordinate space and then composited to the destination with any other
content.
当这个值被设置为 YES 时,layer 会在它的本地坐标控件被渲染成一个位图,然后与其他任何内容合成为目标。这个被渲染出来的位图会被缓存起来。
