

我平时项目开发必备框架
- Android上最强网络请求 Net
- Android上最强列表(包含StateLayout) BRV
- Android最强缺省页 StateLayout
- JSON和长文本日志打印工具 LogCat
- 支持异步和全局自定义的吐司工具 Tooltip
- 开发调试窗口工具 DebugKit
- 一行代码创建透明状态栏 StatusBar
译为"约束布局", 是Google在AndroidStudio2.2引入的布局. 在AndroidStudio 2.3直接替代了之前的Activity创建的默认布局RelativeLayout. 可以看到Google对其重视性.
特点
- 配合布局编辑器,提升效率(鼠标创建布局, 不过由于卡顿/bug/多余属性等问题我还是建议代码)
- 更好的屏幕适配
- 百分比
- 辅助线
- 分组显示隐藏
- 共同约束
- 隐藏状态边距
- 解决布局嵌套过多引起的性能问题(大多数时候只需要一个根布局就能解决, 因为他拥有其他布局的特性)
本文实时更新测试版最新特性
官方文档
最新依赖版本
dependencies {
  compile 'com.android.support.constraint:constraint-layout:1.1.1'
}
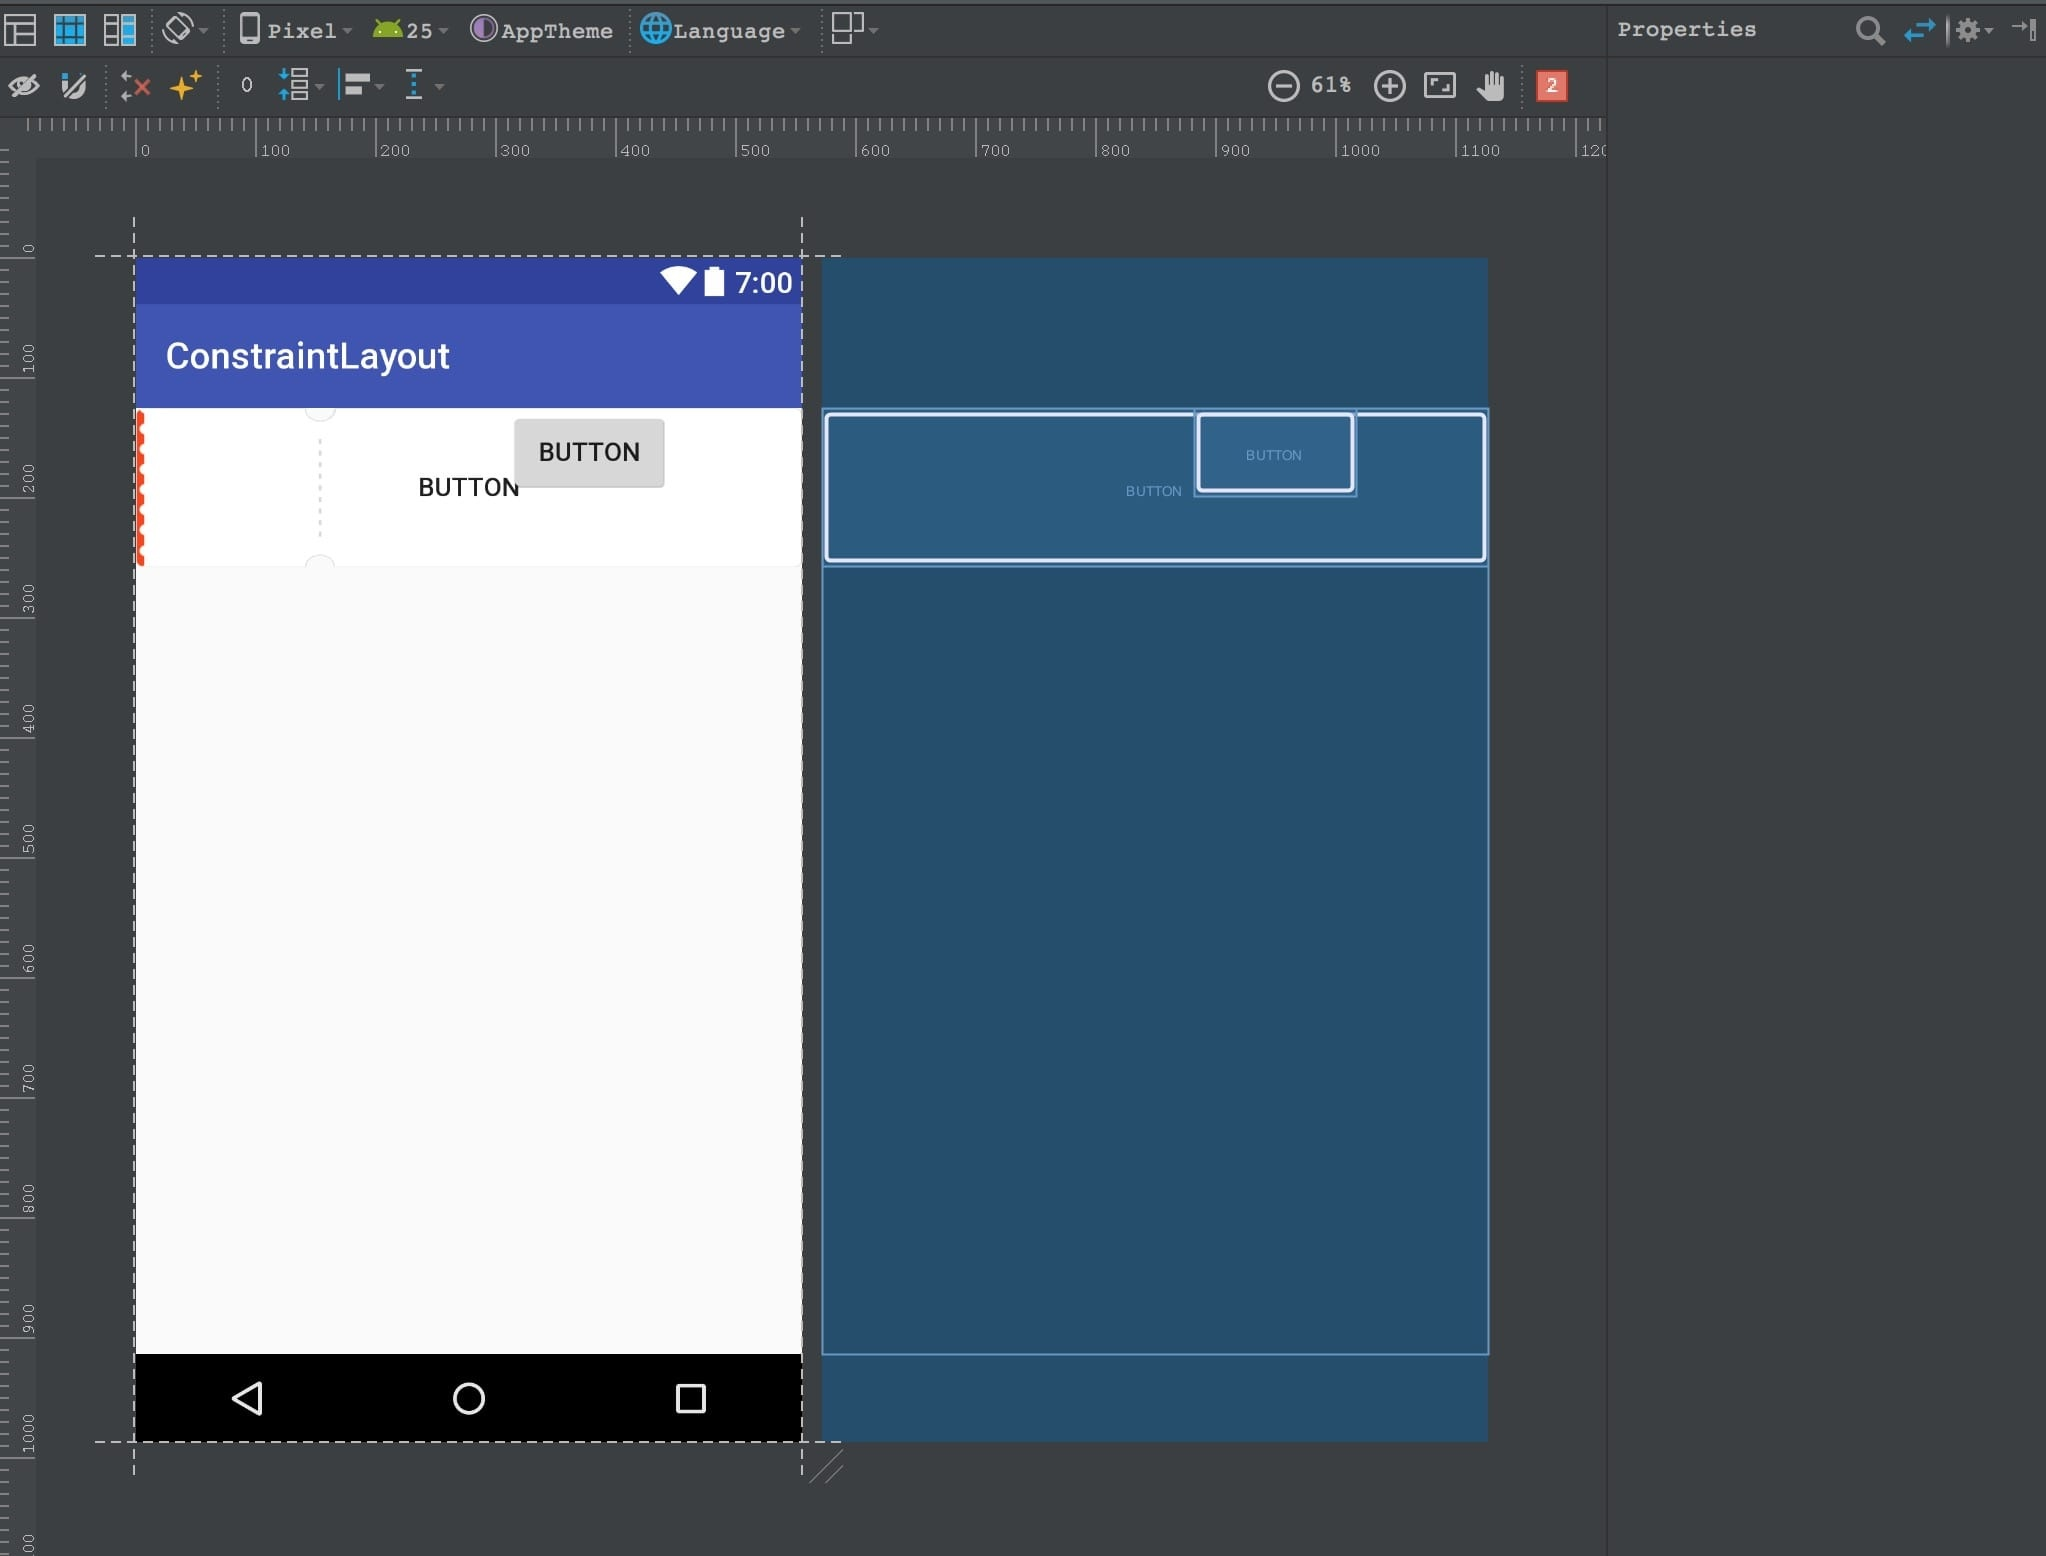
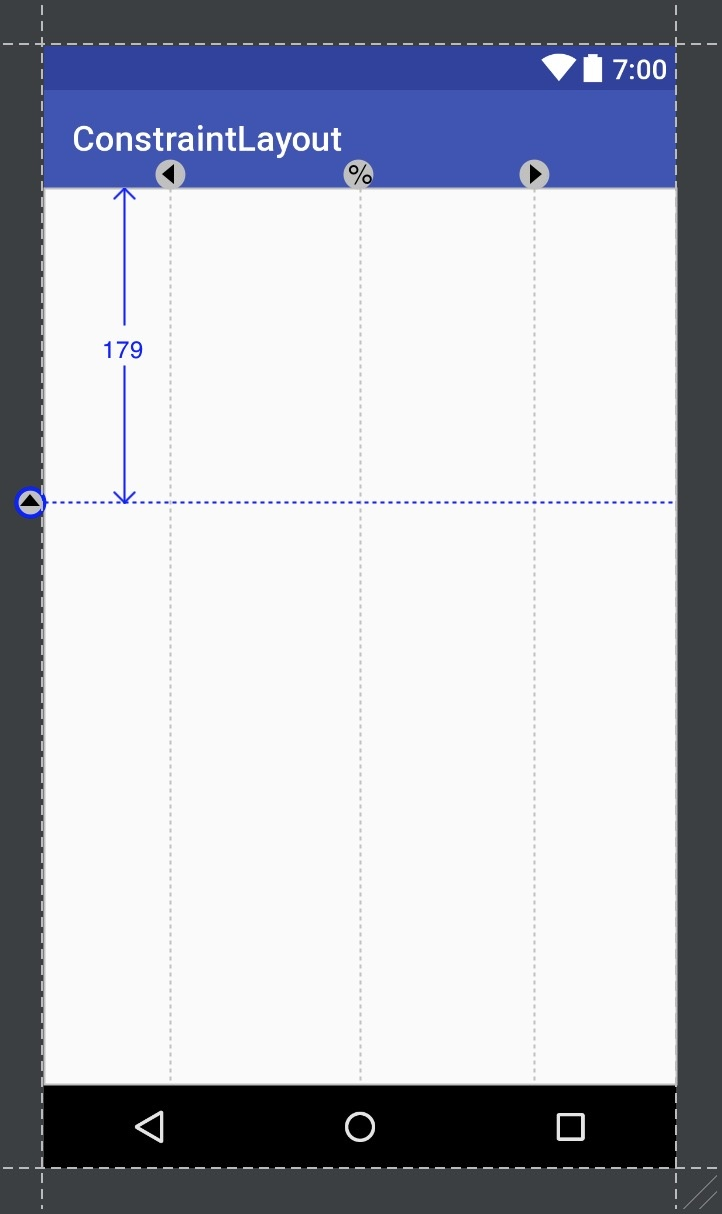
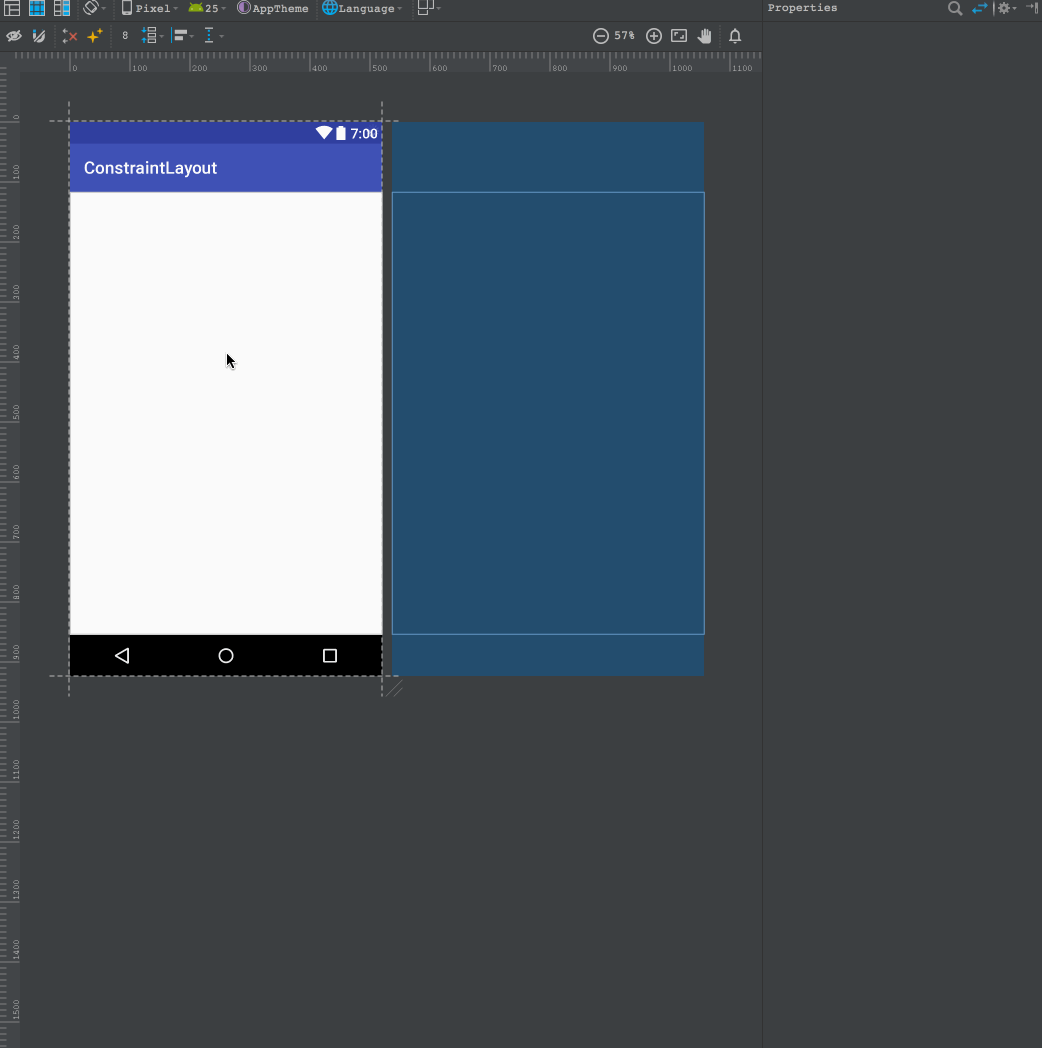
布局编辑器
ConstraintLayout是至今对AndroidStudio的布局编辑器支持最好的布局.
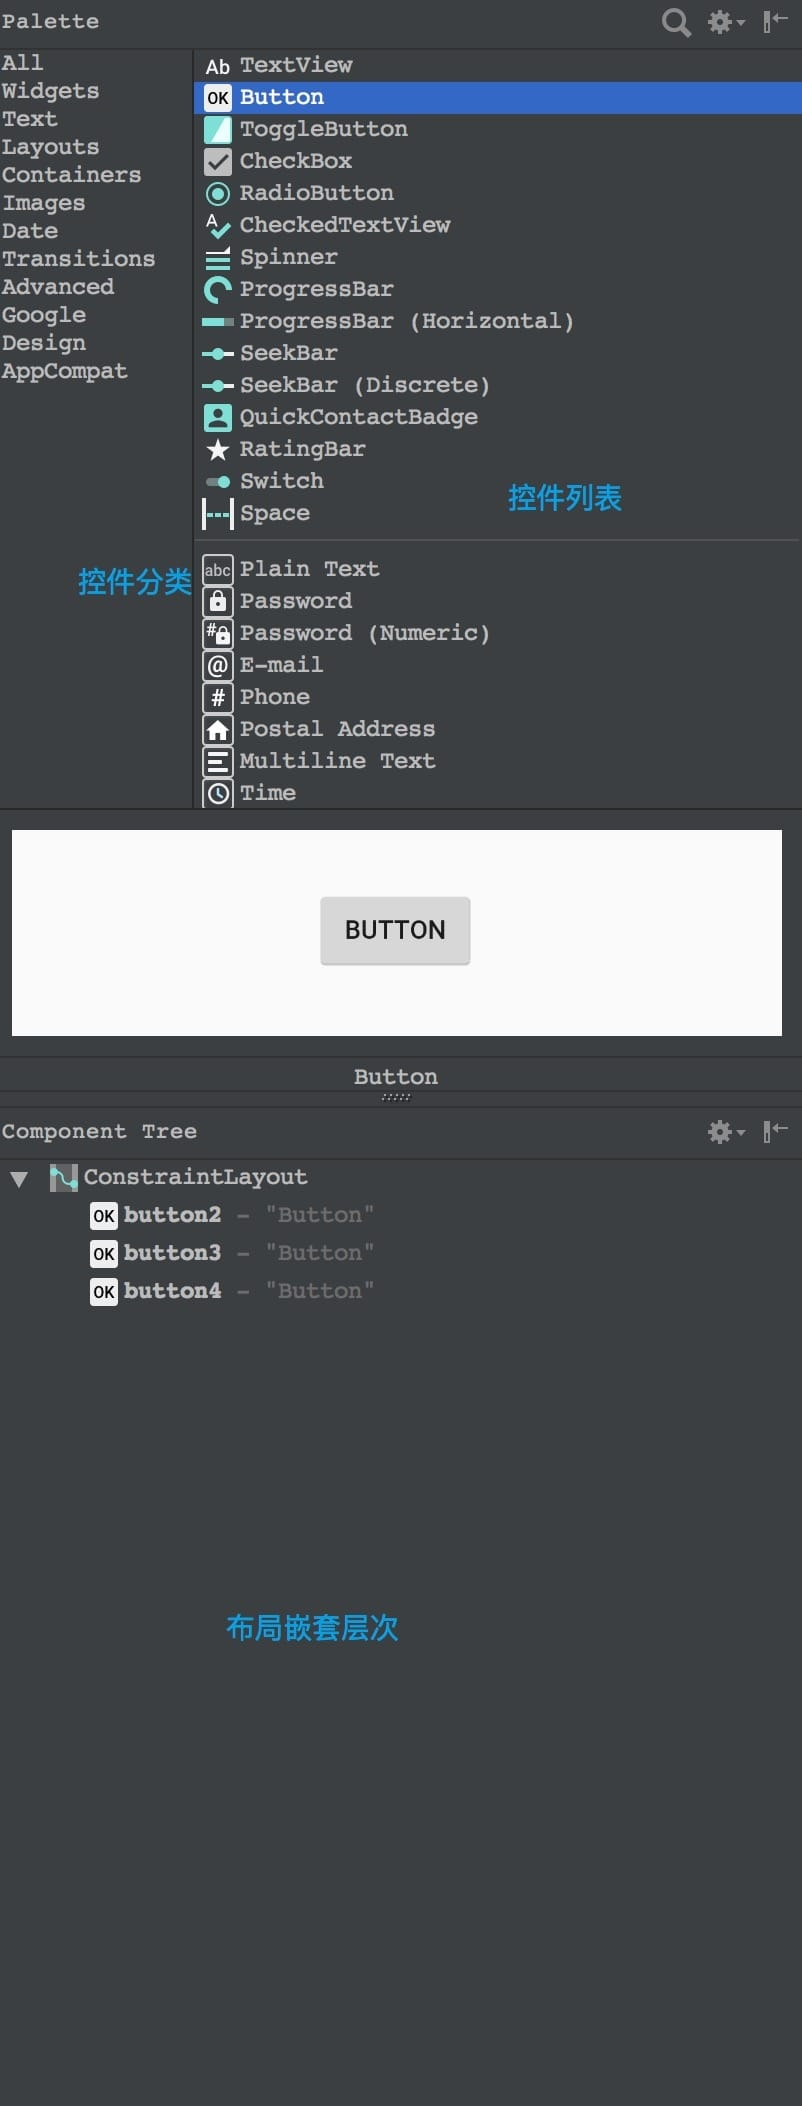
布局编辑器面板
布局编辑器左边有个面板, 用于拖控件到布局编辑器中
控件列表
在布局编辑器的左边就是全部的控件列表. 可以通过直接拖动到布局预览界面来创建视图控件. 并且不需要你手动导入依赖包.
布局编辑器设置

依次介绍:
- 只显示预览
- 只显示蓝图
- 蓝图和预览都显示
- 预览界面显示方向
- 手机屏幕型号
- 系统API版本
- 预览界面主题
- 预览界面语言
- 布局变形(即详细定制一个预览布局)
预览图和蓝图
顺序依次
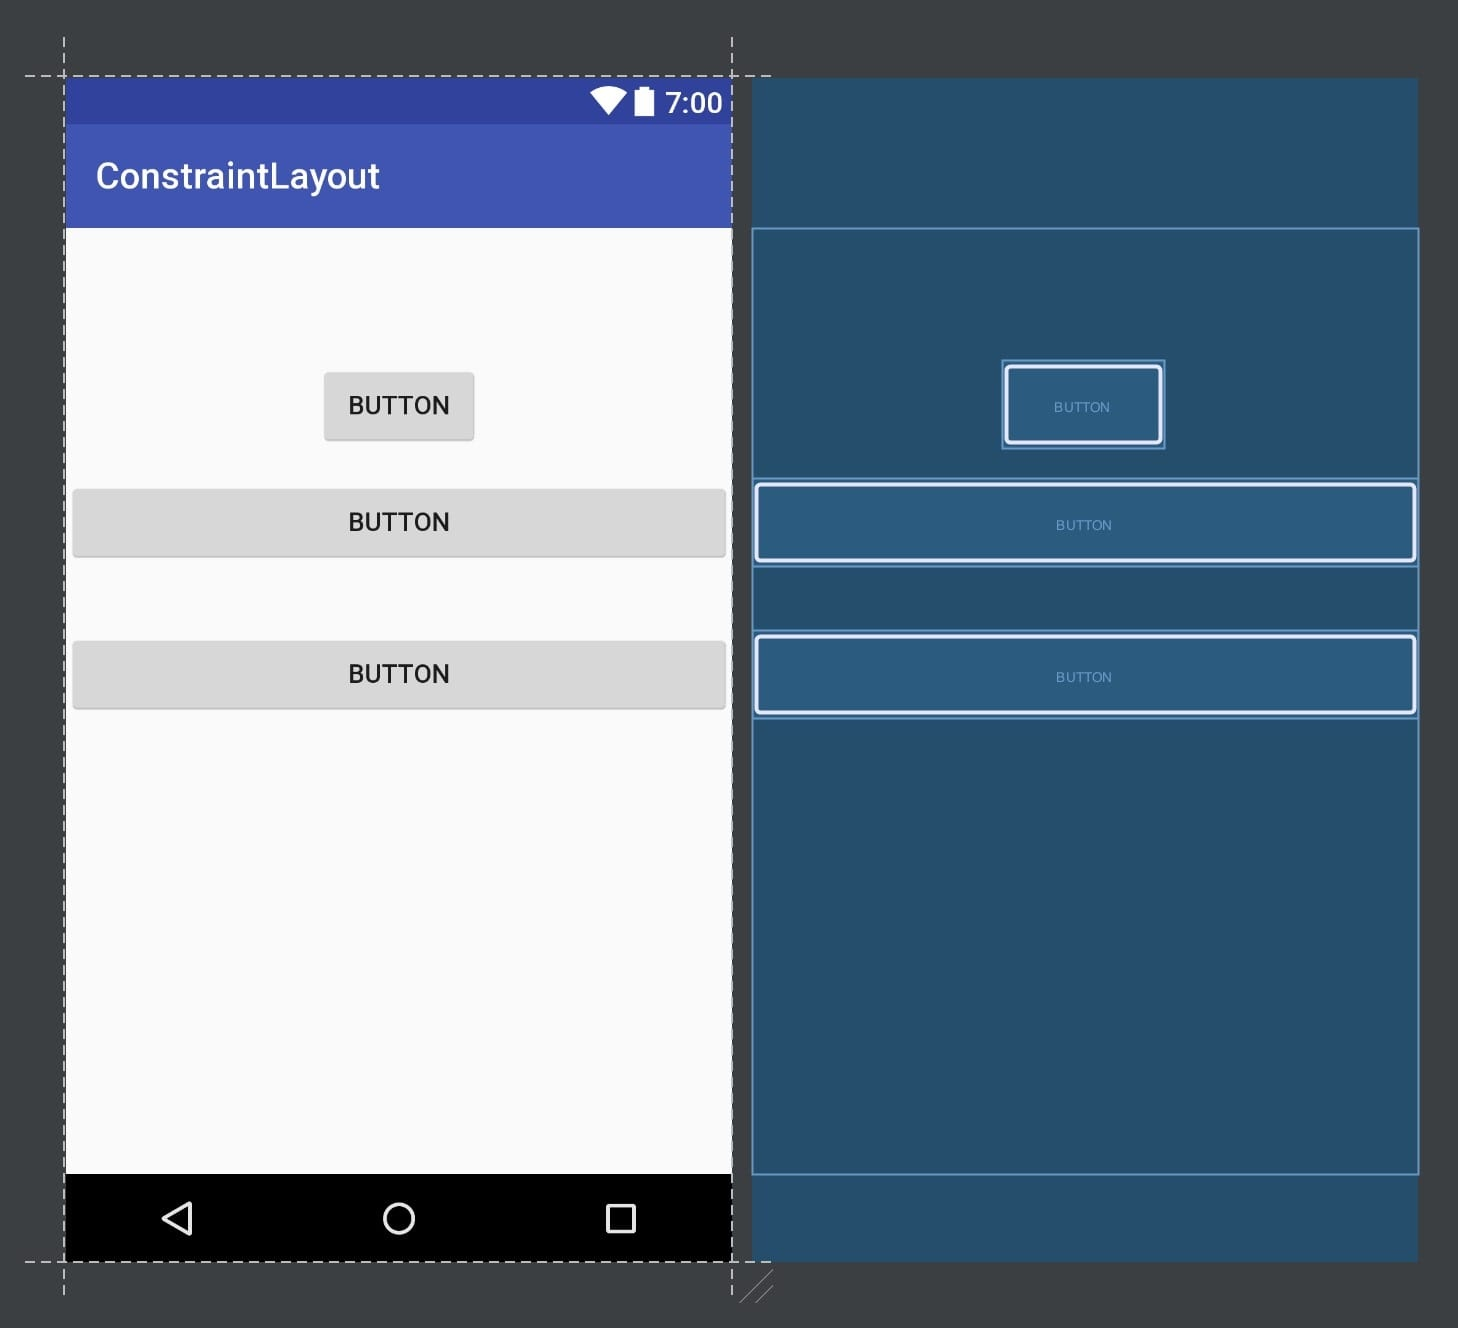
预览图主要显示手机的实际效果(ConstraintLayout拥有布局编辑器属性, 所以存在预览界面和实际应用不同的情况), 蓝图主要清晰显示布局的信息
两者都可以直接编辑布局, 看你的喜好.
预览界面控制

- 缩小
- 缩放百分比
- 放大
- 适应屏幕
- 打开一个缩略图(可以控制预览界面显示范围)
- 错误和警告提示数量
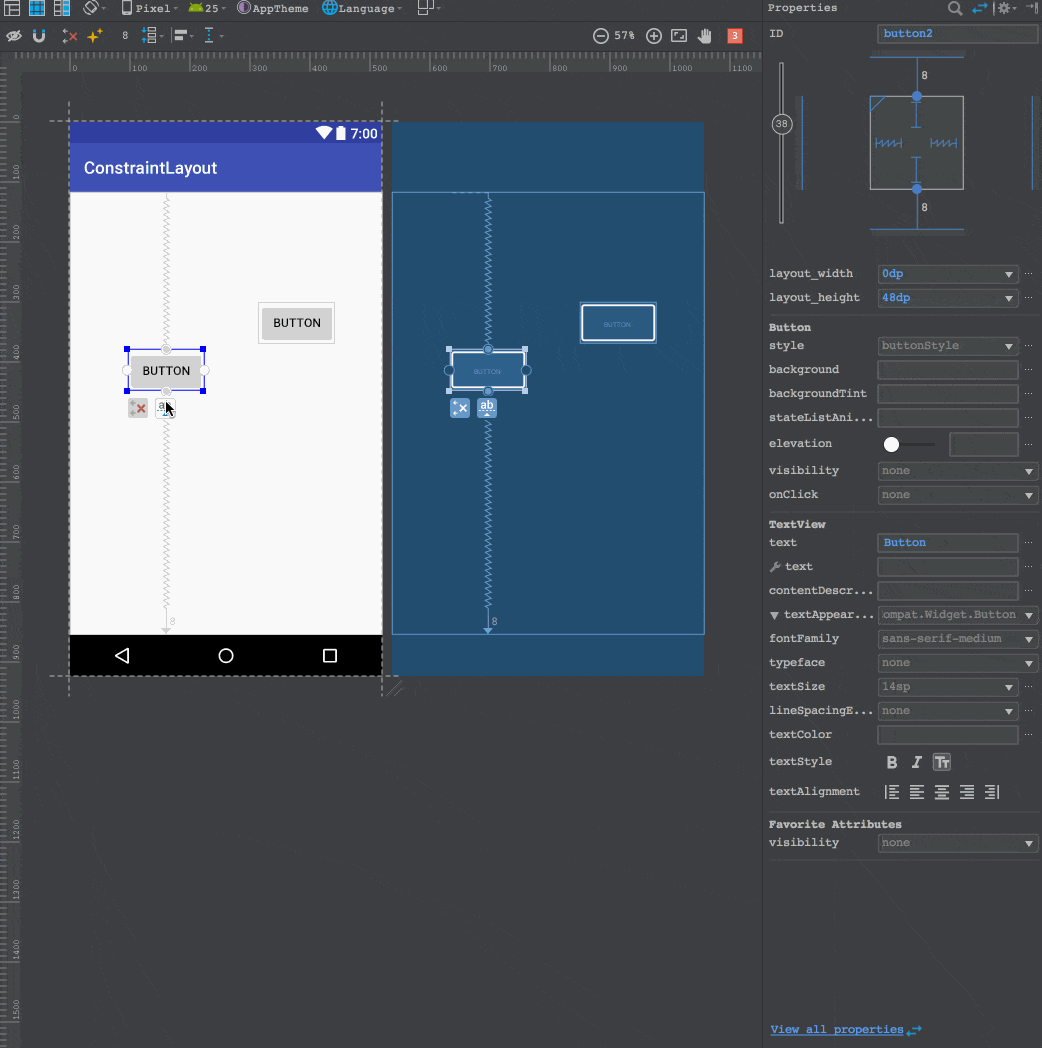
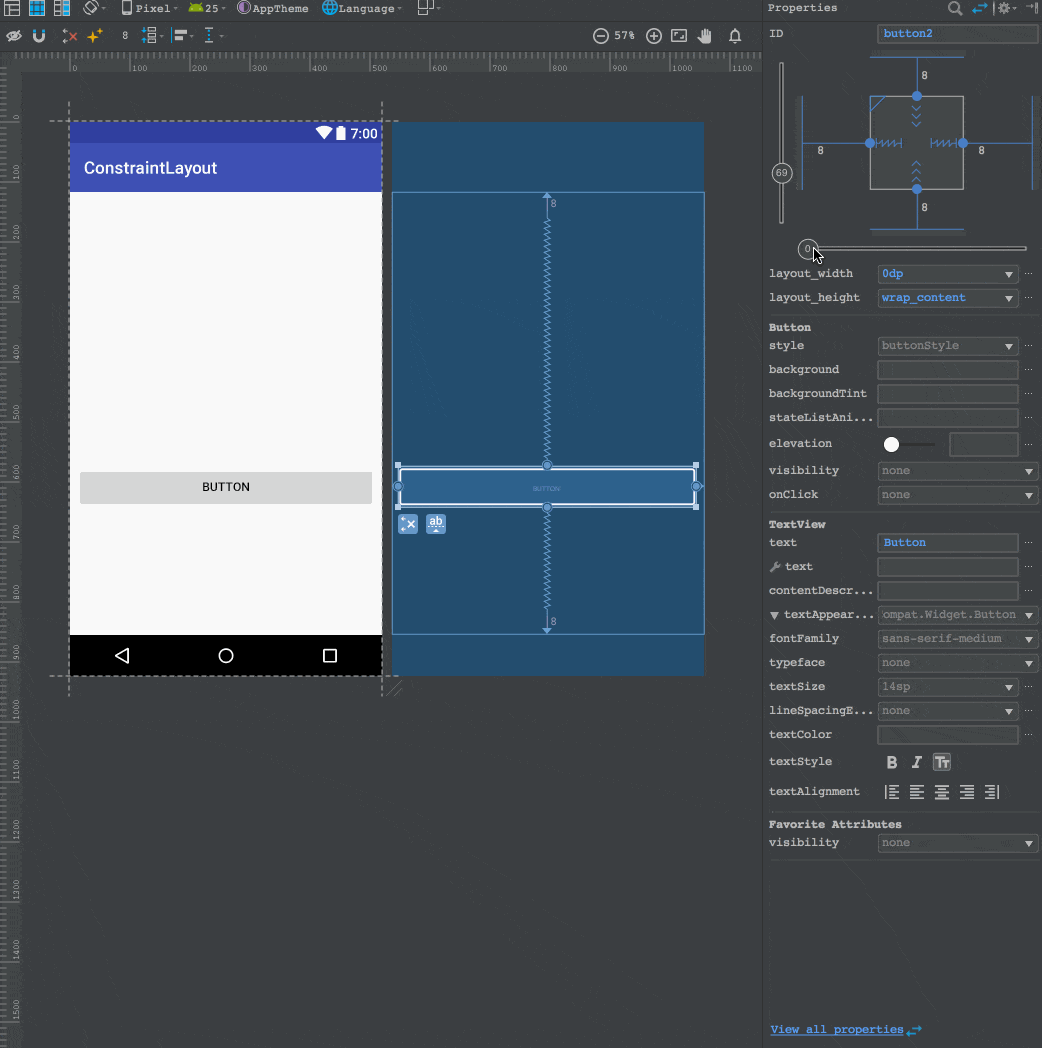
ConstraintLayout布局属性
这一栏是根据你选择的ViewGroup变化的布局属性栏, 这里我只介绍ConstraintLayout的布局属性栏, 其他的没什么好介绍的一看就知道了.

依次功能:
- 是否显示全部约束(不管是否开启都会显示你选择控件的约束的)
- 自动连接约束(AutoConnect)
- 删除所有约束
- 推论约束(infer Constraint)
- 默认边距
- 对齐方式
- 排列方式
- 辅助线(GuideLine)
自动连接约束
这个类似磁铁的图标如果处于开启状态. 控件只要一拖到布局编辑器中就会自动创建水平和垂直方向各一条约束.
推论约束
该功能属于一次性功能, 点击一次就会自动计算并且给当前布局编辑器中所有没有进行约束处理的控件进行水平和垂直方向各一条约束.
辅助工具
ConstraintLayout可以配合一些"辅助控件"使用
GuidLine
辅助线用户是不可见的, 也没有宽高参数(你给他设置也无效). 只是在约束布局中做一个相对基准线而已.
<android.support.constraint.Guideline
      android:layout_width="wrap_content"
      android:layout_height="wrap_content"
      android:id="@+id/guideline2"
      android:orientation="vertical"
      app:layout_constraintGuide_percent="0.41"
      />
辅助线有三种属性
- begin 相对父布局左边边距
- end 相对父布局右边边距
- percent 相对父布局百分比
app:layout_constraintGuide_begin="20dp"

app:layout_constraintGuide_end="340dp"

app:layout_constraintGuide_percent="0.055555556"
辅助线有水平和垂直两种:

Barriers
障碍物, 分为垂直和水平(类似GuidLine).
使用场景:当两个文本并排时右侧有一个按钮, 但是两个文本可能长度都是不确定的包裹类型. 把任何一个文本作为按钮的约束都可能导致按钮覆盖住另一个文本内容. 这个时候就需要Barriers.
Barrier控件可以使用属性来同时约束多个控件
app:constraint_referenced_ids="tv_1,tv_2"
然后通过属性指定在控件的方向
app:barrierDirection="right"
right和left等于垂直
bottom和top等于水平
int[]	getReferencedIds()

int	getType()

void	setReferencedIds(int[] ids)

void	setType(int type)
Group
组是Constraintlayout 1.1x版本增加的辅助工具, 目的在于同时分组控制多个控件的Visibility属性.
xml属性
app:constraint_referenced_ids="tv_1,tv_2"
java方法
int[]	getReferencedIds()

void	setReferencedIds(int[] ids)
通过以上属性将多个控件的id填入, 就可以同时控制多个控件的隐藏和显示
示例:
<android.support.constraint.ConstraintLayout xmlns:android="http://schemas.android.com/apk/res/android"
    xmlns:app="http://schemas.android.com/apk/res-auto"
    xmlns:tools="http://schemas.android.com/tools"
    android:layout_width="match_parent"
    android:layout_height="match_parent"
    tools:context="com.jiuxing.constraintlayout.MainActivity">

    <TextView
        android:id="@+id/tv_1"
        android:layout_width="wrap_content"
        android:layout_height="wrap_content"
        android:text="Hello World!"
        app:layout_constraintBottom_toBottomOf="parent"
        app:layout_constraintLeft_toLeftOf="parent"
        app:layout_constraintRight_toRightOf="parent"
        app:layout_constraintTop_toTopOf="parent" />

    <TextView
        android:id="@+id/tv_2"
        android:layout_width="wrap_content"
        android:layout_height="wrap_content"
        android:layout_marginBottom="64dp"
        android:layout_marginEnd="60dp"
        android:text="TextView"
        app:layout_constraintBottom_toTopOf="@+id/tv_1"
        app:layout_constraintEnd_toEndOf="parent" />

    <android.support.constraint.Group
        android:id="@+id/group"
        android:layout_width="151dp"
        android:layout_height="126dp"
        android:layout_marginEnd="192dp"
        android:visibility="gone"
        android:layout_marginTop="24dp"
        android:background="@color/colorAccent"
        app:constraint_referenced_ids="tv_1,tv_2"
        app:layout_constraintEnd_toEndOf="parent"
        app:layout_constraintTop_toTopOf="parent" />

</android.support.constraint.ConstraintLayout>
Tip: 设置背景颜色并不影响Group组内控件颜色. 只单单是Visibility属性.
使用场景: 某些情况你可能需要控制多个控件同步显示或者隐藏, 在数据未加载成功时很多视图不应该显示给用户(加载中布局)
Placeholder
占位控件; 通过不断地setContent来替换视图内容;
示例:
<android.support.constraint.ConstraintLayout xmlns:android="http://schemas.android.com/apk/res/android"
    xmlns:app="http://schemas.android.com/apk/res-auto"
    xmlns:tools="http://schemas.android.com/tools"
    android:layout_width="match_parent"
    android:layout_height="match_parent"
    tools:context="com.jiuxing.constraintlayout.MainActivity">


    <android.support.constraint.Placeholder
        android:id="@+id/placeholder"
        android:layout_width="50dp"
        android:layout_height="50dp"
        android:layout_marginStart="64dp"
        android:layout_marginTop="48dp"
        app:content="@+id/iv"
        app:layout_constraintStart_toStartOf="parent"
        app:layout_constraintTop_toTopOf="parent" />

    <ImageView
        android:id="@+id/iv"
        android:layout_width="200dp"
        android:layout_height="100dp"
        android:src="@color/colorAccent"
         />

</android.support.constraint.ConstraintLayout>
- 控件iv和Placeholder都需要设置宽高尺寸(否者Crash), 但是具体以iv尺寸为准.
- 位置坐标由Placeholder决定, iv可以不用设置
PlaceHolder之所以强大在于同时也提供代码设置内容id
// 设置内容视图
View	getContent()
void	setContentId(int id)
如果PlaceHolder没有设置内容那么同样想显示怎么办
// 设置空
void	setEmptyVisibility(int visibility)
int	getEmptyVisibility()
示例:
要求在创建视图的时候就设置好, 否则后面设置无效(例如在onCreate方法中就设置)
place.setEmptyVisibility(View.VISIBLE);
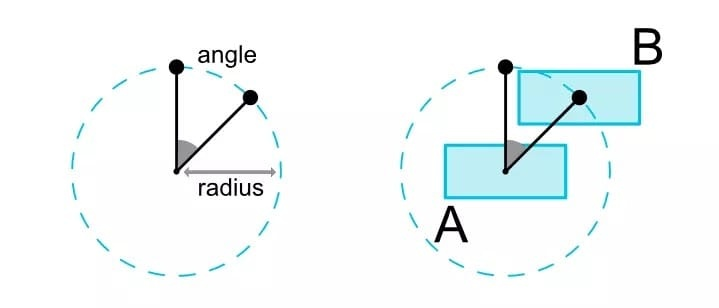
Circular Position
涉及到三个属性
app:layout_constraintCircle="@id/btn_invoke"
<!--圆心控件-->
app:layout_constraintCircleRadius="100dp"
<!--圆形半径大小-->
app:layout_constraintCircleAngle="80"
<!--圆形的角度-->
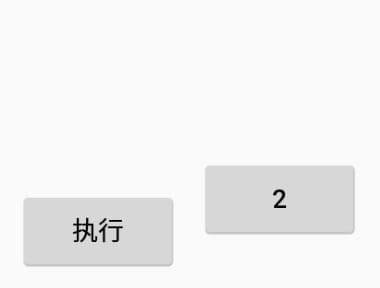
示例:
<Button
        android:id="@+id/btn_invoke"
        android:layout_width="wrap_content"
        android:layout_height="wrap_content"
        android:layout_marginBottom="24dp"
        android:onClick="invoke"
        android:text="执行"
        app:layout_constraintBottom_toBottomOf="parent"
        app:layout_constraintEnd_toEndOf="parent"
        app:layout_constraintStart_toStartOf="parent"
        />

<Button
        android:id="@+id/btn_2"
        android:layout_width="wrap_content"
        android:layout_height="wrap_content"
        android:layout_marginEnd="51dp"
        android:layout_marginTop="31dp"
        android:text="2"
        app:layout_constraintCircle="@id/btn_invoke"
        app:layout_constraintCircleRadius="100dp"
        app:layout_constraintCircleAngle="80"
        app:layout_constraintEnd_toEndOf="parent"
        app:layout_constraintTop_toTopOf="parent"
        />
效果图:
- 使用环形定位会导致之前的约束坐标失效
- 角度和半径默认为零, 所以不设置角度和半径只指定圆形就会完全重叠
强制约束
在1.1之前如果布局属性是wrap_content将无法遵守约束, 这一问题现在可以通过以下属性修复了;
app:layout_constrainedWidth=”true”
Percent Dimensions
说到Percent Dimensions就不得不说ConstraintLayout中的0dp问题,当控件设置为0dp的时候(0dp的称呼又叫match_constraint),默认的行为是撑开(spread),占满可用空间,但是这个行为是可以用layout_constraintWidth_default 属性来设置的。在 ConstraintLayout 1.0.x中,这个属性还可以把它设置为wrap。而到了1.1.x,它又有了一个新的值:percent,允许我们设置控件占据可用空间的百分比。
下面的TextView控件将占据剩余宽度的50%和剩余高度的50%。
    <TextView
        android:id="@+id/textView6"
        android:layout_width="0dp"
        android:layout_height="0dp"

        app:layout_constraintHeight_default="percent"
        app:layout_constraintHeight_percent="0.5"

        app:layout_constraintWidth_default="percent"
        app:layout_constraintWidth_percent="0.5" />
布局属性
除了布局编辑器写布局也应该要了解布局的属性, 不然有些问题你看不出来的.
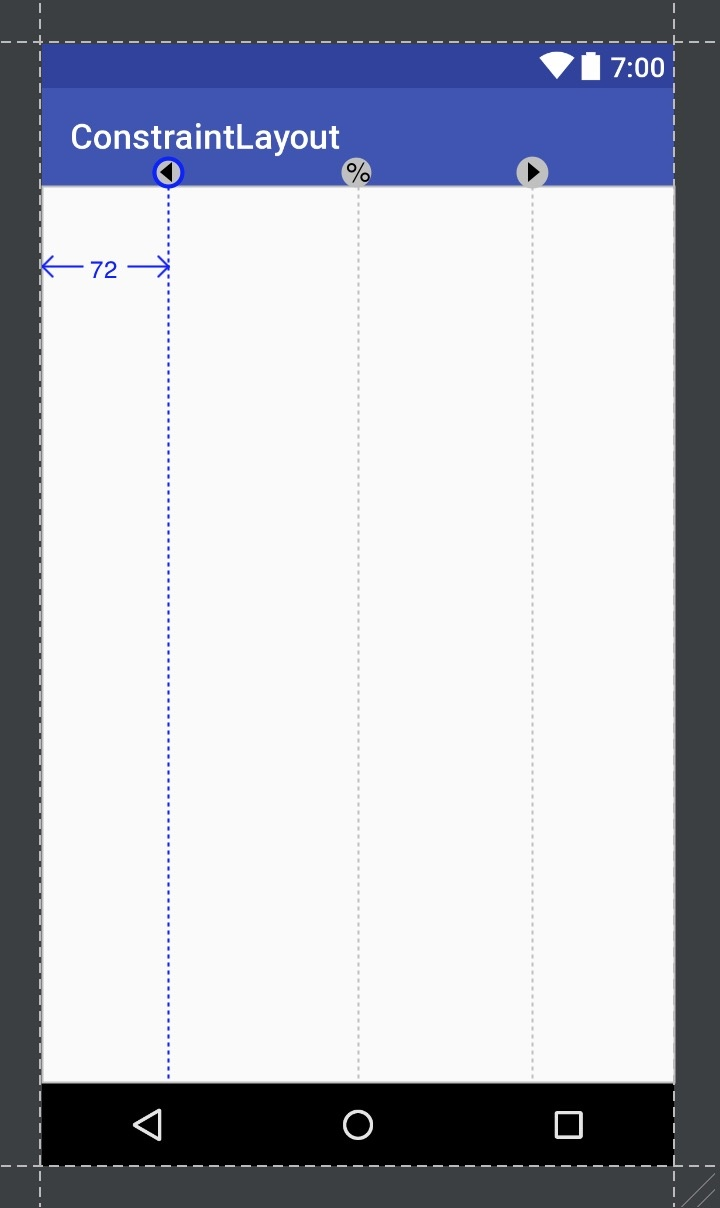
编辑器属性
该属性并不会在Android上有任何影响, 只会影响AS的布局编辑器坐标
tools:layout_editor_absoluteY="246dp"
tools:layout_editor_absoluteX="36dp"
布局编辑器
真机上
约束
一个控件有四个约束点/ 十二个约束属性(左和右有各有两个属性start和end以及right和left)
约束只能是同一水平下才能相互约束, 例如左和右之间能约束, 左不能和上下约束点关联.
约束并不是相互关联的关系. 而是
// 和父布局关联约束
app:layout_constraintBottom_toBottomOf="parent"
app:layout_constraintLeft_toLeftOf="parent"
app:layout_constraintRight_toRightOf="parent"
app:layout_constraintTop_toTopOf="parent"

// 和其他控件关联约束
app:layout_constraintLeft_toRightOf="@+id/button3"
app:layout_constraintRight_toLeftOf="@+id/button3"
app:layout_constraintTop_toBottomOf="@id/button3"
app:layout_constraintBottom_toTopOf="@id/button3"


layout_constraintStart_toEndOf
layout_constraintStart_toStartOf
layout_constraintEnd_toStartOf
layout_constraintEnd_toEndOf
文字基准线
有些控件是包含文字内容的, 所以约束布局的控件有一个文字基准线约束. 默认是隐藏,需要点击开关显示.
layout_constraintBaseline_toBaselineOf
注意: 使用了文字基准线对齐就不需要使用上下约束了
百分比偏移
通过小数点(百分比)控制控件在屏幕垂直/水平的百分比位置.
注意: 只有水平位置(上下/左右约束点都添加了约束)都添加约束, 该控件才支持百分比偏移
app:layout_constraintHorizontal_bias="0.0"
app:layout_constraintVertical_bias="0.69"
注意: 如果是约束的ConstraintLayout, 不需要这两个属性也可以设置百分比偏移
边距
一般的边距没什么好讲的. 和以前一样.
android:layout_marginStart
android:layout_marginEnd
android:layout_marginLeft
android:layout_marginTop
android:layout_marginRight
android:layout_marginBottom
因为约束布局控件之前的关联性太强, 如果一个布局隐藏(gone)就可能导致整个布局的位置移动. 所以ConstraintLayout拥有隐藏边距属性
ConstraintLayout中使用Gone属性值
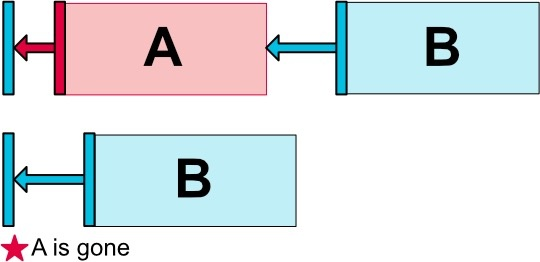
根据官方图可以看出Constraintlayout如果控件被隐藏并不会像其他布局一样坐标变成0,0点. 只是margin和宽高变成0.
layout_goneMarginStart
layout_goneMarginEnd
layout_goneMarginLeft
layout_goneMarginTop
layout_goneMarginRight
layout_goneMarginBottom
以上边距属性会根据其约束的控件是否是隐藏(invisible不算)来生效, 同时margin失效.
宽高比
通过设置宽或者高中的一个为match_constraint(0dp), 就可以设置控件的宽高比
matc_constraint的宽或高会根据另一边的尺寸变化来符合比例
宽高比分两种:
宽:高
app:layout_constraintDimensionRatio="2:1"
很简单就是宽比高, 默认受约束的就是match_constraint(0dp)的一边.
受约束的会根据另一边发生尺寸比例的变化(如果是match_constraint和wrap_content时1:1比例会发生尺寸变化成正方形)
自定义
app:layout_constraintDimensionRatio="w,2:1"
我理解为颠倒了比例. w即设置比例为高比宽, h为宽比高. 实际操作体验吧
宽高
宽高属性值
- Fixed 固定值
- Wrap_Content 包裹值
- Match_Constraint "0dp"
Match_Constraint
理论上ConstraintLayout的宽高不再使用match_parent这一属性值. 取而代之的是0dp(称为match_constraint).
**Important: **
MATCH_PARENTis not supported for widgets contained in aConstraintLayout, though similar behavior can be defined by usingMATCH_CONSTRAINTwith the corresponding left/right or top/bottom constraints being set to"parent".
官方说明match_parent在ConstraintLayout中不被支持
match_constraint只有在水平或者垂直拥有两条方向的约束时才有效, 即匹配剩余全部空间. 如果只有水平只存在一条或者没有约束相当于wrap_content.
示例图:
如果你强行使用编辑器会自动帮你转换成固定dp值, 不过如果你仅仅是约束ConstraintLayout布局并没有问题.不能理解我说的什么自己动手试试.
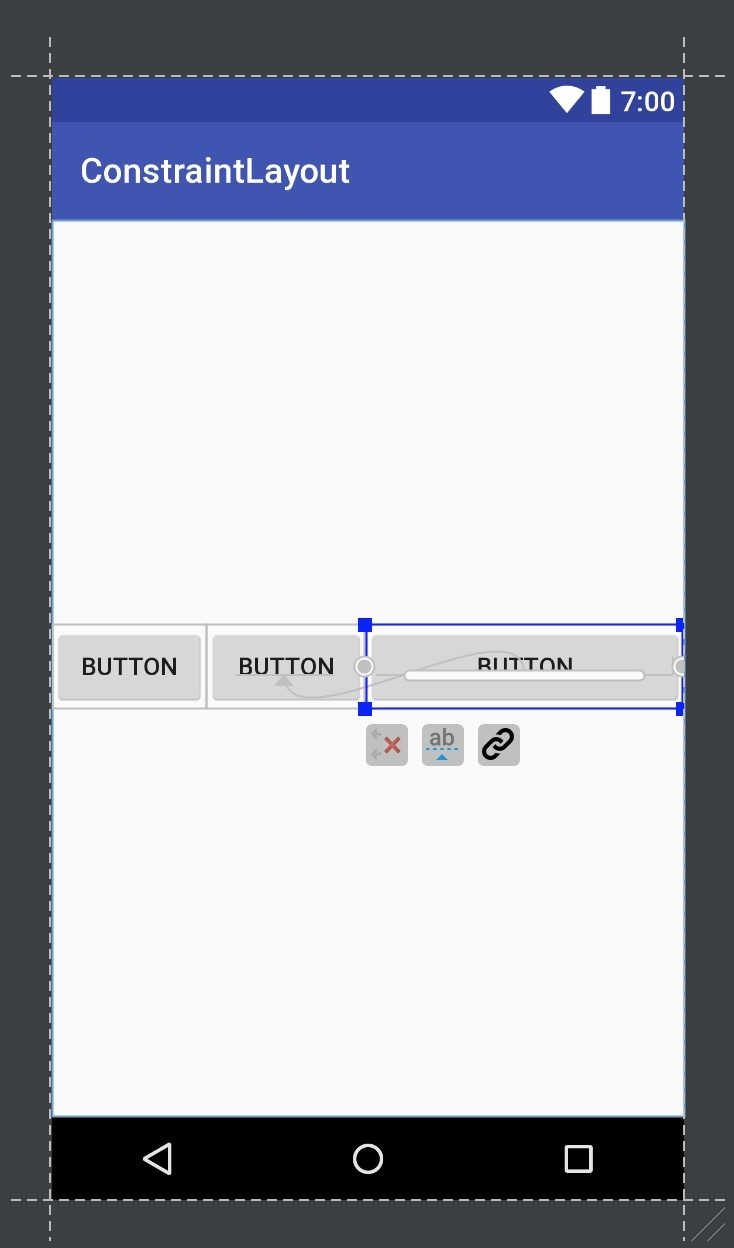
链模式
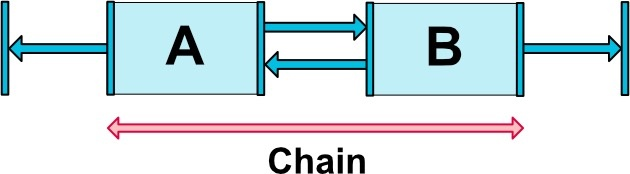
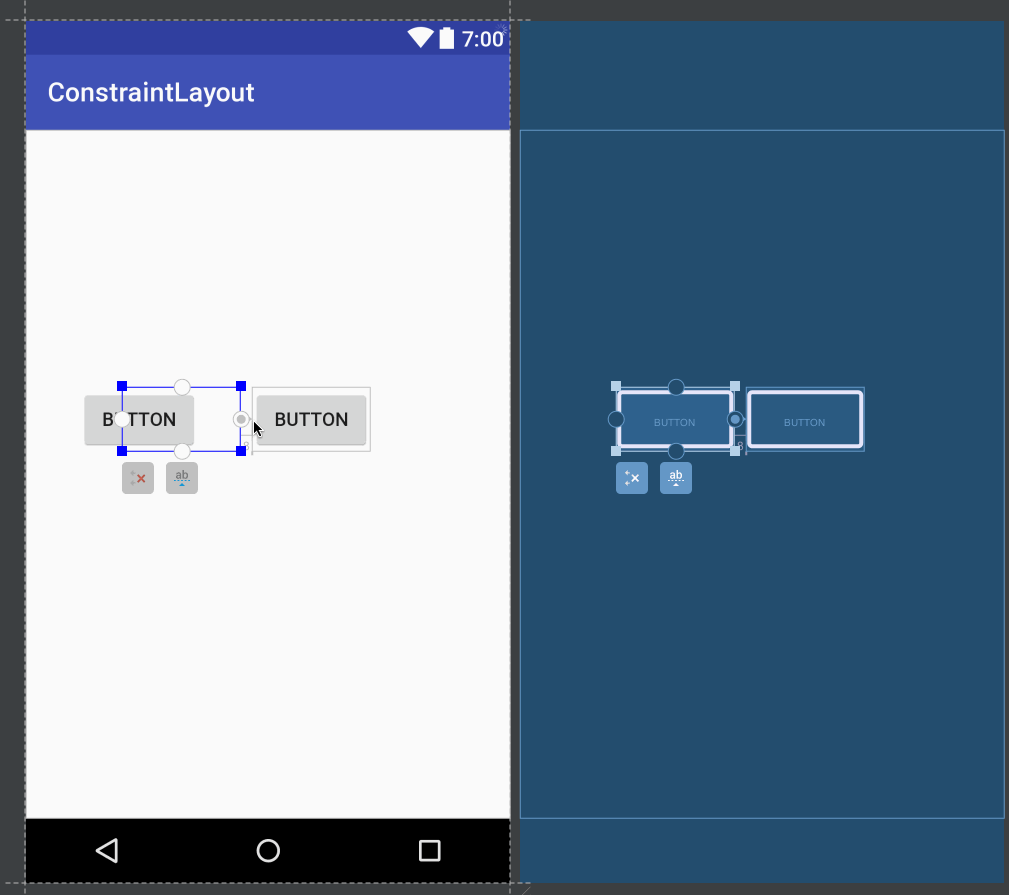
两个空间相互约束就会产生一个锁链. (注意布局编辑器中是无法通过拖动约束点相互约束, 我认为是bug)
只能通过多选居中的方式或者直接XML编辑.

app:layout_constraintHorizontal_chainStyle="packed"
链接在一起主要是可以设置不同的样式达到适配父容器宽度或者高度的效果. 注: 一个链还有第一个控件才需要设置(chainStyle)样式.
根据样式有三种参数值:
- Spread 均布(默认样式)
- Spread inside 头尾靠边, 其他中间均布
- Packed 居中靠齐
官方有一张介绍图
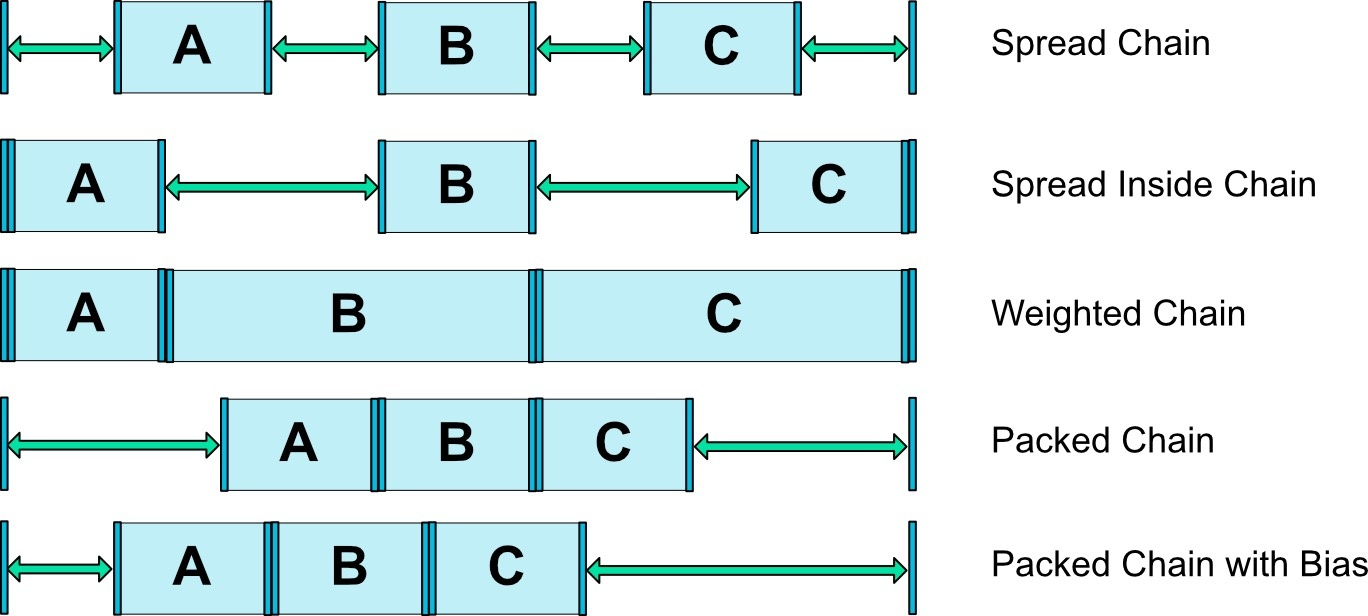
虽然看着有五个,实际上属性还是那三个. 不过有加入权重和百分比偏移. Bias是偏移, weighted是权重.
权重
和LinearLayout的wight属性一样. 不过只支持spread和spread_inside有效.
layout_constraintHorizontal_weight
同样可以编辑属性也可以鼠标修改

宽高约束
wrap_content不受约束的限制 (这一问题在ConstraintLayout1.1被解决)
app:layout_constrainedWidth=”true|false”
app:layout_constrainedHeight=”true|false”
Optimizer
需要知道的是,当我们使用 MATCH_CONSTRAINT 时,ConstraintLayout 将不得不对控件进行 2 次测量,而测量的操作是昂贵的。
而优化器(Optimizer)的作用就是对 ConstraintLayout 进行优化,对应设置给 ConstraintLauyout 的属性是:
- layout_optimizationLevel。
可设置的值有:
- none:不应用优化。
- standard:仅优化直接约束和屏障约束(默认的)。
- direct:优化直接约束。
- barrier:优化屏障约束。
- chain:优化链约束(实验)。
- dimensions:优化尺寸测量(实验)。
在设置值时,可以设置多个,如:
app:layout_optimizationLevel="direct|barrier|dimensions"
ConstraintSet
修改ConstraintLayout官方不推荐使用ConstraintLayout.LayoutParams而是推荐使用ConstraintSet
ConstraintSet可以直接通过代码创建或改变约束/改变Margin等操作, 并且都提供方法而非成员变量.
如果你想修改ConstraintLayout中任意一个控件的属性都需要进行以下三个步骤.
步骤:
- 克隆或者加载XMl布局
- 修改属性
- 应用到新的布局上
示例:
public class MainActivity extends AppCompatActivity {
    ConstraintSet mConstraintSet = new ConstraintSet(); // create a Constraint Set
    ConstraintLayout mConstraintLayout; // cache the ConstraintLayout


    @Override
    protected void onCreate(Bundle savedInstanceState) {
        super.onCreate(savedInstanceState);
        setContentView(R.layout.state1);
        Context context = this;

        mConstraintLayout = (ConstraintLayout) findViewById(R.id.activity_main);
        mConstraintSet.clone(mConstraintLayout); // 克隆一个布局到ConstraintSet
    }

    public void onClick(View view) {
        TransitionManager.beginDelayedTransition(mConstraintLayout); // 一行代码添加动画
        mConstraintSet1.applyTo(mConstraintLayout); // 应用到新的布局
    }
}
官方示例, 但是我发现我是无效.
克隆
复制一个ConstraintLayout布局到ConstraintSet中. 后面可以对ConstraintSet进行修改(即对复制的布局修改).
void clone (ConstraintSet set)

void clone (ConstraintLayout constraintLayout)

void clone (Context context,
                int constraintLayoutId)
创建约束
这仅仅指的是创建一条约束, 一个控件可以存在n条约束. 最少两条才能确定位置.
需要注意的是START和LEFT本身是可以并存的. 不要混用
void connect(int startID, int startSide, int endID, int endSide)

void connect(int startID, int startSide, int endID, int endSide, int margin)
示例:
// 克隆布局
mConstraintSet = new ConstraintSet();
mConstraintSet.clone(mBinding.root);


// 用三条约束连接两个控件
mConstraintSet.connect(R.id.btn_3, ConstraintSet.LEFT, R.id.btn, ConstraintSet.RIGHT, 100);
mConstraintSet.connect(R.id.btn_3, ConstraintSet.TOP, R.id.btn, ConstraintSet.TOP);
mConstraintSet.connect(R.id.btn_3, ConstraintSet.BOTTOM, R.id.btn, ConstraintSet.BOTTOM);

// 应用布局
mConstraintSet.applyTo(mBinding.root);
垂直居中
void	centerVertically(int viewId, int toView)

void	centerVertically(int centerID,
                         int topId,
                         int topSide,
                         int topMargin,
                         int bottomId,
                         int bottomSide,
                         int bottomMargin,
                         float bias)
示例: 相对父布局垂直居中
mConstraintSet.centerVertically(R.id.btn_3, ConstraintSet.PARENT_ID);
相对其他控件垂直居中
mConstraintSet.centerVertically(R.id.btn_3, R.id.btn);
错误示例: 如果你使用TOP或者BOTTOM之类的属性, 只会贴靠顶部.. 并不会居中
mConstraintSet.centerVertically(R.id.btn_3, ConstraintSet.TOP);
注意如果你在第二种方法垂直居中使用了LEFT或RIGHT会导致程序停止
水平居中
水平居中同样不能使用TOP或者BOTTOM, 并且Rtl和不包含Rtl有使用上的区别
void	centerHorizontally(int centerID,
                           int leftId,
                           int leftSide,
                           int leftMargin,
                           int rightId,
                           int rightSide,
                           int rightMargin,
                           float bias)

void	centerHorizontally(int viewId,
                           int toView)
// 只能使用LEFT/RIGHT 否者Crash

void	centerHorizontallyRtl(int viewId,
                              int toView)


void	centerHorizontallyRtl(int centerID,
                              int startId,
                              int startSide,
                              int startMargin,
                              int endId,
                              int endSide,
                              int endMargin,
                              float bias)
// 只能使用START/END
示例:
// 居中父布局
mConstraintSet.centerHorizontallyRtl(R.id.btn_3, ConstraintSet.PARENT_ID);

mConstraintSet.centerHorizontallyRtl(R.id.btn_3, R.id.btn, ConstraintSet.START, 0, R.id.btn_2, ConstraintSet.END, 0, 0.5f);
居中
该方法不仅支持水平居中还支持垂直居中.
void center (int centerID,
                int firstID,
                int firstSide,
                int firstMargin,
                int secondId,
                int secondSide,
                int secondMargin,
                float bias)
宽高
可以是一个像素值尺寸或者 WRAP_CONTENT或MATCH_CONSTRAINT
void constrainHeight (int viewId,
                int height) // 像素单位

void constrainWidth (int viewId,
                int width)
最大和最小宽高只在MATCH_CONSTRAINT情况下才有效果
void constrainMaxHeight (int viewId,
                int height)


void constrainMinHeight (int viewId,
                int height)


void constrainMaxWidth (int viewId,
                int width)

void constrainMinWidth (int viewId,
                int width)
默认宽高: 即均布排列的时候宽度(例如weight模式下)
void constrainDefaultWidth (int viewId,
                int width)

void constrainDefaultWidth (int viewId,
                int width)
GuidLine
创建Guideline
void create (int guidelineID,  // 给创建的guideline指定id
                int orientation) // guidline方向
设置Guideline边距
void setGuidelineEnd (int guidelineID,
                int margin)

void setGuidelineBegin (int guidelineID,
                int margin)

void setGuidelinePercent (int guidelineID,
                float ratio)
Barrier
void createBarrier (int id,  // id
                int direction,  // 方向
                int... referenced) // 组id
设置类型
void setBarrierType (int id,
                int type)
删除约束
void clear (int viewId,
                int anchor)
// 删除该空间某一约束

void clear (int viewId)
// 删除该控件全部约束
示例: 删除顶部约束
mConstraintSet.clear(R.id.btn, ConstraintSet.TOP);
透明度
void setAlpha (int viewId,
                float alpha)
旋转
旋转中心是控件的中心
void setRotation (int viewId,
                float rotation)
// 以控件的左上角为中心旋转

void setRotationX (int viewId,
                float rotationX)

// 以控件的x轴翻转

void setRotationY (int viewId,
                float rotationY)
// 以控件的y轴翻转
缩放
以控件为中心, 百分比浮点数
void setScaleX (int viewId,
                float scaleX) // 倍数关系

void setScaleY (int viewId,
                float scaleY)
偏移
以控件中心偏移
void setTranslation (int viewId,
                float translationX,
                float translationY)

void setTranslationX (int viewId,
                float translationX)

void setTranslationY (int viewId,
                float translationY)

void setTranslationZ (int viewId,
                float translationZ)
// z轴偏移必须在大于21才有效
设置边距
void setMargin (int viewId,
                int anchor,
                int value)
示例:
mConstraintSet.setMargin(R.id.btn, ConstraintSet.TOP, 200);
百分比
如果想要百分比生效必须同时设置两边约束(例如左右或者上下)
void setHorizontalBias (int viewId,
                float bias)

void setVerticalBias (int viewId,
                float bias)
应用
将当前ConstraintSet实例中Clone的ConstraintLayout应用到一个ConstraintLayout布局中. 由于你是通过clone()方法来创建的ConstraintSet所以如果不使用apply()并不会改变clone的ConstraintLayout.
void applyTo (ConstraintLayout constraintLayout)
加载XML
不用Clone直接加载一个XML布局文件.
void load (Context context,
                int resourceId)
Issues
主要介绍一些可能是Bug或者是我知识层面不够的问题
tools命名
如果你使用了infer Constraint会发现自动生成了很多以tools开头的属性, 这些属性不用去管, 不对应用有任何影响.
tools:layout_constraintTop_creator="1"
控件无法拖动
主要是因为控件存在两个左右边距属性(start和left或者right和end)
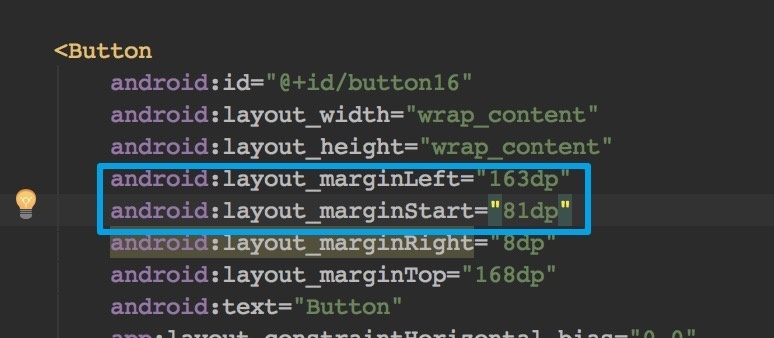
删除start或者end即可. 个人认为是bug, 已经提交给Google.(我的推荐是全部都是用START和END)
布局编辑器中相互约束
要想使用Chain两个控件必须相互约束, 但是布局编辑器中无法相互约束
但是XML直接编辑或者以下方法还是可以相互约束的, 所以个人认为是bug
控件消失
如果出现控件不在编辑器内显示, 请检查编辑器属性坐标.
tools:layout_editor_absoluteX="137dp"
tools:layout_editor_absoluteY="-118dp"
