

最近手头做了一个新的项目,开发中对状态栏的要求比较多,也作了一些总结,分享给大家。
简答题
- 全屏、不保留状态栏文字(Splash页面,欢迎页面)
- 全屏保留状态栏文字(页面上部有Banner图)
- 标题栏与状态栏颜色一致(部分App风格)
- 不同Fragment中对StatusBar的处理不一样
- 设置状态栏文字的颜色
- 切换fragment时,toolBar显示与否、statusbar显示与否、statusBar颜色、statusBar文字颜色(新增)
思考题
- Activity中window是怎么回事?里面有什么View/ViewGroup?
- setFitsSystemWindows()是什么鬼?
简答题,是本篇文章阐述的内容;思考题,是针对所阐述的内容做一些拓展,反应两个层面:怎么开发?为什么能实现这样的功能?
简答题
需求一、全屏,不保留状态栏文字(Splash页面,欢迎页面)
这个效果大家脑补下,就不贴图了
首先在style.xml中设置为noActionBar的主题,这是必须的
<style name="fullScreen" parent="Theme.AppCompat.DayNight.NoActionBar">
</style>
方式有三种
@Override
protected void onCreate(@Nullable Bundle savedInstanceState) {
    super.onCreate(savedInstanceState);
    setContentView(R.layout.activity_fullscreen_no_text);
    //方式一
    //getWindow().addFlags(WindowManager.LayoutParams.FLAG_FULLSCREEN);
    //方式二
    //getWindow().getDecorView().setSystemUiVisibility(View.SYSTEM_UI_FLAG_FULLSCREEN);
    //方式三 style.xml中配置
    //<style name="fullScreen" parent="Theme.AppCompat.DayNight.NoActionBar">
    //        <item name="android:windowFullscreen">true</item>
    //</style>
}
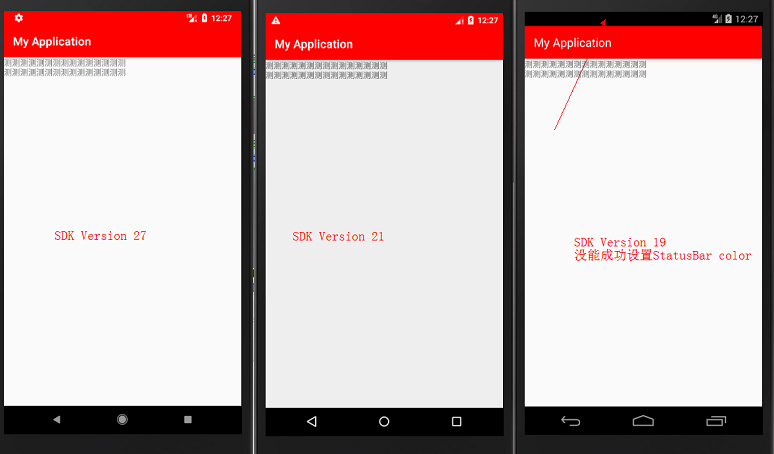
需求二、全屏保留状态栏文字(页面上部有Banner图)

现在项目,大部分向下支持到19,所以先不考虑太低版本的情况
Window window = getWindow();
//默认API 最低19
if (Build.VERSION.SDK_INT > Build.VERSION_CODES.JELLY_BEAN_MR2) {
    window.addFlags(WindowManager.LayoutParams.FLAG_TRANSLUCENT_STATUS);
    ViewGroup contentView = window.getDecorView().findViewById(Window.ID_ANDROID_CONTENT);
    contentView.getChildAt(0).setFitsSystemWindows(false);
}
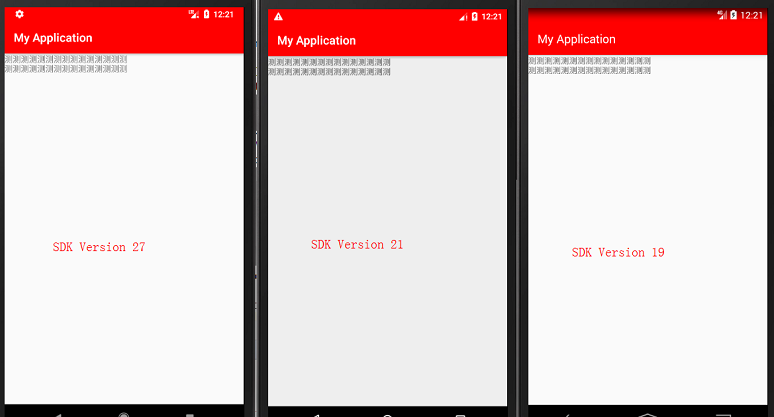
需求三、标题栏与状态栏颜色一致 xml中配置
<style name="status_toolbar_same_color" parent="Theme.AppCompat.Light.DarkActionBar">
    <!-- Customize your theme here. -->
    <item name="colorPrimary">@color/status_toolBar_same_color</item>
    <item name="colorPrimaryDark">@color/status_toolBar_same_color</item>
    <item name="colorAccent">@color/colorAccent</item>
</style>
Window window = getWindow();
    if (Build.VERSION.SDK_INT >= Build.VERSION_CODES.LOLLIPOP) {
        window.addFlags(WindowManager.LayoutParams.FLAG_DRAWS_SYSTEM_BAR_BACKGROUNDS);
        window.setStatusBarColor(getResources().getColor(R.color.status_toolBar_same_color));
    } else {
        window.addFlags(WindowManager.LayoutParams.FLAG_TRANSLUCENT_STATUS);
        ViewGroup systemContent = findViewById(android.R.id.content);

        View statusBarView = new View(this);
        ViewGroup.LayoutParams lp = new ViewGroup.LayoutParams(ViewGroup.LayoutParams.MATCH_PARENT, getStatusBarHeight());
        statusBarView.setBackgroundColor(getResources().getColor(R.color.status_toolBar_same_color));

        systemContent.getChildAt(0).setFitsSystemWindows(true);

        systemContent.addView(statusBarView, 0, lp);

    }
适配后的结果:
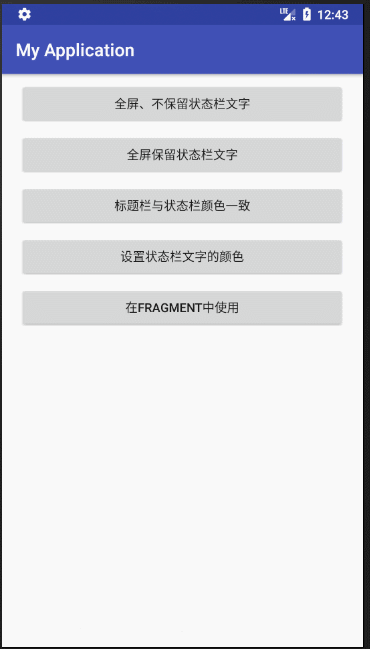
需求四、不同Fragment中对StatusBar的处理不一样
先上图
<android.support.v7.widget.Toolbar
    android:id="@+id/base_toolbar"
    android:layout_width="match_parent"
    android:layout_height="?attr/actionBarSize"
    android:background="@android:color/holo_blue_dark">

    <TextView
        android:id="@+id/base_title"
        android:layout_width="wrap_content"
        android:layout_height="wrap_content"
        android:layout_gravity="center"
        android:textColor="@android:color/black" />
</android.support.v7.widget.Toolbar>

<FrameLayout
    android:id="@+id/base_container"
    android:layout_width="match_parent"
    android:layout_height="0dp"
    android:layout_weight="1">

</FrameLayout>
上述代码是两个Fragment所依附的Activity对应的部分layout
private void addStatusBar() {
    //条件状态栏透明,要不然不会起作用
    getWindow().addFlags(WindowManager.LayoutParams.FLAG_TRANSLUCENT_STATUS);
    if (mStatusBarView == null) {
        mStatusBarView = new View(FragmentStatusAndActionBarActivity.this);
        int screenWidth = getResources().getDisplayMetrics().widthPixels;
        int statusBarHeight = getStatusBarHeight();
        ViewGroup.LayoutParams params = new ViewGroup.LayoutParams(screenWidth, statusBarHeight);
        mStatusBarView.setLayoutParams(params);
        mStatusBarView.requestLayout();

        //获取根布局
        ViewGroup systemContent = findViewById(android.R.id.content);
        ViewGroup userContent = (ViewGroup) systemContent.getChildAt(0);
        userContent.setFitsSystemWindows(false);
        userContent.addView(mStatusBarView, 0);
    }
}
上面是对应Activity中的布局,意思就是不使用系统提供的ActionBar,使用ToolBar来代替(网上一大推代替的方法),下面的代码中设置,状态栏透明,并且设置了sitFitSystemWindow(false),通过这些操作,我们相当于把系统的StatusBar,ActionBar,都干掉了,那么接下来,我们就可以模拟创建出StatusBaruserContent.addView(mStatusBarView, 0);那么现在我们就可以自己控制statusBar和ActionBar,显示什么颜色?消失还是隐藏?
ToolBar显示的Fragment:
 @Override
public void onHiddenChanged(boolean hidden) {
    super.onHiddenChanged(hidden);
    mActivity.mToolbar.setVisibility(View.VISIBLE);//设置ToolBar显示
    //设置statusBar的颜色
    mActivity.mStatusBarView.setBackgroundColor(getResources().getColor(android.R.color.holo_blue_bright));
}
ToolBar隐藏的Fragment
@Override
public void onHiddenChanged(boolean hidden) {
    super.onHiddenChanged(hidden);
    mActivity.mToolbar.setVisibility(View.GONE);//设置ToolBar消失
    //设置statusBar的颜色
    mActivity.mStatusBarView.setBackgroundColor(getResources().getColor(android.R.color.holo_orange_light));
}
需求五、设置状态栏文字的颜色

 //设置白底黑字
if (Build.VERSION.SDK_INT >= Build.VERSION_CODES.M) {
    getWindow().getDecorView().setSystemUiVisibility(View.SYSTEM_UI_FLAG_LIGHT_STATUS_BAR);
}
但是需要注意的是:目前只有android原生6.0以上支持修改状态栏字体
除此国内厂商小米、魅族也开放了修改状态栏字体的方式
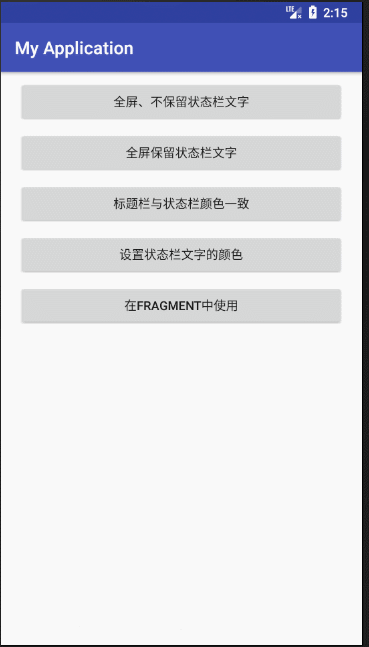
需求六、切换fragment时,toolBar和statusbar显示与否、statusBar颜色、status文字颜色(新增)
评论区,有同学提出能否"不同Fragment中切换状态栏颜色和状态栏文字的颜色,甚至同时切换风格(纯色状态栏变成banner往上顶的状态栏)的情况",这种情况肯定是没有问题的,也不难,现在状态栏和标题栏都是我们自己,我们想让它怎么样,它不得乖乖听话,对不~
先上图:
其实调整的不多,这里我只贴下关键代码,gitub代码仓库已更新,大家可以clone看完成代码
这是只有Banner的fragment:
 @Override
    public void onHiddenChanged(boolean hidden) {
        super.onHiddenChanged(hidden);
        //设置ToolBar隐藏
        mActivity.mToolbar.setVisibility(View.GONE);
        //设置statusBar的隐藏
        mActivity.mStatusBarView.setVisibility(View.GONE);
        //恢复默认statusBar文字颜色
        if (Build.VERSION.SDK_INT >= Build.VERSION_CODES.M)
            mActivity.getWindow().getDecorView().setSystemUiVisibility(View.VISIBLE);
        mActivity.mStatusBarView.setVisibility(View.GONE);
    }
改变statusBar字体颜色
@Override
public void onHiddenChanged(boolean hidden) {
    super.onHiddenChanged(hidden);
    //设置ToolBar显示
    mActivity.mToolbar.setVisibility(View.VISIBLE);
    //设置ToolBar的颜色
    mActivity.mToolbar.setBackgroundColor(getResources().getColor(R.color.colorAccent));
    //设置statusBar的颜色
    mActivity.mStatusBarView.setBackgroundColor(getResources().getColor(R.color.colorAccent));
    //设置statusBar显示
    mActivity.mStatusBarView.setVisibility(View.VISIBLE);
    //设置statusBar字体颜色
    if (Build.VERSION.SDK_INT >= Build.VERSION_CODES.M)
        mActivity.getWindow().getDecorView().setSystemUiVisibility(View.SYSTEM_UI_FLAG_LIGHT_STATUS_BAR);
}
思考题
思考一、Activity中window是怎么回事?里面有什么View/ViewGroup
写了个方法,将整个Window内的View都打印出来了
private void printChildView(ViewGroup viewGroup) {
    Log.i("printView-ViewGroup", viewGroup.getClass().getSimpleName() + "的子View和数量:" + viewGroup.getChildCount());
    for (int i = 0; i < viewGroup.getChildCount(); i++) {
        String simpleName = viewGroup.getChildAt(i).getClass().getSimpleName();
        Log.i("printView-ChildView", simpleName);
    }
    for (int i = 0; i < viewGroup.getChildCount(); i++) {
        if (viewGroup.getChildAt(i) instanceof ViewGroup) {
            printChildView((ViewGroup) viewGroup.getChildAt(i));
        }
    }
}
这是结果
printView-ViewGroup: DecorView的子View和数量:1
printView-ChildView: LinearLayout
printView-ViewGroup: LinearLayout的子View和数量:2
printView-ChildView: ViewStub
printView-ChildView: FrameLayout
printView-ViewGroup: FrameLayout的子View和数量:1
printView-ChildView: ActionBarOverlayLayout
printView-ViewGroup: ActionBarOverlayLayout的子View和数量:2
printView-ChildView: ContentFrameLayout
printView-ChildView: ActionBarContainer
printView-ViewGroup: ContentFrameLayout的子View和数量:2
printView-ChildView: View
printView-ChildView: ConstraintLayout
printView-ViewGroup: ConstraintLayout的子View和数量:1
printView-ChildView: AppCompatTextView
printView-ViewGroup: ActionBarContainer的子View和数量:2
printView-ChildView: Toolbar
printView-ChildView: ActionBarContextView
printView-ViewGroup: Toolbar的子View和数量:1
printView-ChildView: AppCompatTextView
printView-ViewGroup: ActionBarContextView的子View和数量:0
我们根据结果画一个分布图
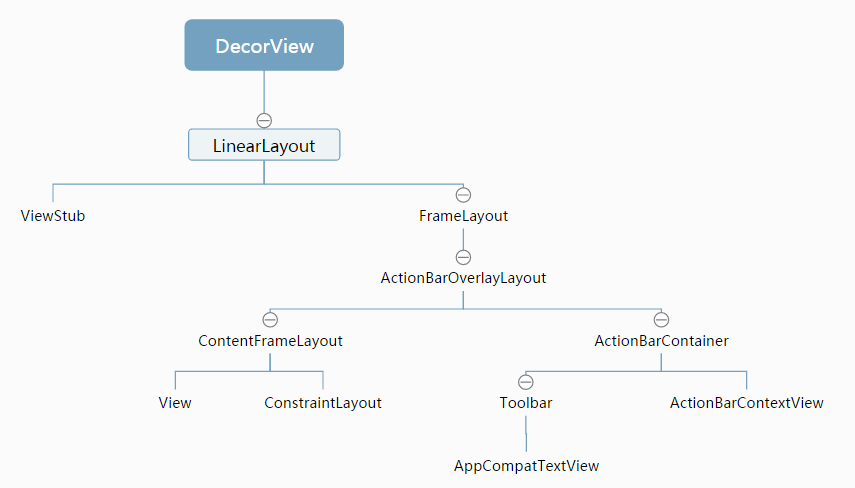
上述这个ContentFrameLayout就是我们Activity中通过setContentView(View)添加的,至于其中的View是我们自己设备的statusbar,把这个图画出来,希望能起一个抛砖引玉的作用,有想法的可以继续往下研究,我这里就不研究了,有想法的可以评论。
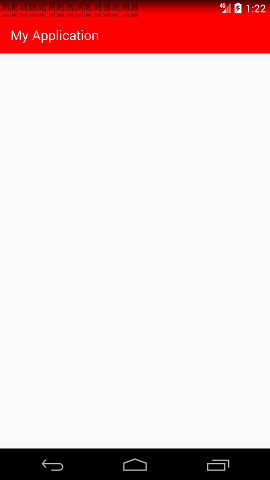
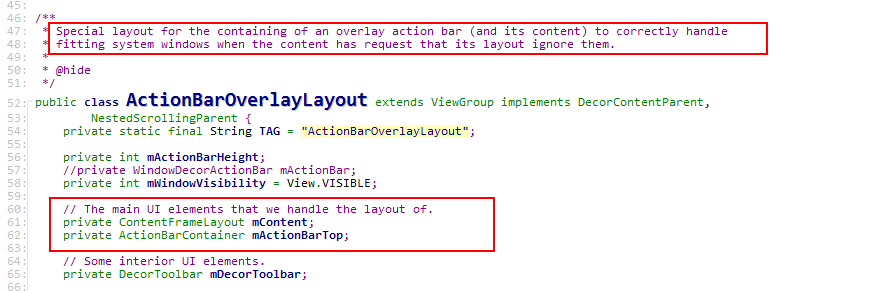
思考二、setFitsSystemWindows()是什么鬼?
fitsSystemWindows代表的是:当设置SystemBar(包含StatusBar&NavigationBar)透明之后,通过添加flag的方式 将fitsSystemWindows至为true,则还是为SystemBar预留空间,当设置为false的时候,就是不为SystemBar预留空间,比如我们设置状态栏和标题栏的时候,如果不设置fitSystemWindows为true的话,就变成了
我们思考一中,发现ToolBar和我们的开发者通过setContentView是在一个ActionBarOverlayLayout中,那我就去看看这个View
<android.support.v7.internal.widget.ActionBarOverlayLayout
        xmlns:android="http://schemas.android.com/apk/res/android"
        xmlns:app="http://schemas.android.com/apk/res-auto"
        android:id="@+id/decor_content_parent"
        android:layout_width="match_parent"
        android:layout_height="match_parent"
        android:fitsSystemWindows="true">

    <include layout="@layout/abc_screen_content_include"/>

    <android.support.v7.internal.widget.ActionBarContainer
            android:id="@+id/action_bar_container"
            android:layout_width="match_parent"
            android:layout_height="wrap_content"
            android:layout_alignParentTop="true"
            style="?attr/actionBarStyle"
            android:touchscreenBlocksFocus="true"
            android:gravity="top">

        <android.support.v7.widget.Toolbar
                android:id="@+id/action_bar"
                android:layout_width="match_parent"
                android:layout_height="wrap_content"
                app:navigationContentDescription="@string/abc_action_bar_up_description"
                style="?attr/toolbarStyle"/>

        <android.support.v7.internal.widget.ActionBarContextView
                android:id="@+id/action_context_bar"
                android:layout_width="match_parent"
                android:layout_height="wrap_content"
                android:visibility="gone"
                android:theme="?attr/actionBarTheme"
                style="?attr/actionModeStyle"/>

    </android.support.v7.internal.widget.ActionBarContainer>

</android.support.v7.internal.widget.ActionBarOverlayLayout>
通过includy引入的ContentView abc_screen_content_include.xml
<merge xmlns:android="http://schemas.android.com/apk/res/android">

    <android.support.v7.internal.widget.ContentFrameLayout
            android:id="@id/action_bar_activity_content"
            android:layout_width="match_parent"
            android:layout_height="match_parent"
            android:foregroundGravity="fill_horizontal|top"
            android:foreground="?android:attr/windowContentOverlay" />

</merge>
layout布局很普通,没有什么特别之处,我看到这时候,猜想:当我们设置了fitSystemwindow(false),是不是在这个ActionBarOverlayLayout的onLyout()过程会对相应的布局做调整。然后穷就去他的onLayout()里看:
@Override
protected void onLayout(boolean changed, int left, int top, int right, int bottom) {
    final int count = getChildCount();

    final int parentLeft = getPaddingLeft();
    final int parentRight = right - left - getPaddingRight();

    final int parentTop = getPaddingTop();
    final int parentBottom = bottom - top - getPaddingBottom();

    for (int i = 0; i < count; i++) {
        final View child = getChildAt(i);
        if (child.getVisibility() != GONE) {
            final LayoutParams lp = (LayoutParams) child.getLayoutParams();

            final int width = child.getMeasuredWidth();
            final int height = child.getMeasuredHeight();

            int childLeft = parentLeft + lp.leftMargin;
            int childTop = parentTop + lp.topMargin;

            child.layout(childLeft, childTop, childLeft + width, childTop + height);
        }
    }
}
然而毛都没有。。。懵逼了,layout的参数都是来自布局文件里的,后来我跟着setFitSystemWindow()看到一个方法,就是这个fitSystemWindows(Rect insets)它的注释说明里有The content insets tell you the space that the status bar,应该是调用这个方法进行设置的,但是怎么调用的,目前我还没有找到,希望懂得同学指点迷津,万分感谢!
 /**
     * Called by the view hierarchy when the content insets for a window have
     * changed, to allow it to adjust its content to fit within those windows.
     * The content insets tell you the space that the status bar, input method,
     * and other system windows infringe on the application's window.
     ...
    protected boolean fitSystemWindows(Rect insets) {
        if ((mPrivateFlags3 & PFLAG3_APPLYING_INSETS) == 0) {
            if (insets == null) {
                // Null insets by definition have already been consumed.
                // This call cannot apply insets since there are none to apply,
                // so return false.
                return false;
            }
            // If we're not in the process of dispatching the newer apply insets call,
            // that means we're not in the compatibility path. Dispatch into the newer
            // apply insets path and take things from there.
            try {
                mPrivateFlags3 |= PFLAG3_FITTING_SYSTEM_WINDOWS;
                return dispatchApplyWindowInsets(new WindowInsets(insets)).isConsumed();
            } finally {
                mPrivateFlags3 &= ~PFLAG3_FITTING_SYSTEM_WINDOWS;
            }
        } else {
            // We're being called from the newer apply insets path.
            // Perform the standard fallback behavior.
            return fitSystemWindowsInt(insets);
        }
    }
文章中有任何有异议的地方欢迎提出!
学不尽的技术,做不完的分享!
