

前言
知识是无穷无尽,技术需要积累,记录一点一滴,让成长的时间轴上变得充实一些。 今天就讲讲UITableView/UICollectionView的一些使用技巧。结合自己项目情况进行展开。
Header/Footer高度、悬停设置
高度设置
有时候我们需要设置 TableView 的头部和尾部的间距,头部尾部的高度只需要在代理里面设置高度就行。
示例代码如下:
- (CGFloat)tableView:(UITableView *)tableView heightForHeaderInSection:(NSInteger)section {
    return 0.01f;
}

- (UIView *)tableView:(UITableView *)tableView viewForHeaderInSection:(NSInteger)section {
    UIView *view = [[UIView alloc] initWithFrame:CGRectMake(0, 0, kScreenWidth, 20)];
    view.backgroundColor = [UIColor clearColor];
    return view;
}

- (CGFloat)tableView:(UITableView *)tableView heightForFooterInSection:(NSInteger)section {
    return 10;
}

- (UIView *)tableView:(UITableView *)tableView viewForFooterInSection:(NSInteger)section {
    UIView *view = [[UIView alloc] initWithFrame:CGRectMake(0, 0, kScreenWidth, 1)];
    view.backgroundColor = [UIColor clearColor];
    return view;
}
小结:通过上面的代码实现的效果可以看出,当自定义头部和尾部视图时,即使自定义头部和尾部视图设置了高度。高度最终还是由tableView:heightForHeaderInSection:和tableView:heightForFooterInSection:两个代理方法决定。当没有实现这两个代理方法时,高度为默认高度。
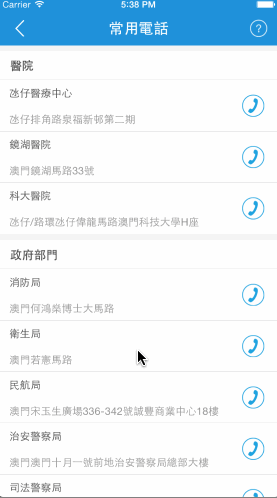
悬停
TableView的悬停功能只有在 Style 是 UITableViewStylePlain 的时候才有。如果有这么一种需求,就是需要有Header悬停,同时每个section之间需要有间隔。
效果如下:
方式一(全部悬停):
- (CGFloat)tableView:(UITableView *)tableView heightForHeaderInSection:(NSInteger)section {
    return kHeaderHeight+9;
}

- (UIView *)tableView:(UITableView *)tableView viewForHeaderInSection:(NSInteger)section {
    BillListModel *model = _sectionArr[section];

    UIView *header = ({
        UIView *bgView = [[UIView alloc] initWithFrame:CGRectMake(0, 0, KScreenWidth, kHeaderHeight+9)];
        bgView.backgroundColor = [UIColorTools colorWithTheme:UIColorThemeAppBgColor];

        UILabel *titleLab = [[UILabel alloc] initWithFrame:CGRectMake(0, 9, KScreenWidth, kHeaderHeight)];
        titleLab.backgroundColor = [UIColorTools colorWithTheme:UIColorThemeWhite];
        titleLab.textColor = [UIColorTools colorWithTheme:UIColorThemeBlack];
        titleLab.text = model.time;
        [bgView addSubview:titleLab];

        UIImageView *lineHBottom = [[UIImageView alloc] initWithFrame:CGRectMake(0.0, titleLab.mj_max_y - 0.5, KScreenWidth, 0.5)];
        lineHBottom.backgroundColor = [UIColorTools colorWithTheme:UIColorThemeSeparatorColor];
        [bgView addSubview:lineHBottom];

        bgView;
    });
    return header;
}

- (void)scrollViewDidScroll:(UIScrollView *)scrollView  {
    if (scrollView == _tableView) {
        UITableView *tableview = (UITableView *)scrollView;
        CGFloat sectionHeaderHeight = kHeaderHeight;
        CGFloat sectionFooterHeight = 9;
        CGFloat offsetY = tableview.contentOffset.y;
        if (offsetY >= 0 && offsetY <= sectionFooterHeight) {
            tableview.contentInset = UIEdgeInsetsMake(-offsetY, 0, -sectionHeaderHeight, 0);
        } else if (offsetY >= sectionFooterHeight && offsetY <= tableview.contentSize.height - tableview.frame.size.height - sectionHeaderHeight) {
            tableview.contentInset = UIEdgeInsetsMake(-sectionFooterHeight, 0, 0, 0);
        } else if (offsetY >= 0 && tableview.contentSize.height >= tableview.contentSize.height) {
            tableview.contentInset = UIEdgeInsetsMake(-sectionFooterHeight, 0, 0, 0);
        }
    }
}

方式二(部分悬停):
- (CGFloat)tableView:(UITableView *)tableView heightForHeaderInSection:(NSInteger)section {
    if (section == 0) {
        return 10.f;
    } else if (section == 2) {
        return 0;
    }
    return kHeight4_7(35);
}

- (CGFloat)tableView:(UITableView *)tableView heightForFooterInSection:(NSInteger)section {
    return 10.f;
}

- (UIView *)tableView:(UITableView *)tableView viewForHeaderInSection:(NSInteger)section {
    UIView *headerView = [UIView new];
    headerView.backgroundColor = [UIColorTools colorWithTheme:UIColorThemeWhite];
    if (section == 0) {
        headerView.backgroundColor = [UIColor clearColor];
    }
    return headerView;
}

- (UIView *)tableView:(UITableView *)tableView viewForFooterInSection:(NSInteger)section {
    UIView *footerView = [[UIView alloc] init];
    footerView.backgroundColor = [UIColor clearColor];
    return footerView;
}
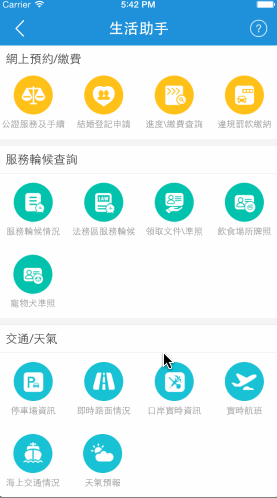
CollectionView的悬停功能只有在 Style 是 UITableViewStylePlain 的时候才有。如果有这么一种需求,就是需要有Header悬停,同时每个section之间需要有间隔。
效果如下:
滚动监听

UIScrollView 减速
可能通过decelerationRate的属性来设置,它的值域是(0.0,1.0),当decelerationRate设置为0.1时,当手指touch up时就会很慢的停下来。
UIScrollView 如何判断停止滑动
这里停止滑动的意思要明确一下,有两种:
1、第一种是指手指停止ScrollView。
当手指停止滑动时,iOS会调UIScrollView的delegate
- (void)scrollViewDidEndDragging:(UIScrollView *)scrollView willDecelerate:(BOOL)decelerate
如果decelerate还为NO时,它最终停下,否则它还没最终停下
2、第二种是指ScrollView停止滑动,指的滚动条完全停止下来。
当decelerate = true时,iOS才会调UIScrollView的delegate
- (void)scrollViewDidEndDecelerating:(UIScrollView *)scrollView
那UIScrollView真正停止滑动,应该怎么判断呢? 解决方法如下:
- (void)scrollViewDidEndDragging:(UIScrollView *)scrollView willDecelerate:(BOOL)decelerate {
    if(!decelerate) {
        //OK,真正停止了,do something
    }
}
//然后
- (void)scrollViewDidEndDecelerating:(UIScrollView *)scrollView {
    //OK,真正停止了,do something
}
UIScrollView左右滑动到某个位置时,禁止继续向左或者向右滑动
- (void)scrollViewDidScroll:(UIScrollView *)scrollView {
    CGFloat contentOffsetX = scrollView.contentOffset.x;
    if (contentOffsetX<=0 || contentOffsetX>=kScreenWidth) {
        //当滑动到最左边或者最右边时,禁止继续滑动
        scrollView.scrollEnabled = NO;
    } else {
        scrollView.scrollEnabled = YES;
    }
}

- (void)scrollViewDidEndDragging:(UIScrollView *)scrollView willDecelerate:(BOOL)decelerate {
    scrollView.scrollEnabled = YES;
}

- (void)scrollViewDidEndDecelerating:(UIScrollView *)scrollView {
    scrollView.scrollEnabled = YES;

}
消息传递
当手指触摸后,scrollView会暂时拦截触摸事件,使用一个计时器,假如在计时器到点后,没有发生手指移动事件,那么,scrollView发送tracking events到被点击的subView。 假如在计时器到点前,发生了移动事件,那么scrollView取消tracking自己发生滚动。
子类可以重载touchesShouldBegin:withEvent:inContentView:决定自己是否接收touch事件。
当pagingEnabled值为YES,会自动滚动到subView的边界,默认是NO。
touchesShouldCancelInContentView:开始发送tracking messages消息给subView的时候
调用这个方法,决定是否发送tracking messages消息到subview,假如返回NO,则发送,YES则不发送。
假如canCancelContentTouches属性是NO,则不调用这个方法来影响如何处理滚动手势。
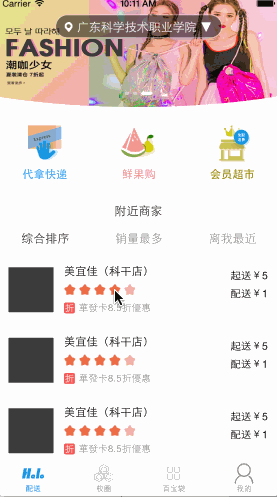
修改tableView中headerView的位置(类似美团外卖首页)
实现原理就是监听滚动情况,重设scrollView.contentInset即可 效果如下:
- (void)scrollViewDidScroll:(UIScrollView *)scrollView {
    CGFloat contentOffsety = scrollView.contentOffset.y;
    _contentOffSet_y = contentOffsety;
    //这个header其实是section的header到顶部的距离
    CGFloat header = kBannerHight+[HSFuntionCell cellHeight]+kFooterViewHeight-64;

    NSLog(@"=======%lf=====%lf", contentOffsety, header);

    if (contentOffsety<=header&&contentOffsety>=0) {
        //当视图滑动的距离小于header时
        scrollView.contentInset = UIEdgeInsetsMake(0, 0, 0, 0);

        self.headerView.layer.borderColor = [UIColorTools colorWithTheme:UIColorThemeWhite].CGColor;

    } else if (contentOffsety>header) {
        //当视图滑动的距离大于header时,这里就可以设置section的header的位置,设置的时候要考虑到导航栏的透明对滚动视图的影响
        scrollView.contentInset = UIEdgeInsetsMake(64, 0, 0, 0);

        self.headerView.layer.borderColor = [UIColorTools colorWithTheme:UIColorThemeSeparatorColor].CGColor;
    }
    self.headerView.borderWhich = DDViewBorderTop;
    //设置导航条透明度
    [self setNavigationColor:contentOffsety];
}
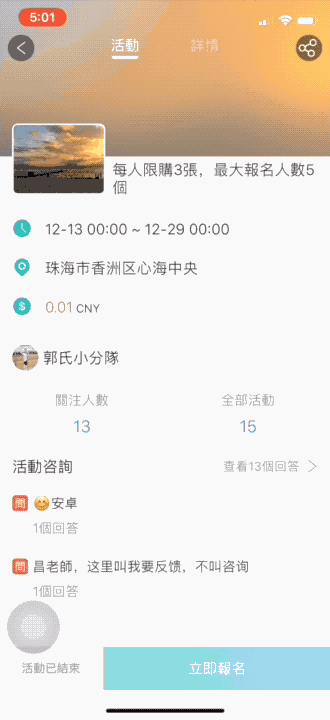
顶部拉伸效果(头像拉伸)
实现思路:自定义一个ViewA,作为TableView的headerView,然后监听TableView的滚动,将回调传递给ViewA即可。
效果如下:
下面是自定义MOActivityTopView
.h文件
@interface MOActivityTopView : UIView

@property (nonatomic, strong) MOActivityModel *model;

- (void)didScroll:(CGFloat)contentOffSetY;

@end
.m文件
#import "MOActivityTopView.h"

#define kViewHeight     (kScreenWidth*340/750.)
#define kTopHeight      (kScreenWidth*240/750.)
#define kBottomHeight   (kScreenWidth*100/750.)

@interface MOActivityTopView ()

/// 背景图
@property (nonatomic, strong) UIImageView *backgroundImgV;
/// 毛玻璃
@property (nonatomic, strong) UIVisualEffectView *visualEffectView;
/// 活動圖
@property (nonatomic, strong) UIImageView *activityImgV;
/// 活動名稱
@property (nonatomic, strong) UILabel *activityLab;

@end

@implementation MOActivityTopView

- (instancetype)init {
    if (self = [super initWithFrame:CGRectMake(0, 0, kScreenWidth, kViewHeight)]) {
        [self setUp];
    }
    return self;
}

#pragma mark - Getter
-(UIImageView *)backgroundImgV {
    if (_backgroundImgV == nil) {
        _backgroundImgV = [[UIImageView alloc]initWithFrame:CGRectMake(0, 0, self.dd_w, kTopHeight)];
        [_backgroundImgV setContentMode:UIViewContentModeScaleAspectFill];
        [_backgroundImgV setClipsToBounds:YES];
    }
    return _backgroundImgV;
}

- (void)setUp {
    [self addSubview:self.backgroundImgV];

    UIVisualEffect *blurEffect;
    blurEffect = [UIBlurEffect effectWithStyle:UIBlurEffectStyleLight];

    _visualEffectView = [[UIVisualEffectView alloc] initWithEffect:blurEffect];
    //    _visualEffectView.alpha = 0.8;

    _visualEffectView.frame = self.backgroundImgV.frame;
    [self addSubview:_visualEffectView];

    UIView *bgView = [[UIView alloc] initWithFrame:CGRectMake(0, self.backgroundImgV.dd_max_y, kScreenWidth, kBottomHeight)];
    bgView.backgroundColor = [UIColorTools colorWithTheme:UIColorThemeWhite];
    [self addSubview:bgView];

    CGFloat height = (kScreenWidth*160/750.);
    CGFloat width = height/(16/21.);
    _activityImgV = [[UIImageView alloc] initWithFrame:CGRectMake(15, bgView.dd_h-7-height, width, height)];
    [bgView addSubview:_activityImgV];

    _activityLab = [[UILabel alloc] initWithFrame:CGRectMake(_activityImgV.dd_max_x+8, 0, kScreenWidth-_activityImgV.dd_max_x-8-15, kBottomHeight)];
    _activityLab.textColor = [UIColorTools colorWithTheme:UIColorThemeBlack];
    _activityLab.numberOfLines = 2;
//    _activityLab.adjustsFontSizeToFitWidth = YES;
    [bgView addSubview:_activityLab];
}

- (void)layoutSubviews {
    [super layoutSubviews];
    _activityImgV.clipsToBounds = YES;
    _activityImgV.layer.masksToBounds = YES;
    _activityImgV.layer.borderWidth = 1.5;
    _activityImgV.layer.borderColor = [UIColorTools colorWithTheme:UIColorThemeWhite].CGColor;
    _activityImgV.layer.cornerRadius = kViewCornerRadius;
}

- (void)setModel:(MOActivityModel *)model {
    _model = model;
    [_activityImgV sd_setImageWithURL:kMOImageUrlSet(model.ActivityURL) placeholderImage:[UIImage placeholderImage_activity]];
    [_backgroundImgV sd_setImageWithURL:kMOImageUrlSet(model.ActivityURL) placeholderImage:kImageSet(@"Icon-noti")];
    _activityLab.text = model.ActivityName;
}

- (void)didScroll:(CGFloat)contentOffSetY {
    //图片高度
    CGFloat imageHeight = self.dd_h;
    //图片宽度
    CGFloat imageWidth = kScreenWidth;
    //图片上下偏移量
    CGFloat imageOffsetY = contentOffSetY;

//    NSLog(@"图片上下偏移量 imageOffsetY:%f ->",imageOffsetY);

    //下拉
    if (imageOffsetY < 0) {
        CGFloat totalOffset = imageHeight + ABS(imageOffsetY);
        CGFloat f = totalOffset / imageHeight;
        self.backgroundImgV.frame = CGRectMake(-(imageWidth * f - imageWidth) * 0.5, imageOffsetY, imageWidth * f, totalOffset);
    }

//    //上拉
//    if (imageOffsetY > 0) {
//        CGFloat totalOffset = imageHeight - ABS(imageOffsetY);
//        CGFloat f = totalOffset / imageHeight;
//        [self.backgroundImgV setFrame:CGRectMake(-(imageWidth * f - imageWidth) * 0.5, imageOffsetY, imageWidth * f, totalOffset)];
//    }
    _visualEffectView.frame = self.backgroundImgV.frame;
}

@end
监听滚动
- (UIView *)topHeaderView {
    if (!_topHeaderView) {
        _topHeaderView = [[MOActivityTopView alloc] init];
        _topHeaderView.model = _model;
    }
    return _topHeaderView;
}

- (void)scrollViewDidScroll:(UIScrollView *)scrollView {
    CGFloat contentOffSetY = scrollView.contentOffset.y;
    [self.topHeaderView didScroll:contentOffSetY];
}
再一次感谢您花费时间阅读这篇文章!
微博: @Danny_吕昌辉
博客: SuperDanny
