

一 模拟实现 stream.Readable & stream.Writable
1 模拟实现 stream.Readable
1) flowing模式的实现
let EventEmitter = require('events');
let fs = require('fs');

class ReadStream extends EventEmitter {
    constructor(path, options) {
        super(path, options);

        // 初始化参数
        this.path = path;
        this.flags = options.flags || 'r';
        this.mode = options.mode || 0o666;
        this.pos = this.start = options.start || 0;
        this.end = options.end;
        this.encoding = options.encoding;
        this.highWaterMark = options.highWaterMark || 64 * 1024;


        this.flowing = null;
        this.buffer = Buffer.alloc(this.highWaterMark);
        this.open()
        this.on('newListener', (type, listener) => {
            if (type == 'data') {//on('data')触发read操作
                this.flowing = true;
                this.read();
            }
        });
    }

    read() {
        if (typeof this.fd !== 'number') {
            return this.once('open', () => this.read());
        }
        let howMuchToRead = this.end ? Math.min(this.end - this.pos + 1, this.highWaterMark) : this.highWaterMark;

        fs.read(this.fd, this.buffer, 0, howMuchToRead, this.pos, (err, bytes) => {
            if (err) {
                if (this.autoClose) {
                    this.destroy();
                }
                return this.emit('error', err);
            }
            if (bytes) {
                let data = this.buffer.slice(0, bytes);
                data = this.encoding ? data.toString(this.encoding) : data;
                this.emit('data', data);

                this.pos += bytes;

                if (this.end && this.pos > this.end) {
                    return this.endFn();
                } else {
                    if (this.flowing) {
                        this.read();
                    }
                }
            } else {
                return this.endFn();
            }

        })
    }

    endFn() {
        this.emit('end');
        this.destroy();
    }

    open() {
        fs.open(this.path, this.flags, this.mode, (err, fd) => {
            if (err) {
                if (this.autoClose) {
                    this.destroy();
                    return this.emit('error', err);
                }
            }
            this.fd = fd;
            this.emit('open');// 容错异步操作
        })
    }

    destroy() {
        fs.close(this.fd, () => {
            this.emit('close');
        });
    }

    pipe(dest) {
        this.on('data', data => {
            let flag = dest.write(data);
            if (!flag) {
                this.pause();
            }
        });
        dest.on('drain', () => {
            this.resume();
        });
    }

    pause() {
        this.flowing = false;
    }

    resume() {
        this.flowing = true;
        this.read();
    }
}

module.exports = ReadStream;
flowing模式的实现逻辑比价简单,flowing模式的测试代码如下:
let fs = require('fs');
fs.createReadStream();
require('stream');
let ReadStream = require('./ReadStream');
let rs = new ReadStream('1.txt',{
   highWaterMark:3,
    encoding:'utf8'
});

rs.on('readable',function () {
    console.log(rs.length);//3
    console.log(rs.read(1));//读了1个字节
    console.log(rs.length);//2
    setTimeout(()=>{
        console.log(rs.length);//又向缓存区里加入了highWaterMark个字节
    },500)
});
2) paused模式的实现
let fs = require('fs');
let EventEmitter = require('events');

class ReadStream extends EventEmitter {
    constructor(path, options) {
        super(path, options);
        // 初始化参数
        this.path = path;
        this.highWaterMark = options.highWaterMark || 64 * 1024;
        this.buffer = Buffer.alloc(this.highWaterMark);
        this.flags = options.flags || 'r';
        this.encoding = options.encoding;
        this.mode = options.mode || 0o666;
        this.start = options.start || 0;
        this.end = options.end;
        this.pos = this.start;
        this.autoClose = options.autoClose || true;
        this.bytesRead = 0;
        this.closed = false;
        this.flowing;
        this.needReadable = false;
        this.length = 0;
        this.buffers = [];
        this.on('end', function () {
            if (this.autoClose) {
                this.destroy();
            }
        });
        this.on('newListener', (type) => {
            if (type == 'data') {
                this.flowing = true;
                this.read();
            }
            if (type == 'readable') {
                this.read(0);
            }
        });
        this.open();
    }

    open() {
        fs.open(this.path, this.flags, this.mode, (err, fd) => {
            if (err) {
                if (this.autoClose) {
                    this.destroy();
                    return this.emit('error', err);
                }
            }
            this.fd = fd;
            this.emit('open');// 容错异步
        });
    }

    read(n) {
        if (typeof this.fd != 'number') {
            return this.once('open', () => this.read());
        }
        n = parseInt(n, 10);
        if (n != n) {
            n = this.length;
        }
        if (this.length == 0)
            this.needReadable = true;
        let ret;
        if (0 < n < this.length) {// 从缓存区中读取(shift)数据
            ret = Buffer.alloc(n);
            let b;
            let index = 0;
            while (null != (b = this.buffers.shift())) {
                for (let i = 0; i < b.length; i++) {
                    ret[index++] = b[i];
                    if (index == ret.length) {
                        this.length -= n;
                        b = b.slice(i + 1);
                        this.buffers.unshift(b);//把没有取完的Buffer再放回缓存区
                        break;
                    }
                }
            }
            ret = ret.toString(this.encoding);
        }

        let _read = () => {// 把读取到的数据push到缓存区中
            let m = this.end ? Math.min(this.end - this.pos + 1, this.highWaterMark) : this.highWaterMark;
            fs.read(this.fd, this.buffer, 0, m, this.pos, (err, bytesRead) => {
                if (err) {
                    return
                }
                let data;
                if (bytesRead > 0) {
                    data = this.buffer.slice(0, bytesRead);
                    this.pos += bytesRead;
                    this.length += bytesRead;
                    if (this.end && this.pos > this.end) {
                        if (this.needReadable) {
                            this.emit('readable');
                        }

                        this.emit('end');
                    } else {
                        this.buffers.push(data);
                        if (this.needReadable) {
                            this.emit('readable');
                            this.needReadable = false;
                        }

                    }
                } else {
                    if (this.needReadable) {
                        this.emit('readable');
                    }
                    return this.emit('end');
                }
            })
        }
        if (this.length == 0 || (this.length < this.highWaterMark)) {
            _read();
        }
        return ret;
    }

    destroy() {
        fs.close(this.fd, (err) => {
            this.emit('close');
        });
    }

    pause() {
        this.flowing = false;
    }

    resume() {
        this.flowing = true;
        this.read();
    }

    pipe(dest) {
        this.on('data', (data) => {
            let flag = dest.write(data);
            if (!flag) this.pause();
        });
        dest.on('drain', () => {
            this.resume();
        });
        this.on('end', () => {
            dest.end();
        });
    }
}

module.exports = ReadStream;
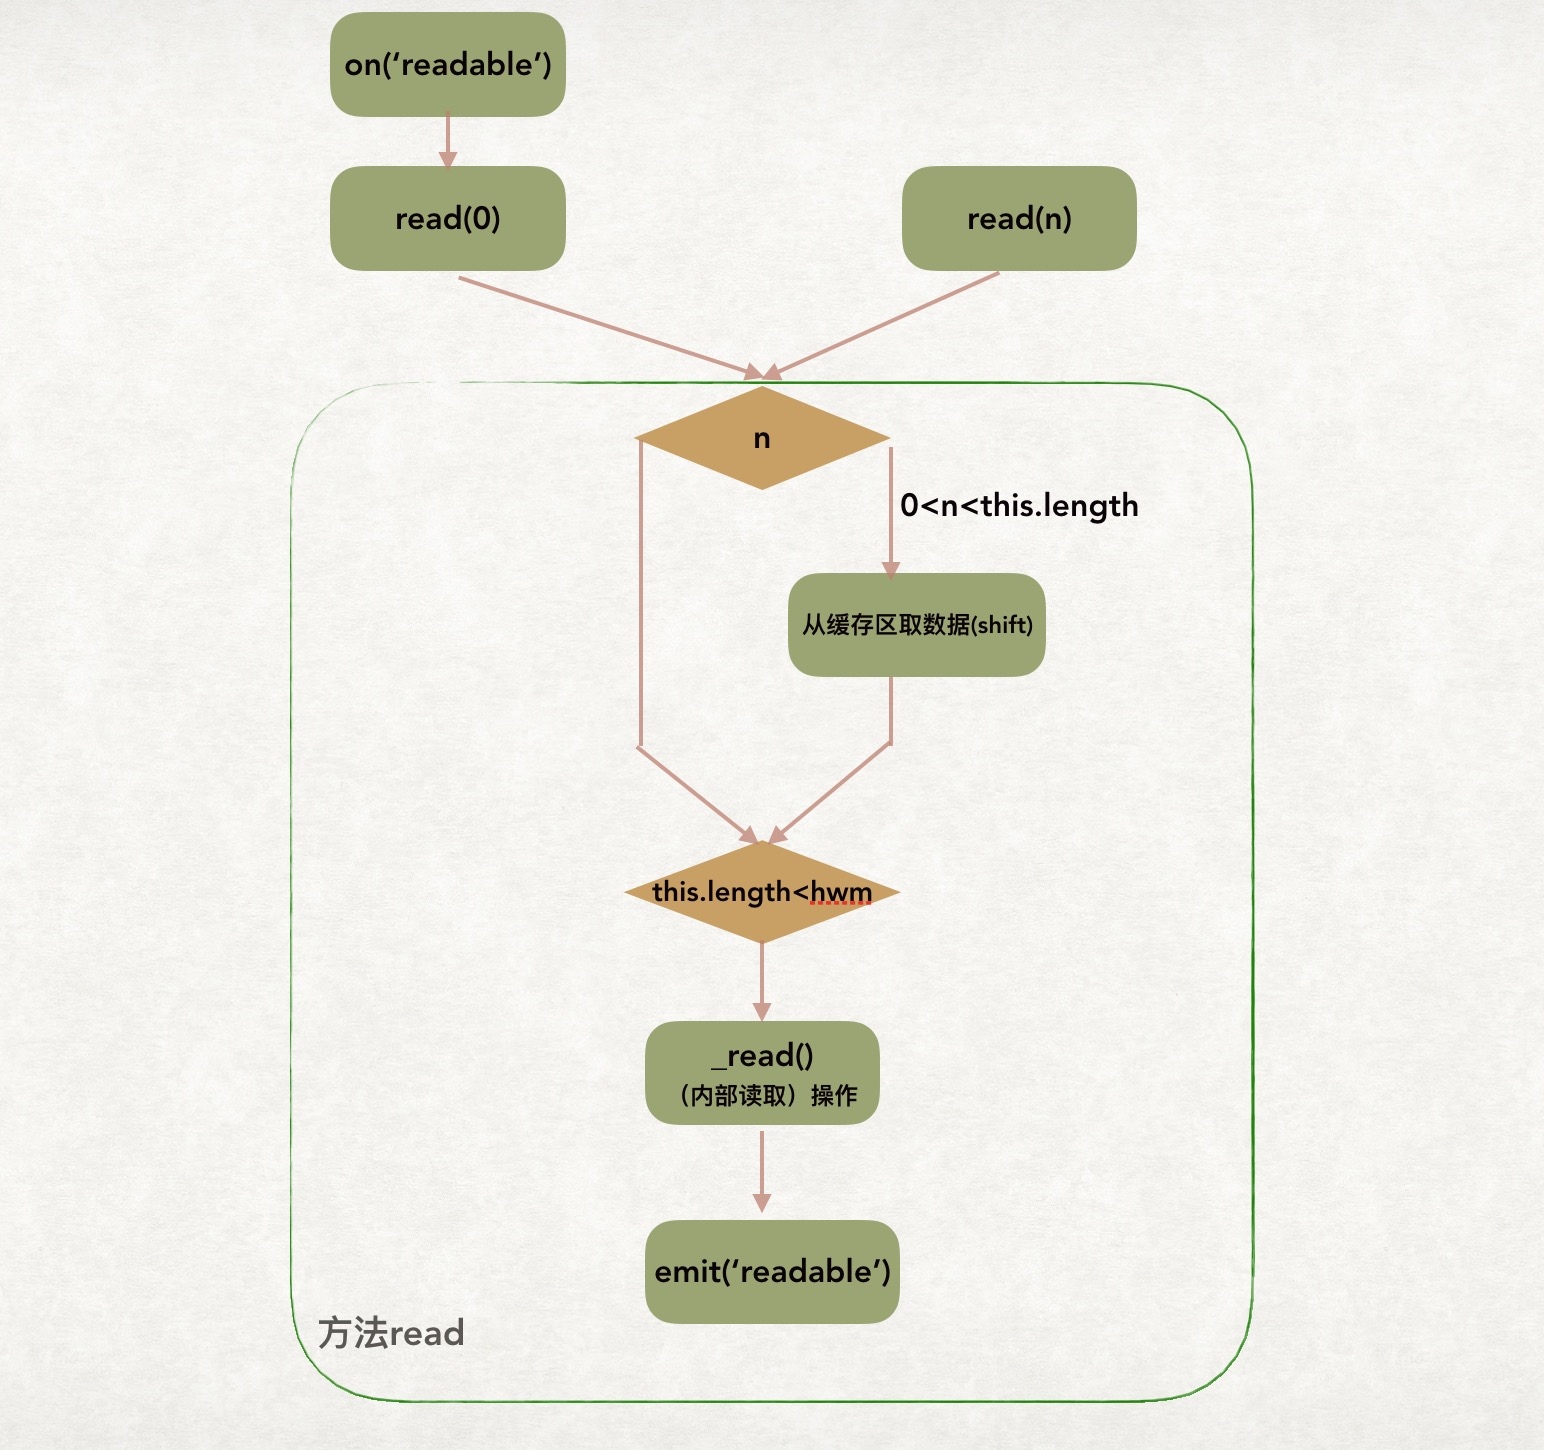
read方法
-
在调用完_read()后,read(n)会试着从缓存中取数据。
-
如果_read()是异步调用push方法的,则此时缓存中的数据量不会增多,容易出现数据量不够的现象。
-
如果read(n)的返回值为null,说明这次未能从缓存中取出所需量的数据。此时,消耗方需要等待新的数据到达后再次尝试调用read方法。
-
在数据到达后,流是通过readable事件来通知消耗方的。
-
在此种情况下,push方法如果立即输出数据,接收方直接监听data事件即可,否则数据被添加到缓存中,需要触发readable事件,消耗方必须监听这个readable事件,再调用read方法取得数据。
-
另外,流中维护了一个缓存,当缓存中的数据足够多时,调用read()不会引起_read()的调用,即不需要向底层请求数据。state.highWaterMark是给缓存大小设置的一个上限阈值。如果取走n个数据后,缓存中保有的数据不足这个量,便会从底层取一次数据。
paused模式实现的逻辑相对比较复杂,下图为read方法的逻辑图,可以参考一下:
paused模式的测试代码如下:
let fs = require('fs');
let ReadStream = require('./ReadStream');
let rs = new ReadStream('1.txt', {
    highWaterMark: 3,
    encoding: 'utf8'
});

rs.on('readable', function () {
    console.log(rs.length);// 3 当前缓存区的长度
    console.log('char', rs.read(1));
    console.log(rs.length);// 2 当你消耗掉一个字节之后,缓存区变成2个字节了

    //一旦发现缓冲区的字节数小于最高水位线了,则会现再读到最高水位线个字节填充到缓存区里
    setTimeout(() => {
        console.log(rs.length);//5
    }, 500)
});
2 模拟实现 stream.Writable
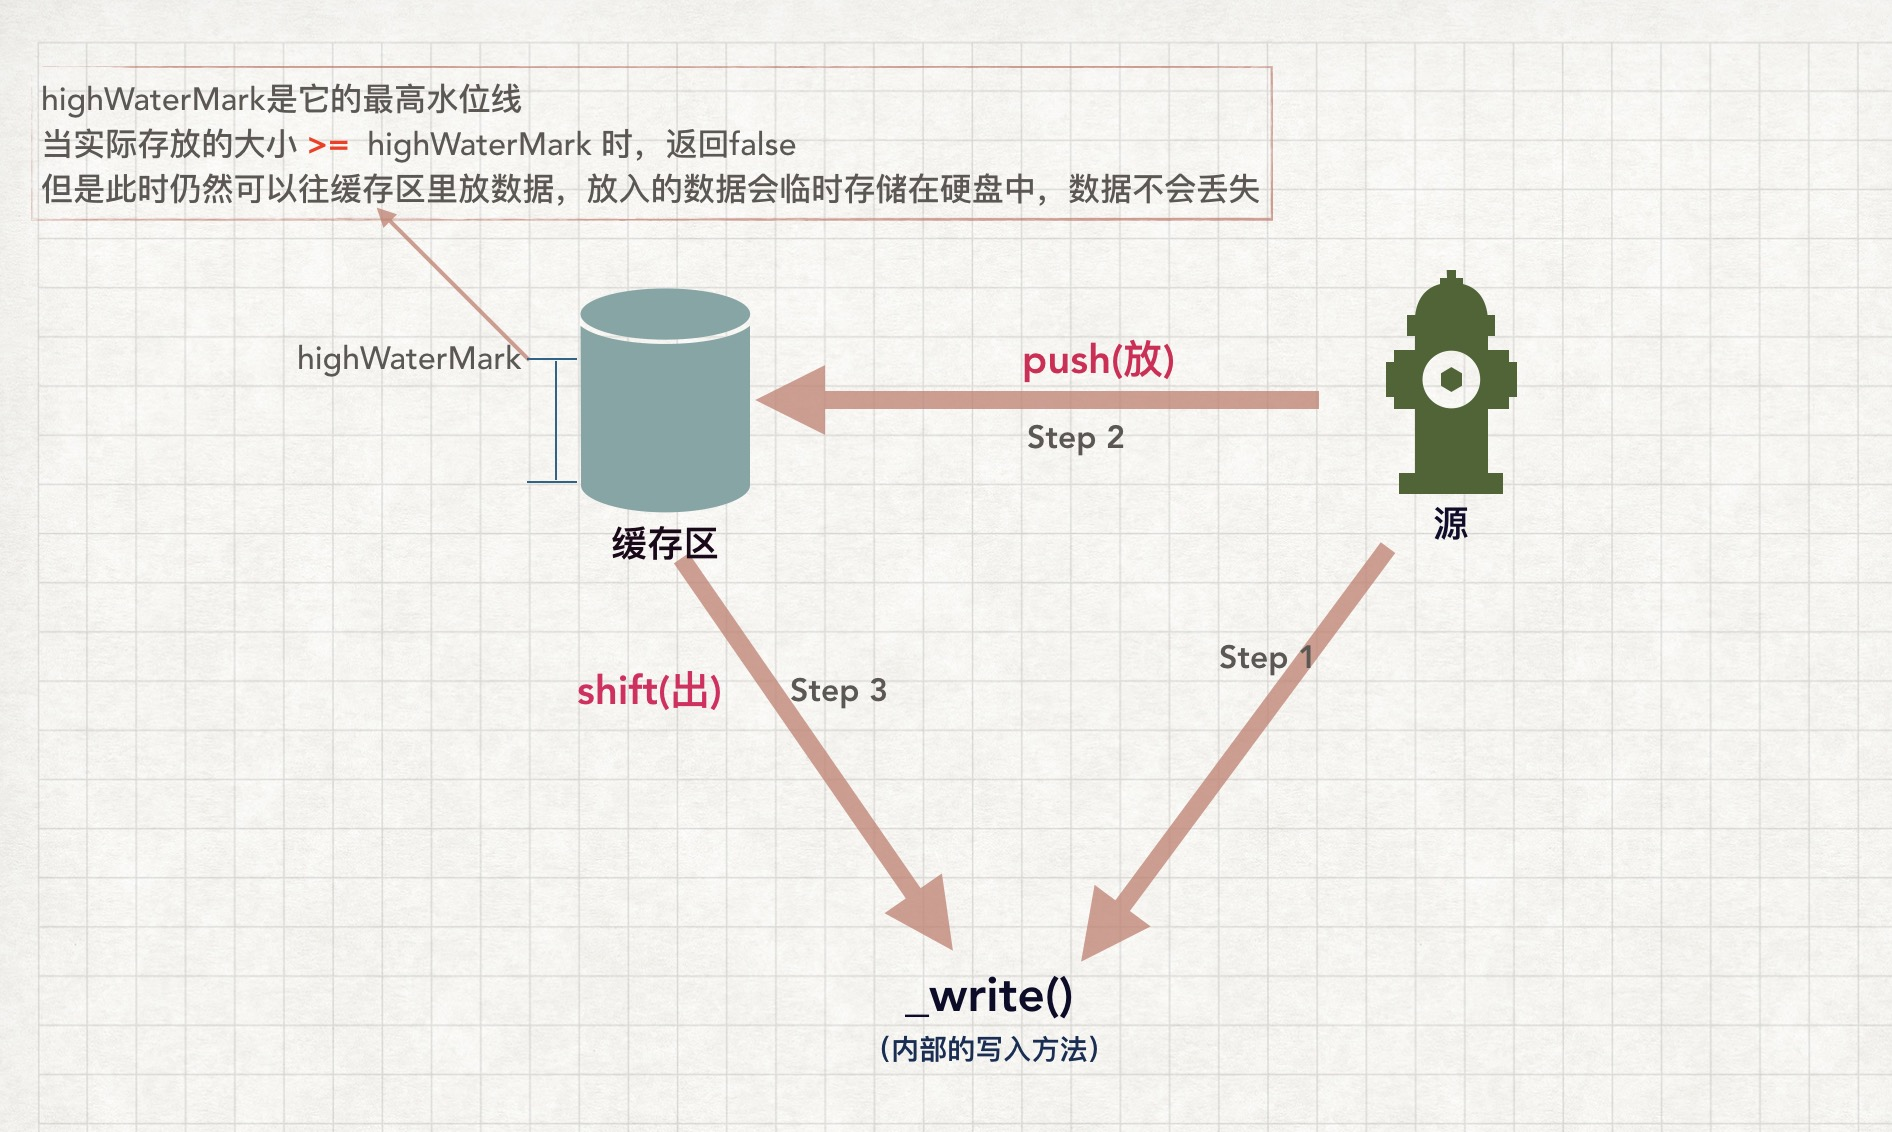
先来张Writable的内部机制模拟图
let fs = require('fs');
let EventEmitter = require('events');

class WriteStream extends EventEmitter {
    constructor(path, options) {
        super(path, options);
        this.path = path;
        this.flags = options.flags || 'w';
        this.mode = options.mode || 0o666;
        this.start = options.start || 0;
        this.pos = this.start;
        this.encoding = options.encoding || 'utf8';
        this.autoClose = options.autoClose;
        this.highWaterMark = options.highWaterMark || 16 * 1024;

        this.buffers = [];//缓存区
        this.writing = false;//表示内部正在写入数据
        this.length = 0;//表示缓存区字节的长度
        this.open();
    }

    open() {
        fs.open(this.path, this.flags, this.mode, (err, fd) => {
            if (err) {
                if (this.autoClose) {
                    this.destroy();
                }
                return this.emit('error', err);
            }
            this.fd = fd;
            this.emit('open');
        });
    }


    write(chunk, encoding, cb) {
        chunk = Buffer.isBuffer(chunk) ? chunk : Buffer.from(chunk, this.encoding);
        let len = chunk.length;

        this.length += len;//缓存区的长度加上当前写入的长度

        let ret = this.length < this.highWaterMark; //判断当前最新的缓存区是否小于最高水位线
        if (this.writing) {//表示正在向底层写数据,当前数据必须放在缓存区里
            this.buffers.push({
                chunk,
                encoding,
                cb
            });
        } else {
            this.writing = true;
            this._write(chunk, encoding, () => this.clearBuffer()); //在底层写完当前数据后要清空缓存区
        }
        return ret;
    }

    clearBuffer() {
        let data = this.buffers.shift();
        if (data) {
            this._write(data.chunk, data.encoding, () => this.clearBuffer())
        } else {
            //缓存区清空的时候,发射'drain'事件
            this.writing = false;
            this.emit('drain');
        }
    }

    _write(chunk, encoding, cb) {
        if (typeof this.fd !== 'number') {
            return this.once('open', () => this._write(chunk, encoding, cb));
        }
        fs.write(this.fd, chunk, 0, chunk.length, this.pos, (err, bytesWritten) => {
            if (err) {
                if (this.autoClose) {
                    this.destroy();
                    this.emit('error', err);
                }
            }
            this.pos += bytesWritten;

            this.length -= bytesWritten;

            cb && cb();
        })
    }

    destroy() {
        fs.close(this.fd, () => {
            this.emit('close');
        })
    }
}

module.exports = WriteStream;
Writable实现的逻辑图如下:
Writable的测试代码,如下:
let fs = require('fs');
let WriteStream = require('./WriteStream');
let ws = new WriteStream('./1.txt', {
    flags: 'w',
    mode: 0o666,
    start: 0,
    encoding: 'utf8',
    autoClose: true,
    highWaterMark: 3
});
let n = 9;
ws.on('error', (err) => {
    console.log(err);
});

function write() {
    let flag = true;
    while (flag && n > 0) {
        flag = ws.write(n + "", 'utf8', () => {
            console.log('ok')
        });
        n--;
        console.log('flag=', flag);
    }
}

ws.on('drain', () => {
    console.log('drain');
    write();
});
write();
二 深入理解NodeStream的内部机制
2.1 stream.Readable
我们先来理清一下通过Readable读取数据的机制,如下图中:
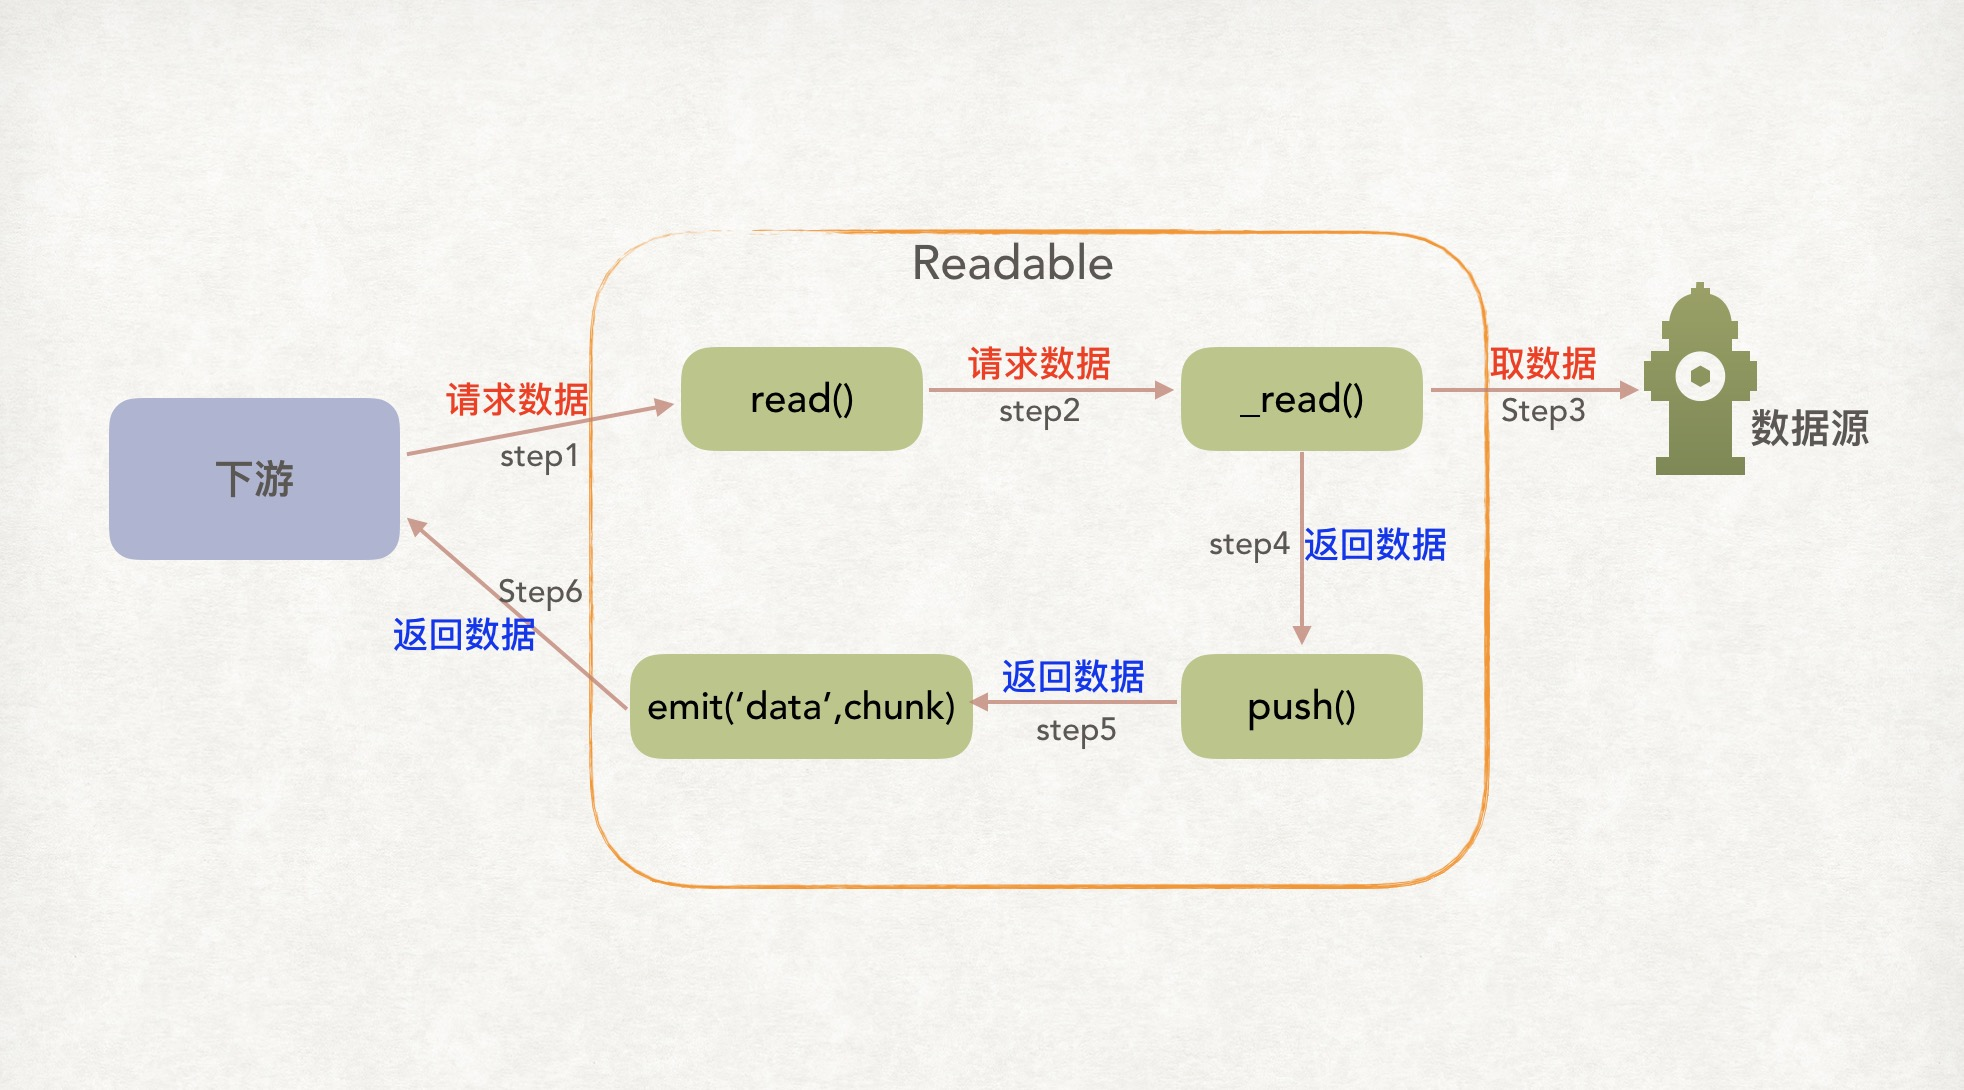
- 用Readable创建对象readable后,便得到了一个可读流。
- 如果实现_read方法,就将流连接到一个底层数据源。
- 流通过调用_read向底层请求数据,底层再调用流的push方法将需要的数据传递过来。
- 当readable连接了数据源后,下游便可以调用readable.read(n)向流请求数据,同时监听readable的data事件来接收取到的数据。
来段代码感受一下:
let {Readable} = require('stream');
let index = 3;
let rs = new Readable({
    read() {//实现_read方法(源码里会将read处理为_read)
        if (index > 0) {
            this.push(index-- + '');
        } else {
            this.push(null);
        }
    }
});

rs.on('data', (data) => {
    console.log(data.toString());//3 2 1
});
push()的作用:
- 消耗方调用read(n)促使流输出数据,而流通过_read()使底层调用push方法将数据传给流。
- 如果流在流动模式下(state.flowing为true)输出数据,数据会自发地通过data事件输出,不需要消耗方反复调用read(n)。
- 如果调用push方法时缓存为空,则当前数据即为下一个需要的数据。这个数据可能先添加到缓存中,也可能直接输出。
- 执行read方法时,在调用_read后,如果从缓存中取到了数据,就以data事件输出。
- 所以,如果_read异步调用push时发现缓存为空,则意味着当前数据是下一个需要的数据,且不会被read方法输出,应当在push方法中立即以data事件输出。
来段'readable'的列子:
let {Readable} = require('stream');
let index = 9;
let rs = new Readable({
    highWaterMark: 3,
    read() {
        if (index > 0) {
            this.push(index-- + '');
        } else {
            this.push(null);
        }
    }
});

let once = false;
rs.setEncoding('utf8');
rs.on('readable', (chunk) => {
    console.log(rs.read(1));
});
/*
9
8
*/
触发'readable'事件的几种情况:
- 在流中有数据可读取时触发
- 达到流数据尾部时触发
- 当有新数据流到缓存区时触发
2.2 stream.Writable
let {Writable} = require('stream');
let arr = [];
let ws = Writable({
    write(chunk, encoding, cb) {//底层写入方法
        arr.push(chunk.toString());
        cb();//进入下一次写入
    }
});

for (i = 0; i < 5; i++) {
    ws.write(i + '', 'utf8', () => {
        console.log('ok');
    });
}
ws.end();
setTimeout(() => {
    console.log(arr);// [ '0', '1', '2', '3', '4' ]
});
2.3 pipe
当写入速度过快,把缓存区装满了之后,就会出现「背压」,这个时候是需要告诉底层暂停写入,当缓存区队列释放之后,Writable Stream 会触发一个'drain'事件,恢复底层写入。
let {Writable, Readable} = require('stream');
let i = 0;
let rs = Readable({
    highWaterMark: 2,
    read() {
        if (i < 10) {
            this.push(i++ + '');
        } else {
            this.push(null);
        }
    }
});

let ws = Writable({
    highWaterMark: 2,
    write(chunk, encoding, cb) {
        console.log(chunk.toString());//0
    }
});

rs.pipe(ws);
setTimeout(() => {
    console.log('Readable缓存区length:', rs._readableState.length);//2
    console.log('Writable缓存区length:', ws._writableState.length);//2
});
/*
0
Readable缓存区length: 2
Writable缓存区length: 2
*/
此时ws的write方法没有完全执行完成,所以缓存区里并没有减掉它的长度,所以在这个地方(write函数里面没有执行cb)Writable缓存区length仍然是2。
2.4 Duplex
Duplex 流是同时实现了 Readable 和 Writable 接口的流,但是read 和 write 之间没有关系,也就是说可读流和可写流之间没有关系。
let {Duplex} = require('stream');
let index = 0;
let duplex = Duplex({//
    read() {
        if (index++ < 3) {
            this.push('a');
        } else {
            this.push(null);
        }

    },
    write(chunk, encoding, cb) {
        console.log(chunk.toString().toUpperCase());
        cb();
    }
});

process.stdin.pipe(duplex).pipe(process.stdout);// 在控制台的读和写互不干扰,没有关系
2.5 Transform
变换流(Transform streams)是一种Duplex流。它的输出与输入是通过某种方式关联的。和所有 Duplex 流一样,变换流同时实现了 Readable 和 Writable 接口。
let {Transform} = require('stream');

let t = Transform({
    transform(chunk, encoding, cb) {
        this.push(chunk.toString().toUpperCase());//从可读流拿到数据,转换后写出
        cb();//相当于write()
    }
});
process.stdin.pipe(t).pipe(process.stdout);
2.6 对象流
前面我们使用的例子都是Buffer,传入的参数都是字符串,但是也可以向可读流和可写流放入对象,可读流把readableObjectMode参数设置为true,可写流把writableObjectMode设置为true。
let {Transform} = require('stream');
let fs = require('fs');
let rs = fs.createReadStream('./user.json');
let toJson = Transform({
    readableObjectMode: true,//可以向可读流里放对象
    transform(chunk, encoding, cb) {//作为可读流
        this.push(JSON.parse(chunk.toString()))
    }
});

let outJson = Transform({
    writableObjectMode: true,//可以把对象放到可写流里
    transform(chunk, encoding, cb) {//作为可写流
        console.log(chunk);
    }
});
rs.pipe(toJson).pipe(outJson);
// {name: 'Lucy'}
三 参考文献
个人能力有限,如果文章有理解不正确的地方,欢迎指正。
