

最近我开始学习framework,不想一上来就研究到c/c++层进程启动原理什么的,首先得从四大组件的启动流程入手学习,所以我决定写几篇博文,来记录整个过程的学习心得。
关于Activity的启动流程,我准备分成两个部分来写:app进程篇和system进程篇,作为一个应用层开发者,其实掌握前者已经够用了,第二篇作为提高,毕竟多了解一点也没有坏处,就这样吧。

本文主要基于
android8.1.0_r15代码分支调试分析;
需要掌握的知识:
- Activity生命周期
- AIDL原理
- Handler机制
一、从startActivity到AMS
我们都知道,打开一个新的Activity需要调用startActivity方法,该方法定义在Context中的,并且在Activity中做了重写,如果是在Service中开启一个Activity呢,Service的实现来自Context,先分析在Context中的实现。
1.1 在ContextImpl中startActivity实现;
ContextImpl#startActivity
@Override
public void startActivity(Intent intent) {
    warnIfCallingFromSystemProcess();
    startActivity(intent, null);
}

@Override
public void startActivity(Intent intent, Bundle options) {
    warnIfCallingFromSystemProcess();
    if ((intent.getFlags()&Intent.FLAG_ACTIVITY_NEW_TASK) == 0
            && options != null && ActivityOptions.fromBundle(options).getLaunchTaskId() == -1) {
        throw new AndroidRuntimeException(
                "Calling startActivity() from outside of an Activity "
                + " context requires the FLAG_ACTIVITY_NEW_TASK flag."
                + " Is this really what you want?");
    }
    //真正的调用在这里
    mMainThread.getInstrumentation().execStartActivity(
            getOuterContext(), mMainThread.getApplicationThread(), null,
            (Activity) null, intent, -1, options);
}
顺手看一眼Activity中是怎样实现的(fk,你到底眼看的还是手看的);
1.2 Activity中是startActivity实现
Activity#startActivity
@Override
public void startActivity(Intent intent) {
    this.startActivity(intent, null);
}

@Override
public void startActivity(Intent intent, @Nullable Bundle options) {
    if (options != null) {
        startActivityForResult(intent, -1, options);
    } else {
        startActivityForResult(intent, -1);
    }
}

public void startActivityForResult(@RequiresPermission Intent intent, int requestCode,
        @Nullable Bundle options) {
    if (mParent == null) {
        options = transferSpringboardActivityOptions(options);
        //真正的调用在这里
        Instrumentation.ActivityResult ar =
            mInstrumentation.execStartActivity(
                this, mMainThread.getApplicationThread(), mToken, this,
                intent, requestCode, options);
        if (ar != null) {
            mMainThread.sendActivityResult(
                mToken, mEmbeddedID, requestCode, ar.getResultCode(),
                ar.getResultData());
        }
        if (requestCode >= 0) {
            mStartedActivity = true;
        }
        cancelInputsAndStartExitTransition(options);
    } else {
        if (options != null) {
            mParent.startActivityFromChild(this, intent, requestCode, options);
        } else {
            mParent.startActivityFromChild(this, intent, requestCode);
        }
    }
}
比较Activity和ContextImpl的区别:
最终都是调用Instrumentation.execStartActivity(Context, IBinder, IBinder, Activity, Intent, int, Bundle)方法,然后就是ContextImpl下有几个参数传null。
此外,Context还定义startActivityAsUser方法,该方法对应用层是隐藏的,最终也调用Instrumentation.execStartActivity另一个重载方法,暂不追踪另一个方法。那我们继续跟进Instrumentation代码。
1.3 Instrumentation中execStartActivity
注意:Instrumentation下,execStartActivity有几个重载方法,我们这里只分析有七个参数,且第四个参数为Activity类型的execStartActivity方法。
Instrumentation#execStartActivity
public ActivityResult execStartActivity(
       Context who, IBinder contextThread, IBinder token, Activity target,
       Intent intent, int requestCode, Bundle options) {
   IApplicationThread whoThread = (IApplicationThread) contextThread;
   Uri referrer = target != null ? target.onProvideReferrer() : null;
   if (referrer != null) {
       intent.putExtra(Intent.EXTRA_REFERRER, referrer);
   }
   if (mActivityMonitors != null) {
       synchronized (mSync) {
           final int N = mActivityMonitors.size();
           for (int i=0; i<N; i++) {
               final ActivityMonitor am = mActivityMonitors.get(i);
               ActivityResult result = null;
               if (am.ignoreMatchingSpecificIntents()) {
                   result = am.onStartActivity(intent);
               }
               if (result != null) {
                   am.mHits++;
                   return result;
               } else if (am.match(who, null, intent)) {
                   am.mHits++;
                   if (am.isBlocking()) {
                       return requestCode >= 0 ? am.getResult() : null;
                   }
                   break;
               }
           }
       }
   }
   try {
       intent.migrateExtraStreamToClipData();
       intent.prepareToLeaveProcess(who);
       //真正的调用在这里
       int result = ActivityManager.getService()
           .startActivity(whoThread, who.getBasePackageName(), intent,
                   intent.resolveTypeIfNeeded(who.getContentResolver()),
                   token, target != null ? target.mEmbeddedID : null,
                   requestCode, 0, null, options);
       checkStartActivityResult(result, intent);
   } catch (RemoteException e) {
       throw new RuntimeException("Failure from system", e);
   }
   return null;
}
我们先捋清每个参数的意义
| 参数名 | 参数类型 | 意义 |
|---|---|---|
| who | Context | 上下文对象 |
| contextThread | IBinder | ApplicationThread对象 |
| token | IBinder | 当前Activity的Token,可能为空 |
| target | Activity | 当前Activity,可能为空 |
| intent | Intent | intent |
| requestCode | int | startActivityforResult传的requestCode |
| options | Bundle | 传递的数据 |
这七个参数最不熟悉的就是token和contextThread,这两个是IBinder类型,这个问题先放一放,带着疑问,我们继续往下看ActivityManager.getService()是什么鬼。
1.4 ActivityManager和AMS
ActivityManager#getService
//获取的是一个单例对象
public static IActivityManager getService() {
    return IActivityManagerSingleton.get();
}

private static final Singleton<IActivityManager> IActivityManagerSingleton =
        new Singleton<IActivityManager>() {
            @Override
            protected IActivityManager create() {
                final IBinder b = ServiceManager.getService(Context.ACTIVITY_SERVICE);
                //正在的IActivityManager在这里
                final IActivityManager am = IActivityManager.Stub.asInterface(b);
                return am;
            }
        };
getService()返回是从IActivityManagerSingleton单例对象中得到,真正的操作是IActivityManager.Stub,就这两行代码
final IBinder b = ServiceManager.getService(Context.ACTIVITY_SERVICE);
final IActivityManager am = IActivityManager.Stub.asInterface(b);
Stub这货是AIDL生成的,关于AIDL原理自行学习,我们从AIDL生成的代码里拿到了IActivityManager代理对象,然后再回到Instrumentation.execStartActivity继续看
真正调用的是IActivityManager.startActivity()方法,AIDL应该该有的东西。我们还是分析一下IActivityManager.aidl文件怎样定义该方法的。
frameworks/base/core/java/android/app/IActivityManager.aild
int startActivity(in IApplicationThread caller, in String callingPackage, in Intent intent,
            in String resolvedType, in IBinder resultTo, in String resultWho, int requestCode,
            int flags, in ProfilerInfo profilerInfo, in Bundle options);
这个方法一共十个参数,但是没有注释,我们看看调用端Instrumentation怎么传参的吧。
| 参数名 | 传参值 | 意义 |
|---|---|---|
| caller | whoThread | ApplicationThread对象 |
| callingPackage | who.getBasePackageName() | 应用包名 |
| intent | intent | |
| resolvedType | intent.resolveTypeIfNeeded(who.getContentResolver()) | Return the MIME data type of this intent |
| resultTo | token | 调用者,也就是结果将要返给谁 |
| resultWho | target != null ? target.mEmbeddedID : null | 调用者的另一种标识吧 |
| requestCode | requestCode | |
| flags | 0 | |
| ProfilerInfo | null | |
| Bundle | options |
写的马马虎虎凑合看一下吧,其实很好理解。
那么IActivityManager真正的Stub是谁呢,按照AIDL的惯例,肯定是继承它的IActivityManager.Stub,一番搜索,我们找到了ActivityManagerService这个类。
frameworks/base/service/core/java/com/android/server/am/ActivityManagerService.java
@Override
public final int startActivity(IApplicationThread caller, String callingPackage,
        Intent intent, String resolvedType, IBinder resultTo, String resultWho, int requestCode,
        int startFlags, ProfilerInfo profilerInfo, Bundle bOptions) {
    return startActivityAsUser(caller, callingPackage, intent, resolvedType, resultTo,
            resultWho, requestCode, startFlags, profilerInfo, bOptions,
            UserHandle.getCallingUserId());
}
WMS我们暂时不再往下追踪,因为已经超出这篇文章的提纲了,先记住这个类方法入口,我们下篇将要从这里分析,到这我画一张图,总结一下上面说的这些。
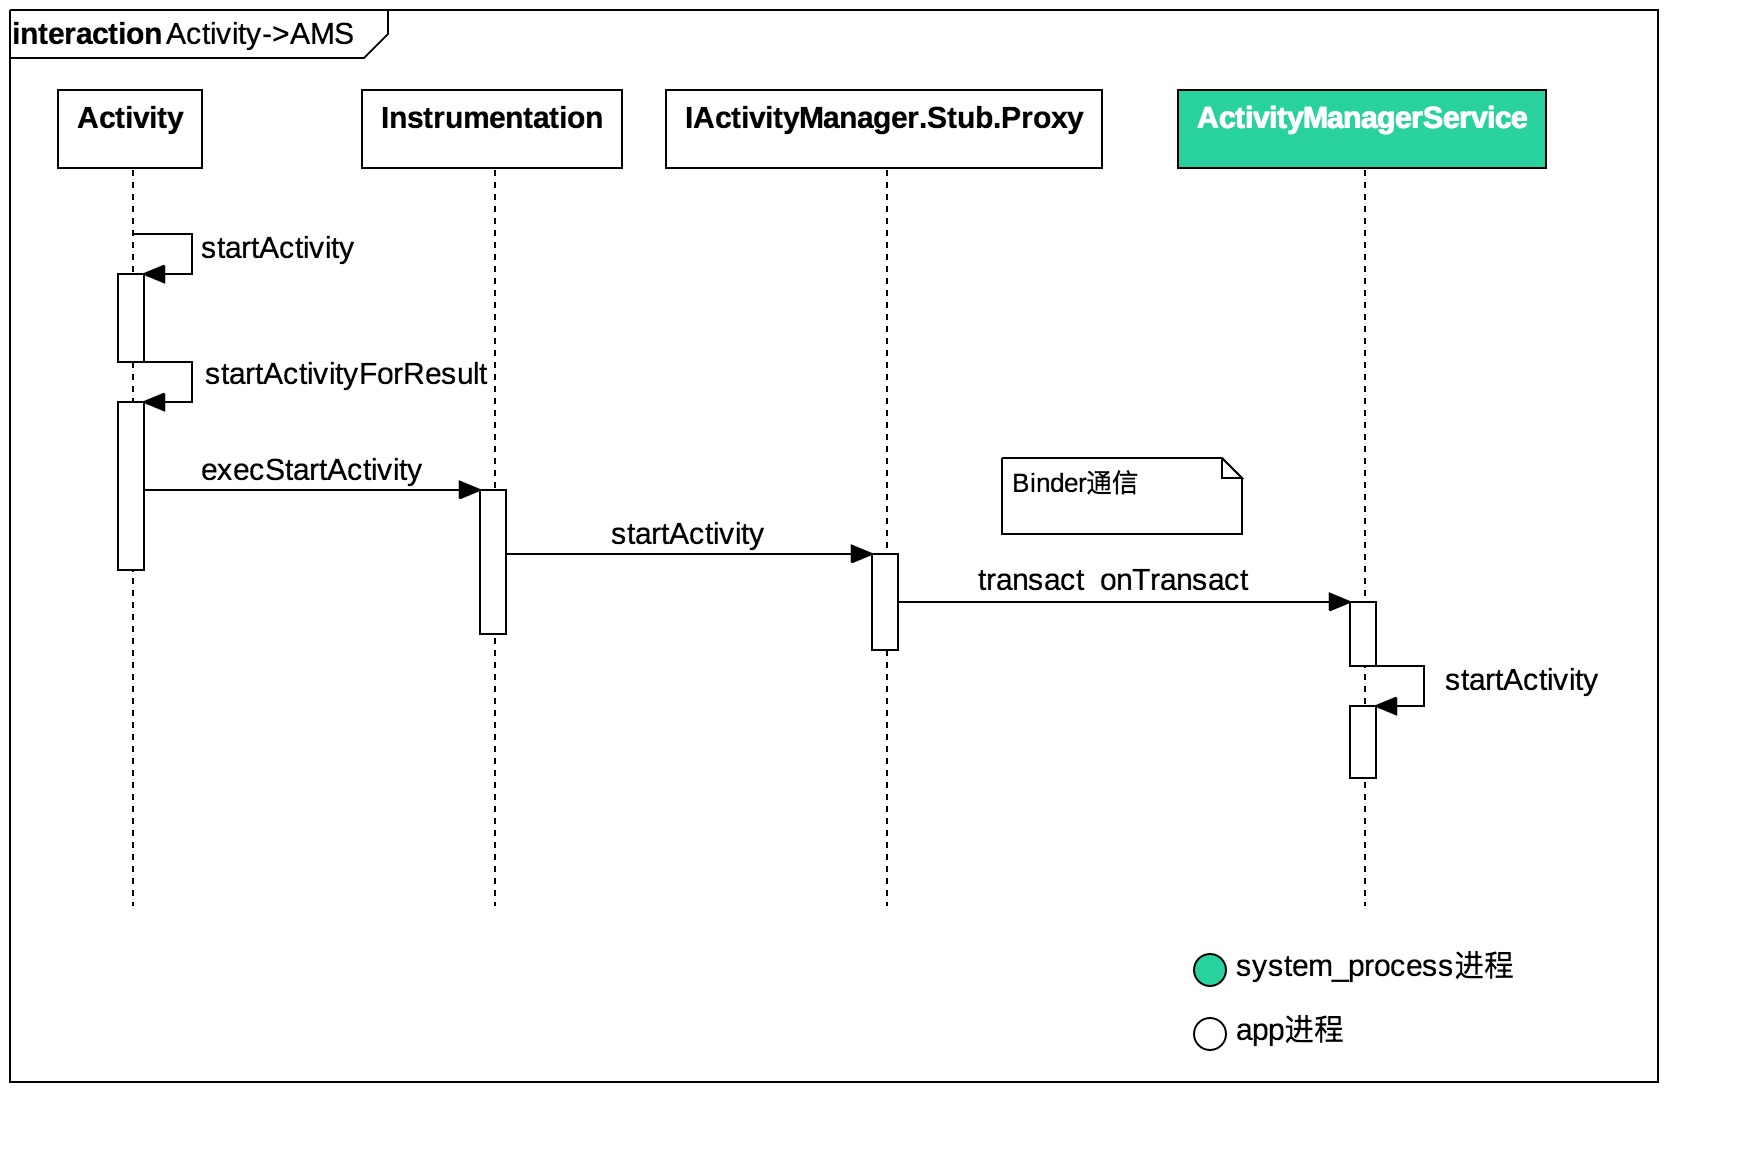
图画的很简单,值得注意的是绿色代表运行在system_process进程,system_process就是AMS所在的进程。
二、ActivityThread分析
上文我们一直提到一个类型IApplicationThread,在Activity和ContextImpl中传值是mMainThread.getApplicationThread(),mMainThread是ActivityThread类型,getApplicationThread得到了ApplicationThread,那我们重点分析ApplicationThread和ActivityThread这两个对象。
2.1 main方法入口
首先,ActivityThread并没有继承Thread,那它就不是线程的子类,那它代表了什么,从官方的注释的来看,他是一个应用进程主线程执行的管理者,负责调度和执行四大组件,着手分析他,我们从main方法入口。
ActivityThread#main
    public static void main(String[] args) {
        Looper.prepareMainLooper();
        ActivityThread thread = new ActivityThread();
        thread.attach(false);
        if (sMainThreadHandler == null) {
            sMainThreadHandler = thread.getHandler();
        }
        if (false) {
            Looper.myLooper().setMessageLogging(new
                    LogPrinter(Log.DEBUG, "ActivityThread"));
        }
        Trace.traceEnd(Trace.TRACE_TAG_ACTIVITY_MANAGER);
        Looper.loop();
    }
精简完代码可以看出,main方法中调用Looper.prepareMainLooperf方法,该方法创建主线程的Looper对象,紧接着创建ActivityThread对象并调用attach方法,attach方法参数system用来区分是否是系统进程,我们先不考虑系统进程
2.2 attach方法
ActivityThread#attach
private void attach(boolean system) {
    sCurrentActivityThread = this;
    mSystemThread = system;
    if (!system) {
        //获取IActivityManager代理对象
        final IActivityManager mgr =ActivityManager.getService();
        try {
            //调用attachApplication方法
            mgr.attachApplication(mAppThread);
        } catch (RemoteException ex) {
            throw ex.rethrowFromSystemServer();
        }
    }
}
上面关于system的和ViewRootImpl相关的代码已经精简掉,可以清楚的看到调用IActivityManager的attachApplication方法,上文已经提到过startActivity方法也是类似,但是巧合的是两个方法都传递了IApplicationThread对象作为第一个参数,上面传递的是mAppThread,那么这个mAppThread和IApplicationManager何种关系?
2.3 ApplicationThread分析
ApplicationThread继承自IApplicationThread.Stub,说到这里大家可能就尬笑了,又是AIDL,先看一下它定义哪些参数,放眼望去大部分是schedule开头的方法
ApplicationThread#scheduleLaunchActivity
@Override
public final void scheduleLaunchActivity(Intenintent, IBinder token, int ident,
        ActivityInfo info, Configuration curConfigConfiguration overrideConfig,
        CompatibilityInfo compatInfo, Strinreferrer, IVoiceInteractor voiceInteractor,
        int procState, Bundle statePersistableBundle persistentState,
        List<ResultInfo> pendingResultsList<ReferrerIntent> pendingNewIntents,
        boolean notResumed, boolean isForwardProfilerInfo profilerInfo) {
    updateProcessState(procState, false);
    ActivityClientRecord r = neActivityClientRecord();
    r.token = token;
    r.ident = ident;
    r.intent = intent;
    r.referrer = referrer;
    r.voiceInteractor = voiceInteractor;
    r.activityInfo = info;
    r.compatInfo = compatInfo;
    r.state = state;
    r.persistentState = persistentState;
    r.pendingResults = pendingResults;
    r.pendingIntents = pendingNewIntents;
    r.startsNotResumed = notResumed;
    r.isForward = isForward;
    r.profilerInfo = profilerInfo;
    r.overrideConfig = overrideConfig;
    updatePendingConfiguration(curConfig);
    sendMessage(H.LAUNCH_ACTIVITY, r);
}
方法太多不粘贴了,但是有个类有必要留意一下,那就是ActivityClientRecord
2.3.1 ActivityClientRecord.token意义:
ActivityClientRecord名字为啥带个client,我认为是为了区别AMS的,ActivityThread相对于AMS就是client;
再顾名思义,这个类是客户端记录Activity信息的,有个关键属性token,token在前文出现过,但是这里出现意义不一样,为啥,因为这个从WMS传递过来的,这是来源,其实在system_process中并不会生成正在的Activity对象,那如何在app端和system_process中共同标识唯一的Activity呢,就是这个token。
再回归到scheduleLaunchActivity方法,最后调用了 sendMessage()方法;追踪该方法,最终调用mH的sendMessage方法
ApplicationThread#sendMessage
private void sendMessage(int what, Object obj, int arg1, int arg2, boolean async) {
    Message msg = Message.obtain();
    msg.what = what;
    msg.obj = obj;
    msg.arg1 = arg1;
    msg.arg2 = arg2;
    if (async) {
    msg.setAsynchronous(true);
    }
    //真正的大佬
    mH.sendMessage(msg);
}
那么mH又是谁,是H,继承自Handler,一个H单字母好风骚,H是干啥的呢,主要进行线程间通信,主要看它的handleMessage方法
2.4 H类
ActivityThread.H
 public static final int LAUNCH_ACTIVITY         = 100;
 public static final int PAUSE_ACTIVITY          = 101;
 public static final int PAUSE_ACTIVITY_FINISHING= 102;
 ...

 public void handleMessage(Message msg) {
     if (DEBUG_MESSAGES) Slog.v(TAG, ">>> handling: " + codeToString(msg.what));
     switch (msg.what) {
         case LAUNCH_ACTIVITY: {
             Trace.traceBegin(Trace.TRACE_TAG_ACTIVITY_MANAGER, "activityStart");
             final ActivityClientRecord r = (ActivityClientRecord) msg.obj;

             r.packageInfo = getPackageInfoNoCheck(
                     r.activityInfo.applicationInfo, r.compatInfo);
             handleLaunchActivity(r, null, "LAUNCH_ACTIVITY");
             Trace.traceEnd(Trace.TRACE_TAG_ACTIVITY_MANAGER);
         } break;
}
代码太长少粘贴为妙,反正是定义一堆常量,然后handleMessage一路的switch case,很有规律的最终调用ActivityThread下名字handleXXX()的方法;
随便进入一个比如handleLaunchActivity方法,下面貌似是创建Activity的代码,对创建Activity的代码就是这里。 既然找到了Activity的创建入口,我们是不是趁着兴奋一路进入handleLaunchActivity看个究竟;说得对,但是我想回过头来捋一下这几个类的关系ActivityThread,H,ApplicationThread,IApplicationThread,IActivityManager;
2.5 ActivityThread & ApplicationThread & ActivityManagerService关系
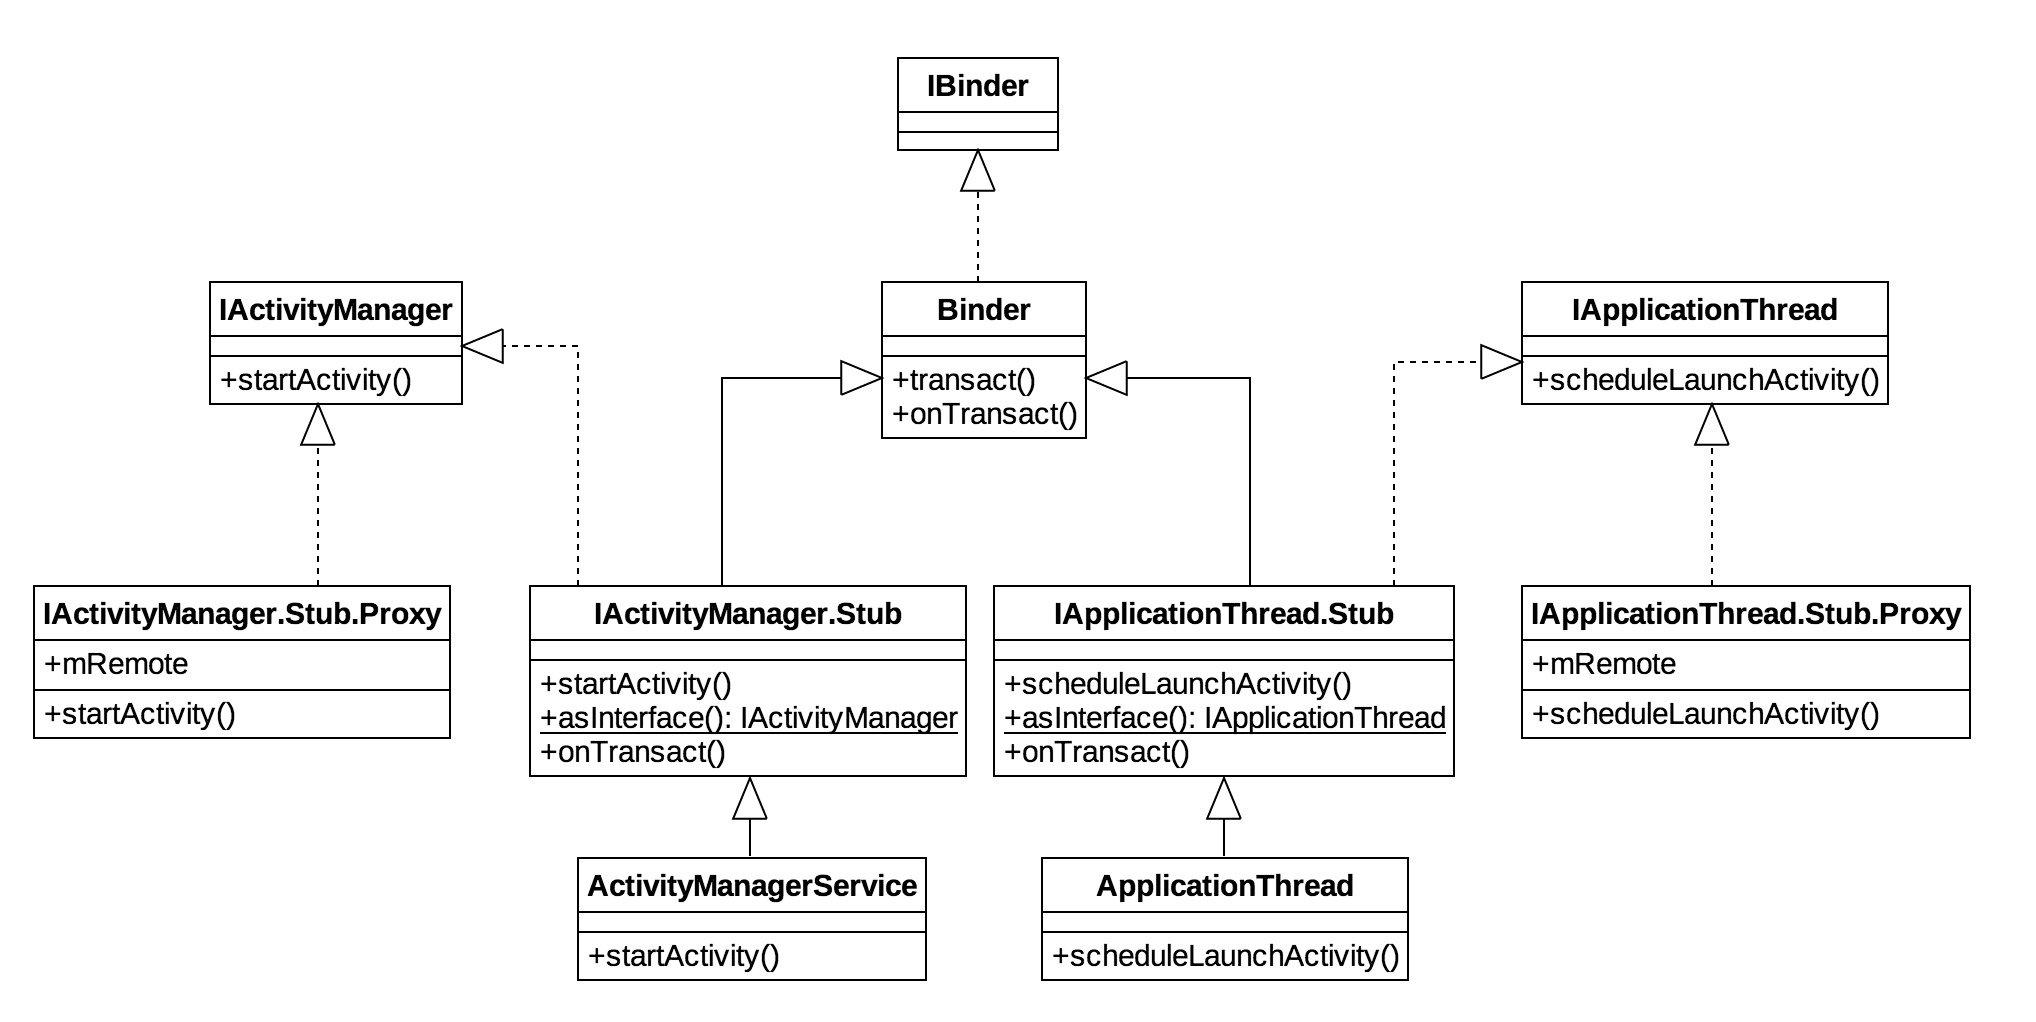
先说ApplicationThread和ActivityManagerService进程间双向通信:
分析这两个之前,必须得了解AIDL的Proxy/Stub模式,Proxy作为客户端的代理对象,Stub作为服务端的存根(真正实现),IActivityManager和IApplicationThread两者实现binder双向通信。
当app进程向system_process进程请求startActivity事,app进程从ActivityManager得到IActivityManager的Proxy对象,system_process进程正真的Stub是ActivityManagerService;
当system_process向app进程答复这个请求时,此时app进程作为服务端,system_process调用IApplicationThread的proxy对象,app进程正真的Stub是ApplicationThread,从而实现了两者的双向通信。
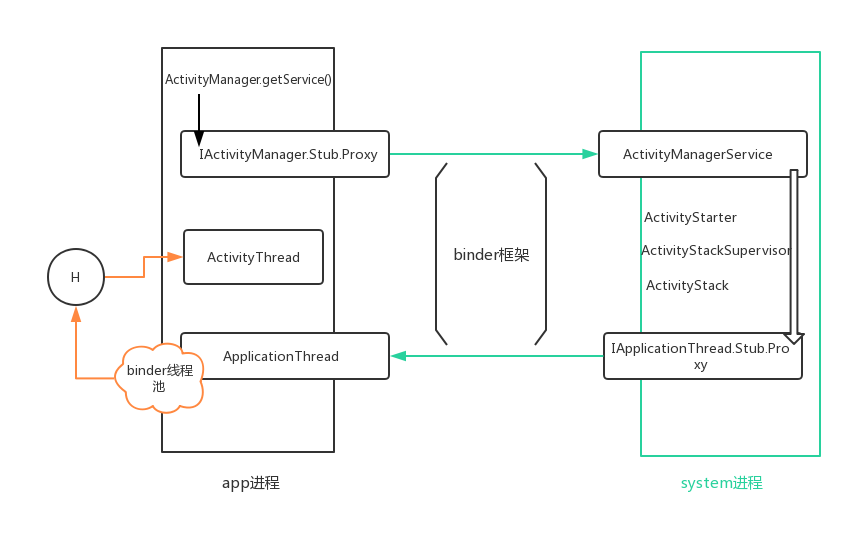
再说ActivityThread和ApplicationThread线程间通信:
为什么说这两个哥们是需要线程通信,上文得知ActivityThread是代码主线程,ApplicationThread代表app进程的IApplicationThread.Stub;
这两者跟线程有什么关系,这就涉及到binder的另一个知识binder线程池,具体不在这里描述,记住一点ApplicationThrea里面的方法都是在binder线程中执行的,所以H这个类应运而生,接管这两者之间的线程通信。呵呵我有图。
三、Activity从创建到显示经历了什么
接前文所讲,我们继续从handleLaunchActivity方法分析,探究Activity的创建和启动。
3.1 分析handleLaunchActivity()
ActivityThread#handleLaunchActivity
private void handleLaunchActivity(ActivityClientRecord r, Intent customIntent, String reason) {
    // If we are getting ready to gc after going to the background, well
    // we are back active so skip it.
    unscheduleGcIdler();
    mSomeActivitiesChanged = true;
    if (r.profilerInfo != null) {
        mProfiler.setProfiler(r.profilerInfo);
        mProfiler.startProfiling();
    }
    // Make sure we are running with the most recent config.
    handleConfigurationChanged(null, null);
    if (localLOGV) Slog.v(
    TAG, "Handling launch of " + r);
    // Initialize before creating the activity
    if (!ThreadedRenderer.sRendererDisabled) {
    GraphicsEnvironment.earlyInitEGL();
    }
    WindowManagerGlobal.initialize();
    //调用performLaunchActivity方法返回Activity对象
    Activity a = performLaunchActivity(r, customIntent);
    if (a != null) {
        r.createdConfig = new Configuration(mConfiguration);
        reportSizeConfigurations(r);
        Bundle oldState = r.state;
        //调用resume方法
        handleResumeActivity(r.token, false, r.isForward,
                !r.activity.mFinished && !r.startsNotResumed, r.lastProcessedSeq, reason);
    if (!r.activity.mFinished && r.startsNotResumed) {
            performPauseActivityIfNeeded(r, reason);
            if (r.isPreHoneycomb()) {
                r.state = oldState;
            }
        }
    } else {
        // If there was an error, for any reason, tell the activity manager to stop us.
        try {
            ActivityManager.getService()
                .finishActivity(r.token, Activity.RESULT_CANCELED, null,
                        Activity.DONT_FINISH_TASK_WITH_ACTIVITY);
        } catch (RemoteException ex) {
            throw ex.rethrowFromSystemServer();
        }
    }
    }
流程解析:
- 真正创建Activity的地方是在
performLaunchActivity方法中 - 如果a不为空,调用
handleResumeActivity执行resume,如果需要,调用performPauseActivityIfNeeded - 如果a为空,通知AMS关闭该Activity
3.2 分析performLaunchActivity()
ActivityThread#performLaunchActivity
private Activity performLaunchActivity(ActivityClientRecord r, Intent customIntent) {
    ActivityInfo aInfo = r.activityInfo;
    if (r.packageInfo == null) {
        r.packageInfo = getPackageInfo(aInfo.applicationInfo, r.compatInfo,
                Context.CONTEXT_INCLUDE_CODE);
    }
    ComponentName component = r.intent.getComponent();
    if (component == null) {
        component = r.intent.resolveActivity(
            mInitialApplication.getPackageManager());
        r.intent.setComponent(component);
    }
    if (r.activityInfo.targetActivity != null) {
        component = new ComponentName(r.activityInfo.packageName,
                r.activityInfo.targetActivity);
    }
    //创建ContextImpl
    ContextImpl appContext = createBaseContextForActivity(r);
    Activity activity = null;
    try {
        //类加载器
        java.lang.ClassLoader cl = appContext.getClassLoader();
        //创建Activity
        activity = mInstrumentation.newActivity(
                cl, component.getClassName(), r.intent);
        StrictMode.incrementExpectedActivityCount(activity.getClass());
        r.intent.setExtrasClassLoader(cl);
        r.intent.prepareToEnterProcess();
        if (r.state != null) {
            r.state.setClassLoader(cl);
        }
    } catch (Exception e) {
        if (!mInstrumentation.onException(activity, e)) {
            throw new RuntimeException(
                "Unable to instantiate activity " + component
                + ": " + e.toString(), e);
        }
    }
    try {
        //得到Application
        Application app = r.packageInfo.makeApplication(false, mInstrumentation);
        if (localLOGV) Slog.v(TAG, "Performing launch of " + r);
        if (localLOGV) Slog.v(
                TAG, r + ": app=" + app
                + ", appName=" + app.getPackageName()
                + ", pkg=" + r.packageInfo.getPackageName()
                + ", comp=" + r.intent.getComponent().toShortString()
                + ", dir=" + r.packageInfo.getAppDir());
        if (activity != null) {
            CharSequence title = r.activityInfo.loadLabel(appContext.getPackageManager());
            Configuration config = new Configuration(mCompatConfiguration);
            if (r.overrideConfig != null) {
                config.updateFrom(r.overrideConfig);
            }
            if (DEBUG_CONFIGURATION) Slog.v(TAG, "Launching activity "
                    + r.activityInfo.name + " with config " + config);
            Window window = null;
            if (r.mPendingRemoveWindow != null && r.mPreserveWindow) {
                window = r.mPendingRemoveWindow;
                r.mPendingRemoveWindow = null;
                r.mPendingRemoveWindowManager = null;
            }
            //ContextImpl和Activity绑定
            appContext.setOuterContext(activity);
            //调用Activity的attath方法
            activity.attach(appContext, this, getInstrumentation(), r.token,
                    r.ident, app, r.intent, r.activityInfo, title, r.parent,
                    r.embeddedID, r.lastNonConfigurationInstances, config,
                    r.referrer, r.voiceInteractor, window, r.configCallback);
            if (customIntent != null) {
                activity.mIntent = customIntent;
            }
            r.lastNonConfigurationInstances = null;
            checkAndBlockForNetworkAccess();
            activity.mStartedActivity = false;
            int theme = r.activityInfo.getThemeResource();
            if (theme != 0) {
                activity.setTheme(theme);
            }
            activity.mCalled = false;
            //调用Instrumentation.callActivityOnCreate()
            if (r.isPersistable()) {
                 mInstrumentation.callActivityOnCreate(activity, r.state, r.persistentState);
            } else {
                mInstrumentation.callActivityOnCreate(activity, r.state);
            }
            if (!activity.mCalled) {
                throw new SuperNotCalledException(
                    "Activity " + r.intent.getComponent().toShortString() +
                    " did not call through to super.onCreate()");
            }
            r.activity = activity;
            r.stopped = true;
            if (!r.activity.mFinished) {
                //调用performStart
                activity.performStart();
                r.stopped = false;
            }
            //条件调用Instrumentation.callActivityOnRestoreInstanceState()
            if (!r.activity.mFinished) {
                if (r.isPersistable()) {
                    if (r.state != null || r.persistentState != null) {
                        mInstrumentation.callActivityOnRestoreInstanceState(activity, r.state,
                                r.persistentState);
                    }
                } else if (r.state != null) {
                    mInstrumentation.callActivityOnRestoreInstanceState(activity, r.state);
                }
            }
            //条件调用Instrumentation.callActivityOnPostCreate()
            if (!r.activity.mFinished) {
                activity.mCalled = false;
                if (r.isPersistable()) {
                    mInstrumentation.callActivityOnPostCreate(activity, r.state,
                            r.persistentState);
                } else {
                    mInstrumentation.callActivityOnPostCreate(activity, r.state);
                }
                if (!activity.mCalled) {
                    throw new SuperNotCalledException(
                        "Activity " + r.intent.getComponent().toShortString() +
                        " did not call through to super.onPostCreate()");
                }
            }
        }
        r.paused = true;
        //讲Activity放到集合中
        mActivities.put(r.token, r);
    } catch (SuperNotCalledException e) {
        throw e;
    } catch (Exception e) {
        if (!mInstrumentation.onException(activity, e)) {
            throw new RuntimeException(
                "Unable to start activity " + component
                + ": " + e.toString(), e);
        }
    }
    return activity;
}
在performLaunchActivity方法中做的工作挺多,我们整理一下关键的流程
- 创建ContextImpl
- 调用mInstrumentation.newActivity()返回Activity对象
- 得到Application对象
- 将Activity关联到ContextImpl
- 调用Activity的attach()方法
- 调用Instrumentation.callActivityOnCreate()
- !mFinished调用activity.performStart();
- !mFinished调用Instrumenation.callActivityOnRestoreInstanceState
- !mFinished调用Instrumentation.callActivityOnPostCreate()
- 把Activity对象加入到集合中 我们逐一分析
3.3 ContextImpl创建
ActivityThread#createBaseContextForActivity
private ContextImpl createBaseContextForActivity(ActivityClientRecord r) {
    final int displayId;
    try {
        displayId = ActivityManager.getService().getActivityDisplayId(r.token);
    } catch (RemoteException e) {
        throw e.rethrowFromSystemServer();
    }
    //创建ContextImpl
    ContextImpl appContext = ContextImpl.createActivityContext(
            this, r.packageInfo, r.activityInfo, r.token, displayId, r.overrideConfig);
    final DisplayManagerGlobal dm = DisplayManagerGlobal.getInstance();
    String pkgName = SystemProperties.get("debug.second-display.pkg");
    if (pkgName != null && !pkgName.isEmpty()
            && r.packageInfo.mPackageName.contains(pkgName)) {
        for (int id : dm.getDisplayIds()) {
            if (id != Display.DEFAULT_DISPLAY) {
                Display display =
                        dm.getCompatibleDisplay(id, appContext.getResources());
                appContext = (ContextImpl) appContext.createDisplayContext(display);
                break;
            }
        }
    }
    return appContext;
}
ContextImpl的真正创建是调用ContextImpl.createActivityContext,接下来又要分析Instrumentation这个家伙了
3.4 再次分析Instrumentation
Instrumentation#newActivity
public Activity newActivity(ClassLoader cl, String className,
        Intent intent)
        throws InstantiationException, IllegalAccessException,
        ClassNotFoundException {
        //反射调用
    return (Activity)cl.loadClass(className).newInstance();
}
Instrumentation#callActivityOnCreate
 public void callActivityOnCreate(Activity activity, Bundle icicle) {
     prePerformCreate(activity);
     activity.performCreate(icicle);
     postPerformCreate(activity);
 }
Instrumentation#callActivityOnRestoreInstanceState
public void callActivityOnRestoreInstanceState(Activity activity, Bundle savedInstanceState) {
    activity.performRestoreInstanceState(savedInstanceState);
}
Instrumentation#callActivityOnPostCreate
public void callActivityOnPostCreate(Activity activity, Bundle icicle) {
    activity.onPostCreate(icicle);
}
Instrumentation大部分起到一个中转作用,真正还是调用了Activity的相关方法,所以最终代码归结到Activity身上。
3.5 分析performResumeActivity()
再回到handleLaunchActivity的第二步调用handleResumeActivity,handleResumeActivity方法会继续调用performResumeActivity
ActivityThread#performResumeActivity
public final ActivityClientRecord performResumeActivity(IBinder token,
        boolean clearHide, String reason) {
    ActivityClientRecord r = mActivities.get(token);
    if (localLOGV) Slog.v(TAG, "Performing resume of " + r
            + " finished=" + r.activity.mFinished);
    if (r != null && !r.activity.mFinished) {
        if (clearHide) {
            r.hideForNow = false;
            r.activity.mStartedActivity = false;
        }
        try {
            r.activity.onStateNotSaved();
            r.activity.mFragments.noteStateNotSaved();
            checkAndBlockForNetworkAccess();
            if (r.pendingIntents != null) {
                deliverNewIntents(r, r.pendingIntents);
                r.pendingIntents = null;
            }
            if (r.pendingResults != null) {
                deliverResults(r, r.pendingResults);
                r.pendingResults = null;
            }
            //调用在这里
            r.activity.performResume();

            synchronized (mResourcesManager) {
                for (int i = mRelaunchingActivities.size() - 1; i >= 0; i--) {
                    final ActivityClientRecord relaunching = mRelaunchingActivities.get(i);
                    if (relaunching.token == r.token
                            && relaunching.onlyLocalRequest && relaunching.startsNotResumed) {
                        relaunching.startsNotResumed = false;
                    }
                }
            }
            EventLog.writeEvent(LOG_AM_ON_RESUME_CALLED, UserHandle.myUserId(),
                    r.activity.getComponentName().getClassName(), reason);
            r.paused = false;
            r.stopped = false;
            r.state = null;
            r.persistentState = null;
        } catch (Exception e) {
            if (!mInstrumentation.onException(r.activity, e)) {
                throw new RuntimeException(
                    "Unable to resume activity "
                    + r.intent.getComponent().toShortString()
                    + ": " + e.toString(), e);
            }
        }
    }
    return r;
}
这里关键点是调用Activity.performResume方法; 继续解析handleResumeActivity()方法
3.6 分析handleResumeActivity()
ActivityTread#handleResumeActivity
final void handleResumeActivity(IBinder token,
        boolean clearHide, boolean isForward, boolean reallyResume, int seq, String reason) {
    ActivityClientRecord r = mActivities.get(token);
    if (!checkAndUpdateLifecycleSeq(seq, r, "resumeActivity")) {
        return;
    }
    // If we are getting ready to gc after going to the background, well
    // we are back active so skip it.
    unscheduleGcIdler();
    mSomeActivitiesChanged = true;
    // TODO Push resumeArgs into the activity for consideration
    //最终会调用activity的performResume()
    r = performResumeActivity(token, clearHide, reason);
    if (r != null) {
        final Activity a = r.activity;
        if (localLOGV) Slog.v(
            TAG, "Resume " + r + " started activity: " +
            a.mStartedActivity + ", hideForNow: " + r.hideForNow
            + ", finished: " + a.mFinished);
        final int forwardBit = isForward ?
                WindowManager.LayoutParams.SOFT_INPUT_IS_FORWARD_NAVIGATION : 0;
        // If the window hasn't yet been added to the window manager,
        // and this guy didn't finish itself or start another activity,
        // then go ahead and add the window.
        boolean willBeVisible = !a.mStartedActivity;
        if (!willBeVisible) {
            try {
                willBeVisible = ActivityManager.getService().willActivityBeVisible(
                        a.getActivityToken());
            } catch (RemoteException e) {
                throw e.rethrowFromSystemServer();
            }
        }
        if (r.window == null && !a.mFinished && willBeVisible) {
            //获取到window
            r.window = r.activity.getWindow();
            //docor设置成INVISIBLE状态
            View decor = r.window.getDecorView();
            decor.setVisibility(View.INVISIBLE);
            ViewManager wm = a.getWindowManager();
            WindowManager.LayoutParams l = r.window.getAttributes();
            a.mDecor = decor;
            l.type = WindowManager.LayoutParams.TYPE_BASE_APPLICATION;
            l.softInputMode |= forwardBit;
            if (r.mPreserveWindow) {
                a.mWindowAdded = true;
                r.mPreserveWindow = false;
                ViewRootImpl impl = decor.getViewRootImpl();
                if (impl != null) {
                    impl.notifyChildRebuilt();
                }
            }
            if (a.mVisibleFromClient) {
                if (!a.mWindowAdded) {
                    a.mWindowAdded = true;
                    //把decorView假如wm
                    wm.addView(decor, l);
                } else {
                    a.onWindowAttributesChanged(l);
                }
            }
        } else if (!willBeVisible) {
            if (localLOGV) Slog.v(
                TAG, "Launch " + r + " mStartedActivity set");
            r.hideForNow = true;
        }
        // Get rid of anything left hanging around.
        cleanUpPendingRemoveWindows(r, false /* force */);
        // The window is now visible if it has been added, we are not
        // simply finishing, and we are not starting another activity.
        if (!r.activity.mFinished && willBeVisible
                && r.activity.mDecor != null && !r.hideForNow) {
            if (r.newConfig != null) {
                performConfigurationChangedForActivity(r, r.newConfig);
                if (DEBUG_CONFIGURATION) Slog.v(TAG, "Resuming activity "
                        + r.activityInfo.name + " with newConfig " + r.activity.mCurrentConfig);
                r.newConfig = null;
            }
            if (localLOGV) Slog.v(TAG, "Resuming " + r + " with isForward="
                    + isForward);
            WindowManager.LayoutParams l = r.window.getAttributes();
            if ((l.softInputMode
                    & WindowManager.LayoutParams.SOFT_INPUT_IS_FORWARD_NAVIGATION)
                    != forwardBit) {
                l.softInputMode = (l.softInputMode
                        & (~WindowManager.LayoutParams.SOFT_INPUT_IS_FORWARD_NAVIGATION))
                        | forwardBit;
                if (r.activity.mVisibleFromClient) {
                    //decorView更新wm
                    ViewManager wm = a.getWindowManager();
                    View decor = r.window.getDecorView();
                    wm.updateViewLayout(decor, l);
                }
            }
            r.activity.mVisibleFromServer = true;
            mNumVisibleActivities++;
            if (r.activity.mVisibleFromClient) {
                r.activity.makeVisible();
            }
        }
        if (!r.onlyLocalRequest) {
            r.nextIdle = mNewActivities;
            mNewActivities = r;
            if (localLOGV) Slog.v(
                TAG, "Scheduling idle handler for " + r);
            Looper.myQueue().addIdleHandler(new Idler());
        }
        r.onlyLocalRequest = false;
        // Tell the activity manager we have resumed.
        if (reallyResume) {
            try {
                //通知AMS这个activity更新了状态
               ActivityManager.getService().activityResumed(token);
            } catch (RemoteException ex) {
                throw ex.rethrowFromSystemServer();
            }
        }
    } else {
        //异常情况,干掉AMS的记录
        try {
            ActivityManager.getService()
                .finishActivity(token, Activity.RESULT_CANCELED, null,
                        Activity.DONT_FINISH_TASK_WITH_ACTIVITY);
        } catch (RemoteException ex) {
            throw ex.rethrowFromSystemServer();
        }
    }
}
3.7 Activity显示和WindowManager继承
activity真正的显示是逻辑是windowManager.add(View,WindowManager.LayoutParams),WindowManager从Activity获取,Activity从Window得到,分析Window代码得到WindowManagerImpl是真正的实现,确定么?
在看WindowManagerImpl代码,我曹真正的实现是WindowManagerGlobal,顺藤摸瓜到WindowManagerGlobal.addView方法,发现WindowManagerGlobal也只是记录记录view的信息,真正处理View的ViewRootImpl对象。
WindowManager.addView追踪: Activity->Window->WindowManagerImpl->WindowManagerGlobal->ViewRootImpl.setView(),END;
3.8 小结
回到主题,总结一下Activity相关方法被调用的顺序 0. 反射构造
- attach()
- performCreate()
- performStart()
- performRestoreInstanceState()
- onPostCreate()
- performResume()
Activity显示关键代码顺序:
- activity.performResume()
- ViewRootImpl.setView() 发问,Activity执行onResume的时候,真是已经展示在屏幕上了吗?
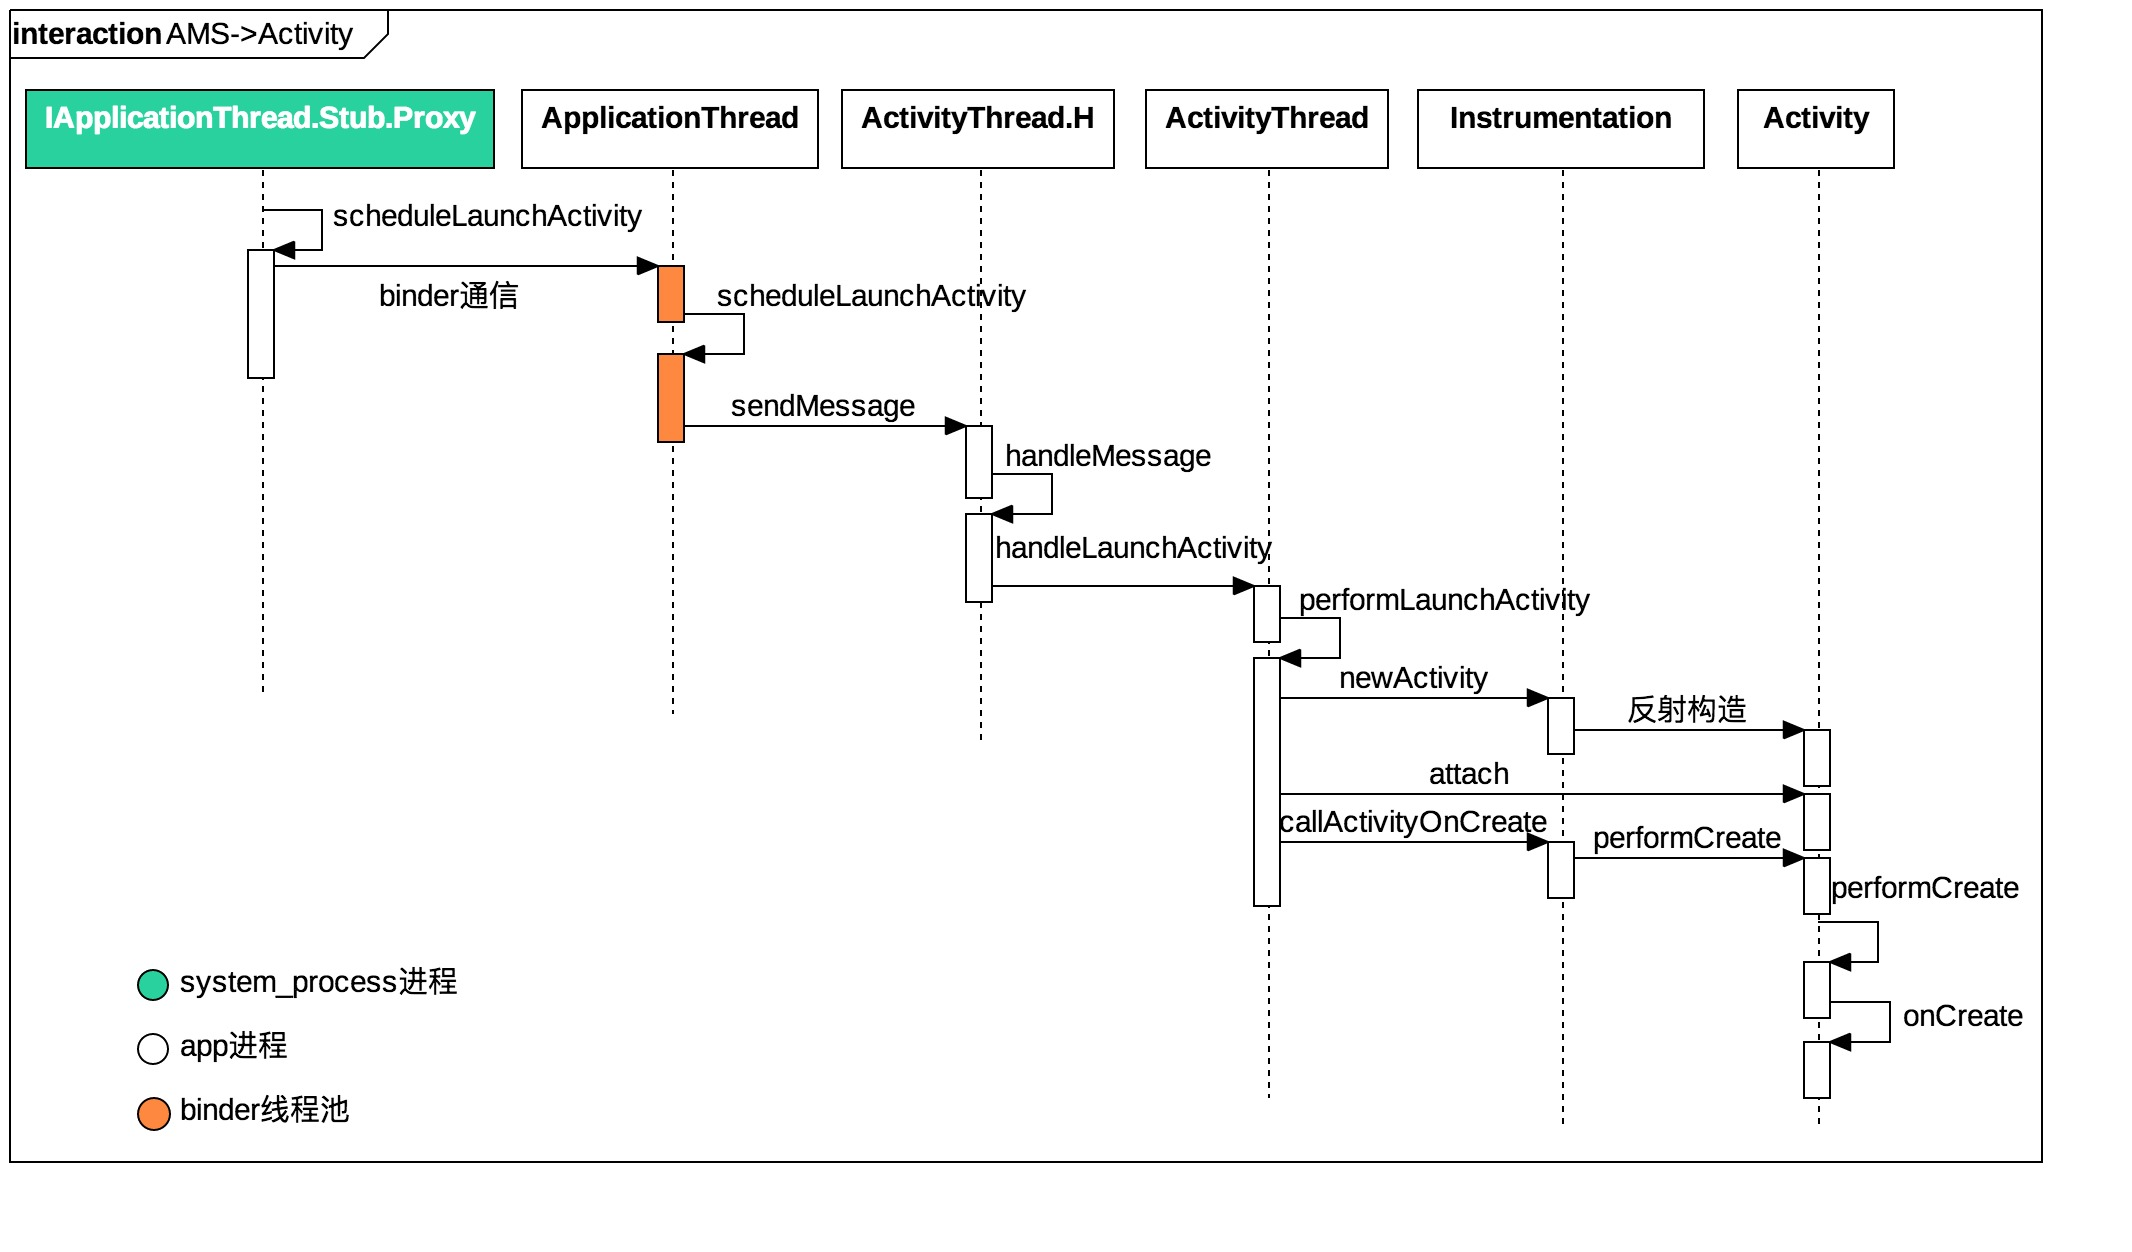
现在我们可以很轻松的得到从AMS到Activity的启动时序图:
总结
洋洋洒洒写了一篇,整体没有多大的深度,是以Activity的启动为主线,记录了在app进程中Activity启动的调用过程,但是没有讲到Activity其他生命周期的相关调用,没有讲到Activity自身调用的流程,算是遗憾吧。
另外:近期想写两篇VirtualApk的源码解析(包括gradle_plugin),到时应该会涉及到更详细更具体的知识点了,加油吧!
