


该文章属于《Android Handler机制之》系列文章,如果想了解更多,请点击 《Android Handler机制之总目录》
前言
上篇文章,我们讲了ThreadLocal,了解了线程本地变量的实质,如果有小伙伴还是不熟悉ThreadLocal原理的,请参看上篇文章《 Android Handler机制之ThreadLocal》。如果你已经阅读 了该文章,那现在我们就一起来了解Handler与MessageQueue与Looper三者之间的关系及其内部原理。
Handler、MessageQueue、Looper三者之间的关系
在了解其三者关系之前,我先给大家一个全局的关系图,接下来的文章会根据该关系图,进行相应的补充与描述。

从上图中我们可以看出几点
- Handler的创建是与Looper创建的线程是相同的。
- Looper中内部维护了一个MessageQueue(也就是消息队列)。且该队列是通过链表的形式实现的。
- Hanlder最终通过sendMessage方法将消息发送到Looper中对应的MessageQueue中。
- Looper通过消息循环获取消息后,会调用对应的消息中的target(target对应的是发消息的Handler)的dispatchMessage()方法来处理消息。
Looper原理
因为消息队列(MessageQueue的创建是在Looper中内部创建的,同时Handler消息的发送与处理都是围绕着Looper来进行的,所以我们首先来讲Looper。
Looper是如何与主线程关联的
在平时开发中,我们使用Handler主要是为了在主线程中去更新UI,那么Looper是如何与主线程进行关联的呢?在Android中,App进程是由Zygote fork 而创建的,而我们的ActivityThread就是运行在该进程下的主线程中,那么在ActivityThread的main方法中,Looper会通过prepareMainLooper()来创建内部的消息队列(MessageQueue),同时会通过loop()构建消息循环。具体代码如下图所示:
   public static void main(String[] args) {
		...省略部分代码
        Looper.prepareMainLooper();//

        ActivityThread thread = new ActivityThread();
        thread.attach(false);

        if (sMainThreadHandler == null) {
            sMainThreadHandler = thread.getHandler();
        }
        if (false) {
            Looper.myLooper().setMessageLogging(new
                    LogPrinter(Log.DEBUG, "ActivityThread"));
        }
        // End of event ActivityThreadMain.
        Trace.traceEnd(Trace.TRACE_TAG_ACTIVITY_MANAGER);
        Looper.loop();

        throw new RuntimeException("Main thread loop unexpectedly exited");
    }
要了解当前Loooper如何与主线程进行关联的,需要继续查看prepareMainLooper()方法。下述代码中,为了大家方便,我将prepareMainLooper()方法所涉及到的方法全部罗列了出来。
   //创建主线程Looper对象
   public static void prepareMainLooper() {
        prepare(false);
        synchronized (Looper.class) {
            if (sMainLooper != null) {
                throw new IllegalStateException("The main Looper has already been prepared.");
            }
            sMainLooper = myLooper();
        }
    }

  //Looper与当前主线程绑定
  private static void prepare(boolean quitAllowed) {
        if (sThreadLocal.get() != null) {
            throw new RuntimeException("Only one Looper may be created per thread");
        }
        sThreadLocal.set(new Looper(quitAllowed));//创建Looper对象,放入主线程局部变量中
    }

  //获取当前主线程的Looper对象
  public static @Nullable Looper myLooper() {
        return sThreadLocal.get();
   }
观察上诉代码,我们发现,prepareMainLooper方法内部调用prepare()方法(这里我们忽略该方法中的参数 quitAllowed),而prepare内部调用的是ThreadLocal的set()方法。如果你阅读了之前我写的《 Android Handler机制之ThreadLocal》,那么大家应该知道了当前Looper对象已经与主线程关联了(也可以说,当前主线程中保存了当前Looper对象的引用)。
Looper内部创建消息队列
在了解了Looper对象怎么与当前线程关联的后,我们来看看Looper类中的具体方法。之前我们说过,在创建Looper对象的时候,当前Looper对象内部也会创建与之关联的消息队列(MessageQueue)。那么查看Looper对应的构造函数:
    final MessageQueue mQueue;
	//Looper内部会创建MessageQueue对象
    private Looper(boolean quitAllowed) {
        mQueue = new MessageQueue(quitAllowed);
        mThread = Thread.currentThread();
    }
从Looper对象的构造函数中,我们很明显的看出内部创建了MessageQueue对象,也验证了我们之前的说法。
Looper的消息循环
当前Looper对象与主线程关联后,接着会调用Looper对象中的loop()方法来开启消息循环。具体代码如下图所示:
    public static void loop() {
        final Looper me = myLooper();
        if (me == null) {
            throw new RuntimeException("No Looper; Looper.prepare() wasn't called on this thread.");
        }
        final MessageQueue queue = me.mQueue;
		...省略部分代码
        for (;;) {//一直循环去获取消息队列中的消息
            Message msg = queue.next(); //该方法可能堵塞,
            if (msg == null) {
	            //如果没有消息,表示当前消息队列已经退出
                return;
            }

        ...省略部分代码
            try {
             //获取消息后,执行发送消息的handler的dispatchMessage方法。
                msg.target.dispatchMessage(msg);
                end = (slowDispatchThresholdMs == 0) ? 0 : SystemClock.uptimeMillis();
            } finally {
                if (traceTag != 0) {
                    Trace.traceEnd(traceTag);
                }
            }
        ...省略部分代码
            }

            msg.recycleUnchecked();
        }
    }
通过上述代码,我们可以看出,在Looper中的loop()方法中会一直去拿当前消息队列中的消息,如果能取出消息会调用该消息的target去执行dispatchMessage()方法。如果没有消息,就直接退出消息循环。
MessageQueue原理
MessageQueue的next()方法
因为Looper中loop()方法会循环调用MessageQueue中的next方法,接下来带着大家一起查看该方法。代码如下图所示:
 Message next() {
	...省略部分代码
	 for (;;) {
	     synchronized (this) {
	     ...省略部分代码
         if (msg != null) {
           if (now < msg.when) {
                nextPollTimeoutMillis = (int) Math.min(msg.when - now, Integer.MAX_VALUE);
                    } else {
	                    //遍历消息列表,取出消息
                        mBlocked = false;
                        if (prevMsg != null) {
                            prevMsg.next = msg.next;
                        } else {
                            mMessages = msg.next;
                        }
                        msg.next = null;
                        if (DEBUG) Log.v(TAG, "Returning message: " + msg);
                        msg.markInUse();
                        return msg;
                    }
                }
              ...省略部分代码
        }
      }
    }
上述代码中,我省略了很多代码,现在大家不需要关心省略的内容,大家只要关心大的一个方向就够了,关于MessageQueue的next()具体详解,会在下篇文章《Android Handler机制之Message的发送与取出》具体介绍。好了,大家把状态调整过来。
在上文中,我们说过 MessageQueue是以链表的形式来存储消息的,从next()方法中我们能分析出来,next()方法会一直从MessageQueue中去获取消息,直到获取消息后才会退出。
MessageQueue的enqueueMessage()方法
通过上文,我们已经了解Message取消息的流程,现在我们来看看消息队列的加入过程。
boolean enqueueMessage(Message msg, long when) {
	      ...省略部分代码
        synchronized (this) {
          ...省略部分代码
            if (p == null || when == 0 || when < p.when) {
                // New head, wake up the event queue if blocked.
                msg.next = p;
                mMessages = msg;
                needWake = mBlocked;
            } else {
              ...省略部分代码
                //循环遍历消息队列,把当前进入的消息放入合适的位置(比较等待时间)
                for (;;) {
                    prev = p;
                    p = p.next;
                    if (p == null || when < p.when) {
                        break;
                    }
                    if (needWake && p.isAsynchronous()) {
                        needWake = false;
                    }
                }
                //将消息插入合适的位置
                msg.next = p;
                prev.next = msg;
            }

	      ...省略部分代码
        }
        return true;
    }
上诉代码中,我们把重心放在for循环中,在for循环中主要干了 一件事,就是根据当前 meesag.when 的值,来确定当前插入的消息应该放入消息队列的位置。(当前小伙伴肯能会对message.when感到困惑,还是那句话,现阶段我们只用关心主要的流程,具体的方法详解会在下篇文章《Android Handler机制之Message的发送与取出》具体介绍)
Handler的原理
了解了Looper与MessageQueue的原理后,我们大致了解了整个消息处理的关系,现在就剩下发消息与处理消息的流程了。最后一点了,大家坚持看完。
Handler是怎么与Looper进行关联的
在文章最开始的图中,Handler发消息最终会发送到对应的Looper下的MessageQueue中。那么也就是说Handler与Looper之间必然有关联。那么它是怎么与Looper进行关联的呢?查看Handler的构造函数:
  //不带Looper的构造函数
  public Handler() {this(null, false);}
  public Handler(boolean async) {this(null, async);}
  public Handler(Callback callback) {this(callback, false);}
  public Handler(boolean async) {this(null, async);}
  public Handler(Callback callback, boolean async) {
        if (FIND_POTENTIAL_LEAKS) {
            final Class<? extends Handler> klass = getClass();
            if ((klass.isAnonymousClass() || klass.isMemberClass() || klass.isLocalClass()) &&
                    (klass.getModifiers() & Modifier.STATIC) == 0) {
                Log.w(TAG, "The following Handler class should be static or leaks might occur: " +
                    klass.getCanonicalName());
            }
        }
		//Looper.myLooper()内部会调用sThreadLocal.get(),获取线程中保存的looper局部变量
        mLooper = Looper.myLooper();
        if (mLooper == null) {
            throw new RuntimeException(
                "Can't create handler inside thread that has not called Looper.prepare()");
        }
	    //获取当前Looper中的MessageQueue
        mQueue = mLooper.mQueue;
        mCallback = callback;
        mAsynchronous = async;
    }

 //带Looper参数的构造函数
  public Handler(Looper looper) { this(looper, null, false); }
  public Handler(Looper looper, Callback callback) { this(looper, callback, false);}
  public Handler(Looper looper, Callback callback, boolean async) {
        mLooper = looper;
        //获取当前Looper中的MessageQueue
        mQueue = looper.mQueue;
        mCallback = callback;
        mAsynchronous = async;
    }
在Handler的构造函数中,主要分为两种类型的构造函数,一种是带Looper参数的构造函数,一种是不带Looper参数的构造函数。
- 在不带Looper参数的构造函数中,是通过Looper.myLooper()来获取当前Looper对象的(也就是说,Handler获取的Looper对象是与当前实例化当前Handler的线程相关的,那么如果Handler对象是在主线程中创建的,那么获取的就是主线程的Looper,注意前提条件当前线程线程已经通过Looper.prepare()与Looper.loop()构建了循环消息队列,因为只有调用了该方法后,才会将当前Looper对象放入线程的局部变量中)
- 在带Looper参数的构造函数中,Looper对象是通过外部直接传入的。(这里其实给我们提供了一个思路,也就是我们可以构建自己的消息处理循环,具体细节参看类HandlerThread)
Handler怎么将消息发送到MessaageQueue(消息队列)中去
在了解Handler怎么将消息发送到MessageQueue(消息队列),我们先来了解Handler的发消息的系列方法。
//发送及时消息
public final boolean sendMessage(Message msg)
public final boolean sendEmptyMessage(int what)
public final boolean post(Runnable r)

//发送延时消息
public final boolean sendEmptyMessageDelayed(int what, long delayMillis)
public final boolean sendMessageDelayed(Message msg, long delayMillis)
public final boolean postDelayed(Runnable r, long delayMillis)

//发送定时消息
public boolean sendMessageAtTime(Message msg, long uptimeMillis)
public final boolean sendEmptyMessageAtTime(int what, long uptimeMillis)
public final boolean postAtTime(Runnable r, long uptimeMillis)
在Handler发消息的方法中,我们可以总共发消息的种类,分为三种情况,第一种是及时消息,第二种是发送延时消息,第三种是定时消息。其中关于消息怎么在消息队列中排列与处理。具体的方法详解会在下篇文章《Android Handler机制之Message的发送与取出》具体介绍。
通过查看Handler发送消息的几个方法。我们发现内部都调用了MessageQueue的enqueueMessage()方法。
private boolean enqueueMessage(MessageQueue queue, Message msg, long uptimeMillis) {
        msg.target = this;//设置message.target为当前Handler对象
        if (mAsynchronous) {
            msg.setAsynchronous(true);
        }
        return queue.enqueueMessage(msg, uptimeMillis);//获取当前MessageQueue.将消息加入队列中
    }
该方法内部其实很简单,就是获取当前MessageQueue对象,将消息将入消息队列中去了。其中需要大家需要的注意的是这段代码msg.target = this。该代码意思就是当前的消息保存着当前发送消息的Handler对象的应用。该行代码非常重要。因为最后涉及到消息的处理。
Handler怎么处理消息
通过上文的描述,现在我们已经大致了解Handler是怎么将消息加入到消息队列中去了,现在需要关心的是当前消息是怎么被处理的。大家还记的之前我们讲过的Looper原理吧,Looper会调用loop()方法循环的取消息。当取出消息后会调用message.target.dispatchMessage(Message msg)方法。其中message.target从上文我们已经知道了,就是当前发送消息的Handler。那么最终也就会回到Handler中的dispatchMessage()方法。
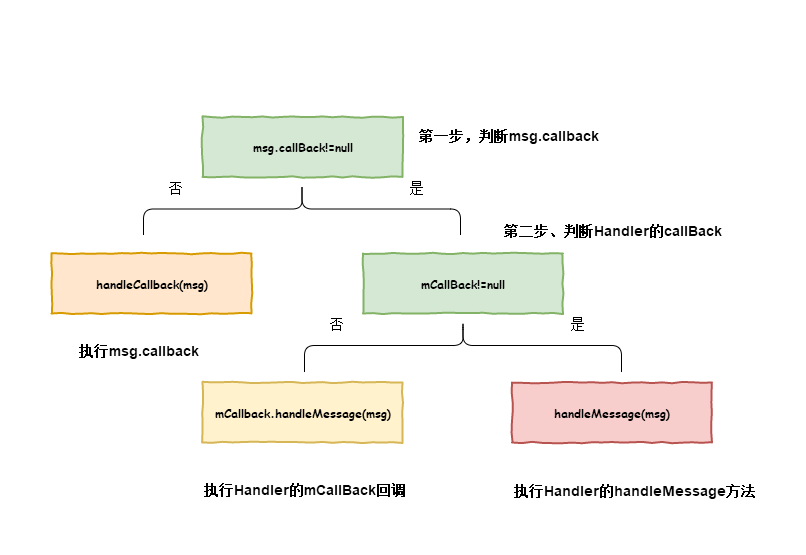
    public void dispatchMessage(Message msg) {
        if (msg.callback != null) {//第一步,判断msg.callback
            handleCallback(msg);
        } else {
            if (mCallback != null) {//第二步、判断Handler的callBack
                if (mCallback.handleMessage(msg)) {
                    return;
                }
            }
            handleMessage(msg);//第三步,执行Handler的handleMessage方法
        }
    }
观察该方法,我们可以得出,Handler中的dispatchMessage()方法主要处理了三个步骤,下面分别对这三个步骤进行讲解
第一步,执行message.callback
在Handler中的dispatchMessage()方法中,我们已经知道如果msg.callback != null,那么我们会直接走handleCallback(msg)方法。在了解该方法之前,首先我们要知道msg.callback对于的类是什么。这里我就直接给大家列出来了。其实msg.callback对应是以下四个方法的Runnable对象。
public final boolean post(Runnable r)
public final boolean postAtTime(Runnable r, long uptimeMillis)
public final boolean postAtTime(Runnable r, Object token, long uptimeMillis)
public final boolean postDelayed(Runnable r, long delayMillis)
以上四个方法在发送Runnable对象时,都会调用getPostMessage(Runnable r) 方法,且该方法都会将Runnable封装在Message对象的callback属性上。具体如下getPostMessage(Runnable r) 方法所示:
  private static Message getPostMessage(Runnable r) {
        Message m = Message.obtain();
        m.callback = r;
        return m;
    }
在了解了Message的callback到底什么过后,我们再来看看handleCallback(Message message)方法
 private static void handleCallback(Message message) {
        message.callback.run();
    }
该方法其实很简单,就是调用相应Runnable的run()方法。
第二步,执行Handler的callBack
如果当前Message.callback为空,接下来会判断Handler中的Callback回调是否为空,如果不为空则执行Callback的handleMessage(Message msg)方法。Callback的具体声明如下:
  //避免创建Handler对象重新HandlerMessage方法,你可以直接传入Callback接口实现
  public interface Callback {
        public boolean handleMessage(Message msg);
    }
其中在Handler的几个构造函数中,可以传入相应Callback接口实现。
public Handler(Callback callback)
public Handler(Looper looper, Callback callback)
public Handler(Callback callback, boolean async)
public Handler(Looper looper, Callback callback, boolean async)
第三步,执行Handler的handleMessage)
如果都不满足上面描述的第一、第二情况时,会最终调用Handler的handleMessage(Message msg)方法。
  //Handler内部该方法是空实现,需要子类具体实现
  public void handleMessage(Message msg) {  }
为了方便大家记忆,我将Handler中的dispatchMessage()具体的逻辑流程画了出来。大家按需观看。
最后
看到最后大家已经发现该篇文章主要着重于将Handler机制的整个流程,对于很多的代码细节并没有过多的描述,特别是关于Looper从MessageQueue(消息队列)中取消息与MessageQueue(消息队列)怎么放入消息的具体细节。不用担心,关于这两个知识点将会在下篇文章《Android Handler机制之Message的发送与取出》具体描述。
