

前言
JS是一门单线程的语言,如果没有异步操作的话,一个很耗时的操作,就可以堵塞整个进程。而出现异步操作之后,就会有数据通信之间的问题,而event loop很好的解决了这个问题。
Event Loop
什么是Event loop?这是我们第一个需要知道的问题。 在html官方标准中是这么介绍的。
To coordinate events, user interaction, scripts, rendering, networking, and so forth, user agents must use event loops as described in this section. There are two kinds of event loops: those for browsing contexts, and those for workers.
为了协调事件,用户交互,脚本运行,页面渲染,网络请求等,用户代理必须使用本节描述event loop。有两种event loop,一种是browsing contexts,另一种是workers.
- browsing contexts:基于浏览器上下文的event loop
- workers:基于Web Worker中的event loop
Event Loop中的两种任务
在标准文档中可以看到两种task,一种就叫task,还有一种叫Microtask。
一、task
An event loop has one or more task queues. A task queue is an ordered list of tasks
规范中指出一个事件循环有一个或者多个任务,任务被有序的排列在队列中。这里我们列举几个典型的任务源:
- DOM操作
- 用户交互(点击事件等操作)
- 网络请求(ajax)
- script代码(脚本任务)
- setTimeout/setInterval
- I/O(node中)
- setImmediate(nodejs中)
二、microtask
Each event loop has a microtask queue. A microtask is a task that is originally to be queued on the microtask queue rather than a task queue. There are two kinds of microtasks: solitary callback microtasks, and compound microtasks.
规范中也指出,每一个event loop只有一个微任务队列,微任务通常只排列在微任务队列上,而不是任务队列。这里有两种微任务:回调微任务和复合微任务。举几个典型的微任务:
- promise
- promise的回调(catch和then)
- process.nextTick(node中)
- MutationObserver(新特性,自己没用过)
三、event loop运行机制
在写这个之前,先写几条总结出来的规律:
- 执行顺序:task > microtask
- task一次只执行一个
- microtask队列清空之后才会执行下一个task
用伪代码表示为:
一个任务,清空微任务栈,一个任务,清空微任务栈,...
关于整个运行过程,可以参见规范第8章
四、example
// 简称set1
setTimeout(()=>{
    console.log('timer1')

    Promise.resolve().then(function() {
        console.log('promise1')
    })
}, 0)
// 简称set2
setTimeout(()=>{
    console.log('timer2')

    Promise.resolve().then(function() {
        console.log('promise2')
    })
    // 简称set3
    setTimeout(() => {
    	console.log('timer3')
    }, 0)
}, 0)

Promise.resolve().then(function() {
    console.log('promise3')
})

console.log('start')
- 运行的过程
-
循环一
1、将脚本任务放入到task队列。
2、从task中取出一个任务运行,运行的结果是将set1和set2放入到task中,将promise.then放入到microtask中,输出start。
3、检查microtask checkpoint,看microtask队列中是否有任务。
4、运行microtask中所有的任务,输出promise3。
5、清空microtask队列之后,进入下一个循环。
-
循环二
1、从task中在取出一个set1任务,运行的结果是输出timer1,将promise.then放入到microtask队列中。
2、检查microtask checkpoint,看microtask队列中是否有任务。
3、运行microtask中所有的任务,输出promise1。
4、清空microtask队列之后,进入下一个循环。
-
循环三
1、从task中在取出一个set2任务,运行的结果是输出timer2,将promise.then放入到microtask队列中,将set3放入到task队列中。
2、检查microtask checkpoint,看microtask队列中是否有任务。
3、运行microtask中所有的任务,输出promise2。
4、清空microtask队列之后,进入下一个循环。
-
循环四
1、从task中在取出一个set3任务,运行的结果是输出timer3
2、检查microtask checkpoint,看microtask队列中没有任务,进入下一个循环。
-
循环五
检测task队列和microtask队列都为空,WorkerGlobalScope对象中closing标志位为true,销毁event loop。
-
- 输出的结果
start
promise3
timer1
promise1
timer2
promise2
timer3
node中的Event Loop
我们先来看一下node的架构。
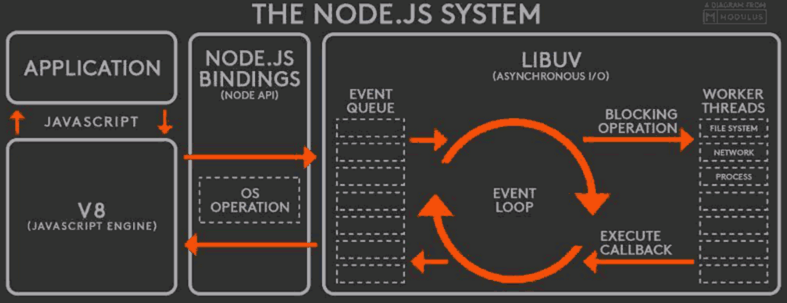
node的异步是通过底层的libuv来实现的。
一、libuv是什么
libuv enforces an asynchronous, event-driven style of programming. Its core job is to provide an event loop and callback based notifications of I/O and other activities. libuv offers core utilities like timers, non-blocking networking support, asynchronous file system access, child processes and more.
libuv使用异步和事件驱动的编程风格。它的核心工作是提供一个event-loop,还有基于I/O和其它事件通知的回调函数。libuv还提供了一些核心工具,例如定时器,非阻塞的网络支持,异步文件系统访问,子进程等。
二、libuv中的event loop
在node的官方doc中,将El分成了六个阶段,我们可以看一下下面的图:
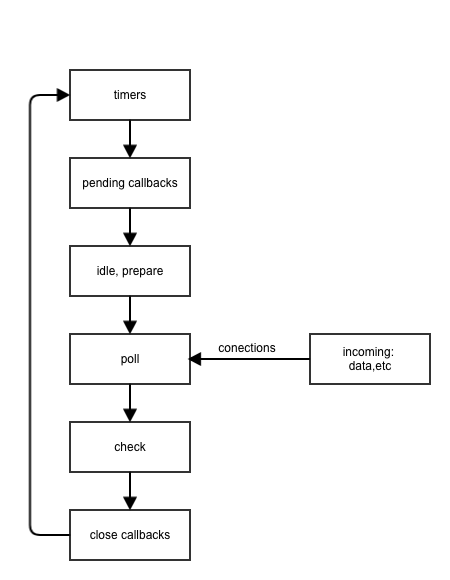
当node开始运行的时候,它会初始化一个event loop,而每个event loop都包含以下六个阶段:
- timers:这个阶段执行setTimeout和setInterval的回调。
- pending callbacks:执行被推迟到下一个iteration的 I/O 回调。
- idle,prepare:仅供内部使用。
- poll:这个过程比较复杂,留到下面讲。
- check:执行setimmediation()回调函数。
- close callback:一些close回调,比如socket.on('close', ...)。
每一个阶段都有一个回调的FIFO队列,当EL运行到一个指定阶段的时候,node将会执行这个队列,当队列中所有的回调都执行完或者执行的回调数上限的时候,EL会跳到下一个阶段。以上所有阶段不包含process.nextTick()。
整个的EL运行过程源码注释版:
//deps/uv/src/unix/core.c
int uv_run(uv_loop_t *loop, uv_run_mode mode) {
	int timeout;
	int r;
	int ran_pending;
	//uv__loop_alive返回的是event loop中是否还有待处理的handle或者request
	//以及closing_handles是否为NULL,如果均没有,则返回0
	r = uv__loop_alive(loop);
	//更新当前event loop的时间戳,单位是ms
	if (!r)
    	uv__update_time(loop);
	while (r != 0 && loop->stop_flag == 0) {
    	//使用Linux下的高精度Timer hrtime更新loop->time,即event loop的时间戳
    	uv__update_time(loop);
    	//执行判断当前loop->time下有无到期的Timer,显然在同一个loop里面timer拥有最高的优先级
    	uv__run_timers(loop);
    	//判断当前的pending_queue是否有事件待处理,并且一次将&loop->pending_queue中的uv__io_t对应的cb全部拿出来执行
    	ran_pending = uv__run_pending(loop);
    	//实现在loop-watcher.c文件中,一次将&loop->idle_handles中的idle_cd全部执行完毕(如果存在的话)
    	uv__run_idle(loop);
    	//实现在loop-watcher.c文件中,一次将&loop->prepare_handles中的prepare_cb全部执行完毕(如果存在的话)
    	uv__run_prepare(loop);

    	timeout = 0;
    	//如果是UV_RUN_ONCE的模式,并且pending_queue队列为空,或者采用UV_RUN_DEFAULT(在一个loop中处理所有事件),则将timeout参数置为
    	//最近的一个定时器的超时时间,防止在uv_io_poll中阻塞住无法进入超时的timer中
    	if ((mode == UV_RUN_ONCE && !ran_pending) || mode == UV_RUN_DEFAULT)
        	timeout = uv_backend_timeout(loop);
    	//进入I/O处理的函数(重点分析的部分),此处挂载timeout是为了防止在uv_io_poll中陷入阻塞无法执行timers;并且对于mode为
    	//UV_RUN_NOWAIT类型的uv_run执行,timeout为0可以保证其立即跳出uv__io_poll,达到了非阻塞调用的效果
    	uv__io_poll(loop, timeout);
    	//实现在loop-watcher.c文件中,一次将&loop->check_handles中的check_cb全部执行完毕(如果存在的话)
    	uv__run_check(loop);
    	//执行结束时的资源释放,loop->closing_handles指针指向NULL
    	uv__run_closing_handles(loop);

    	if (mode == UV_RUN_ONCE) {
        	//如果是UV_RUN_ONCE模式,继续更新当前event loop的时间戳
        	uv__update_time(loop);
        	//执行timers,判断是否有已经到期的timer
        	uv__run_timers(loop);
    	}
    	r = uv__loop_alive(loop);
    	//在UV_RUN_ONCE和UV_RUN_NOWAIT模式中,跳出当前的循环
    	if (mode == UV_RUN_ONCE || mode == UV_RUN_NOWAIT)
        	break;
		}

	//标记当前的stop_flag为0,表示当前的loop执行完毕
	if (loop->stop_flag != 0)
    	loop->stop_flag = 0;
	//返回r的值
	return r;
}
可以结合上面的六个过程看一下。
三、poll阶段
在进入poll阶段之前,会先对timeout进行处理
      timeout = 0;
    	if ((mode == UV_RUN_ONCE && !ran_pending) || mode == UV_RUN_DEFAULT)
        	timeout = uv_backend_timeout(loop);
    	uv__io_poll(loop, timeout);
timeout作为uv__io_poll的第二个参数,当timeout等于0的时候会跳过poll阶段。
我们可以看一下uv_backend_timeout的源码。
int uv_backend_timeout(const uv_loop_t* loop) {
  if (loop->stop_flag != 0)
    return 0;

  if (!uv__has_active_handles(loop) && !uv__has_active_reqs(loop))
    return 0;

  if (!QUEUE_EMPTY(&loop->idle_handles))
    return 0;

  if (!QUEUE_EMPTY(&loop->pending_queue))
    return 0;

  if (loop->closing_handles)
    return 0;

  return uv__next_timeout(loop);
}
以上五种情况(退出事件循环,没有任何异步任务,idle_handles和pending_queue不为空,循环进入到closing_handles)返回的timeout都为0。
uv__next_timeout源码
int uv__next_timeout(const uv_loop_t* loop) {
  const struct heap_node* heap_node;
  const uv_timer_t* handle;
  uint64_t diff;

  heap_node = heap_min((const struct heap*) &loop->timer_heap);
  if (heap_node == NULL)
    return -1; /* block indefinitely */

  handle = container_of(heap_node, uv_timer_t, heap_node);
  if (handle->timeout <= loop->time)
    return 0;

//这句代码给出了关键性的指导
  diff = handle->timeout - loop->time;

//不能大于最大的INT_MAX
  if (diff > INT_MAX)
    diff = INT_MAX;

  return diff;
}
diff代表的是,距离最近的一个异步回调的时间。最大是32767微秒。然后将diff作为timeout的值,传递给poll阶段。
poll阶段主要有两个功能: 1、计算poll阶段堵塞和轮询还有多长时间。 2、处理poll阶段中的事件。
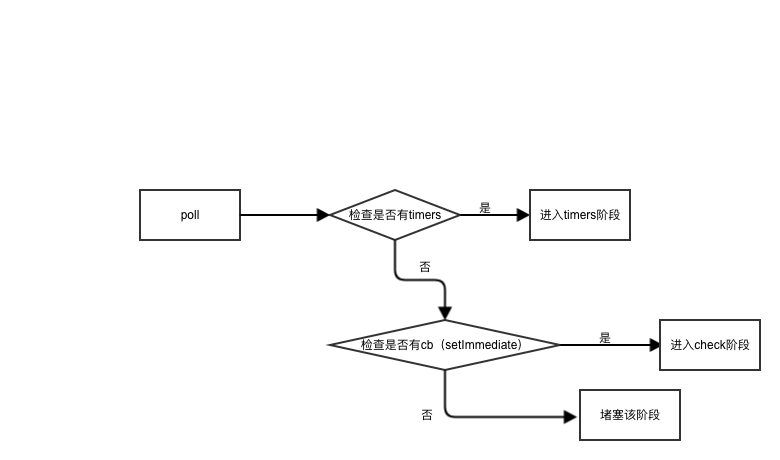
当EL进入到poll阶段的时候,如果代码中没有设定的timers,那么会发生以下两种情况:
-
如果poll队列不是空的,将执行poll阶段里面的cb,直到cb为空,或者执行的cb达到上限。
-
如果poll为空的情况,又会有两种情况发生:
- 如果代码中已经有setImmediate()的回调,那么会进入check阶段,执行check阶段的回调
- 如果代码中没有setImmediate()的回调,那么将会阻塞在这个阶段。
一旦poll阶段是空的,EL会检查是否有到期的timers,如果有一个或者多个已经到达,那么会直接跳到timers阶段执行timers的回调。
用一张图表示:
四、setImmediate() vs setTimeout()
两者的用法是相似的,而setImmediate进入的是check阶段,而setTimeout进入的是timer的阶段。
而在node的docs中举了个例子,如下:
setTimeout(() => {
  console.log('timeout');
}, 0);

setImmediate(() => {
  console.log('immediate');
});
而在多次执行中,两者的触发顺序不一定相同:
$ node timeout_vs_immediate.js
timeout
immediate

$ node timeout_vs_immediate.js
immediate
timeout
而将其放在i/o中执行,两者的顺序是固定的:
const fs = require('fs');

fs.readFile(__filename, () => {
  setTimeout(() => {
    console.log('timeout');
  }, 0);
  setImmediate(() => {
    console.log('immediate');
  });
});
输出的结果:
$ node timeout_vs_immediate.js
immediate
timeout

$ node timeout_vs_immediate.js
immediate
timeout
- 具体原因:
在node中,计时器的时间是精确到毫秒级别的,所以setTimeout(cb, 0) === setTimeout(cb, 1)。 EL初始化是需要耗时的,但是hrtime这个值精确到纳秒级别,所以整个脚本运行会发生以下两种情况:
1、loop准备时间超过1ms,那么loop->time >=1,就会发生
uv_run_timers。 2、loop准备时间小于1ms,那么loop->time<1,uv_run_timers不生效,就会直接到后面的check阶段去。
而如果有fs的情况下,直接走的是uv__io_poll,触发回调之后,直接走check,在走timer阶段。
五、process.nextTick()
process.nextTick()在node中不参与任何阶段,但是每当切换阶段的时候,需要清空process.nextTick()队列中的回调。
看一个例子:
var fs = require('fs');

fs.readFile(__filename, () => {
  setTimeout(() => {
    console.log('setTimeout');
  }, 0);
  setImmediate(() => {
    console.log('setImmediate');
    process.nextTick(()=>{
      console.log('nextTick3');
    })
  });
  process.nextTick(()=>{
    console.log('nextTick1');
  })
  process.nextTick(()=>{
    console.log('nextTick2');
  })
});
输出结果:
nextTick1
nextTick2
setImmediate
nextTick3
setTimeout
整个循环过程: 循环一:
1、进来的时候,直接进入poll阶段,执行回调。
2、挂载setTimeout,挂载setImmediate,将process.nextTick推进nextTick队列中
3、先执行nextTick队列,输出nextTick1和nextTick2。
4、进入check阶段,执行setImmediate回调,输出setImmediate。
5、在执行nextTick队列,输出nextTick3。
循环二:
1、进入timer阶段,有到期的定时器,输出setTimeout。
