


本文将对category的源码进行比较全面的整理分析,最后结合一些面试题进行总结,希望对读者有所裨益。
GitHub Repo:iOSDeepAnalyse
Follow: MisterBooo · GitHub
Source: Category:从底层原理研究到面试题分析
公众号:五分钟学算法
目录
- 1.Category源码分析
- 2.load源码分析
- 3.initialize源码分析
- 4.load与initialize对比
- 5.面试题分析
源码分析
1.源码阅读前的准备
本节代码基于以下的代码进行编译研究:
@interface Person : NSObject
- (void)instanceRun;
+ (void)methodRun;
@property(nonatomic, copy) NSString *name;
@end
@interface Person (Eat)
@property(nonatomic, assign) int age;
- (void)instanceEat;
+ (void)methodEat;
@end
@interface Person (Drink)
- (void)instanceEat;
@property(nonatomic, copy) NSString *waters;
@end
2.objc4中的源码
通过objc4中的源码进行分析,可以在objc-runtime-new.h中找到Category的结构如下
struct category_t {
    const char *name;
    classref_t cls;
    struct method_list_t *instanceMethods;
    struct method_list_t *classMethods;
    struct protocol_list_t *protocols;
    struct property_list_t *instanceProperties;
    // Fields below this point are not always present on disk.
    struct property_list_t *_classProperties;

    method_list_t *methodsForMeta(bool isMeta) {
        if (isMeta) return classMethods;
        else return instanceMethods;
    }

    property_list_t *propertiesForMeta(bool isMeta, struct header_info *hi);
};
不难发现在这个结构体重存储着对象方法、类方法、协议和属性。接下来我们来验证一下我们刚刚自己编写的Person+Eat.m这个分类在编译时是否是这种结构。
通过
xcrun -sdk iphoneos clang -arch arm64 -rewrite-objc Person+Eat.m
命令将Person+Eat.m文件编译成cpp文件,以下的源码分析基于Person+Eat.cpp里面的代码。下面让我们开始窥探Category的底层结构吧~
2.Person+Eat.cpp源码
将Person+Eat.cpp的代码滑到底部部分,可以看见一个名为_category_t的结构体,这就是Category的底层结构
struct _category_t {
	const char *name;
	struct _class_t *cls;
	const struct _method_list_t *instance_methods; // 对象方法列表
	const struct _method_list_t *class_methods;// 类方法列表
	const struct _protocol_list_t *protocols;// 协议列表
	const struct _prop_list_t *properties;// 属性列表
};
Person+Eat.m这个分类的结构也是符合_category_t这种形式的
static struct _category_t _OBJC_$_CATEGORY_Person_$_Eat __attribute__ ((used, section ("__DATA,__objc_const"))) =
{
	"Person",
	0, // &OBJC_CLASS_$_Person,
	(const struct _method_list_t *)&_OBJC_$_CATEGORY_INSTANCE_METHODS_Person_$_Eat, // 对象方法列表
	(const struct _method_list_t *)&_OBJC_$_CATEGORY_CLASS_METHODS_Person_$_Eat,// 类方法列表
	(const struct _protocol_list_t *)&_OBJC_CATEGORY_PROTOCOLS_$_Person_$_Eat, // 协议列表
	(const struct _prop_list_t *)&_OBJC_$_PROP_LIST_Person_$_Eat, // 属性列表
};
我们开始来分析上面这个结构体的内部成员,其中Person表示类名
对象方法列表
_OBJC_$_CATEGORY_INSTANCE_METHODS_Person_$_Eat是对象方法列表,在Person+Eat.cpp文件中可以找到_OBJC_$_CATEGORY_INSTANCE_METHODS_Person_$_Eat具体描述
_OBJC_$_CATEGORY_INSTANCE_METHODS_Person_$_Eat __attribute__ ((used, section ("__DATA,__objc_const"))) = {
	sizeof(_objc_method),
	1,
	{{(struct objc_selector *)"instanceEat", "v16@0:8", (void *)_I_Person_Eat_instanceEat}}
};
instanceEat就是我们上述实现的Person+Eat分类里面的实例方法。
类方法列表
_OBJC_$_CATEGORY_CLASS_METHODS_Person_$_Eat是类方法列表,在Person+Eat.cpp中具体描述如下
 _OBJC_$_CATEGORY_CLASS_METHODS_Person_$_Eat __attribute__ ((used, section ("__DATA,__objc_const"))) = {
	sizeof(_objc_method),
	1,
	{{(struct objc_selector *)"classEat", "v16@0:8", (void *)_C_Person_Eat_classEat}}
};
协议列表
_OBJC_CATEGORY_PROTOCOLS_$_Person_$_Eat是协议列表,在Person+Eat.cpp中具体描述如下
 _OBJC_CATEGORY_PROTOCOLS_$_Person_$_Eat __attribute__ ((used, section ("__DATA,__objc_const"))) = {
	2,
	&_OBJC_PROTOCOL_NSCopying,
	&_OBJC_PROTOCOL_NSCoding
};
属性列表
_OBJC_$_PROP_LIST_Person_$_Eat是属性列表,在Person+Eat.cpp中具体描述如下
_OBJC_$_PROP_LIST_Person_$_Eat __attribute__ ((used, section ("__DATA,__objc_const"))) = {
	sizeof(_prop_t),
	2,
	{{"weight","Ti,N"},
	{"height","Ti,N"}}
};
3.Category的加载处理过程
通过上面的分析,我们验证了编写一个分类的时候,在编译期间,这个分类内部的确会有category_t这种数据结构,那么这种数据结构是如何作用到这个类的呢?分类的方法和类的方法调用的逻辑是怎么样的呢?我们接下来回到objc4源码中进一步分析Category的加载处理过程来揭晓Category的神秘面纱。
我们按照如下函数的调用顺序,一步一步的研究Category的加载处理过程
void _objc_init(void);
└── void map_images(...);
    └── void map_images_nolock(...);
        └── void _read_images(...);
            └── void _read_images(...);
                └── static void remethodizeClass(Class cls);
                    └──attachCategories(Class cls, category_list *cats, bool flush_caches);
| 文件名 | 方法 |
|---|---|
| objc-os.mm | _objc_init |
| objc-os.mm | map_images |
| objc-os.mm | map_images_nolock |
| objc-runtime-new.mm | _read_images |
| objc-runtime-new.mm | remethodizeClass |
| objc-runtime-new.mm | attachCategories |
| objc-runtime-new.mm | attachLists |
在iOS 程序 main 函数之前发生了什么
中提到,_objc_init这个函数是runtime的初始化函数,那我们从_objc_init这个函数开始进行分析。
/***********************************************************************
* _objc_init
* Bootstrap initialization. Registers our image notifier with dyld.
* Called by libSystem BEFORE library initialization time
**********************************************************************/

void _objc_init(void)
{
    static bool initialized = false;
    if (initialized) return;
    initialized = true;

    // fixme defer initialization until an objc-using image is found?
    environ_init();
    tls_init();
    static_init();
    lock_init();
    exception_init();

    _dyld_objc_notify_register(&map_images, load_images, unmap_image);
}
接着我们来到 &map_images读取资源(images这里代表资源模块),来到map_images_nolock函数中找到_read_images函数,在_read_images函数中我们找到与分类相关的代码
// Discover categories.
    for (EACH_HEADER) {
        category_t **catlist =
            _getObjc2CategoryList(hi, &count);
        bool hasClassProperties = hi->info()->hasCategoryClassProperties();

        for (i = 0; i < count; i++) {
            category_t *cat = catlist[i];
            Class cls = remapClass(cat->cls);

            if (!cls) {
                catlist[i] = nil;
                if (PrintConnecting) {
                    _objc_inform("CLASS: IGNORING category \?\?\?(%s) %p with "
                                 "missing weak-linked target class",
                                 cat->name, cat);
                }
                continue;
            }
            bool classExists = NO;
            if (cat->instanceMethods ||  cat->protocols
                ||  cat->instanceProperties)
            {
                addUnattachedCategoryForClass(cat, cls, hi);
                if (cls->isRealized()) {
                    remethodizeClass(cls);
                    classExists = YES;
                }
                if (PrintConnecting) {
                    _objc_inform("CLASS: found category -%s(%s) %s",
                                 cls->nameForLogging(), cat->name,
                                 classExists ? "on existing class" : "");
                }
            }

            if (cat->classMethods  ||  cat->protocols
                ||  (hasClassProperties && cat->_classProperties))
            {
                addUnattachedCategoryForClass(cat, cls->ISA(), hi);
                if (cls->ISA()->isRealized()) {
                    remethodizeClass(cls->ISA());
                }
                if (PrintConnecting) {
                    _objc_inform("CLASS: found category +%s(%s)",
                                 cls->nameForLogging(), cat->name);
                }
            }
        }
    }
在上面的代码中,主要做了以下的事情
- 1.获取
category列表list - 2.遍历
category list中的每一个category - 3.获取
category的cls,如果没有cls,则跳过(continue)这个继续获取下一个 - 4.如果
cat有实例方法、协议、属性,则调用addUnattachedCategoryForClass,同时如果cls有实现的话,就进一步调用remethodizeClass方法 - 5.如果
cat有类方法、协议,则调用addUnattachedCategoryForClass,同时如果cls的元类有实现的话,就进一步调用remethodizeClass方法
其中4,5两步的区别主要是cls是类对象还是元类对象的区别,我们接下来主要是看在第4步中的addUnattachedCategoryForClass和remethodizeClass方法。
addUnattachedCategoryForClass
static void addUnattachedCategoryForClass(category_t *cat, Class cls,
                                          header_info *catHeader)
{
    runtimeLock.assertWriting();

    // DO NOT use cat->cls! cls may be cat->cls->isa instead
    NXMapTable *cats = unattachedCategories();
    category_list *list;

    list = (category_list *)NXMapGet(cats, cls);
    if (!list) {
        list = (category_list *)
            calloc(sizeof(*list) + sizeof(list->list[0]), 1);
    } else {
        list = (category_list *)
            realloc(list, sizeof(*list) + sizeof(list->list[0]) * (list->count + 1));
    }
    list->list[list->count++] = (locstamped_category_t){cat, catHeader};
    NXMapInsert(cats, cls, list);
}
static NXMapTable *unattachedCategories(void)
{
    runtimeLock.assertWriting();
    //全局对象
    static NXMapTable *category_map = nil;
    if (category_map) return category_map;
    // fixme initial map size
    category_map = NXCreateMapTable(NXPtrValueMapPrototype, 16);
    return category_map;
}
对上面的代码进行解读:
- 1.通过
unattachedCategories()函数生成一个全局对象cats - 2.我们从这个单例对象中查找
cls,获取一个category_list*list列表 - 3.要是没有
list指针。那么我们就生成一个category_list空间。 - 4.要是有
list指针,那么就在该指针的基础上再分配出category_list大小的空间 - 5.在这新分配好的空间,将这个
cat和catHeader写入。 - 6.将数据插入到
cats中,key是cls, 值是list
remethodizeClass
static void remethodizeClass(Class cls)
{
    //分类数组
    category_list *cats;
    bool isMeta;

    runtimeLock.assertWriting();

    isMeta = cls->isMetaClass();

    // Re-methodizing: check for more categories
    if ((cats = unattachedCategoriesForClass(cls, false/*not realizing*/))) {
        if (PrintConnecting) {
            _objc_inform("CLASS: attaching categories to class '%s' %s",
                         cls->nameForLogging(), isMeta ? "(meta)" : "");
        }

        attachCategories(cls, cats, true /*flush caches*/);
        free(cats);
    }
}
在remethodizeClass函数中将通过attachCategories函数我们的分类信息附加到该类中。
attachCategories
//cls = [Person class]
//cats = [category_t(Eat),category_t(Drink)]
static void
attachCategories(Class cls, category_list *cats, bool flush_caches)
{
    if (!cats) return;
    if (PrintReplacedMethods) printReplacements(cls, cats);

    bool isMeta = cls->isMetaClass();

    // 重新分配内存
    method_list_t **mlists = (method_list_t **)
        malloc(cats->count * sizeof(*mlists));
    property_list_t **proplists = (property_list_t **)
        malloc(cats->count * sizeof(*proplists));
    protocol_list_t **protolists = (protocol_list_t **)
        malloc(cats->count * sizeof(*protolists));

    // Count backwards through cats to get newest categories first
    int mcount = 0;
    int propcount = 0;
    int protocount = 0;
    int i = cats->count;
    bool fromBundle = NO;
    while (i--) {
        auto& entry = cats->list[i];

        method_list_t *mlist = entry.cat->methodsForMeta(isMeta);
        if (mlist) {
            mlists[mcount++] = mlist;
            fromBundle |= entry.hi->isBundle();
        }

        property_list_t *proplist =
            entry.cat->propertiesForMeta(isMeta, entry.hi);
        if (proplist) {
            proplists[propcount++] = proplist;
        }

        protocol_list_t *protolist = entry.cat->protocols;
        if (protolist) {
            protolists[protocount++] = protolist;
        }
    }

    auto rw = cls->data();

    prepareMethodLists(cls, mlists, mcount, NO, fromBundle);
    rw->methods.attachLists(mlists, mcount);
    free(mlists);
    if (flush_caches  &&  mcount > 0) flushCaches(cls);

    rw->properties.attachLists(proplists, propcount);
    free(proplists);

    rw->protocols.attachLists(protolists, protocount);
    free(protolists);
}
对上面的代码进行解读(假设cls是类对象,元类对象分析同理):
-
1.根据方法列表、属性列表、协议列表分配内存
-
2.
cats是这种数据结构:[category_t(Eat),category_t(Drink),。。。],遍历cats,然后- 1.获取一个分类里面的所有对象方法,存储在
mlist数组中,然后再将mlist数组添加到二维数组mlists中 - 2.获取一个分类里面的所有协议,存储在
proplist数组中,然后再将proplist数组添加到二维数组proplists中 - 3.获取一个分类里面的所有属性,存储在
protolist数组中,然后再将protolist数组添加到二维数组protolists中
- 1.获取一个分类里面的所有对象方法,存储在
-
3.获取
cls的的bits指针class_rw_t,通过attachLists方法,将mlists附加到类对象方法列表中,将proplists附加到类对象的属性列表中,将protolists附加到类对象的协议列表中
其中mlists的数据结构如下,proplists与protolists同理:
[
	[method_t,method_t],
	[method_t,method_t]
]
attachLists
   void attachLists(List* const * addedLists, uint32_t addedCount) {
        if (addedCount == 0) return;

        if (hasArray()) {
            // many lists -> many lists
            uint32_t oldCount = array()->count;
            uint32_t newCount = oldCount + addedCount;
            setArray((array_t *)realloc(array(), array_t::byteSize(newCount)));
            array()->count = newCount;
            memmove(array()->lists + addedCount, array()->lists,
                    oldCount * sizeof(array()->lists[0]));
            memcpy(array()->lists, addedLists,
                   addedCount * sizeof(array()->lists[0]));
        }
        else if (!list  &&  addedCount == 1) {
            // 0 lists -> 1 list
            list = addedLists[0];
        }
        else {
            // 1 list -> many lists
            List* oldList = list;
            uint32_t oldCount = oldList ? 1 : 0;
            uint32_t newCount = oldCount + addedCount;
            setArray((array_t *)malloc(array_t::byteSize(newCount)));
            array()->count = newCount;
            if (oldList) array()->lists[addedCount] = oldList;
            memcpy(array()->lists, addedLists,
                   addedCount * sizeof(array()->lists[0]));
        }
    }
在attachLists方法主要关注两个变量array()->lists和addedLists
- array()->lists: 类对象原来的方法列表,属性列表,协议列表,比如Person中的那些方法等
- addedLists:传入所有分类的方法列表,属性列表,协议列表,比如Person(Eat)、Person(Drink)中的那些方法等。
上面代码的作用就是通过memmove将原来的类找那个的方法、属性、协议列表分别进行后移,然后通过memcpy将传入的方法、属性、协议列表填充到开始的位置。
我们来总结一下这个过程:
-
通过Runtime加载某个类的所有Category数据
-
把所有Category的方法、属性、协议数据,合并到一个大数组中,后面参与编译的Category数据,会在数组的前面
-
将合并后的分类数据(方法、属性、协议),插入到类原来数据的前面
我们可以用如下的动画来表示一下这个过程(更多动画相关可在公众号内获取)

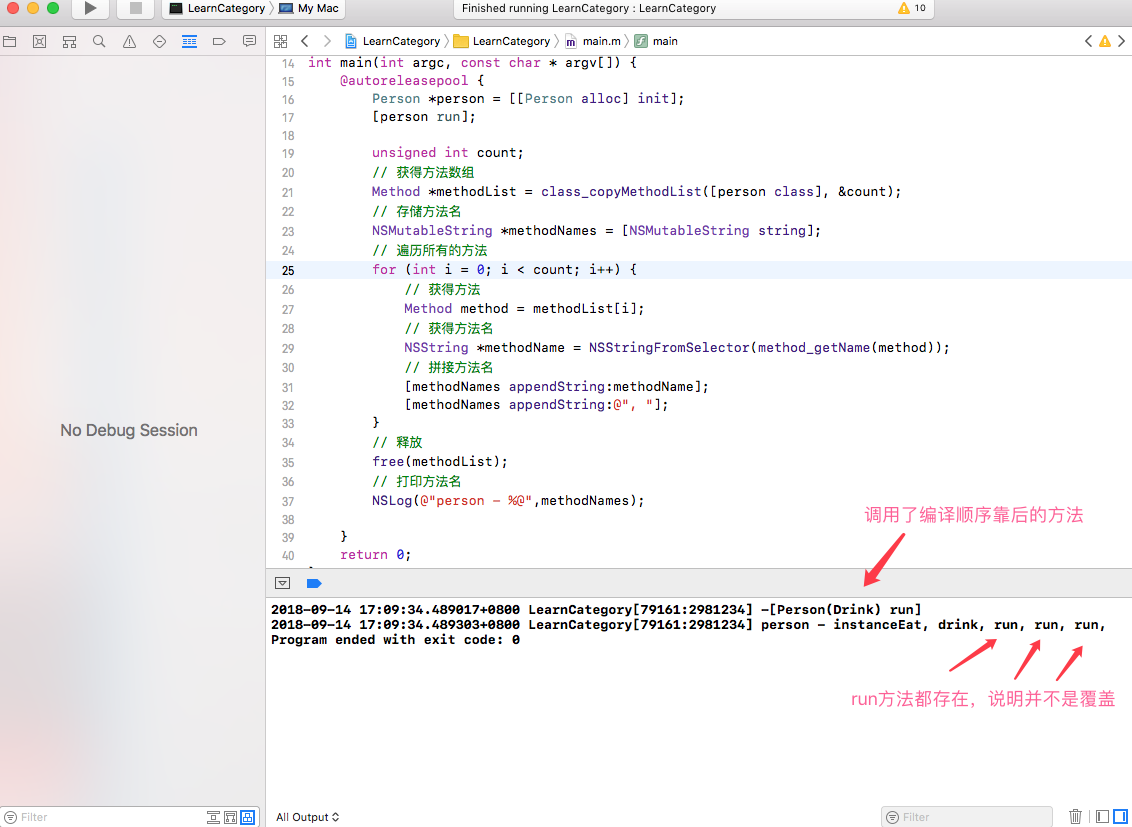
- 1)、category的方法没有“完全替换掉”原来类已经有的方法,也就是说如果category和原来类都有methodA,那么category附加完成之后,类的方法列表里会有两个methodA.
- 2)、category的方法被放到了新方法列表的前面,而原来类的方法被放到了新方法列表的后面,这也就是我们平常所说的category的方法会“覆盖”掉原来类的同名方法,这是因为运行时在查找方法的时候是顺着方法列表的顺序查找的,它只要一找到对应名字的方法,就会罢休^_^,殊不知后面可能还有一样名字的方法。
我们通过代码来验证一下上面两个注意点是否正确
load与initialize
load方法与initialize方法的调用与一般普通方法的调用有所区别,因此笔者将其放在这一节一并分析进行想对比
load源码分析
同样的,我们按照如下函数的调用顺序,一步一步的研究load的加载处理过程
void _objc_init(void);
└── void load_images(...);
    └── void call_load_methods(...);
        └── void call_class_loads(...);
我们直接从load_images方法进行分析
void
load_images(const char *path __unused, const struct mach_header *mh)
{
    // Return without taking locks if there are no +load methods here.
    if (!hasLoadMethods((const headerType *)mh)) return;

    recursive_mutex_locker_t lock(loadMethodLock);

    // Discover load methods
    {
        rwlock_writer_t lock2(runtimeLock);
        prepare_load_methods((const headerType *)mh);
    }

    // Call +load methods (without runtimeLock - re-entrant)
    call_load_methods();
}
在load_images方法中主要关注prepare_load_methods方法与call_load_methods方法
prepare_load_methods
void prepare_load_methods(header_info *hi)
{
    size_t count, i;

    rwlock_assert_writing(&runtimeLock);

    classref_t *classlist =
        _getObjc2NonlazyClassList(hi, &count);
    for (i = 0; i < count; i++) {
        schedule_class_load(remapClass(classlist[i]));
    }

    category_t **categorylist = _getObjc2NonlazyCategoryList(hi, &count);
    for (i = 0; i < count; i++) {
        category_t *cat = categorylist[i];
        Class cls = remapClass(cat->cls);
        if (!cls) continue;  // category for ignored weak-linked class
        realizeClass(cls);
        assert(cls->ISA()->isRealized());
        add_category_to_loadable_list(cat);
    }
}
static void schedule_class_load(Class cls)
{
    if (!cls) return;
    assert(cls->isRealized());  // _read_images should realize

    if (cls->data()->flags & RW_LOADED) return;

    // 确保父类优先的顺序
    schedule_class_load(cls->superclass);

    add_class_to_loadable_list(cls);
    cls->setInfo(RW_LOADED);
}
顾名思义,这个函数的作用就是提前准备好满足 +load 方法调用条件的类和分类,以供接下来的调用。
然后在这个类中调用了schedule_class_load(Class cls)方法,并且在入参时对父类递归的调用了,确保父类优先的顺序。
call_load_methods
经过prepare_load_methods的准备,接下来call_load_methods就开始大显身手了。
void call_load_methods(void)
{
    static BOOL loading = NO;
    BOOL more_categories;

    recursive_mutex_assert_locked(&loadMethodLock);

    // Re-entrant calls do nothing; the outermost call will finish the job.
    if (loading) return;
    loading = YES;

    void *pool = objc_autoreleasePoolPush();

    do {
        // 1. Repeatedly call class +loads until there aren't any more
        while (loadable_classes_used > 0) {
            call_class_loads();
        }

        // 2. Call category +loads ONCE
        more_categories = call_category_loads();

        // 3. Run more +loads if there are classes OR more untried categories
    } while (loadable_classes_used > 0  ||  more_categories);

    objc_autoreleasePoolPop(pool);

    loading = NO;
}
在call_load_methods中我们看do循环这个方法,它调用上一步准备好的类和分类中的 +load 方法,并且确保类优先于分类的顺序。
call_class_loads
call_class_loads是load方法调用的核心方法
static void call_class_loads(void)
{
    int i;

    // Detach current loadable list.
    struct loadable_class *classes = loadable_classes;
    int used = loadable_classes_used;
    loadable_classes = nil;
    loadable_classes_allocated = 0;
    loadable_classes_used = 0;

    // Call all +loads for the detached list.
    for (i = 0; i < used; i++) {
        Class cls = classes[i].cls;
        load_method_t load_method = (load_method_t)classes[i].method;
        if (!cls) continue;

        if (PrintLoading) {
            _objc_inform("LOAD: +[%s load]\n", cls->nameForLogging());
        }
        (*load_method)(cls, SEL_load);
    }

    // Destroy the detached list.
    if (classes) _free_internal(classes);
}
这个函数的作用就是真正负责调用类的 +load 方法了。它从全局变量 loadable_classes 中取出所有可供调用的类,并进行清零操作。
loadable_classes = nil;
loadable_classes_allocated = 0;
loadable_classes_used = 0;
其中 loadable_classes 指向用于保存类信息的内存的首地址,loadable_classes_allocated 标识已分配的内存空间大小,loadable_classes_used 则标识已使用的内存空间大小。
然后,循环调用所有类的 +load 方法。注意,这里是(调用分类的 +load 方法也是如此)直接使用函数内存地址的方式 (*load_method)(cls, SEL_load); 对 +load 方法进行调用的,而不是使用发送消息 objc_msgSend 的方式。
但是如果我们写[Student load]时,这是使用发送消息 objc_msgSend 的方式。
举个🌰:
@interface Person : NSObject
@end
@implementation Person
+ (void)load{
    NSLog(@"%s",__func__);
}
@end
@interface Student : Person
@end
@implementation Student
//+ (void)load{
//    NSLog(@"%s",__func__);
//}
@end
int main(int argc, const char * argv[]) {
    @autoreleasepool {
        [Student load];
    }
    return 0;
}
输出如下:

第一句走的是load的加载方式,而第二句走的是objc_msgSend中消息发送机制,isa指针通过superclass在父类中找到类方法。
小总结:
+load方法会在runtime加载类、分类时调用- 每个类、分类的+load,在程序运行过程中只调用一次
- 调用顺序
1.先调用类的+load
按照编译先后顺序调用(先编译,先调用)
调用子类的+load之前会先调用父类的+load
2.再调用分类的+load
按照编译先后顺序调用(先编译,先调用)
initialize源码分析
同样的,我们按照如下函数的调用顺序,一步一步的研究initialize的加载处理过程
Method class_getInstanceMethod(Class cls, SEL sel);
└── IMP lookUpImpOrNil(Class cls, SEL sel, id inst, bool initialize, bool cache, bool resolver);
    └── IMP lookUpImpOrForward(Class cls, SEL sel, id inst, bool initialize, bool cache, bool resolver);
        └── void _class_initialize(Class cls);
        	  └── void callInitialize(Class cls);
我们直接打开objc-runtime-new.mm文件来研究lookUpImpOrForward这个方法
lookUpImpOrForward
IMP lookUpImpOrForward(Class cls, SEL sel, id inst,
                       bool initialize, bool cache, bool resolver)
{
    ...
        rwlock_unlock_write(&runtimeLock);
    }

    if (initialize  &&  !cls->isInitialized()) {
        _class_initialize (_class_getNonMetaClass(cls, inst));
        // If sel == initialize, _class_initialize will send +initialize and
        // then the messenger will send +initialize again after this
        // procedure finishes. Of course, if this is not being called
        // from the messenger then it won't happen. 2778172
    }

    // The lock is held to make method-lookup + cache-fill atomic
    // with respect to method addition. Otherwise, a category could
    ...
}
initialize && !cls->isInitialized()判断代码表明当一个类需要初始化却没有初始化时,会调用_class_initialize进行初始化。
_class_initialize
void _class_initialize(Class cls)
{
    ...
    Class supercls;
    BOOL reallyInitialize = NO;

    // Make sure super is done initializing BEFORE beginning to initialize cls.
    // See note about deadlock above.
    supercls = cls->superclass;
    if (supercls  &&  !supercls->isInitialized()) {
        _class_initialize(supercls);
    }
 	 ...

 	 callInitialize(cls);

    ...
}
同样的supercls && !supercls->isInitialized()表明对入参的父类进行了递归调用,以确保父类优先于子类初始化。
callInitialize
void callInitialize(Class cls)
{
    ((void(*)(Class, SEL))objc_msgSend)(cls, SEL_initialize);
    asm("");
}
最后在callInitialize中通过发送消息 objc_msgSend 的方式对 +initialize方法进行调用,也就是说+ initialize与一般普通方法的调用处理是一样的。
举个🌰:
@interface Person : NSObject
@end
@implementation Person
+ (void)initialize{
    NSLog(@"%s",__func__);
}
@end
@implementation Person (Eat)
+ (void)initialize{
    NSLog(@"%s",__func__);
}
@end
@interface Student : Person
@end
@implementation Student
+ (void)initialize{
    NSLog(@"%s",__func__);
}
@end
@interface Teacher : Person
@end
@implementation Teacher
@end
int main(int argc, const char * argv[]) {
    @autoreleasepool {
        [Student alloc];
        [Student initialize];
        [Person alloc];
        [Person alloc];
        [Person alloc];
        [Person alloc];
        [Person alloc];
        [Person alloc];
        NSLog(@"****分割线***");
        [Teacher alloc];
        [Teacher initialize];
    }
    return 0;
}
输出如下:

小总结:
+initialize方法会在类第一次接收到消息时调用- 调用顺序
- 先调用父类的+initialize,再调用子类的+initialize
- 先初始化父类,再初始化子类,每个类只会初始化1次
load与initialize对比
| 条件 | +load | +initialize |
|---|---|---|
| 关键方法 | (*load_method)(cls, SEL_load) |
objc_msgSend |
| 调用时机 | 被添加到 runtime 时 | 收到第一条消息前,可能永远不调用 |
| 调用顺序 | 父类->子类->分类 | 父类->子类 |
| 调用次数 | 1次 | 多次 |
| 是否需要显式调用父类实现 | 否 | 否 |
| 是否沿用父类的实现 | 否 | 是 |
| 分类中的实现 | 类和分类都执行 | 覆盖类中的方法,只执行分类的实现 |
面试题
1.Category的使用场合是什么?
-
- 给现有的类添加方法
-
- 将一个类的实现拆分成多个独立的源文件
-
- 声明私有的方法
2.Category和Class Extension的区别是什么?
-
- Class Extension是编译时决议,在编译的时候,它的数据就已经包含在类信息中
-
- Category是运行时决议,在运行时,才会将数据合并到类信息中(可通过上面的动画进行理解
^_^)
- Category是运行时决议,在运行时,才会将数据合并到类信息中(可通过上面的动画进行理解
3.Category的实现原理?
-
- Category编译之后的底层结构是
struct category_t,里面存储着分类的对象方法、类方法、属性、协议信息
- Category编译之后的底层结构是
-
- 在程序运行的时候,runtime会将Category的数据,合并到类信息中(类对象、元类对象中)(依旧可通过上面的动画进行理解
-_-||))
- 在程序运行的时候,runtime会将Category的数据,合并到类信息中(类对象、元类对象中)(依旧可通过上面的动画进行理解
4.一个类的有多个分类方法,分类中都含有与原类同名的方法,请问调用改方法时会调用谁的方法?分类会覆盖原类的方法吗?
不会覆盖!所有分类的方法会在运行时将它们的方法都合并到一个大数组中,后面参与编译的Category数据,会在数组的前面,然后再将该数组合并到类信息中,调用时顺着方法列表的顺序查找。
5.load与initialize的区别
见load与initialize对比章节的表格
6.Category能否添加成员变量?如果可以,如何给Category添加成员变量?
不能直接给Category添加成员变量,但是可以通过关联对象或者全局字典等方式间接实现Category有成员变量的效果
