

除了动态代理,还有哪些方法可以方便的自动帮我们生成类呢?
应该说,除了动态代理,还有注解和字节码注入(主要是asm和aspectj)两种方法可以方便的帮我们自动生成类。 关于字节码注入,我们下一节再说,今天只说注解,尤其是编译期注解,运行时注解因为大量要在运行期用到反射 所以很多人都不用了改用编译期注解了。比方说eventbus这个框架 2.0到3.0 主要就是修改的这个。所以运行时z 注解就留给感兴趣的人自己看看吧,比编译期注解简单多了
编译期注解能帮我们解决什么问题?
假设现在有个需求: 输入商品编码,返回对应的服装品牌并输出他们的价格。 显然这是一个工厂模式就能解决的简单问题。 首先定义一个接口:
package com.longfor.retentiontest;

public interface IClothes {
    void getPrice();
}
然后定义三个服装品牌
package com.longfor.retentiontest;

import android.util.Log;

import com.longfor.annotationprocessorjavalib.Factory;


public class BandNike implements IClothes {

    @Override
    public void getPrice() {
        Log.v("wuyue", "nike price is 500");
    }
}
package com.longfor.retentiontest;

import android.util.Log;

import com.longfor.annotationprocessorjavalib.Factory;

public class BandLevis implements IClothes {
    @Override
    public void getPrice() {
        Log.v("wuyue", "levis price is 5000");
    }
}
package com.longfor.retentiontest;

import android.util.Log;

import com.longfor.annotationprocessorjavalib.Factory;

public class BandGucci implements IClothes {
    @Override
    public void getPrice() {
        Log.v("wuyue", "gucci price is 5000");
    }
}
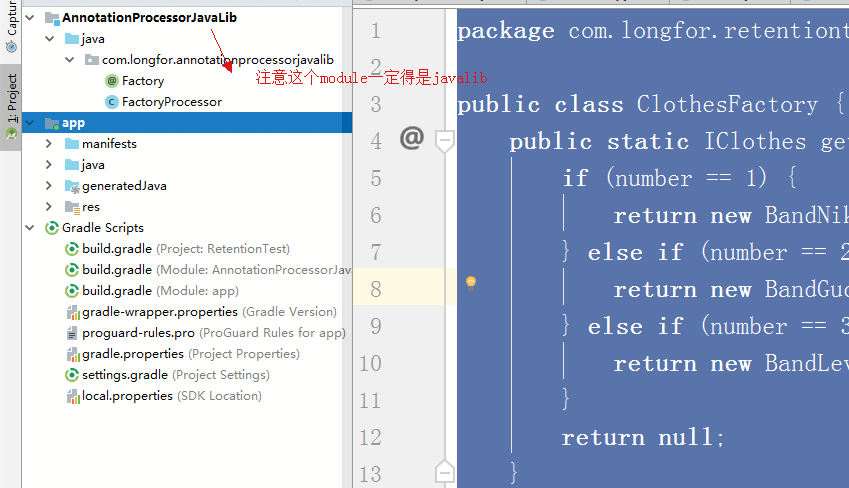
然后一个工厂解决我们所有问题:
package com.longfor.retentiontest;

public class ClothesFactory {
    public static IClothes getBandClothesByNumber(int number) {
        if (number == 1) {
            return new BandNike();
        } else if (number == 2) {
            return new BandGucci();
        } else if (number == 3) {
            return new BandLevis();
        }
        return null;
    }
}
这段代码其实还有优化空间的,比如说这品牌我们暂时只有3个,如果新增到30个 300个 怎么处理?尤其是这个方法要提供 给别的模块使用的时候?不能每新加一个就重新写一遍工厂类 重新打包吧。
所以解决问题的方法就是:用编译期注解的方法 来动态的帮我们生成工厂类,然后新增的品牌只要加上我们的注解就ok。 因为编译期注解生成的工厂类 会根据我们的注解来写好对应的语句。
如何在 androidstudio中 编写编译期注解代码
首先我们new一个java lib
注意他的build文件的写法:
apply plugin: 'java-library'
tasks.withType(JavaCompile) {
    options.encoding = "UTF-8"
}
dependencies {
    implementation fileTree(dir: 'libs', include: ['*.jar'])
    //协助我们生成meta-inf 等信息的
    implementation 'com.google.auto.service:auto-service:1.0-rc2'
    //square公司 协助生成java代码的辅助库
    implementation 'com.squareup:javapoet:1.7.0'

}

sourceCompatibility = "7"
targetCompatibility = "7"
然后看下我们的app的build文件:
apply plugin: 'com.android.application'

android {
    compileSdkVersion 27
    defaultConfig {
        applicationId "com.longfor.retentiontest"
        minSdkVersion 21
        targetSdkVersion 27
        versionCode 1
        versionName "1.0"
        testInstrumentationRunner "android.support.test.runner.AndroidJUnitRunner"
    }
    buildTypes {
        release {
            minifyEnabled false
            proguardFiles getDefaultProguardFile('proguard-android.txt'), 'proguard-rules.pro'
        }
    }
}

dependencies {
    implementation fileTree(dir: 'libs', include: ['*.jar'])
    implementation 'com.android.support:appcompat-v7:27.1.1'
    implementation 'com.android.support.constraint:constraint-layout:1.1.0'
    testImplementation 'junit:junit:4.12'
    androidTestImplementation 'com.android.support.test:runner:1.0.2'
    androidTestImplementation 'com.android.support.test.espresso:espresso-core:3.0.2'
    //主要就是下面的代码
    compile project(":AnnotationProcessorJavaLib")
    //注意不要遗漏这个
    annotationProcessor project(":AnnotationProcessorJavaLib")

}
然后我们可以开始写我们的注解,先看一下基本结构:
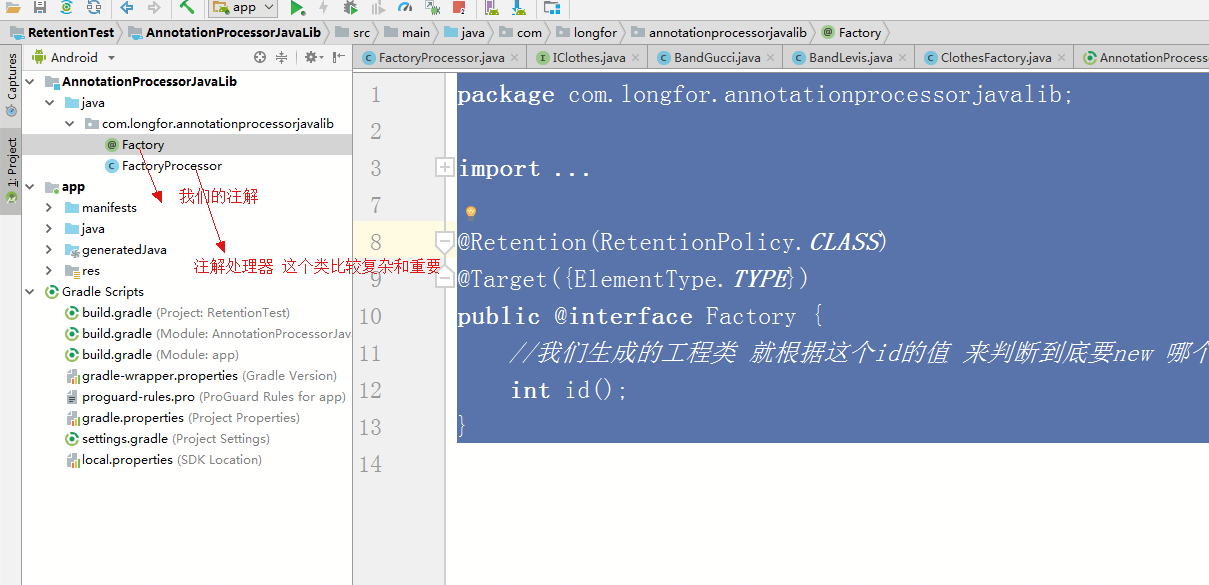
然后看一下具体写法:
package com.longfor.annotationprocessorjavalib;

import java.lang.annotation.ElementType;
import java.lang.annotation.Retention;
import java.lang.annotation.RetentionPolicy;
import java.lang.annotation.Target;

@Retention(RetentionPolicy.CLASS)
@Target({ElementType.TYPE})
public @interface Factory {
    //我们生成的工程类 就根据这个id的值 来判断到底要new 哪个对象
    int id();
}
看下我们最关键的注解处理器的写法:
package com.longfor.annotationprocessorjavalib;

import com.google.auto.service.AutoService;
import com.squareup.javapoet.ClassName;
import com.squareup.javapoet.JavaFile;
import com.squareup.javapoet.MethodSpec;
import com.squareup.javapoet.TypeSpec;

import java.io.IOException;
import java.util.HashMap;
import java.util.Iterator;
import java.util.LinkedHashSet;
import java.util.Map;
import java.util.Set;

import javax.annotation.processing.AbstractProcessor;
import javax.annotation.processing.Filer;
import javax.annotation.processing.Messager;
import javax.annotation.processing.ProcessingEnvironment;
import javax.annotation.processing.Processor;
import javax.annotation.processing.RoundEnvironment;
import javax.lang.model.SourceVersion;
import javax.lang.model.element.Element;
import javax.lang.model.element.ElementKind;
import javax.lang.model.element.Modifier;
import javax.lang.model.element.TypeElement;
import javax.lang.model.util.Elements;
import javax.lang.model.util.Types;

/**
 * 自定义注解处理器
 */
@AutoService(Processor.class)
public class FactoryProcessor extends AbstractProcessor {
    Types mTypeUtils;
    /**
     * 用来处理Element的工具类,Element代表源代码 比如类名 包名 方法名 等等
     */
    Elements mElementUtils;
    Filer filer;
    //日志输出用的,不需要可以不用
    Messager messager;


    /**
     * 这个初始化的代码不要忘记了
     *
     * @param processingEnvironment
     */
    @Override
    public synchronized void init(ProcessingEnvironment processingEnvironment) {
        super.init(processingEnvironment);
        mTypeUtils = processingEnvironment.getTypeUtils();
        mElementUtils = processingEnvironment.getElementUtils();
        filer = processingEnvironment.getFiler();
        messager = processingEnvironment.getMessager();
    }

    HashMap<Integer, String> idClassMap = new HashMap<>();
    private String mSupperClsQualifiedName; //被注解的类的父类的完全限定名称(即包名+类名)

    @Override
    public boolean process(Set<? extends TypeElement> set, RoundEnvironment roundEnvironment) {

        //因为Element可以是 类 方法 或者变量
        for (Element annotatedElement : roundEnvironment.getElementsAnnotatedWith(Factory.class)) {
            //所以这里要判断 只有是注解到类的才处理
            if (annotatedElement.getKind() == ElementKind.CLASS) {
                //TypeElement可以获取类的名字 但是获取不到 类的信息
                TypeElement typeElement = (TypeElement) annotatedElement;
                Factory annotation = typeElement.getAnnotation(Factory.class);
                //把我们的id 取出来
                int id = annotation.id();
                //把我们的类名取出来
                String className = typeElement.getQualifiedName().toString();
                //然后放到map里面 建立我们的id--class的 对应关系
                idClassMap.put(id, className);

            }
        }

        //然后生成我们的类
        generateCode();
        return false;
    }

    /**
     * 其实生成java代码 就是写一个字符串的事。。。你可以自己拼字符串 拼成 java 源代码的
     * <p>
     * 这里示范 我们用javapoet 来协助我们生成java源代码, 其实对于简单的注解来讲
     * <p>
     * 直接写字符串可能更方便。javapoet适合构建比较复杂的java源码
     */
    public void generateCode() {
        //总体来说 (TypeSpec)用于创建类或者接口,(FieldSpec)用来创建字段,(MethodSpec)用来创建方法和构造函数,(ParameterSpec)用来创建参数,(AnnotationSpec)用于创建注解

        //创建一个class对象 来告诉MethodSpec 我们要生成的方法 返回值的类型是什么
        ClassName iClothes = ClassName.get("com.longfor.retentiontest", "IClothes");

        MethodSpec.Builder method = MethodSpec.methodBuilder("getBandClothesByNumber")
                .addModifiers(Modifier.PUBLIC, Modifier.STATIC)
                .returns(iClothes)
                .addParameter(Integer.class, "number");

        Iterator iterator = idClassMap.entrySet().iterator();
        //设置循环次数
        int times = 0;
        //这边是生成方法体的语句,对于我们来说 重要的是理解 $L $S $T $N 的区别
        while (iterator.hasNext()) {
            Map.Entry entry = (Map.Entry) iterator.next();
            Integer id = (Integer) entry.getKey();
            String className = (String) entry.getValue();
            times++;
            ClassName cls = ClassName.get("com.longfor.retentiontest", className);
            if (times == 1) {
                method.beginControlFlow("if (number==$L)", id)
                        .addStatement("return new $T()", cls).endControlFlow();
            } else {
                method.beginControlFlow("else if (number==$L)", id)
                        .addStatement("return new $T()", cls).endControlFlow();
            }
        }
        method.addStatement("return null");

        /**
         * TypeSpec用来创建类或者接口
         */
        TypeSpec annotationClothesFactory = TypeSpec.classBuilder("AnnotationClothesFactory")
                .addModifiers(Modifier.PUBLIC)
                .addMethod(method.build())
                .build();

        JavaFile javaFile = JavaFile.builder("com.longfor.retentiontest", annotationClothesFactory)
                .build();

        try {
            javaFile.writeTo(filer);
        } catch (IOException e) {
            e.printStackTrace();
        }
    }

    @Override
    public Set<String> getSupportedAnnotationTypes() {
        Set<String> annotations = new LinkedHashSet<>();
        //配置需要处理的注解 这里只处理我们自己的注解
        annotations.add(Factory.class.getCanonicalName());
        return annotations;
    }

    @Override
    public SourceVersion getSupportedSourceVersion() {
        return SourceVersion.latestSupported();
    }
}
注释写的很详细了,我就不多啰嗦了,还有看不懂的可以在下面留言问。
然后我们再回到主app包下,把我们的注解加上去:
package com.longfor.retentiontest;

import android.util.Log;

import com.longfor.annotationprocessorjavalib.Factory;


@Factory(id = 2)
public class BandGucci implements IClothes {
    @Override
    public void getPrice() {
        Log.v("wuyue", "gucci price is 5000");
    }
}

package com.longfor.retentiontest;

import android.util.Log;

import com.longfor.annotationprocessorjavalib.Factory;

@Factory(id = 3)
public class BandLevis implements IClothes {
    @Override
    public void getPrice() {
        Log.v("wuyue", "levis price is 5000");
    }
}

package com.longfor.retentiontest;

import android.util.Log;

import com.longfor.annotationprocessorjavalib.Factory;


@Factory(id = 1)
public class BandNike implements IClothes {

    @Override
    public void getPrice() {
        Log.v("wuyue", "nike price is 500");
    }
}
然后我们rebuild一下工程,
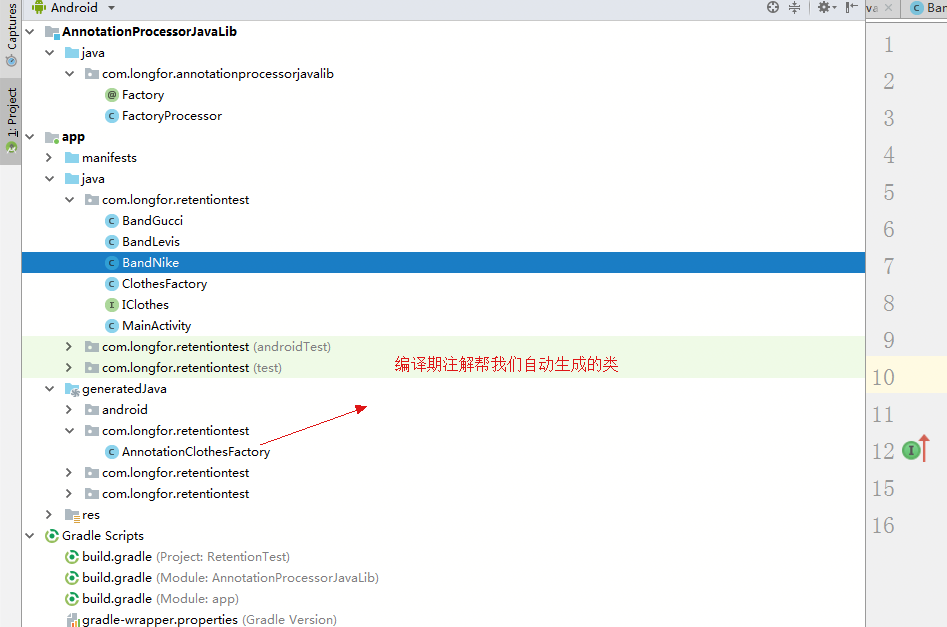
你看 ,这个自动生成的类就写好了,然后我们看一下写的符合不符合我们要求:
package com.longfor.retentiontest;

import java.lang.Integer;

public class AnnotationClothesFactory {
  public static IClothes getBandClothesByNumber(Integer number) {
    if (number==1) {
      return new com.longfor.retentiontest.BandNike();
    }
    else if (number==2) {
      return new com.longfor.retentiontest.BandGucci();
    }
    else if (number==3) {
      return new com.longfor.retentiontest.BandLevis();
    }
    return null;
  }
}
嗯 看样子很完美,可以正常使用。 注意这里其实很多信息都可以利用注解相关的类来自动获取,我这里为了简单方便 很多地方是写死值的,如果你们要写的注解真的要做成sdk的话,这边最好能用代码获取判断各种异常情况。
butterknife 是如何实现的?
有了上面的基础,相信butterknife的原理你一定能搞清楚了。实际上butterknife就是利用编译期注解 生成一个名字为 xxxActivity?ViewBinder的类,在这个类的构造函数里面自动帮我们执行了findviewById等方法罢了。 然后在ButterKnife.bind方法里面利用反射的技术来手动的调用我们这个生成的类的构造方法。 至此就完成了绑定的操作了。
如何学习编译器注解
在读完我这篇文章以后,如果想深入学习编译期注解的话 建议先好好读一下这篇文章 如何更优秀的写出编译期注解
读完全部弄懂以后还是建议大家至少在evnetbus和butterknife里面 至少选择一份源码进行精读。 在精读源码的过程中仔细弄懂注解中Element及其他的子类的各种用法,以及javapoet的各种api的使用。
有了上面的基础再碰到需要编译期注解才能完成的工作时就会事半功倍了。
最后问大家一个小问题,正在学习编译期注解的你们,是如何在android studio中查看注解过程中的日志的呢? 换句话说,在学习的过程中我应该如何输出一些日志 到android stuido中方便我学习呢?知道的同学请留言与我分享谢谢~
