

个人技术博客:www.zhenganwen.top
创建并启动线程
熟悉Java的人都能很容易地写出如下代码:
public static class MyThread extends Thread {
    @Override
    public void run() {
        System.out.println("MyThread is running...");
    }
}

public static void main(String[] args) {
    Thread t = new MyThread();
    t.start();
}
线程的生命周期
这是一个面试常问的基础问题,你应该肯定的回答线程只有五种状态,分别是:新建状态、就绪状态、执行状态、阻塞状态、终止状态。
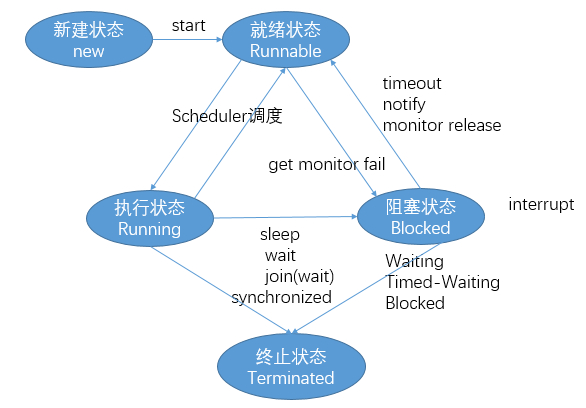
就绪状态和执行状态
由于Scheduler(调度器)的时间片分配算法,每个Running的线程会执行多长时间是未知的,因此线程能够在Runnable和Running之间来回转换。阻塞状态的线程必须先进入就绪状态才能进入执行状态。
执行状态和阻塞状态
Running线程在主动调用Thread.sleep()、obj.wait()、thread.join()时会进入TIMED-WAITING或WAITING状态并主动让出CPU执行权。如果是TIMED-WAITING,那么在经过一定的时间之后会主动返回并进入Runnable状态等待时间片的分配。
thread.join()的底层就是当前线程不断轮询thread是否存活,如果存活就不断地wait(0)。
Running线程在执行过程中如果遇到了临界区(synchronized修饰的方法或代码块)并且需要获取的锁正在被其他线程占用,那么他会主动将自己挂起并进入BLOCKED状态。
阻塞状态和就绪状态
如果持有锁的线程退出临界区,那么在该锁上等待的线程都会被唤醒并进入就绪状态,但只有抢到锁的线程会进入执行状态,其他没有抢到锁的线程仍将进入阻塞状态。
如果某个线程调用了obj的notify/notifyAll方法,那么在该线程退出临界区时(调用wait/notify必须先通过synchronized获取对象的锁),被唤醒的等待在obj.wait上的线程才会从阻塞状态进入就绪状态获取obj的monitor,并且只有抢到monitor的线程才会从obj.wait返回,而没有抢到的线程仍旧会阻塞在obj.wait上
终止状态
在执行状态下的线程执行完run方法或阻塞状态下的线程被interrupt时会进入终止状态,随后会被销毁。
start源码剖析
public synchronized void start() {
    if (threadStatus != 0)
        throw new IllegalThreadStateException();
    group.add(this);
    boolean started = false;
    try {
        start0();
        started = true;
    } finally {
        try {
            if (!started) {
                group.threadStartFailed(this);
            }
        } catch (Throwable ignore) {}
    }
}

private native void start0();
start方法主要做了三件事:
- 将当前线程对象加入其所属的线程组(线程组在后续将会介绍)
- 调用
start0,这是一个native方法,在往期文章《Java线程是如何实现的?》一文中谈到线程的调度将交给LWP,这里的启动新建线程同样属于此范畴。因此我们能够猜到此JNI(Java Native Interface)调用将会新建一个线程(LWP)并执行该线程对象的run方法 - 将该线程对象的
started状态置为true表示已被启动过。正如初学线程时老师所讲的,线程的start只能被调用一次,重复调用会报错就是通过这个变量实现的。
为什么要引入Runnable
单一职责原则
我们将通过Thread来模拟这样一个场景:银行多窗口叫号。从而思考已经有Thread了为什么还要引入Runnable
首先我们需要一个窗口线程模拟叫号(窗口叫号,相应号码的顾客到对应窗口办理业务)的过程:
public class TicketWindow extends Thread {

    public static final Random RANDOM = new Random(System.currentTimeMillis());
    private static final int MAX = 20;
    private int counter;
    private String windowName;

    public TicketWindow(String windowName) {
        super(windowName);
        counter = 0;
        this.windowName = windowName;
    }

    @Override
    public void run() {
        System.out.println(windowName + " start working...");
        while (counter < MAX){
            System.out.println(windowName + ": It's the turn to number " + counter++);
            //simulate handle the business
            try {
                Thread.sleep(RANDOM.nextInt(1000));
            } catch (InterruptedException e) {
                e.printStackTrace();
            }
        }
    }
}
然后编写一个叫号客户端模拟四个窗口同时叫号:
public class WindowThreadClient {
    public static void main(String[] args) {
        Stream.of("Window-1","Window-2","Window-3","Window-4").forEach(
            windowName -> new TicketWindow(windowName).start()
        );
    }
}
你会发现同一个号码被叫了四次,显然这不是我们想要的。正常情况下应该是四个窗口共享一个叫号系统,窗口只负责办理业务而叫号则应该交给叫号系统,这是典型的OOP中的单一职责原则。
我们将线程和要执行的任务耦合在了一起,因此出现了如上所述的尴尬情况。线程的职责就是执行任务,它有它自己的运行时状态,我们不应该将要执行的任务的相关状态(如本例中的counter、windowName)将线程耦合在一起,而应该将业务逻辑单独抽取出来作为一个逻辑执行单元,当需要执行时提交给线程即可。于是就有了Runnable接口:
public interface Runnable {
    public abstract void run();
}
因此我们可以将之前的多窗口叫号改造一下:
public class TicketWindowRunnable implements Runnable {

    public static final Random RANDOM = new Random(System.currentTimeMillis());
    private static final int MAX = 20;
    private int counter = 0;

    @Override
    public void run() {
        System.out.println(Thread.currentThread().getName() + " start working...");
        while (counter < MAX){
            System.out.println(Thread.currentThread().getName()+ ": It's the turn to number " + counter++);
            //simulate handle the business
            try {
                Thread.sleep(RANDOM.nextInt(1000));
            } catch (InterruptedException e) {
                e.printStackTrace();
            }
        }
    }
}
测试类:
public class WindowThreadClient {
    public static void main(String[] args) {
        TicketWindowRunnable ticketWindow = new TicketWindowRunnable();
        Stream.of("Window-1", "Window-2", "Window-3", "Window-4").forEach(
                windowName -> new Thread(ticketWindow, windowName).start()
        );
    }
}
如此你会发现没有重复的叫号了。但是这个程序并不是线程安全的,因为有多个线程同时更改windowRunnable中的counter变量,由于本节主要阐述Runnable的作用,因此暂时不对此展开讨论。
策略模式和函数式编程
将Thread中的run通过接口的方式暴露出来还有一个好处就是对策略模式和函数式编程友好。
首先简单介绍一下策略模式,假设我们现在需要计算一个员工的个人所得税,于是我们写了如下工具类,传入基本工资和奖金即可调用calculate得出应纳税额:
public class TaxCalculator {

    private double salary;
    private double bonus;

    public TaxCalculator(double base, double bonus) {
        this.salary = base;
        this.bonus = bonus;
    }

    public double calculate() {
        return salary * 0.03 + bonus * 0.1;
    }
}
这样写有什么问题?我们将应纳税额的计算写死了:salary * 0.03 + bonus * 0.1,而税率并非一层不变的,客户提出需求变动也是常有的事!难道每次需求变更我们都要手动更改这部分代码吗?
这时策略模式来帮忙:当我们的需求的输入是不变的,但输出需要根据不同的策略做出相应的调整时,我们可以将这部分的逻辑抽取成一个接口:
public interface TaxCalculateStrategy {
    public double calculate(double salary, double bonus);
}
具体策略实现:
public class SimpleTaxCalculateStrategy implements TaxCalculateStrategy {
    @Override
    public double calculate(double salary, double bonus) {
        return salary * 0.03 + bonus * 0.1;
    }
}
而业务代码仅调用接口:
public class TaxCalculator {

    private double salary;
    private double bonus;
    private TaxCalculateStrategy taxCalculateStrategy;

    public TaxCalculator(double base, double bonus, TaxCalculateStrategy taxCalculateStrategy) {
        this.salary = base;
        this.bonus = bonus;
        this.taxCalculateStrategy = taxCalculateStrategy;
    }

    public double calculate() {
        return taxCalculateStrategy.calculate(salary, bonus);
    }
}
将Thread中的逻辑执行单元run抽取成一个接口Runnable有着异曲同工之妙。因为实际业务中,需要提交给线程执行的任务我们是无法预料的,抽取成一个接口之后就给我们的应用程序带来了很大的灵活性。
另外在JDK1.8中引入了函数式编程和lambda表达式,使用策略模式对这个特性也是很友好的。还是借助上面这个例子,如果计算规则变成了(salary + bonus) * 1.5,可能我们需要新增一个策略类:
public class AnotherTaxCalculatorStrategy implements TaxCalculateStrategy {
    @Override
    public double calculate(double salary, double bonus) {
        return (salary + bonus) * 1.5;
    }
}
在JDK增加内部类语法糖之后,可以使用匿名内部类省去创建新类的开销:
public class TaxCalculateTest {
    public static void main(String[] args) {
        TaxCalculator taxCalaculator = new TaxCalculator(5000,1500, new TaxCalculateStrategy(){
            @Override
            public double calculate(double salary, double bonus) {
                return (salary + bonus) * 1.5;
            }
        });
    }
}
但是在JDK新增函数式编程后,可以更加简洁明了:
public class TaxCalculateTest {
    public static void main(String[] args) {
        TaxCalculator taxCalaculator = new TaxCalculator(5000, 1500, (salary, bonus) -> (salary + bonus) * 1.5);
    }
}
这对只有一个抽象方法run的Runnable接口来说是同样适用的。
构造Thread对象,你也许不知道的几件事
查看Thread的构造方法,追溯到init方法(略有删减):
Thread parent = currentThread();
if (g == null) {
    if (g == null) {
        g = parent.getThreadGroup();
    }
}

this.group = g;
this.daemon = parent.isDaemon();
this.priority = parent.getPriority();

this.target = target;
setPriority(priority);
this.stackSize = stackSize;

tid = nextThreadID();
-
g是当前对象的ThreadGroup,2~8就是在设置当前对象所属的线程组,如果在new Thread时没有显式指定,那么默认将父线程(当前执行new Thread的线程)线程组设置为自己的线程组。 -
9~10行,从父线程中继承两个状态:是否是守护线程、优先级是多少。当然了,在new Thread之后可以通过thread.setDeamon或thread.setPriority进行自定义 -
12行,如果是通过new Thread(Runnable target)方式创建的线程,那么取得传入的Runnable target,线程启动时调用的run中会执行不空的target的run方法。理论上来讲创建线程有三种方式:- 实现
Runnable接口MyRunnable,通过new Thread(myRunnable)执行MyRunnable中的run - 继承
Thread并重写run,通过new MyThread()执行重写的run - 继承
Thread并重写run,仍可向构造方法传入Runnable实现类实例:new MyThread(myRunnable),但是只会执行MyThread中重写的run,不会受myRunnable的任何影响。这种创建线程的方式有很大的歧义,除了面试官可能会拿来为难你一下,不建议这样使用
- 实现
-
设置线程优先级,一共有10个优先级别对应取值
[0,9],取值越大优先级越大。但这一参数具有平台依赖性,这意味着可能在有的操作系统上可能有效,而在有的操作系统上可能无效,因为Java线程是直接映射到内核线程的,因此具体的调度仍要看操作系统。 -
设置栈大小。这个大小指的是栈的内存大小而非栈所能容纳的最大栈帧数目,每一个方法的调用和返回对应一个栈帧从线程的虚拟机栈中入栈到出栈的过程,在下一节中会介绍这个参数。虚拟机栈知识详见《深入理解Java虚拟机(第二版)》第二章。
-
设置线程的
ID,是线程的唯一标识,比如偏向锁偏向线程时会在对象头的Mark Word中存入该线程的ID(偏向锁可见《并发编程的艺术》和《深入理解Java虚拟机》第五章)。通过
nextThreadID会发现是一个static synchronized方法,原子地取得线程序列号threadSeqNumber自增后的值:public static void main(String[] args) { new Thread(() -> { System.out.println(Thread.currentThread().getId()); //11 }).start(); }为什么
main中创建的第一个线程的ID是11(意味着他是JVM启动后创建的第11个线程)呢?这因为在JVM在执行main时会启动JVM进程的第一个线程(叫做main线程),并且会启动一些守护线程,比如GC线程。
多线程与JVM内存结构
JVM内存结构
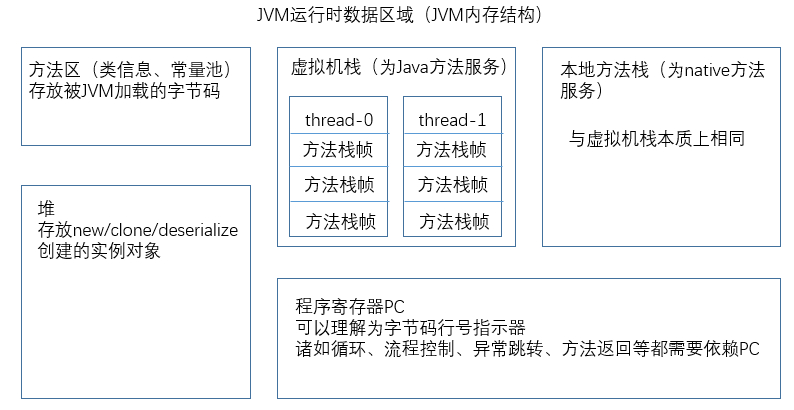
这里要注意的是每个线程都有一个私有的虚拟机栈。所有线程的栈都存放在JVM运行时数据区域的虚拟机栈区域中。
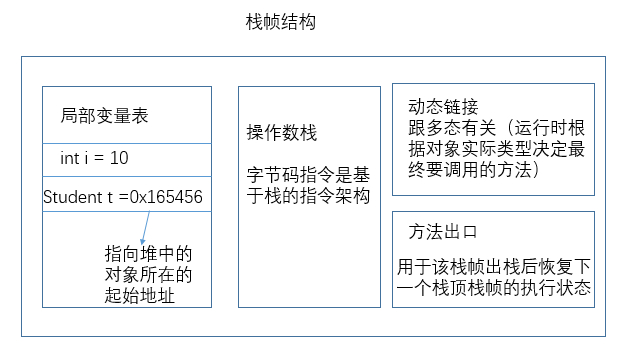
栈帧内存结构
stackSize参数
Thread提供了一个可以设置stackSize的重载构造方法:
public Thread(ThreadGroup group,
              Runnable target,
              String name,
              long stackSize)
官方文档对该参数的描述如下:
The stack size is the approximate number of bytes of address space that the virtual machine is to allocate for this thread's stack. The effect of the stackSize parameter, if any, is highly platform dependent.
你能通过指定stackSize参数近似地指定虚拟机栈的内存大小(注意:是内存大小即字节数而不是栈中所能容纳的最大栈帧数目,而且这个大小指的是该线程的栈大小而并非是整个虚拟机栈区的大小)。且该参数具有高度的平台依赖性,也就是说在各个操作系统上,同样的参数表现出来的效果有所不同。
On some platforms, specifying a higher value for the
stackSizeparameter may allow a thread to achieve greater recursion depth before throwing aStackOverflowError. Similarly, specifying a lower value may allow a greater number of threads to exist concurrently without throwing anOutOfMemoryError(or other internal error). The details of the relationship between the value of thestackSizeparameter and the maximum recursion depth and concurrency level are platform-dependent. On some platforms, the value of the stackSize parameter may have no effect whatsoever.
在一些平台上,为stackSize指定一个较大的值,能够允许线程在抛出栈溢出异常前达到较大的递归深度(因为方法栈帧的大小在编译期可知,以局部变量表为例,基本类型变量中只有long和double占8个字节,其余的作4个字节处理,引用类型根据虚拟机是32位还是64位而占4个字节或8个字节。如此的话栈越大,栈所能容纳的最大栈帧数目也即递归深度也就越大)。类似的,指定一个较小的stackSize能够让更多的线程共存而避免OOM异常(有的读者可能会异或,栈较小怎么还不容易抛出OOM异常了呢?不是应该栈较小,内存更不够用,更容易OOM吗?其实单线程环境下,只可能发生栈溢出而不会发生OOM,因为每个方法对应的栈帧大小在编译器就可知了,线程启动时会从虚拟机栈区划分一块内存作为栈的大小,因此无论是压入的栈帧太多还是将要压入的栈帧太大都只会导致栈无法继续容纳栈帧而抛出栈溢出。那么什么时候回抛出OOM呢。对于虚拟机栈区来说,如果没有足够的内存划分出来作为新建线程的栈内存时,就会抛出OOM了。这就不难理解了,有限的进程内存除去堆内存、方法区、JVM自身所需内存之后剩下的虚拟机栈是有限的,分配给每个栈的越少,能够并存的线程自然就越多了)。最后,在一些平台上,无论将stackSize设置为多大都可能不会起到任何作用。
The virtual machine is free to treat the
stackSizeparameter as a suggestion. If the specified value is unreasonably low for the platform, the virtual machine may instead use some platform-specific minimum value; if the specified value is unreasonably high, the virtual machine may instead use some platform-specific maximum. Likewise, the virtual machine is free to round the specified value up or down as it sees fit (or to ignore it completely).
虚拟机会将stackSize视为一种建议,在栈大小的设置上仍有一定的话语权。如果给定的值太小,虚拟机会将栈大小设置为平台对应的最小栈大小;相应的如果给定的值太大,则会设置成平台对应的最大栈大小。又或者,虚拟机能够按照给定的值向上或向下取舍以设置一个合适的栈大小(甚至虚拟机会忽略它)。
Due to the platform-dependent nature of the behavior of this constructor, extreme care should be exercised in its use. The thread stack size necessary to perform a given computation will likely vary from one JRE implementation to another. In light of this variation, careful tuning of the stack size parameter may be required, and the tuning may need to be repeated for each JRE implementation on which an application is to run.
由于此构造函数的平台依赖特性,在使用时需要格外小心。线程栈的实际大小的计算规则会因为JVM的不同实现而有不同的表现。鉴于这种变化,可能需要仔细调整堆栈大小参数,并且对于应用程序使用的不同的JVM实现需要有不同的调整。
Implementation note: Java platform implementers are encouraged to document their implementation's behavior with respect to the
stackSizeparameter.
不指定stackSize时栈溢出时方法调用深度:
public class StackSizeTest {
    public static int counter = 0;
    public static void main(String[] args) {
        new Thread(() -> {
            try {
                count();
            } catch (StackOverflowError e) {
                System.out.println(counter);	// result -> 35473
            }
        }).start();
    }

    public static void count() {
        counter++;
        count();
    }
}
指定stackSize为10KB
显式指定stackSize之后显著地影响了线程栈的大小,调用深度由原来的35473变成了296:
public class StackSizeTest {
    public static int counter = 0;
    public static void main(String[] args) {
        new Thread(null,() -> {
            try {
                count();
            } catch (StackOverflowError e) {
                System.out.println(counter);
            }
        },"test-stack-size",10 * 1024).start(); //stackSize -> 10KB  result -> 296
    }

    public static void count() {
        counter++;
        count();
    }
}
通过调整局部变量大小来调整栈帧大小
要想改变栈帧的大小,通过增加局部变量即可实现。以下通过增加多个long变量(一个占8个字节),较上一次的测试,方法调用深度又有明显的减小:
public class StackSizeTest {
    public static int counter = 0;
    public static void main(String[] args) {
        new Thread(null,() -> {
            try {
                count();
            } catch (StackOverflowError e) {
                System.out.println(counter);
            }
        },"test-stack-size",10 * 1024).start(); //stackSize -> 10KB  result -> 65
    }

    public static void count() {
        long a,b,c,d,e,f,g,h,j,k,l,m,n,o,p,q;
        counter++;
        count();
    }
}
守护线程及其使用场景
通过thread.setDaemon(true)可将新建后的线程设置为守护线程,必须在线程启动前(thread.start)设置才有效。
- 守护线程的特性就是在其父线程终止时,守护线程也会跟着销毁。
- JVM只有在最后一个非守护线程终止时才会退出。
心跳检测
集群架构中,通常需要心跳检测机制。如果应用程序开一条非守护线程来做心跳检测,那么可能会出现应用主程序都终止运行了但心跳检测线程仍在工作的情况,这时JVM会因为仍有非守护线程在工作而继续占用系统的CPU、内存资源,这显然是不应该的。
下列代码简单模仿了这一场景:
public class HeartCheck {
    public static void main(String[] args) {

        // worker thread
        new Thread(()->{

            // start the heart-check thread first
            Thread heartCheck = new Thread(()->{
                // do interval-automatic heart check and notify the parent thread when heart check has error
                while (true) {
                    System.out.println("do heart check");
                    try {
                        Thread.sleep(100);	//interval
                    } catch (InterruptedException e) {
                        e.printStackTrace();
                    }
                }
            });
            heartCheck.setDaemon(true);
            heartCheck.start();

            // simulate work
            try {
                Thread.sleep(5000);
            } catch (InterruptedException e) {
                e.printStackTrace();
            }
        }).start();
    }
}
join方法详解
源码剖析
直接上源码:
public final synchronized void join(long millis) throws InterruptedException {
    long base = System.currentTimeMillis();
    long now = 0;

    if (millis < 0) {
        throw new IllegalArgumentException("timeout value is negative");
    }

    if (millis == 0) {
        while (isAlive()) {
            wait(0);
        }
    } else {
        while (isAlive()) {
            long delay = millis - now;
            if (delay <= 0) {
                break;
            }
            wait(delay);
            now = System.currentTimeMillis() - base;
        }
    }
}
如果调用某个线程thread的join(),会分发到join(0),执行上述的第10~12行,只要当前线程获取到了CPU执行权就会轮询thread的执行状态(isAlive是个native方法,但我们能够猜到它的作用就是检测thread是否存活,即不是Terminated状态),一旦发现thread仍然存活就会释放CPU执行权(通过wait(0)的方式),等下一轮的轮询,直到thread进入终止状态,那么当前线程将从thread.join()返回。
一定要区分清楚,调用thread.join()阻塞的是当前线程,不会对thread线程造成任何影响。
join提供了一个重载的限时等待方法(这是一个经典的超时等待模型:只有当条件满足或者已超过等待时限时才返回),这也是为了避免当前线程陷入永久等待的困境,能够在等待一段时间发现目标线程仍未执行完后自动返回。
join有一个比较好玩的地方就是如果线程调用它自己的join方法,那么该线程将无限wait下去,因为:Thread.currentThread().join()会等待当前线程执行完,而当前线程正在调用当前线程的join即等当前线程执行完……就让他自个儿去慢慢玩儿吧~
join使用场景
分步骤执行任务
比如电商网站中的用户行为日志,可能需要经过聚合、筛选、分析、归类等步骤加工,最后再存入数据库。并且这些步骤的执行必须是按部就班的层层加工,那么一个步骤就必须等到上一个步骤结束后拿到结果在开始,这时就可以利用join做到这点。
下列代码简单模仿了此场景:
public class StepByStep {

    public static void main(String[] args) throws InterruptedException {
        Thread step1 = new Thread(() -> {
            System.out.println("start capture data...");
            //simulate capture data
            try {
                Thread.sleep(1000);
                System.out.println("capture done.");
            } catch (InterruptedException e) {
                e.printStackTrace();
            }
        });
        step1.start();

        Thread step2 = new Thread(() -> {
            try {
                step1.join();
                System.out.println("start screen out the data...");
                Thread.sleep(1000);
                System.out.println("screen out done.");
            } catch (InterruptedException e) {
                e.printStackTrace();
            }
        });
        step2.start();

        Thread step3 = new Thread(() -> {
            try {
                step2.join();
                System.out.println("start analyze the data...");
                Thread.sleep(1000);
                System.out.println("analyze done.");
            } catch (InterruptedException e) {
                e.printStackTrace();
            }
        });
        step3.start();

        Thread step4 = new Thread(() -> {
            try {
                step3.join();
                System.out.println("start classify the data");
                Thread.sleep(1000);
                System.out.println("classify done.");
            } catch (InterruptedException e) {
                e.printStackTrace();
            }
        });
        step4.start();

        step4.join();

        System.out.println("write into database");
    }
}
值得注意的是,如果调用未启动线程的join,将会立即返回:
public class StepByStep {

    public static void main(String[] args) throws InterruptedException {
        Thread t = new Thread(() -> {

        });
        t.join();
    }
}
Fork/Join模型
有时任务量太大且任务是可分的(子任务之间没有上例的依赖关系),那么我们不妨将任务拆分成互不相干的子任务(这一步叫做Fork),分别为各个子任务分配一个单独线程从而实现子任务并行执行,提高执行效率,最后将个子任务的结果整合起来做最后的加工(主线程就可以使用join来等待各个子任务线程的执行结果,从而最后做一个汇总)。JDK8提供的Stream和ForkJoin框架都有此模型的身影。
异常感知
我们可以通过join的重载方法提供的限时等待,在目标任务执行时间过长时自动返回,从而采取其他弥补策略,而不至于老是傻傻地等着。
interrupt详解
public void interrupt() {
    if (this != Thread.currentThread())
        checkAccess();

    synchronized (blockerLock) {
        Interruptible b = blocker;
        if (b != null) {
            interrupt0();           // Just to set the interrupt flag
            b.interrupt(this);
            return;
        }
    }
    interrupt0();
}
这里有一个细节,interrupt首先会设置线程的中断标志位,然后再打断它。
查看官方文档:
If this thread is blocked in an invocation of the
wait(),wait(long), orwait(long, int)methods of theObjectclass, or of thejoin(),join(long),join(long, int),sleep(long), orsleep(long, int), methods of this class, then its interrupt status will be cleared and it will receive anInterruptedException.If none of the previous conditions hold then this thread's interrupt status will be set.
Interrupting a thread that is not alive need not have any effect.
由此我们可以提取三点信息:
Timed-Waiting/Waiting中的线程被打断后首先会清除它的中断标志位,然后再抛出InterruptedException。因此被中断的线程进入- 处于运行状态(
Runnable/Running)下的线程不会被打断,但是其中断标志位会被设置,即调用它的isInterrupted将返回true - 对终止状态下的线程调用
interrupt不会产生任何效果。
isInterrupted
Tests whether this thread has been interrupted. The interrupted status of the thread is unaffected by this method.
A thread interruption ignored because a thread was not alive at the time of the interrupt will be reflected by this method returning false.
测试线程是否被中断过,该方法的调用不会改变线程的中断标志位。对一个终止状态下的线程调用过interrupt并不会导致该方法返回true。
于是我们可以使用isInterrupted来测试一下上面提取的3个结论:
public static void main(String[] args) throws InterruptedException {
    Thread t1 = new Thread(() -> {
        try {
            Thread.sleep(3000);
        } catch (InterruptedException e) {

        }

        try {
            Thread.sleep(3000);
        } catch (InterruptedException e) {
            e.printStackTrace();
        }
    });
    t1.start();
    t1.interrupt();
    System.out.println(t1.isInterrupted());	//true
    Thread.sleep(1000);
    System.out.println(t1.isInterrupted());	//false
}
上述代码在t1.interrupt后马上检查t1的中断标志位,由于interrupt是先设置中断标志位,再中断,因此17行的输出检测到了中断标志位返回true;接着18~19行先等t1在抛出InterruptedException时清除标志位,再检测其中断标志位发现返回false证明了结论1:抛出InterruptedException之前会先清除其中断标志位。
static volatile boolean flag = true;
public static void main(String[] args) throws InterruptedException {
    Thread t1 = new Thread(() -> {
        while (flag) {

        }
    });
    t1.start();
    t1.interrupt();
    System.out.println(t1.isInterrupted());	//true
    flag = false;
    t1.join();
    System.out.println(t1.isInterrupted());	//false
}
interrupted不会中断正在运行的线程,但会设置其中断标志位,因此第10行返回true。由第13行的输出我们还可以的处一个新的结论:对终止状态的线程调用isInterrupted始终会返回false。
interrupted
这是一个静态方法,用来检测当前线程是否被中断过,但与isInterrupted不同,它的调用会导致当前线程的中断标志位被清除且isInterrupted是实例方法。也就是说如果连续两次调用Thread.interrupted,第二次一定会返回false。
static volatile boolean flag = true;
public static void main(String[] args) throws InterruptedException {
    Thread t1 = new Thread(() -> {
        while (flag) {

        }
        System.out.println(Thread.currentThread().isInterrupted());	//true
        System.out.println(Thread.interrupted());	//true
        System.out.println(Thread.interrupted());	//false
    });
    t1.start();
    t1.interrupt();
    flag = false;
}
如何优雅地终结线程
stop
Thread有一个弃用的方法stop,弃用的原因是这个方法是类似于linux中kill -9的方式强制立即终止线程,不给线程任何喘息的机会,这意味着执行了一半的程序突然没后文了,如果线程打开了I/O、数据库连接等资源时将无法及时释放他们。
利用守护线程和join
守护线程在其父线程终结时也会随之终结,因此我们可以通过将线程设置为守护线程,通过控制其父线程的终结时间来间接终结他:
public class ThreadService {

    private Thread executeThread;
    private volatile boolean finished;

    public void execute(Runnable task) {
        executeThread =new Thread(() -> {
            Thread t = new Thread(() -> {
                task.run();
            });
            t.setDaemon(true);
            t.start();

            try {
                t.join();
                finished = true;
            } catch (InterruptedException e) {
                System.out.println("task execution was interrupted");
            }
        });
        executeThread.start();
    }

    public void shutdown(long millis) {
        long base = System.currentTimeMillis();
        long now = 0;
        while (!finished) {
            now = System.currentTimeMillis() - base;
            if (now >= millis) {
                System.out.println("task execution time out, kill it now");
                executeThread.interrupt();
                break;
            }

            try {
                Thread.sleep(10);
            } catch (InterruptedException e) {
                System.out.println("was interrupted when shutdown");
            }
        }
        finished = true;
    }
}
在上述代码中,可以通过给shutdown传入一个task执行时限,要求它在millis时间内执行完,如果超出这个时间则视为任务执行异常,通过终止其父线程来终止它。如果它执行正常,在millis时间内返回了,那也会导致父线程的结束,shutdown也能通过轮询finished状态来感知任务执行结束。
使用共享状态变量
public class ThreadCloseGraceful implements Runnable{

    private volatile boolean stop = false;

    @Override
    public void run() {
        while (true) {
            if (stop) {
                break;
            }
            // to do here
        }
    }

    public void shutdown() {
        stop = true;
    }
}
这种方式的要点是,共享状态变量必须声明为volatile,这样执行线程才能及时感知到shutdown命令。
轮询中断标志位
通过轮询线程的中断标志位来感知外界的中断命令。
public class ThreadCloseGraceful extends Thread{

    @Override
    public void run() {
        while (true) {
            if (Thread.interrupted()) {
                break;
            }
            // to do here
        }
    }

    public void shutdown() {
        this.interrupt();
    }
}
suspend/resume
resume/suspend被弃用的主要原因是因为suspend将线程挂起时并不会释放其所持有的共享资源,如果一个线程持有一个甚至多个锁后执行suspend,那么将会导致所有等待该锁或这些锁释放的线程陷入长久的阻塞状态。如果碰巧将要resume这个被挂起线程的线程事先也有获取这些锁的需求,那么resume线程也会被阻塞,这可能导致suspend线程将无人唤醒,这些线程都将陷入永久阻塞。
因此在并发场景下,对于临界区来说,suspend和resume是线程对立的,无论是谁先进入临界区,都将导致这两个线程甚至是多个线程陷入死锁。
synchronized详解
synchronized能够保证被同步的代码在多线程环境下的执行是串行化的。
synchronized关键字的用法
- 如果用在实例方法上,那么线程在进入该方法(临界区)时首先要获取
this对象的monitor(也就是我们通常所说的锁,术语是管程),一个monitor同一个时刻只能被一个线程持有,获取失败将陷入阻塞状态(BLOCKED),直到该锁被释放(持有锁的线程退出该方法/临界区)后该线程将加入到新一轮的锁争取之中 - 如果用在静态方法上,则需要获取当前类的
Class对象的monitor,锁获取-释放逻辑和实例方法的相同。 - 用在代码块上(代码块仍然可称为临界区),前两者是JDK自身的语义,隐含着加锁的对象。而用在代码块上则需要在
synchronized括号后显式指定一个同步对象,锁获取-释放逻辑依然相同
synchronized关键字的特性
-
获取锁失败时陷入阻塞、锁释放时相应阻塞在该锁上的线程会被唤醒,这会引起线程由用户态到内核态的切换,时间开销较大,甚至大于临界区代码的实际执行开销。因此原则上要减少
synchronized的使用,但是随着JDK的升级,自旋锁、适应性自旋、锁消除、锁粗化、偏向锁、轻量级锁等优化的引入(详见《深入理解Java虚拟机(第二版)》高并发章节),synchronized的开销实际上也没那么大了。 -
可重入,如果当前线程已持有某个对象的
monitor,在再次进入需要该monitor的临界区时,可直接进入而无需经过锁获取这一步。 -
一个线程可同时持有多个
monitor。注意,这一操作容易导致死锁的发生,以下代码就模仿了这一情景:public class DeadLock { public static Object lock1 = new Object(); public static Object lock2 = new Object(); public static void main(String[] args) { IntStream.rangeClosed(0,19).forEach(i->{ if (i % 2 == 0) { new Thread(() -> m1()).start(); } else { new Thread(() -> m2()).start(); } }); } public static void m1() { synchronized (lock1) { try { Thread.sleep(1000); } catch (InterruptedException e) { e.printStackTrace(); } synchronized (lock2) { System.out.println(Thread.currentThread().getName()); } } } public static void m2() { synchronized (lock2) { try { Thread.sleep(1000); } catch (InterruptedException e) { e.printStackTrace(); } synchronized (lock1) { System.out.println(Thread.currentThread().getName()); } } } }上述代码有很大的几率陷入死锁,但是并不会有任何提示信息。我们可以通过
jps/jstack查看一下线程状态:C:\Users\zaw>jps 2864 5664 Jps 4072 Launcher 2172 DeadLock C:\Users\zaw>jstack 2172 "Thread-1" #12 prio=5 os_prio=0 tid=0x0000000018c71800 nid=0x8f0 waiting for monitor entry [0x00000000196cf000] java.lang.Thread.State: BLOCKED (on object monitor) at deadlock.DeadLock.m2(DeadLock.java:47) - waiting to lock <0x00000000d6081098> (a java.lang.Object) - locked <0x00000000d60810a8> (a java.lang.Object) at deadlock.DeadLock.lambda$null$1(DeadLock.java:21) at deadlock.DeadLock?Lambda$3/1989780873.run(Unknown Source) at java.lang.Thread.run(Thread.java:748) "Thread-0" #11 prio=5 os_prio=0 tid=0x0000000018c70800 nid=0x944 waiting for monitor entry [0x00000000195cf000] java.lang.Thread.State: BLOCKED (on object monitor) at deadlock.DeadLock.m1(DeadLock.java:34) - waiting to lock <0x00000000d60810a8> (a java.lang.Object) - locked <0x00000000d6081098> (a java.lang.Object) at deadlock.DeadLock.lambda$null$0(DeadLock.java:19) at deadlock.DeadLock?Lambda$2/999966131.run(Unknown Source) at java.lang.Thread.run(Thread.java:748)笔者省去了其他线程的状态,分析清楚这一对线程死锁的原因之后,剩下的18个线程是类似的。首先第
9和18两行表明两个线程表明线程因为获取不到对象的锁而陷入BLOCKED状态。11~12行详细的指出Thread-1正在等待获取内存地址为0x00000000d6081098的一个对象的锁,且已持有了内存地址为0x00000000d60810a8的对象的锁。20~21行同样的指出Thread-0等在0x00000000d60810a8对象上,而已获取了0x00000000d6081098对象的锁。可见他们都在无脑阻塞地等待对方释放锁,于是就陷入了死锁。在
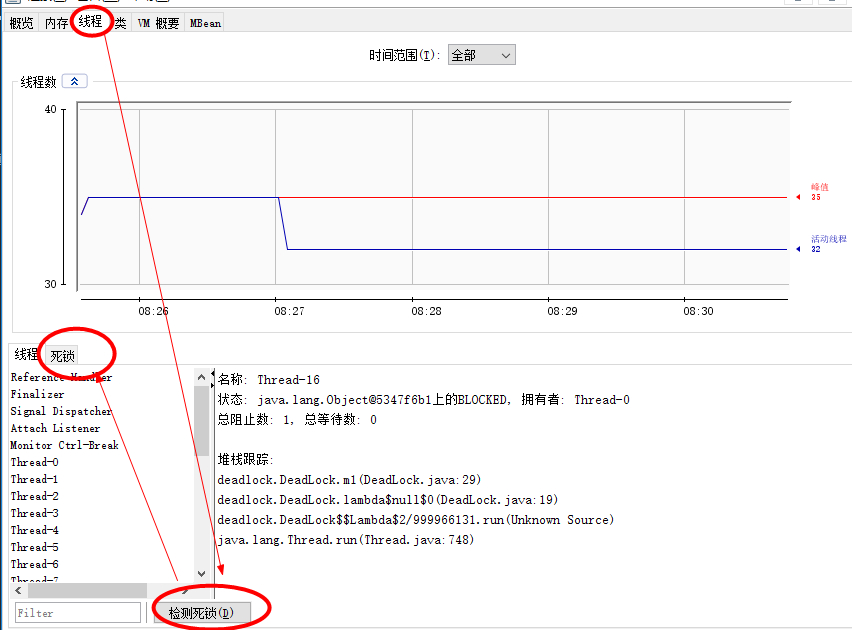
jstack罗列JVM各个线程状态之后还为我们分析了死锁:Found one Java-level deadlock: ============================= "Thread-19": waiting to lock monitor 0x0000000018c5a398 (object 0x00000000d60810a8, a java.lang.Object), which is held by "Thread-1" "Thread-1": waiting to lock monitor 0x0000000018c58d98 (object 0x00000000d6081098, a java.lang.Object), which is held by "Thread-0" "Thread-0": waiting to lock monitor 0x0000000018c5a398 (object 0x00000000d60810a8, a java.lang.Object), which is held by "Thread-1"我们还可以使用JDK内置的JVM性能监控工具JConsole更直观地分析线程状态:
C:\Users\zaw>jps
2864
6148 Jps
4072 Launcher
2172 DeadLock

C:\Users\zaw>jconsole 2172
打开的工具窗口会询问一下是否信任不安全的连接,点击是方可进入。进入后通过线程面板能够查看各线程状态,点击死锁分析,它会为我们分析出当前JVM进程中哪些线程陷入了死锁以及原因是什么:
synchronized底层实现
要想了解为什么线程在执行临界区(包括同步方法和同步代码块)时会有锁获取-释放这一机制,那我们就要知道这个关键字在编译后生成了怎样的JVM指令。
首先我们分别编写一个同步方法和同步块,分别测试synchronized在字节码层面会产生什么样的效果:
public class SynchronizedTest{

	public synchronized void m1(){
		System.out.println("sync method");
	}

	Object lock = new Object();
	public void m2(){
		synchronized(lock){
			System.out.println("sync block");
		}
	}
}
然后使用javac编译,由于编译后的字节码文件是二进制字节流,我们查看不方便(JVM查看方便),因此还需要使用javap将其转换成我们能看懂的友好内容(字节码格式详见《深入理解Java虚拟机(第二版)》中的Class文件格式),为了照顾对这部分不熟悉的读者,笔者做了删减,仅关注synchronized产生的效果:
C:\Users\zaw>cd Desktop

C:\Users\zaw\Desktop>javac SynchronizedTest.java

C:\Users\zaw\Desktop>javap -verbose SynchronizedTest.class

public class SynchronizedTest
  minor version: 0
  major version: 52
  flags: ACC_PUBLIC, ACC_SUPER
Constant pool:
  	# 这里省去了常量池部分
{
  java.lang.Object lock;
    descriptor: Ljava/lang/Object;
    flags:

  public synchronized void m1();
    descriptor: ()V
    flags: ACC_PUBLIC, ACC_SYNCHRONIZED
    Code:
      stack=2, locals=1, args_size=1
         0: getstatic     #4                  // Field java/lang/System.out:Ljava/io/PrintStream;
         3: ldc           #5                  // String sync method
         5: invokevirtual #6                  // Method java/io/PrintStream.println:(Ljava/lang/String;)V
         8: return
      LineNumberTable:
        line 4: 0
        line 5: 8

  public void m2();
    descriptor: ()V
    flags: ACC_PUBLIC
    Code:
      stack=2, locals=3, args_size=1
         0: aload_0
         1: getfield      #3                  // Field lock:Ljava/lang/Object;
         4: dup
         5: astore_1
         6: monitorenter
         7: getstatic     #4                  // Field java/lang/System.out:Ljava/io/PrintStream;
        10: ldc           #7                  // String sync block
        12: invokevirtual #6                  // Method java/io/PrintStream.println:(Ljava/lang/String;)V
        15: aload_1
        16: monitorexit
        17: goto          25
        20: astore_2
        21: aload_1
        22: monitorexit
        23: aload_2
        24: athrow
        25: return
   Exception table:
         from    to  target type
             7    17    20   any
            20    23    20   any
}
SourceFile: "SynchronizedTest.java"
尽管上述代码看起来很长,但是我们只需要关注两个点:
- 对比
20行和33行,会发现同步方法m1比非同步方法m2的flags多了一个ACC_SYNCHRONIZED,因此线程在进入同步方法时,若检测到该方法的flags包含ACC_SYNCHRONIZED,那么该线程将尝试获取this或该方法所在类的Class实例(这取决于方法是实例方法还是静态方法),即同步方法的synchronized语义是通过方法标志位ACC_SYNCHRONIZED来实现的,同步过程是隐式的(同步对象由JVM来指定,锁释放由JVM来完成) - 再看
40~49行,发现它给我们的同步块内的内容System.out.println("sync block")的前后分别加上了一个monitorenter和一个monitorexit,这就对应锁获取-释放,这种同步语义是显式的,同步对象和临界区由我们来控制,相对同步方法灵活一些。
还有一点值得注意的是上述的第49行代码为什么又出现了一个monitorexit?这是为了保证在同步代码块执行过程中如果抛出了异常,线程持有的锁也能够在异常抛出前被释放掉(不至于影响到其他正在等待锁获取的线程)。
如何避免死锁
经过上述的分析,对于锁的理解应该有了更深刻的认识。那么如何避免死锁呢?陷入死锁的线程既不会工作还要持续占用系统资源,我们的应用程序应当避免发生这种情况。
- 避免一个线程同时持有多个锁。如果让线程在已持有锁的情况下,再尝试获取其他的锁,那么一旦获取失败必然导致该线程带着已持有的锁陷入阻塞,占着同步资源陷入阻塞对高并发和不友好,应当避免。
- 避免临界区的执行时间过长。如果执行临界区时发生异常导致线程迟迟不能退出临界区,这是常有的事,比如操作数据库连接时由于网络环境不佳而长时间不能返回,由比如异步调用的webservice接口异常导致异步线程不能及时返回,等等。这样会导致持有锁的线程迟迟不释放锁,如果刚好有很多其他的线程在等待获取该锁,那么这些线程将陷入长久的阻塞中。我们因尽量缩小临界区的范围,只对存在数据争用的代码做同步。同时为了避免大量线程因锁获取而陷入长久的等待,应该使用
Lock的tryLock(millis)超时等待机制,一旦发现等待时间过长,那么就没必要一直等下去,可以先去完成其他任务之后再来尝试获取锁。后面我们将针对这种情况手写一个等待超时就能自动返回的锁。
wait/notify和wait set
弃用suspend/resume之后,官方建议使用wait/notify代替。与suspend/resume的定位不同,wait/notify实现于Object,是所有对象都能够调用的方法。且调用对象的wait/notify前必须先获取该对象的monitor。
以下是官方对wait(millis)给出的说明:
* This method causes the current thread (call it <var>T</var>) to
* place itself in the wait set for this object and then to relinquish
* any and all synchronization claims on this object. Thread <var>T</var>
* becomes disabled for thread scheduling purposes and lies dormant
* until one of four things happens: notify, notifyAll, interrupt, time out
调用一个对象obj的wait方法将会导致当前执行线程被放入obj的等待队列中(wait set,线程休息室),并且释放该线程通过synchronized已持有的所有锁,然后释放CPU的执行权陷入等待,直到被notify/notifyAll通知到、被其他线程调用interrupt中断或者等待时间已超过所设置的时限时才会进入就绪状态重新争取CPU执行权。
这里需要注意的是并非线程被notify/notifyAll唤醒了就能立即从wait返回,被唤醒后只会使线程进入就绪状态争取CPU执行权,只有获取到CPU执行权并且获取到所有wait前释放的锁后才能从wait返回,否则线程仍将阻塞在wait上。
使用wait/notify,我们能够实现线程间的通信。
wait/notify经典范式
官方给出了wait/notify使用的经典范式:
synchronized (obj) {
         while (<condition does not hold>)
             obj.wait();
         ... // Perform action appropriate to condition
     }
使用while而不使用if的原因就是被唤醒并从wait返回的线程应该不断检查它所关注的条件,因为被唤醒可能并不是由于另一个线程为了通知该线程而有针对性的唤醒该线程,这一点从notify的随机唤醒、notifyAll唤醒全部、被唤醒的线程在同一时刻只有一个能够抢到锁,可以看出真正能够从wait返回的线程具有很大的不确定性。由于每个线程的关注的条件不同,所以需要轮询判断条件是否成立,方可从while中退出来。
由此我们可以利用wait/notify实现生产者-消费者通信模型:
public class ClassicForm {

    private static String message;
    private static Object lock = new Object();

    public static void main(String[] args) {
        Thread consumer = new Thread(() -> {
            while(true){
                synchronized (lock) {
                    while (message == null) {	// wait for producing
                        try {
                            lock.wait();
                        } catch (InterruptedException e) {
                            System.out.println("consumer was broken");
                            return;
                        }
                    }
                    System.out.println("CONSUMER receive message : " + message);
                    message = null;
                    lock.notify();
                }
            }
        });

        Thread producer = new Thread(() -> {
            synchronized (lock) {
                for(int i = 0 ; i < 100 ; i++){
                    while (message != null) {	// wait for consuming
                        try {
                            lock.wait();
                        } catch (InterruptedException e) {
                            System.out.println("producer was broken");
                            return;
                        }
                    }
                    message = "please the order, order-id is " + i;
                    lock.notify();
                    System.out.println("PRODUCER send the message : " + message);
                }
            }
        });

        consumer.start();
        producer.start();
    }

}
你会发现这里的message即使没有加volatile,生产者每次所做的更改消费者都能准确获取到。这是由synchronized的unlock指令和JMM(Java内存模型)共同决定的,JMM将在后文中详细展开。
wait/notify限时等待模型
上述代码有一个明显的缺陷,那就是如果生产者生产消息很慢,那么消费者就会一直wait直到有新的消息到来。这样就没有充分利用消费者线程所占用的资源。能否为消费者的等待设置一个限时?在等待时长超过限时之后就不wait了,先去处理其他任务,稍后再来监听生产者生产的消息。下段代码简单模拟了这一场景:
public class WaitTimeoutModel {

    private static String message;
    private static Object lock = new Object();
    private static final long MAX_WAIT_LIMIT = 1000;

    public static void main(String[] args) {
        Thread consumer = new Thread(() -> {
            synchronized (lock) {
                while (true) {
                    long base = System.currentTimeMillis();
                    long now = 0;
                    while (message == null) {
                        now = System.currentTimeMillis() - base;
                        if (now >= MAX_WAIT_LIMIT) {
                            break;  // exit wait
                        }
                        try {
                            lock.wait(MAX_WAIT_LIMIT);
                        } catch (InterruptedException e) {
                            System.out.println("consumer was broken");
                        }
                    }
                    if (message == null) {
                        System.out.println("CONSUMER exit wait, and do other things");
                        try {   // simulate do other thing
                            Thread.sleep(50);
                        } catch (InterruptedException e) {
                            e.printStackTrace();
                        }
                    } else {
                        System.out.println("CONSUMER receive the message : " + message);
                        message = null;
                    }
                }
            }
        });

        Thread producer = new Thread(() -> {
            // prepare message is very slowly
            try {
                Thread.sleep(2000);
            } catch (InterruptedException e) {
                e.printStackTrace();
            }
            // notify consumer
            synchronized (lock) {
                message = "please handle the order, order-id is 5454656465";
                lock.notify();
                System.out.println("PRODUCER send the message : " + message);
            }
        });

        consumer.start();
        producer.start();
    }
}
要点就是在经典范式的基础之上,在轮询状态变量的过程中增加了一个等待时长判断(第14~17行),如果发现超过了给定的时限(这里是MAX_WAIT_LIMIT),那么就不再等待,去做其他事情(第25~30行),相反如果在wait(MAX_WAIT_LIMIT)期间由于生产者的提醒被唤醒,那么同样会跳出轮询(生产者通常生产出消息后才唤醒消费者)进入到第32~33行去消费消息。但无论是哪一种情况,都算是消费者一个逻辑执行单元的结束。由于消费者通常是24小时运行监听的(while(true)),因此在每一个执行单元结束后将重置用来计算等待时长的base和now(第11~12行)。
运行效果如下:
CONSUMER exit wait, and do other things
PRODUCER send the message : please handle the order, order-id is 5454656465
CONSUMER receive the message : please handle the order, order-id is 5454656465
CONSUMER exit wait, and do other things
CONSUMER exit wait, and do other things
CONSUMER exit wait, and do other things
...
超时等待模型被广泛用于并发设计模式以及JUC包,需要好好理解。
wait和sleep的本质区别(面试常问)
wait是Object中的实例方法且调用前需要获取实例对象的锁,sleep是Thread中的静态方法可直接调用sleep不会释放当前线程所持有的锁,而wait则会释放当前线程持有的所有锁sleep和wait都会使线程进入TIMED-WAITING状态释放CPU执行权,但调用sleep的线程在设定的时限后能够自动返回,而wait(millis)在超时后需要先获取对象的锁才能返回、wait(0)更是需要等待被唤醒并获取到锁后才能返回。
多Consumer和多Producer引发的假死问题
下段代码模拟了生产者-消费者模型下两个生产者和两个消费者同时工作导致程序假死的一个案例
public class ProducerConsumer {

    private String message;

    public synchronized void produce() {
        while (message != null) {
            try {
                this.wait();
                Thread.sleep(1000);
            } catch (InterruptedException e) {
                System.out.println(Thread.currentThread().getName() + " was broken");
                return;
            }
        }
        message = "time is " + new Date(System.currentTimeMillis());
        this.notify();
        System.out.println(Thread.currentThread().getName() + " send the message : " + message);
    }

    public synchronized void consume() {
        while (message == null) {
            try {
                this.wait();
            } catch (InterruptedException e) {
                System.out.println(Thread.currentThread().getName() + " was broken");
                return;
            }
        }
        System.out.println(Thread.currentThread().getName() + " recv the message : " + message);
        message = null;
        this.notify();
    }

    public static void main(String[] args) {
        ProducerConsumer pc = new ProducerConsumer();
        Stream.of("p1", "p2").forEach(name -> {
            new Thread(() -> {
                while (true) {
                    pc.produce();
                }
            }, name).start();
        });

        Stream.of("c1", "c2").forEach(name -> {
            new Thread(() -> {
                while (true) {
                    pc.consume();
                }
            }, name).start();
        });
    }
}
输出如下:
p1 send the message : time is Fri Feb 01 14:06:26 CST 2019
c2 recv the message : time is Fri Feb 01 14:06:26 CST 2019
p2 send the message : time is Fri Feb 01 14:06:26 CST 2019
c2 recv the message : time is Fri Feb 01 14:06:26 CST 2019
p1 send the message : time is Fri Feb 01 14:06:27 CST 2019
# 至此,四个线程陷入永久wait
笔者也曾异或良久,一个Producer生产了消息会通知一个Consumer消费,且后者消费完后又会通知一个等待生产的Producer,没问题啊!怎么会都陷入wait呢?
这是因为我们陷入了一个惯性思维,学生产者-消费者模式学着学着就总以为生产者生产了消息会通知消费者、消费者消费完了会通知生产者。我们忘记了notify的本质:notify会从对象的wait set中随机选取一个线程唤醒。我们再来理性地分析一下上述代码:第17行的notify一定会唤醒对象的wait set上的一个消费者线程吗?不一定吧!假设某一时刻p1抢到了锁,而p2,c1,c2均阻塞在wait上,那么p1生产消息后调用的notify有没有可能唤醒的是p2呢(如此的话,被唤醒的p2发现p1生产的消息没有被消费仍然会陷入wait,这样的话四个线程就都陷入wait了,没有其他线程来唤醒他们。类似的,消费者消费完消息后唤醒的也可能是另一个在wait的消费者,这样的唤醒做的是无用功)。就是因为notify的不确定性,从而导致上述代码并没有按照生产者-消费者的套路来,最后四个线程都陷入了wait且没有线程去唤醒他们。
但是如果将第17,34行的notify改成notifyAll就不会死锁了。这是因为notifyAll会唤醒所有阻塞在该对象的wait上的线程。因此p1生产消息后如果调用的是notifyAll,那么p2,c1,c2都会被唤醒并争取该对象的monitor,这时即使p2先抢到了,它也会由于消息未被消费而进入wait进而释放锁并唤醒等待该锁的c1,c2,所以p1的notifyAll最终一定会导致其中一个消费者从wait返回,这样即使是多Producer多Consumer,程序也能跑通了。
p2 send the message : time is Fri Feb 01 14:30:39 CST 2019
c1 recv the message : time is Fri Feb 01 14:30:39 CST 2019
p1 send the message : time is Fri Feb 01 14:30:39 CST 2019
c2 recv the message : time is Fri Feb 01 14:30:39 CST 2019
p2 send the message : time is Fri Feb 01 14:30:40 CST 2019
c1 recv the message : time is Fri Feb 01 14:30:40 CST 2019
p1 send the message : time is Fri Feb 01 14:30:41 CST 2019
c2 recv the message : time is Fri Feb 01 14:30:41 CST 2019
p2 send the message : time is Fri Feb 01 14:30:42 CST 2019
c1 recv the message : time is Fri Feb 01 14:30:42 CST 2019
...
多线程下的生产者-消费者模型,要使用
notifyAll
手写一个BooleanLock
上文说到synchronized有一个严重的缺陷就是,如果持有锁的线程迟迟不释放锁(临界区的执行时间过长),那么等待该锁的其他线程就会一直阻塞住,直到该锁被释放。那么能否实现这样一种机制呢:给等待锁释放的线程设置一个时限,如果超过了该时限,那么就认为锁一时半会儿不会被释放,于是可以让线程利用这段空闲执行其他的任务而非一直阻塞着什么事都不做。
现在我们可以使用wait/notify的经典范式实现synchronized语义,使用其超时等待模型实现限时等待语义。首先定义一个同步对象接口,即Lock:
public interface Lock {

    void lock() throws InterruptedException;

    void unlock();

    void lock(long millis) throws InterruptedException, TimeoutException;

    Collection<Thread> getBlockedThread();

    int getBlockedCount();
}
接着实现一个简单的用一个布尔变量表示同步状态的BooleanLock:
public class BooleanLock implements Lock {

    private volatile boolean isSync = false; //represent whether the lock is held or not. true is held, false is not held
    private Thread currentThread;   //current thread which hold the lock
    private Collection<Thread> waitQueue;

    public BooleanLock() {
        this.isSync = false;
        this.currentThread = null;
        this.waitQueue = new ArrayList<>();
    }

    @Override
    public synchronized void lock() throws InterruptedException {
        waitQueue.add(Thread.currentThread());
        while (isSync) {    // lock is held by other thread
            this.wait();
        }
        // get the lock successfully
        waitQueue.remove(Thread.currentThread());
        currentThread = Thread.currentThread();
        isSync = true;  //indicate the lock is held
        System.out.println(Thread.currentThread().getName() + " get the lock");
    }

    @Override
    public void unlock() {
        // check the operator is the thread which is holding the lock
        if (Thread.currentThread() != currentThread) {
            return;
        }
        synchronized (this) {
            currentThread = null;
            isSync = false;
            this.notifyAll();
            System.out.println(Thread.currentThread().getName() + " release the lock");
        }
    }

    @Override
    public synchronized void lock(long millis) throws InterruptedException, TimeoutException {
        long base = System.currentTimeMillis();
        long now = 0;
        waitQueue.add(Thread.currentThread());
        while (isSync) {
            now = System.currentTimeMillis() - base;
            if (now >= millis) {
                throw new TimeoutException();
            }
            this.wait(millis);
        }
        waitQueue.remove(Thread.currentThread());
        currentThread = Thread.currentThread();
        isSync = true;
        System.out.println(Thread.currentThread().getName() + " get the lock");
    }

    @Override
    public Collection<Thread> getBlockedThread() {
        return Collections.unmodifiableCollection(waitQueue);
    }

    @Override
    public int getBlockedCount() {
        return waitQueue.size();
    }
}
测试synchronized语义:
public static void main(String[] args) {
    BooleanLock lock = new BooleanLock();
    Stream.of("t1", "t2", "t3", "t4", "t5").forEach(name -> {
        new Thread(() -> {
            try {
                lock.lock();
                Thread.sleep(50); // to do thing
            } catch (InterruptedException e) {
                e.printStackTrace();
            } finally {
                printBlockedThread(lock);
                lock.unlock();
            }
        }, name).start();
    });
}

private static void printBlockedThread(BooleanLock lock) {
    System.out.print("There are " + lock.getBlockedCount() + " threads waiting on the lock: ");
    lock.getBlockedThread().forEach(thread -> System.out.print(thread.getName() + " "));
    System.out.println();
}
运行结果:
t1 get the lock
There are 4 threads waiting on the lock: t4 t3 t2 t5
t1 release the lock
t5 get the lock
There are 3 threads waiting on the lock: t4 t3 t2
t5 release the lock
t4 get the lock
There are 2 threads waiting on the lock: t3 t2
t4 release the lock
t2 get the lock
There are 1 threads waiting on the lock: t3
t2 release the lock
t3 get the lock
There are 0 threads waiting on the lock:
t3 release the lock
需要注意的是unlock必须写在finally中确保锁一定会被释放,而synchronized同步块执行时抛出异常JVM会通过异常表(详见《深入理解Java虚拟机(第二版)》Class文件结构一章中的方法表的描述)在异常抛出时释放当前线程所持有的全部的锁。
测试限时获取锁
上例只是实现了与synchronized同样的功能,接着我们测试一下限时获取锁的功能,这是synchronized无法做到的。
public static void main(String[] args) {
    BooleanLock lock = new BooleanLock();
    Stream.of("t1", "t2", "t3", "t4", "t5").forEach(name -> {
        new Thread(() -> {
            try {
                lock.lock(1000);
                Thread.sleep(2000); // the task is very time-consuming
            } catch (InterruptedException e) {
                System.out.println(Thread.currentThread().getName() + " was interrupted");
            } catch (TimeoutException e) {
                System.out.println(Thread.currentThread().getName() + " get lock time out, so do other thing first and then get the lock again");
            } finally {
                lock.unlock();
            }
        }, name).start();
    });
}
输出如下:
t1 get the lock
t2 get lock time out, so do other thing first and then get the lock again
t3 get lock time out, so do other thing first and then get the lock again
t4 get lock time out, so do other thing first and then get the lock again
t5 get lock time out, so do other thing first and then get the lock again
t1 release the lock
给你的应用程序注入钩子程序
在使用一些开源框架时,比如Tomcat,在关闭时仍会有些日志打印出来,这些日志通常是释放应用程序资源的信息。也就是说我们点击terminate的事件被应用程序捕获到后,应用程序并非直接终止而是先释放一些珍贵资源。这就是通过设置钩子函数做到的,它会在应用程序主线程终止前被调用。对应API是Runtime.getRuntime().addShutdownHook(thread)。
下面我将在linux上演示钩子函数的用处。MyApp.java表示我的应用程序:
public class MyApp{
    public static void main(String[] args){

        Runtime.getRuntime().addShutdownHook(
            new Thread(() -> {
                //release resource here, like socket,connection etc
                System.out.println("releasing resources...");
            })
        );

        while(true){
            // start a service
        }
    }
}
通过addShutdownHook设置的线程将在main线程被外界中断时调用,比如我在运行java MyApp时按下了CTRL C
[root@izm5ecexclrsy1gmkl4bgdz ~]# javac MyApp.java
[root@izm5ecexclrsy1gmkl4bgdz ~]# java MyApp
^Creleasing resources...
又比如后台运行MyApp,通过kill pid终止它:
[root@izm5ecexclrsy1gmkl4bgdz ~]# java MyApp &
[1] 14230
[root@izm5ecexclrsy1gmkl4bgdz ~]# jps
14240 Jps
14230 MyApp
[root@izm5ecexclrsy1gmkl4bgdz ~]# kill 14230
[root@izm5ecexclrsy1gmkl4bgdz ~]# releasing resources...
但是kill -9则不会触发钩子程序:
[root@izm5ecexclrsy1gmkl4bgdz ~]# java MyApp &
[1] 14264
[root@izm5ecexclrsy1gmkl4bgdz ~]# ps aux|grep java
root     14264 96.3  1.4 2460724 27344 pts/0   Sl   16:03   0:09 java MyApp
root     14275  0.0  0.0 112660   964 pts/0    R+   16:03   0:00 grep --color=auto java
[root@izm5ecexclrsy1gmkl4bgdz ~]# kill -9 14264
[root@izm5ecexclrsy1gmkl4bgdz ~]# ps aux|grep java
root     14277  0.0  0.0 112660   964 pts/0    R+   16:03   0:00 grep --color=auto java
[1]+  Killed                  java MyApp
获取堆栈信息
Thread.currentThread().getStackTracke()获取当前线程执行到当前方法时栈中的所有栈帧信息,返回StackTraceElement[],一个元素就代表一个方法栈帧,可以通过它得知方法所属的类、方法名、方法执行到了第几行
public static void main(String[] args) {
    m1();
}

public static void m1() {
    m2();
}

private static void m2() {
    m3();
}

private static void m3() {
    Arrays.asList(Thread.currentThread().getStackTrace()).stream()
        .filter(
        //过滤掉native方法
        stackTraceElement -> !stackTraceElement.isNativeMethod()
    ).forEach(
        stackTraceElement -> {
            System.out.println(stackTraceElement.getClassName() + ":" +
                               stackTraceElement.getMethodName() + "():" +
                               stackTraceElement.getLineNumber());
        }
    );

}
捕获run方法运行时异常
由于Runnable接口的run方法并未声明抛出任何异常,因此在重写run时,所有checked exception都需要我们手动解决。但是如果抛出unchecked exception呢,1/0就是典型的例子,我们如何捕获他?
通过thread.setUncheckedExceptionHandler()能够做到这一点:
public static final int A = 1;
public static final int B = 0;
public static void main(String[] args) {
    Thread thread = new Thread(() -> {
        int i = A / B;
    });
    thread.setUncaughtExceptionHandler((t, e) -> {
        // t -> the ref of the thread, e -> exception
        System.out.println(e.getMessage()); /// by zero
    });
    thread.start();
}
线程组ThreadGroup
线程组代表一个线程的集合,一个线程组也可以包含其他线程组,线程组可以以树形结构展开。
-
在JVM启动时,会创建一个名为
main的线程运行main函数和一个名为main的线程组,main线程的线程组是main线程组:public static void main(String[] args) { System.out.println(Thread.currentThread().getName()); //main System.out.println(Thread.currentThread().getThreadGroup().getName()); //main } -
创建线程时,如果没有为该线程显式指定线程组,那么该线程将会拿他的父线程的线程组作为自己的线程组。
如果创建线程组时没有显式指定其父线程组,将会拿当前线程的线程组作为其父线程组
public static void main(String[] args) { Thread t1 = new Thread(() -> { // }); System.out.println(t1.getThreadGroup().getName()); //main ThreadGroup threadGroup = new ThreadGroup("MyThreadGroup"); Thread t2 = new Thread(threadGroup, () -> { // }); System.out.println(t2.getThreadGroup().getName()); //MyThreadGroup System.out.println(t2.getThreadGroup().getParent().getName()); //main } -
threadGroup.list()方法能够打印线程组中存活线程的信息,可用于debugThreadGroup threadGroup = new ThreadGroup("MyThreadGroup"); new Thread(threadGroup, () -> { try { Thread.sleep(1000); } catch (InterruptedException e) { e.printStackTrace(); } }).start(); new Thread(threadGroup, () -> { try { Thread.sleep(1000); } catch (InterruptedException e) { e.printStackTrace(); } }).start(); threadGroup.list(); java.lang.ThreadGroup[name=MyThreadGroup,maxpri=10] Thread[Thread-0,5,MyThreadGroup] Thread[Thread-1,5,MyThreadGroup]
更多API大家可查看官方文档。
自定义线程池
工作线程的执行逻辑
工作线程应该不断轮询任务队列是否有任务可做,有则拿来执行,无则等待外界提交。然后还要为外界提供终止当前线程的stop,其采用的是利用共享状态变量的方式并使用volatile修饰使得外界的终止操作立即对当前工作线程可见。
public class Worker implements Runnable {

    private volatile boolean stop;
    private LinkedList<Runnable> taskQueue;
    private Thread currentThread;

    public Worker(LinkedList<Runnable> taskQueue) {
        this.taskQueue = taskQueue;
    }

    @Override
    public void run() {
        currentThread = Thread.currentThread();
        Runnable task = null;
        OUTER:
        while (!stop) {
            synchronized (taskQueue) {
                while (taskQueue.isEmpty()) {
                    try {
                        taskQueue.wait();
                    } catch (InterruptedException e) {
                        System.out.println(Thread.currentThread().getName()+" has been interrupted");
                        break OUTER;
                    }
                }
                task = taskQueue.removeFirst();
                taskQueue.notifyAll();
            }
            if (task != null) {
                task.run();
            }
        }
    }

    public void interrupt() {
        if (currentThread != null) {
            currentThread.interrupt();
        }
    }

    public void stop() {
        stop = true;
    }
}
线程池:用来创建和管理线程
public class ThreadPool {

    private static final int DEFAULT_THREAD_COUNT = 10;

    private int threadCount;
    private LinkedList<Worker> workQueue;
    private LinkedList<Runnable> taskQueue;

    public ThreadPool() {
        this(DEFAULT_THREAD_COUNT);
    }

    public ThreadPool(int size) {
        this.threadCount = size;
        this.workQueue = new LinkedList<>();
        this.taskQueue = new LinkedList<>();
        init(size);
    }

    //创建并启动count个线程
    private void init(int count) {
        if (count <= 0) {
            throw new IllegalArgumentException("thread pool size must greater than zero");
        }
        for (int i = 0; i < count; i++) {
            Worker worker = new Worker(taskQueue);
            Thread thread = new Thread(worker, "ThreadPool-" + i);
            thread.start();
            workQueue.add(worker);
        }
    }

    public void execute(Runnable task) {
        synchronized (taskQueue) {
            taskQueue.add(task);
            taskQueue.notifyAll();
        }
    }

    public int getThreadCount() {
        return threadCount;
    }

    public int getTaskCount() {
        return taskQueue.size();
    }

    //对wait中的线程调用stop,他也无法轮询该变量而退出循环
    //因此对于wait中的工作线程直接中断它,而正在执行的线程则等他自己轮询到stop而退出
    public void shutdown() {
        synchronized (taskQueue) {
            for (Worker worker : workQueue) {
                worker.stop();
                worker.interrupt();
            }
        }
        System.out.println("thread pool destroyed");
    }
}
测试
public class ThreadPoolTest {
    public static void main(String[] args) throws InterruptedException {
        ThreadPool threadPool = new ThreadPool();
        for (int i = 0; i < 40; i++) {
            int number = i;
            threadPool.execute(()->{
                System.out.println(Thread.currentThread().getName() + "start execute task-" + number);
                try {
                    Thread.sleep(new Random(System.currentTimeMillis()).nextInt(1000));
                } catch (InterruptedException e) {
                    e.printStackTrace();
                }
            });
        }

        Thread.sleep(5000);
        threadPool.shutdown();
    }
}
为线程池增加拒绝策略
线程池的工作队列不应该无限大,如果不注意的或可能会导致OOM,因此在任务队列中的任务数到达一定数目时应对提交的任务采取拒绝策略。
这里应该用策略模式,策略接口:
public interface RefusePolicy {
    void refuse() throws Exception;
}
简单任务数过大就抛异常的策略:
public class DiscardRefusePolicy implements RefusePolicy {

    public class TaskExceededException extends Exception {
        public TaskExceededException(String message) {
            super(message);
        }
    }

    @Override
    public void refuse() throws TaskExceededException {
        throw new TaskExceededException("task has exceeded the taskSize of thread poll");
    }
}
改造execute方法:
private static final int DEFAULT_THREAD_COUNT = 10;
private static final RefusePolicy DEFAULT_REFUSE_POLICY = new DiscardRefusePolicy();
private static final int DEFAULT_TASK_SIZE = 200;

private int threadCount;
private LinkedList<Worker> workQueue;
private LinkedList<Runnable> taskQueue;
private int maxTaskSize;
private RefusePolicy refusePolicy;

public ThreadPool() {
    this(DEFAULT_THREAD_COUNT, DEFAULT_TASK_SIZE, DEFAULT_REFUSE_POLICY);
}

public ThreadPool(int size, int maxTaskSize, RefusePolicy refusePolicy) {
    this.threadCount = size;
    this.maxTaskSize = maxTaskSize;
    this.workQueue = new LinkedList<>();
    this.taskQueue = new LinkedList<>();
    this.refusePolicy = refusePolicy;
    init(size);
}

public void execute(Runnable task) throws Exception {
    synchronized (taskQueue) {
        if (taskQueue.size() >= maxTaskSize) {
            refusePolicy.refuse();
            return;
        }
        taskQueue.add(task);
        taskQueue.notifyAll();
    }
}
测试
public static void main(String[] args) throws InterruptedException {
    ThreadPool threadPool = new ThreadPool();
    for (int i = 0; i < 300; i++) {
        int number = i;
        try {
            threadPool.execute(() -> {
                System.out.println(Thread.currentThread().getName() + "start execute task-" + number);
                try {
                    Thread.sleep(new Random(System.currentTimeMillis()).nextInt(100));
                } catch (InterruptedException e) {
                    e.printStackTrace();
                }
            });
        } catch (Exception e) {
            System.out.println("task-" + i + " execution error : " + e.getMessage());
        }
    }

    Thread.sleep(5000);
    threadPool.shutdown();
}
