[TOC]
React16 新特性总结
生命周期函数
不建议使用的生命周期函数
- componentWillReceiveProps
React 团队对于舍弃 componentWillReceiveProps 函数的解释是开发者错误地在该函数中引入 side effect(副作用,调用外部函数等),导致组件重复多次执行 Updating。正确的做法应该是将 Updating 中的 side effect 都放在 componentDidUpdate 生命周期函数中进行。 另外我个人觉得 componentWillReceiveProps 的功能没有一个明确的定位,往往用于实现通过 props 更新 state 的功能。但 componengWillReceiveProps 只在 Updating 中 props 更新时被调用,无法覆盖所有场景,比如 Mounting 时需要在 contructor 中用 props 初始化 state。故需要使用多个生命周期函数才能实现 props 更新 state 这一单一功能。而 React16 中新提出来的 getDerivedStateFromProps 函数覆盖了所有 state 更新的场景。 - componentWillUpdate React 舍弃 componentWillUpdate 函数的解释与 componentWillReceiveProps 的解释一致。开发者可以将 componentWillUpdate 中的一些 side effects 放置在 componentDidUpdate中。如果开发者想在组件更新前获取 DOM 的信息,可以通过 React16 中新提出来的 getSnapshotBeforeUpdate 函数来实现。
- componentWillMount React 团队 React16 中提供的最核心的 async rendering (异步渲染)功能(目前暂未发布)中,组件的渲染可能会被中断。所以倘若开发者在 componentWillMount 进行了事件绑定,在 componentWillUnmount 中取消事件绑定的话,就可能发生因为异步渲染取消,因而没有调用 componentWillUnmount 函数,从而导致事件回调函数对象的内存泄漏。
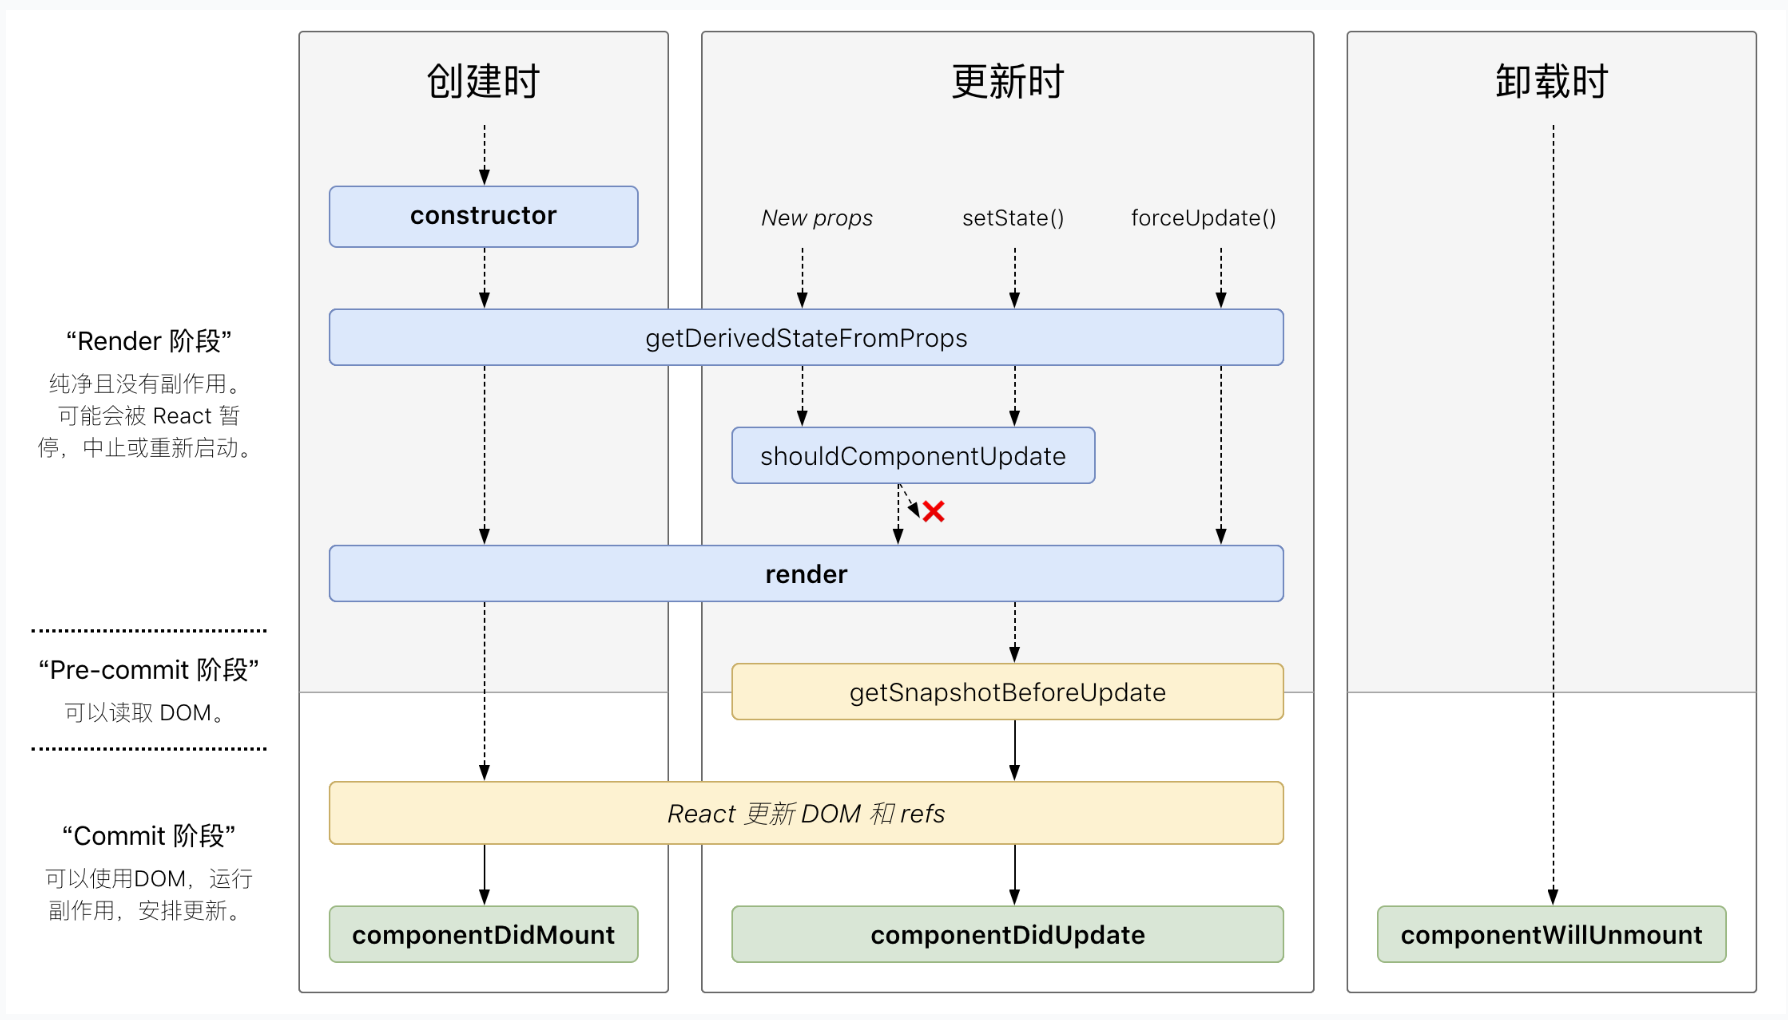
- 小结 从数量上可以看出,React 对类组件的生命周期函数进行了精简。主要取消了 render 阶段中,容易让开发者引入 side effects 的生命周期函数。这样做的主要目的是为了确保 render 阶段顺利执行,不会因为 side effects 带来的重复执行 render 阶段。从而强迫开发者将 side effects 移入 commit 阶段的生命周期函数中。
static getDerivedStateFromProps(props, state)
新的生命周期函数 getDerivedStateFromProps 位于 Mounting 挂载阶段和由 props 更新触发的 Updating 阶段。getDerivedStateFromProps 主要用于替换 componentWillReceiveProps 函数,其功能更加明确,就是根据 props 更新组件的 state。
class Demo extends React.Component{
	state = {
		tmpA: 1,
		tmpB: 'test',
		lastA: null,
		lastB: null
	};

	static getDerivedStateFromProps(props, state){
		if(props.a !== state.lastA){
			return {
				tmpA: props.a,
				lastA: props.a
			}
		}
		return null;
	}

	render(){
		return <div>
			<input
				value={this.state.tmpA}
				onChange={e => {
					this.setState({tmpA: e.target.value})
				}}
			/>
		</div>
	}
}
需要注意的几点是:
- getDerivedStateFromProps 为类的静态方法,无法使用 this 关键字,此举也降低了开发者在该函数中引入 side effects 的可能。
- getDerivedStateFromProps 的参数 props 为将要更新的 props(nextProps)。由于函数中无法使用 this 关键字,需要访问 this.props 的话,可以将 props 中需要用于更新 state 的字段记录在 state 中(如代码中的 lastA 和 lastB)。
- getDerivedStateFromProps 返回的对象和跟 state 进行合并,更新后的 state 用于 render。如果 state 不需要更新,则必须返回 null。
- 其实 React 官方并不提倡使用 derived state,因为这样会使类组件逻辑变得复杂代码臃肿。对于需要根据 props 更新 state 的需求,React 官方建议优化组件的设计来避免。个人总结主要有以下两种方式:
- 直接将组件拆分为完全受控组件,去掉组件的 state
- 对于非受控组件,更新 props 时通过修改组件的 key 值,让组件重新挂载
getSnapshotBeforeUpdate(prevProps, prevState)
getSnapshotBeforeUpdate 函数调用于 render 函数之后 componentDidUpdate 函数之前,主要用于获取更新前的 DOM 元素的信息。关于该函数的用法,React 的官方示例为:
```javascript
//这是一个带滚动条的列表组件
class ScrollingList extends React.Component {
  constructor(props) {
	  super(props);
	  this.listRef = React.createRef();
  }

  getSnapshotBeforeUpdate(prevProps, prevState) {
	  //如果此次更新中,列表变长,则记录更新前滚动的位置
	  //并作为componentDidUpdate函数的第三个参数传入
    if (prevProps.list.length < this.props.list.length) {
      const list = this.listRef.current;
      return list.scrollHeight - list.scrollTop;
    }
    //默认返回null
    return null;
  }

  componentDidUpdate(prevProps, prevState, snapshot) {
	  //根据更新前的滚动位置,设置更新后列表的滚动长度
    if (snapshot !== null) {
      const list = this.listRef.current;
      list.scrollTop = list.scrollHeight - snapshot;
    }
  }

  render() {
    return (
      <div ref={this.listRef}>{/* ...contents... */}</div>
    );
  }
}
```
需要注意的几点:
- getSnapshotBeforeUpdate 函数需要和 componentDidUpdate 一起使用,否则会报 warning
- getSnapshotBeforeUpdate 在生命周期中为什么要在 render 函数之后而不是之前调用?我认为主要还是因为 React 想保证 render 阶段的无副作用,从而在 commit 阶段强行添加一个 pre-commit 阶段来获取更新前的 DOM。可以看出,getSnapshotBeforeUpdate 的引入只是一个折中方案。
小结
可以看出 React16 中,类组件的一个组件的生命周期被划分为类 render 和 commit 两个阶段,render 阶段主要负责组件渲染相关,包括对渲染数据 state 的更新。为了防止一次更新中 render 阶段重复执行,React 将该阶段可能引入 side effects 的生命周期函数 componentWillReceiveProps、componentWillUpdate、componentWillUnmount 等函数移除。
针对需要通过 props 计算 derived state 的需求,提供静态函数 getDerivedStateFromProps。针对获取更新前 DOM 元素的需求,React16 提供了 getSnapshotBeforeUpdate 生命周期函数。
Hooks
简介
React 官方文档对 Hooks 的介绍是 Hooks are a new addition in React 16.8. They let you use state and other React features without writing a class,从介绍中我们可知:
- Hooks只能在函数组件中使用
- Hooks 为函数式组件添加了本来只有类组件才有的一些特性,比如 state。
动机
-
组件逻辑代码复用 相比于 HOC、renderProps 而言,需要提供一个更加灵活轻便并且是原生支持的状态逻辑复用机制。个人总结 renderProps 和 HOC 的缺点在于:
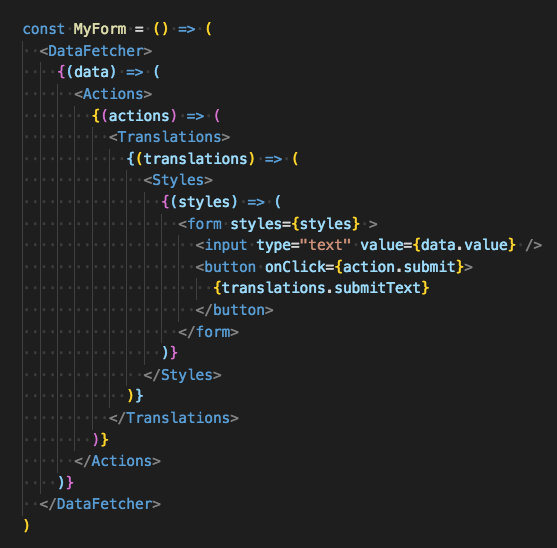
- 二者都会引入 wrapper hell,无论 HOC 还是 renderProps,都是将需要复用都逻辑代码通过另外一个组件引入进来。这些组件虽然只负责逻辑代码的复用,但在 React 组件树中仍然需要渲染或者作为一个抽象组件(不会渲染成真实的 DOM 组件)存在。当复用较多时,React 组件树就会因为多层的 HOC wrapper 或者 render props 的引入而变得臃肿。
- 当对原有代码进行重构时,render props 和 HOC 都会去修改原有组件的结构。
- renderProps 和 HOC 只是在已有机制上的一种设计模式,React 还缺少一个原生机制来支持组件内部逻辑代码的复用。
- renderProps 和 HOC 目前还存在各自的缺点,而 Hooks 可以成功避免这些缺点:
- HOC 需要借助 React 的 class 组件来进行实现,而 React 已经在逐步抛弃 class 组件模式
- renderProps 较多时会导致 render props 的 callback hell
-
HOC、render props 和 Hooks 实现逻辑代码复用示例
当我们需要实现一个简单的显示隐藏的功能时,一般是在组件的 state 中定义一个控制现实还是隐藏的布尔变量,并再添加一个 show 和 hide 方法来控制该变量。如果要将这段逻辑代码提取出来复用的话,可以通过高阶组件 HOC、render props 或者 Hooks 来实现,以下分别列出这三种方法的实现代码以及对应的 React 组件树结构。可以看出使用 Hooks 复用逻辑代码时,由于没有创建额外的组件,故无论是代码还是最后生成的 React 组件树,都是 Hooks 的实现方式更简洁。- HOC
const Wrapper = WrappedComponent => class extends React.Component{
    constructor(props) {
        super(props);
        this.state = {
            isDisplayed: defaultTo(props.initialState, false),
        };
        this.hide = this.hide.bind(this);
        this.show = this.show.bind(this);
    }
    hide() {
        this.setState({isDisplayed: false,});
    }
    show() {
        this.setState({isDisplayed: true,});
    }
    render(){
        const newProps = {
            ...this.props,
            ...this.state,
            hide: this.hide,
            show: this.show
        };
        return <WrappedComponent {...newProps}/>
    }
};

const App = Wrapper(({isDisplayed, hide, show}) => {
        return (
            <div className="App">
                {
                    isDisplayed &&
                    <p onClick={hide}>Click to hide</p>
                }
                <button onClick={show}>Click to display</button>
            </div>
        );
})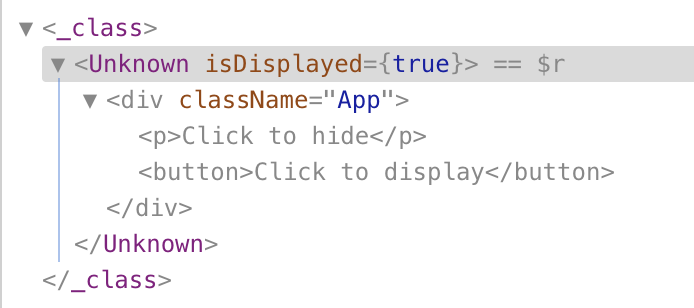
- render props
	class VisibilityHelper extends React.Component {
    constructor(props) {
        super(props);
        this.state = {
            isDisplayed: defaultTo(props.initialState, false),
        };
        this.hide = this.hide.bind(this);
        this.show = this.show.bind(this);
    }
    hide() {
        this.setState({isDisplayed: false});
    }
    show() {
        this.setState({isDisplayed: true});
    }
    render() {
        return this.props.children({
            ...this.state,
            hide: this.hide,
            show: this.show,
        });
    }
}

const App = () => (
    <div className="App">
        <VisibilityHelper>
           {
               ({isDisplayed, hide, show}) => (
                    <div>
                        {
                           isDisplayed &&
                           <p onClick={hide}>Click to hide</p>
                        }
                        <button onClick={show}>Click to display</button>
                    </div>
                )
            }
        </VisibilityHelper>
    </div>
);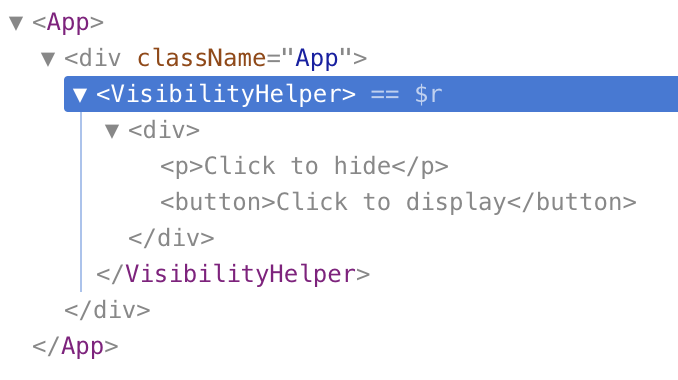
- Hooks
import React, {useState} from 'react';

function useIsDisplayed(initialValue) {
    const [isDisplayed, setDisplayed] = useState(defaultTo(initialValue, false));
    function show(){
        setDisplayed(true);
    }
    function hide() {
        setDisplayed(false);
    }
    return {isDisplayed, show, hide};
}

const App = () => {
    const {isDisplayed, show, hide} = useIsDisplayed(false);
    return (
        <div className="App">
            {
                isDisplayed &&
                <p onClick={hide}>Click to hide</p>
            }
            <button onClick={show}>Click to display</button>
        </div>
    );
};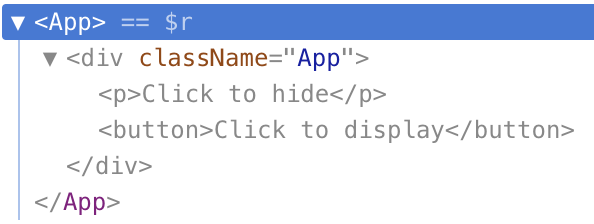
-
武装函数式组件 React 现在力推函数式组件,并逐渐弃用 class 组件(具体原因后面章节再讨论)。之前的函数式组件由于没有 state 以及类型 class 组件生命周期函数的机制,往往用来作展示型组件。而通过 useState hook 可以为函数式组件添加 state,通过 useEffect 可以在函数式组件中实现 class 组件生命周期函数的功能。
useState 介绍
useState 函数用于给函数式组件提供能够持久存储并能将变化映射到视图上的状态 state hook,类似 class 组件中的 state。在上节给出的 Hooks 实现逻辑代码复用的例子中已经展示了 useState 函数的使用。useState 函数的返回值为一个数组,数组中第一个元素为 state 对象,第二个元素为一个 dispatch 方法,用于更新该 state。基本使用为:
import React, {useState} from 'react';
function Counter(){
//声明一个 count 变量,可以通过 setCount dispatch 一个新的 count 值
const [count, setCount] = useState(0);
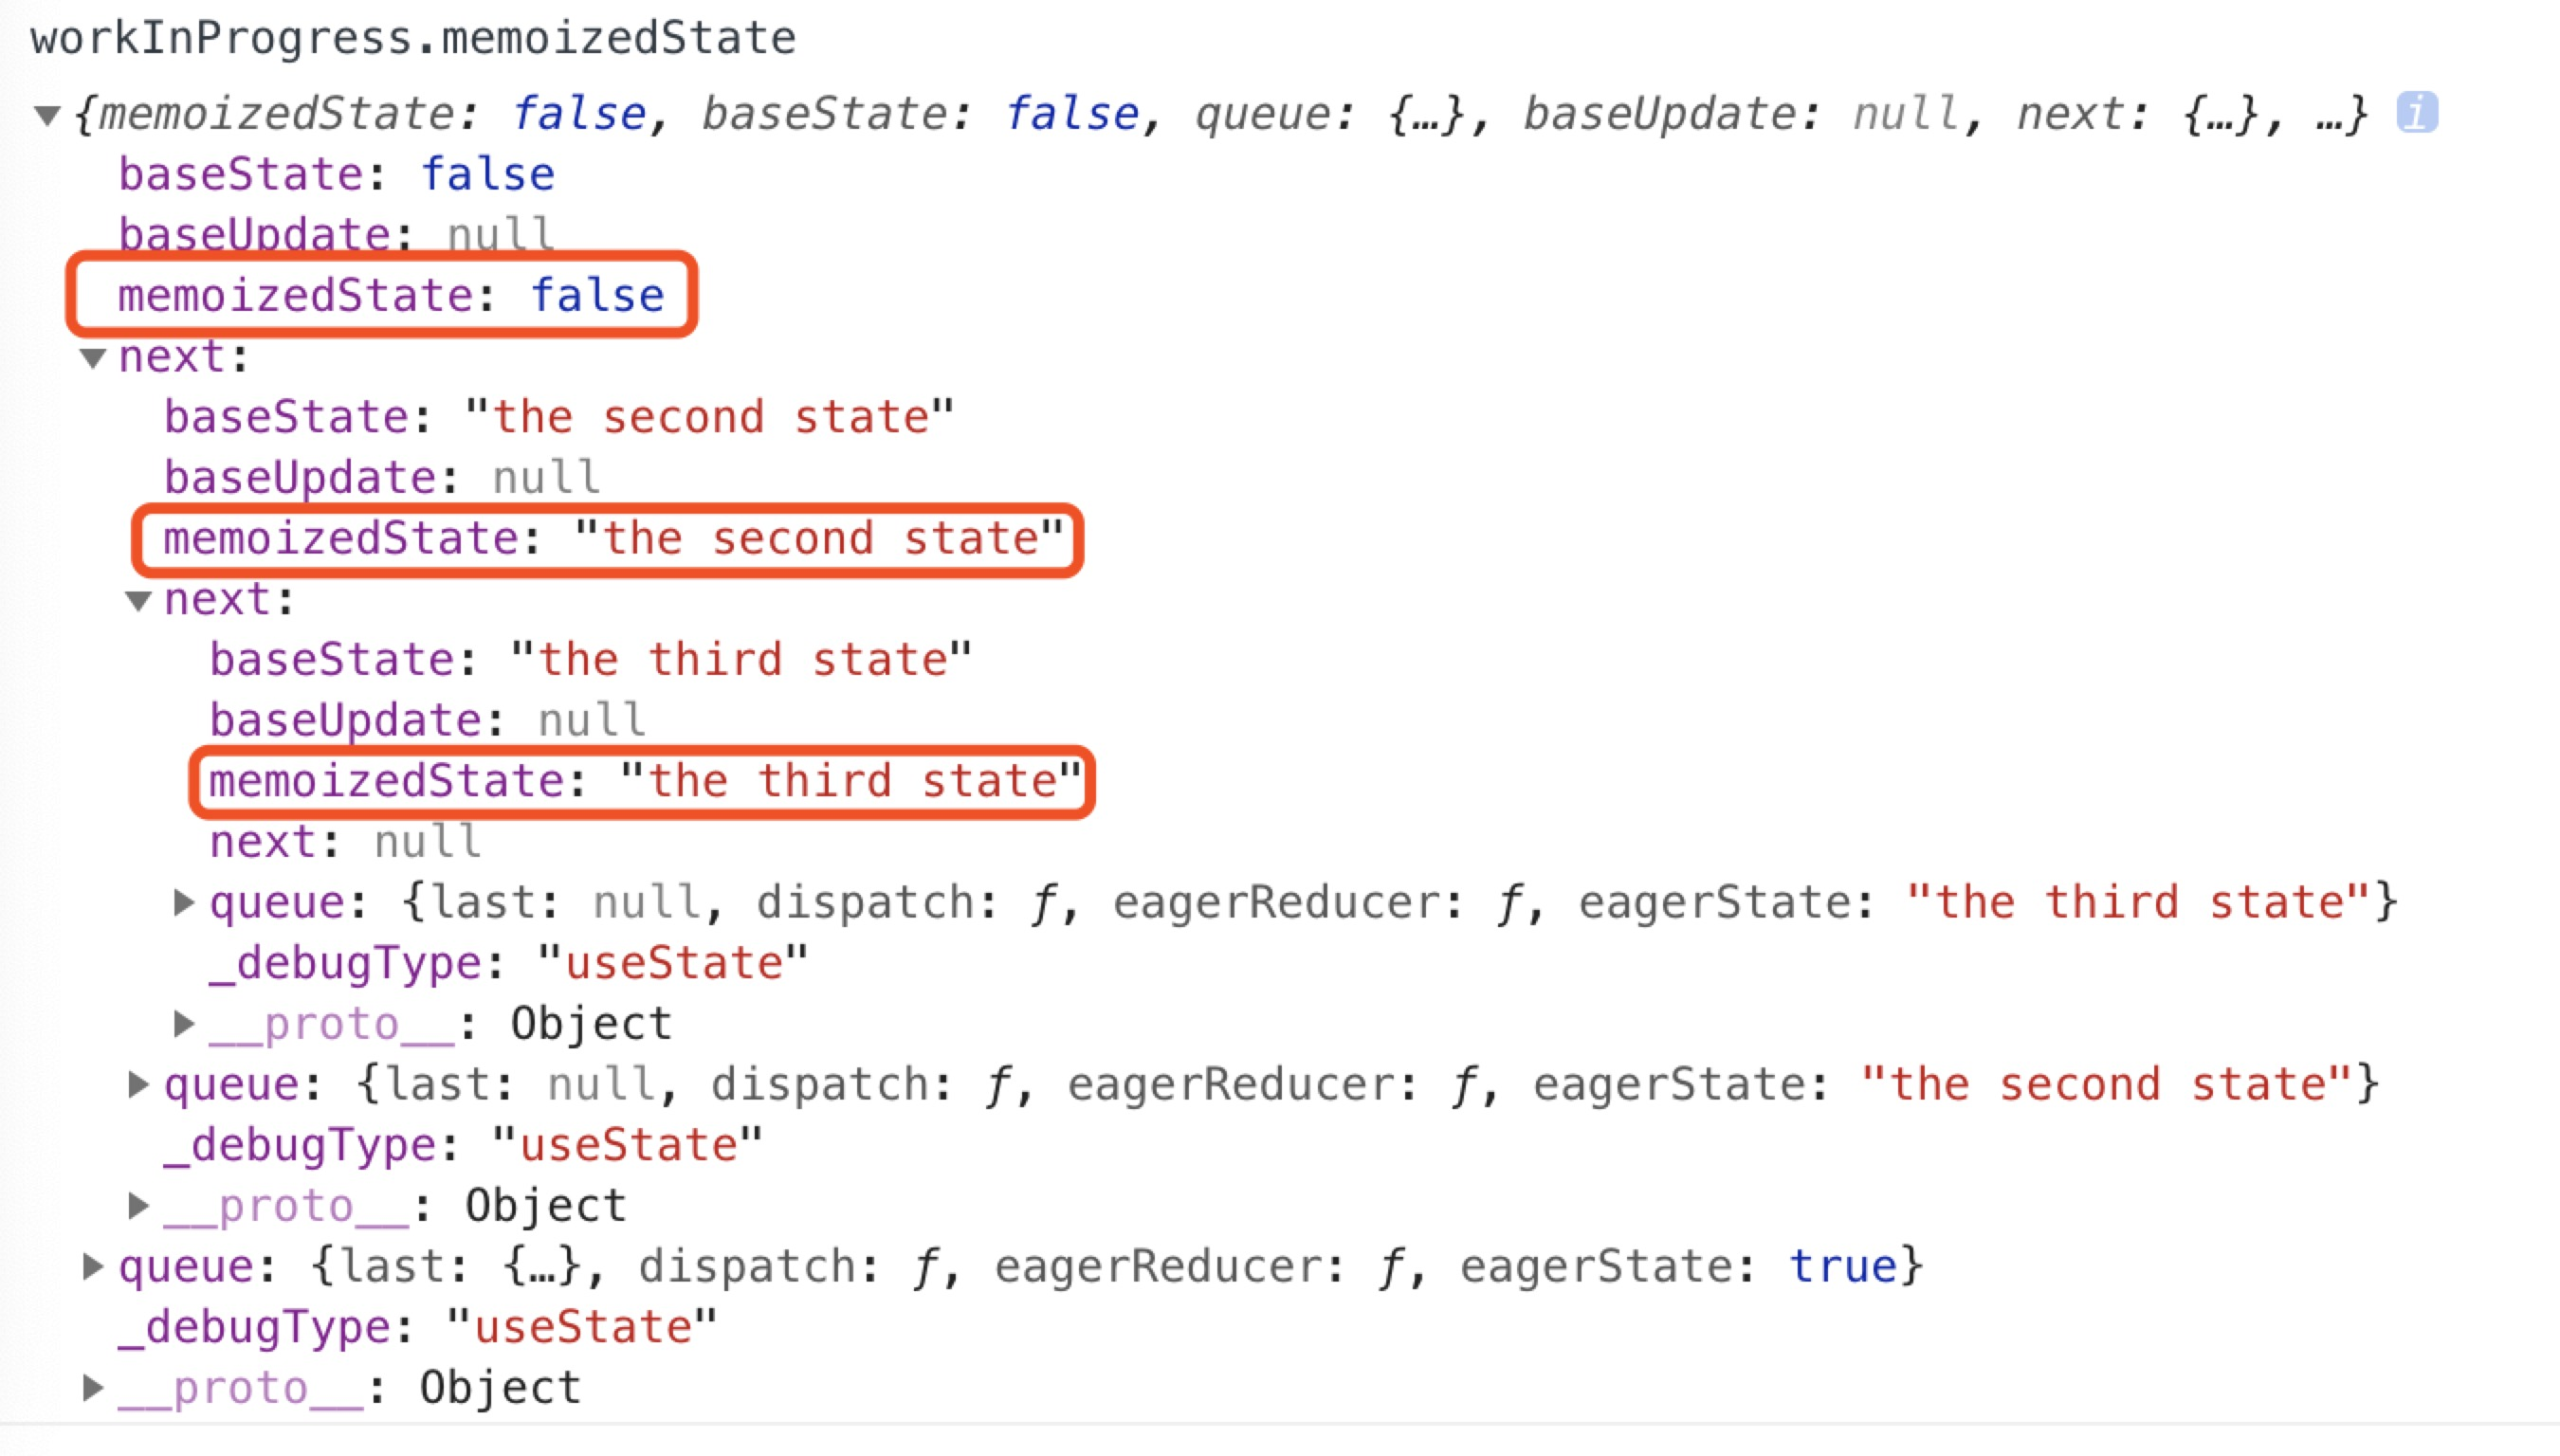
useState('the second state');
useState('the third state');
return <div>
<p>Count: {count}</p>
<button onClick={() => setCount(count + 1)}>+</button>
</div>
}
- state 如何存储
上例中我们可以看到,除了第一次执行组件渲染时调用来 useState(0) 生成一个 state 后,之后重新执行组件渲染时,获取到到 state 都是更改之后都值,故在 React 应该对 state 做了外部存储。React16 中,一次函数式组件的更新中 Hooks 调用逻辑在函数 renderWithHooks 中实现。模块全局变量 firstCurrentHook 指向当前渲染组件的第一个 Hook
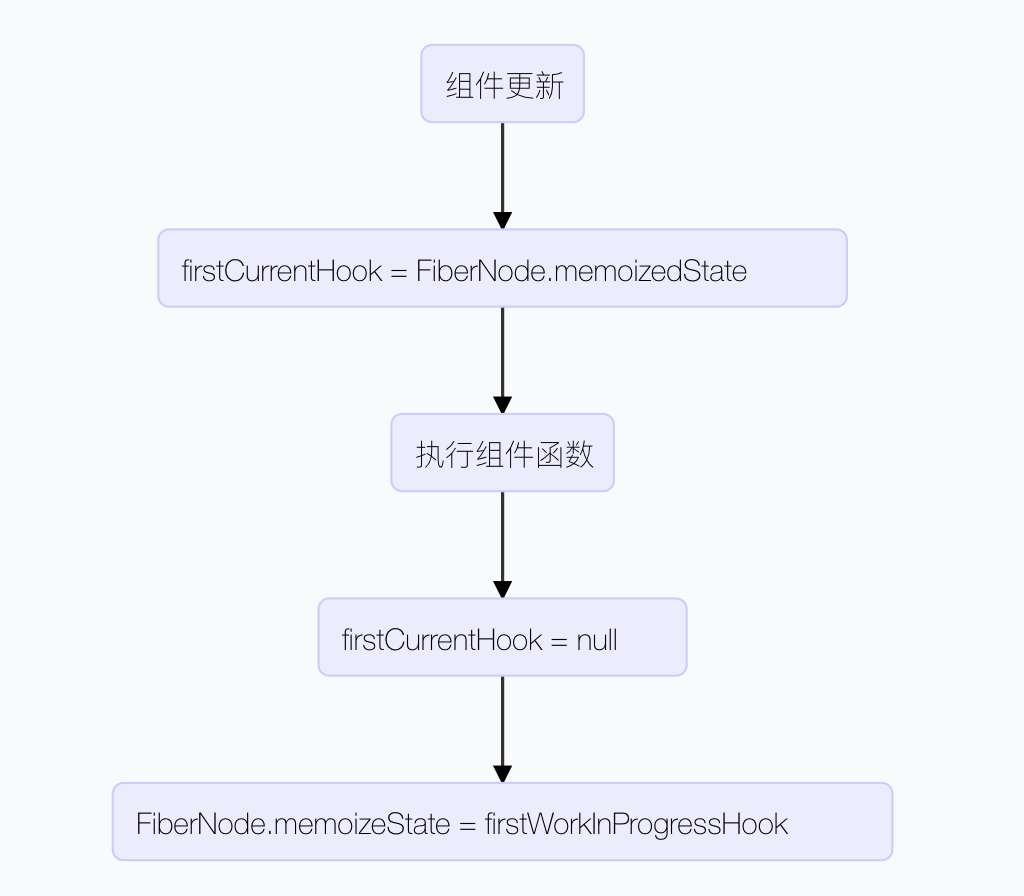
- 同一个组件中的 hooks (state hooks 以及后面的 effect hooks) 都是以链表的形式组织的**,每个 hook.next 指向下一个被声明的 hook。故在示例图中只用找到第一个 hook (firstWorkInProgressHook) 即可。
- 组件的 FiberNode.memoizedState 指向组件的第一个 Hook。下图是本节例子中组件的 hooks 链接结构。当组件被销毁的时候,hooks 才会被销毁,更新过程中的 state 都保存在 FiberNode.memoizedState 属性中。另外 useState 方法返回的第二个 dispatch 函数就是 下图 queue 中的 dispatch 函数
- state hooks 如何触发组件重新渲染 当我们调用 setCount 更新 count 值后,就会触发 Counter 组件的重新渲染。setCount 就是 state hook count 的 dispatch 函数。在初始化 state hooks 的时候,React 会将组件的 Fiber 绑定到 dispatch 函数上,每次 dispatch 函数执行完后会创建一个 Fiber 的更新任务。
- 关于 useState 的使用
- 建议 useState 声明的 state 尽量细颗粒,因为每次更新 state 时都是替换整个 state,如果使用 useState 声明一个大对象的话,不利于 state hooks 的复用
- 尽管组件每次更新时都会调用 useState 函数,但 useState 作为 state 初始值的参数只有在函数首次渲染时才会被使用。所以不建议在 useState 参数中调用 state 的初始化函数对 state 进行初始化,因为在后面每次组件更新中,都会执行一次 state 初始化函数的无效调用。正确的做法是,将 state 初始化函数作为参数传入 useState,因为 state 初始化函数只有在第一次调用 useState 函数时才会执行。
useEffect 介绍
useEffect 函数用于创建一个 effect hook。effect hooks 用于在函数式组件的更新后执行一些 side effects,其之于函数式组件就相当于 componentDidMount 和 componentDidUpdate 之于 class 组件。useEffect 的基本用法为:
const App = () => {
    const [text, setText] = useState('');
    useEffect(() => {
        window.addEventListener('keydown', writing, false);
        return () => {
            window.removeEventListener('keydown', writing, false);
        }
    });

    function writing(e){
        setText(text + e.key);
    }

    return (
        <div className="App">
            <p>{text}</p>
        </div>
    );
};
上例是一个使用函数式组件和 state hooks 以及 effect hooks 实现的监听用户键盘输入并现实输入字符串的功能。可以看到,我们使用 state hooks 来存储以及更新用户输入的字符串,用 effect hooks 来监听以及取消监听 keydown 事件。
- useEffect 的输入是一个函数,该函数在组件渲染完成后执行,主要用于处理一些 side effects
- useEffect 的输入函数可以 return 一个函数,该函数在每次组件重新渲染前以及组件 Unmount 前执行,主要用于解除事件监听
- 函数式组件重新渲染时,先执行 effect hook 的返回函数,再执行 effect hook。对于示例代码而言,就是先执行
window.removeEventListener再执行window.addEventListener - 默认情况下,每次重新渲染时都会执行 effect hooks,比如上例中,每次输入字符后,window 都会执行一边取消监听以及监听 keydown 事件。出于性能的考虑,useEffect 方法提供了第二个数组参数,即
useEffect(() => {}, [])。当传入第二个参数时,只有当第二个参数中的某个 state 或者 props 改变时,该 effect hook 才会被调用。值得注意的是:此时 effect hook 以及在其间的回调函数只能访问到 useEffect 数组参数中的 state 和 props 的最新值,其它 state 和 props 只能获取到初始值 - 使用 effect hooks 可以在一个 useEffect 函数中完成一个事件绑定/解除绑定、订阅/取消订阅的操作。相比于 class 组件中将事件相关的逻辑分散在 componentDidMount 和 componentWillUnmount 两个函数中,useEffect 代码更为紧凑。
useRef 介绍
和 React16 中提供的 createRef 方法一样,用于获取 React 组件的 ref。官方示例:
function TextInputWithFocusButton() {
  const inputEl = useRef(null);
  const onButtonClick = () => {
    //inputEl 的 current 属性指向 input 组件的 dom 节点
    inputEl.current.focus();
  };
  return (
    <>
      <input ref={inputEl} type="text" />
      <button onClick={onButtonClick}>Focus the input</button>
    </>
  );
}
除了用于获取组件 ref 以外,useRef 还可以用于实现类似于 class 组件的实例属性(this.XXX),直接通过对 useRef 方法返回对象的 current 属性进行读写即可。
useReducer 介绍
useReducer 实现了 Redux 中的 reducer 功能。当 state 的逻辑比较复杂的时候,可以考虑使用 useReducer 来定义一个 state hook。示例:
const initialState = {count: 0};

function reducer(state, action) {
  switch (action.type) {
    case 'increment':
      return {count: state.count + 1};
    case 'decrement':
      return {count: state.count - 1};
    default:
      throw new Error();
  }
}

function Counter({initialState}) {
  const [state, dispatch] = useReducer(reducer, initialState);
  return (
    <>
      Count: {state.count}
      <button onClick={() => dispatch({type: 'increment'})}>+</button>
      <button onClick={() => dispatch({type: 'decrement'})}>-</button>
    </>
  );
}
上例是 React 官方提供的 useReducer 的使用示例。当然和 Redux 一样,dispatch 的 action 可以由 actionCreator 来生成。
Hooks 使用规则
- 不要在非 React 函数式组件外调用 useXXX 在调用 useXXX 方法时,会读取当前的组件的 Fiber,如果 Fiber 不存在则报错
- 不要在条件语句中调用 useXXX
在介绍 useState 的时候我们提到过,同一个组件内的所有 Hooks 是由声明的先后顺序,通过链表进行存储的。- 在 React 的 renderWithHooks 和 updateWorkInProgressHook 函数中会通过 currentHook 来记录当前执行的 hook
- currentHook 初始化以及每次执行完组件渲染后都会置为 null。每当执行完 currentHook 后,会将 currentHook 指向 currentHook.next
- 执行完组件渲染后,如果 currentHook.next 不为 null,说明被渲染组件的 Hooks 链表中仍有未执行的 Hooks ,报错
var didRenderTooFewHooks = currentHook !== null && currentHook.next !== null;
自定义 Hook
本节直接使用 React 官网提供的示例代码,需要注意的是,自定义 Hooks 也需要满足上节中提到的使用规则。
import React, { useState, useEffect } from 'react';

//useFriendStatus 为根据好友 ID 获取好友是否在线的自定义 Hook
function useFriendStatus(friendID) {
  const [isOnline, setIsOnline] = useState(null);

  function handleStatusChange(status) {
    setIsOnline(status.isOnline);
  }

  useEffect(() => {
    ChatAPI.subscribeToFriendStatus(friendID, handleStatusChange);
    return () => {
      ChatAPI.unsubscribeFromFriendStatus(friendID, handleStatusChange);
    };
  });

  return isOnline;
}

const friendList = [
  { id: 1, name: 'Phoebe' },
  { id: 2, name: 'Rachel' },
  { id: 3, name: 'Ross' },
];

//聊天对象选择列表组件
function ChatRecipientPicker() {
  const [recipientID, setRecipientID] = useState(1);

  //通过使用 useFriendStatus Hook,
  //将获取当前好友是否在线的逻辑从组件中分离出去
  const isRecipientOnline = useFriendStatus(recipientID);

  return (
    <>
      <Circle color={isRecipientOnline ? 'green' : 'red'} />
      <select
        value={recipientID}
        onChange={e => setRecipientID(Number(e.target.value))}
      >
        {friendList.map(friend => (
          <option key={friend.id} value={friend.id}>
            {friend.name}
          </option>
        ))}
      </select>
    </>
  );
}
使用 Hooks 代替生命周期函数
- constructor class 组件中 constructor 函数一般实现:创建 this、绑定事件处理函数以及初始化 state 等功能。在 FC 中不需要 this 关键字,另外可以通过传入 state 初始化函数到 useState 第二个参数来初始化 state
- render FC 组件函数本身就是 render 函数
- componentDidMount 使用 *useEffect(() => {}, []) 代替 componentDidMount。由于 useEffect 第二个参数为空数组,故第一个参数中的函数只有在组件挂载和卸载时调用
- componentWillUnmount 和 componentDidMount 一样,使用第二个参数为空数组的 useEffect 代替。当组件卸载时,useEffect 第一个函数参数的返回函数会被调用。componentWillUnmount 里面的逻辑可以卸载该函数中
- componentDidUpdate 使用 useEffect 代替 componentDidUpdate,首次渲染触发的 effect hook 中添加判断跳过即可。
- getDerivedStateFromProps 函数式组件中,要实现 class 组件的 getDerivedStateFromProps 函数需要考虑亮点:一是保存上一次的 props 用于和当前要更新的 props 进行比较;二是当 props 变化后触发相应的 derived state 改变。前者可以通过定一个 state hook (称作 prevPropsHook)来记录最近一次更新的 props。后者可以在组件函数调用时通过对比 prevPropsHook 的值与 props 是否相同,若不同则改变相应 state hook 的值。
- shouldComponentUpdate
在 class 组件中,props 和 state 的更新都会触发 shouldComponentUpdate 函数。
- 在函数式组件中,通过高阶组件 React.memo 实现 props 更新判断时候需要重新渲染组件。React.memo 使用方式为
function F({count = 0, isPure = false}){ console.log(`render ${isPure ? 'pure FC' : 'FC'} ${count} times`); return <h2>{count}</h2> } const PureFC = React.memo(F, /*areEqual(prevProps, nextProps)*/); class App extends React.Component{ state = { count: 0, fakeState: false }; render(){ const {count, fakeState} = this.state; return <div> <F count={count} isPure={false}/> <PureFC count={count} isPure={true}/> <button onClick={() => { this.setState({count: count + 1})} }>increase</button> <button onClick={() => {this.setState({fakeState: !fakeState})}}>Click2</button> </div>; } } //*click increase button //render FC 1 times //render pure FC 1 times //*click Click2 button //render FC 1 times- 由于 FC 通过 state hooks 模拟了 class 组件的 state,所以当 state hooks 更新时也需要一个机制模拟 shouldComponentUpdate 函数的跳过 state 更新的功能。React 官方提供的方法比较别扭,即用 useMemo 包裹渲染了 state 的子组件来实现。useMemo 只会在第二个数组参数中的某个元素变化时,才会触发 第一个函数函数的重新执行。官方示例为:
function Parent({ a, b }) { // Only re-rendered if `a` changes: const child1 = useMemo(() => <Child1 a={a} />, [a]); // Only re-rendered if `b` changes: const child2 = useMemo(() => <Child2 b={b} />, [b]); return ( <> {child1} {child2} </> ) } - 其它生命周期函数 诸如 getSnapshotBeforeUpdate、getStateFromError 和 componentDidCatch 函数在 hooks 中还未找到替代方法。
Context
Context 主要解决了 React 组件树非父子组件的状态共享问题,以及子组件与祖先组件之前多层 props 传递繁琐的问题。官方示例:
const ThemeContext = React.createContext('light');

class ThemeProvider extends React.Component {
  state = {theme: 'light'};

  render() {
    return (
      <ThemeContext.Provider value={this.state.theme}>
        {this.props.children}
      </ThemeContext.Provider>
    );
  }
}

const ThemedButton = () => {
  render() {
    return (
      <ThemeContext.Consumer>
        {theme => <Button theme={theme} />}
      </ThemeContext.Consumer>
    );
  }
}
- React.createContext 用于创建一个 Context 对象,该对象支持订阅发布功能。组件可以通过 Context.Provider 发布一个新的值,其所有订阅了该 Context 对象的子组件就可以即使获取到更新后的值。上例中 createContext 方法的参数作为 Context 对象 ThemeContext 的默认值,订阅了 ThemeContext 的组件在获取 Context 值的时候会沿着副组件向上搜索 Context.Provider,如果没有搜索到 Context.Provider,则会使用该默认值。
- Context.Provider 用于发布 Context,Provider 的子组件会从 Context.Provider 组件的 value 属性获取 Context 的值。
- Context.Consumer 可以监听 Context 的变化。当 Context.Provider 的 value 属性变化后,该 Provider 组件下的所有 Consumer 组件都会重新渲染,并且不受 shouldComponentUpdate 返回值的影响。Consumer 采用了 render props 模式, 其子组件为一个函数,函数参数为其监听的 Context 的值。
###Error Boundary React16 中如果组件生命周期中抛出了未经捕获的异常,会导致整个组件树卸载。React16 提供了两个生命周期函数用于捕获子组件中在生命周期中抛出的异常。一个是 static getDerivedStateFromError(error) 在渲染阶段 render 函数前调用,,另一个是 componentDidCatch 在 commit 阶段即完成渲染后调用。关于这两个函数,React 官方示例为:
class ErrorBoundary extends React.Component {
  constructor(props) {
    super(props);
    this.state = { hasError: false };
  }

  static getDerivedStateFromError(error) {
    //主要用于根据额 error 更新 state.
    //和 getDerivedStateFromProps 函数类似,
    //返回的对象会更新到 state
    return { hasError: true };
  }

  componentDidCatch(error, info) {
    //主要用于在 commit 阶段处理错误相关的 side effects
    //比如此处的发送错误信息到服务器
    logErrorToMyService(error, info);
  }

  render() {
    if (this.state.hasError) {
      return <h1>Something went wrong.</h1>;
    }
    return this.props.children;
  }
}
关于 Error Boundary 需要注意的几点是:
- 添加了 getDerivedStateFromError 或者 componentDidCatch 函数的组件可以作为 ErrorBoundary。ErrorBoundary 只会捕获其子组件中抛出的异常,无法捕获自身抛出的异常
- ErrorBoundary 只能捕获子组件生命周期中抛出的异常。其它的,比如回调函数以及事件处理函数中抛出的异常就无法捕获。
- 事件处理函数中建议使用 JavaScript 的 try/catch 进行异常捕获
其它
Portal
在使用 React16 时,如果我们在渲染组件时需要渲染一个脱离于当前组件树之外的组件(如对话框、tooltip等),可以通过 ReactDOM.createPortal(Child, mountDom)* 函数创建一个 Portal,将 React 组件 Child 挂载到真实 DOM 元素 mountDom 上。示例代码:
//html
<body>
    <div id="root"></div>
    <div id="modal"></div>
</body>

//js
const modalDom = document.querySelector('#modal');

function Child(){
    function handleClick(){
        console.log('click child');
    }
    return <button onClick={handleClick}>Child Button</button>
}

function App(){
    const [count, setCount] = useState(0);

    return <div onClick={() => {setCount(count + 1)}}>
        <h1>{count}</h1>
        {
            ReactDOM.createPortal(
                <Child/>,
                modalDom //将 Child 挂载到 id=modal 的 div 元素下
            )
        }
    </div>
}
//将 App 挂载到 id=root 的 div 元素下
ReactDOM.render(<App />, document.getElementById('root'));
上例中,虽然 Child 组件的真实 DOM 节点挂载在 modal 下,而 App 组件的真实 DOM 节点挂载在 root 下。但 Child 组件中的 Click 事件仍然会冒泡到 App 组件。故我们点击 button 时,会依次触发 Child 组件的 handleClick 函数,以及 App 组件的 setCount 操作。
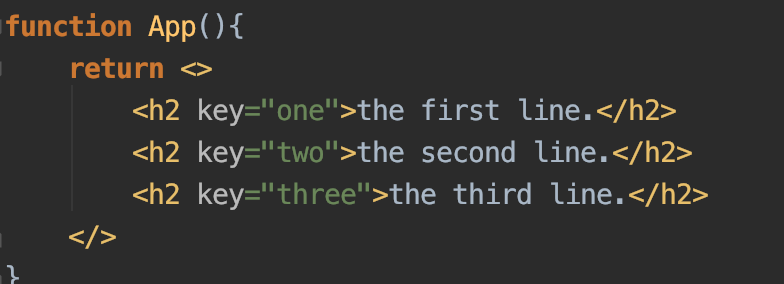
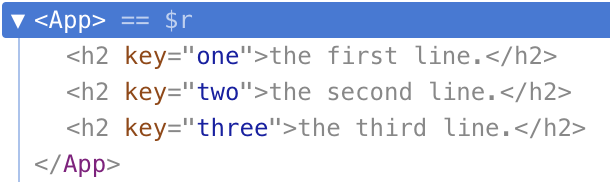
React.Fragment 组件
React16 中可以通过 React.Fragment 组件来组合一列组件,而不需要为了返回一列组件专门引入一个 DIV 组件。其中 <></> 是 <React.Fragment></React.Fragment>的简写。