1.背景
在之前的文章中已经介绍过Seata的总体介绍,如何使用以及Seata-Server的原理分析,有兴趣的可以阅读下面的文章:
这篇文章会介绍Seata中另外两个重要的角色TM(事务管理器)和RM(资源管理器),首先还是来看看下面这张图:
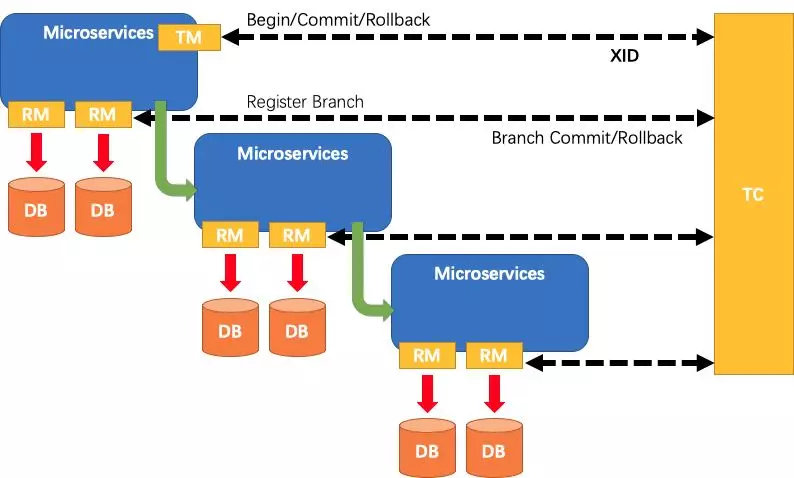
TC的原理已经做了详细介绍,对于TM和RM我们看见在图中都是属于client的角色,他们分别的功能如下:
TM(事务管理器):用来控制整个分布式事务的管理,发起全局事务的Begin/Commit/Rollback。RM(资源管理器):用来注册自己的分支事务,接受TC的Commit或者Rollback请求.
2.Seata-Spring
首先我们来介绍一些Seata-client中Spring模块,Seata通过这个模块对自己的TM和RM进行初始化以及扫描AT模式和TCC模式的注解并初始化这些模式需要的资源。
在Seata的项目中有一个spring模块,里面包含了我们和spring相关的逻辑,GlobalTransactionScanner是其中的核心类:
public class GlobalTransactionScanner extends AbstractAutoProxyCreator implements InitializingBean,ApplicationContextAware,
        DisposableBean
上面代码是类的定义,首先它继承了AbstractAutoProxyCreator实现了wrapIfNecessary方法实现我们的方法的切面代理,实现了InitializingBean接口用于初始化我们的客户端,实现了ApplicationContextAware用于保存我们的spring容器,实现了DisposableBean用于优雅关闭。
首先来看继承AbstractAutoProxyCreator实现的wrapIfNecessary
    protected Object wrapIfNecessary(Object bean, String beanName, Object cacheKey) {
        if (PROXYED_SET.contains(beanName)) {
            return bean;
        }
        interceptor = null;
        //check TCC proxy
        if (TCCBeanParserUtils.isTccAutoProxy(bean, beanName, applicationContext)) {
            //TCC interceptor, proxy bean of sofa:reference/dubbo:reference, and LocalTCC
            interceptor = new TccActionInterceptor(TCCBeanParserUtils.getRemotingDesc(beanName));
        } else {
            Class<?> serviceInterface = SpringProxyUtils.findTargetClass(bean);
            Class<?>[] interfacesIfJdk = SpringProxyUtils.findInterfaces(bean);
            if (!existsAnnotation(new Class[]{serviceInterface})
                    && !existsAnnotation(interfacesIfJdk)) {
                return bean;
            }
            if (interceptor == null) {
                interceptor = new GlobalTransactionalInterceptor(failureHandlerHook);
            }
        }
        if (!AopUtils.isAopProxy(bean)) {
            bean = super.wrapIfNecessary(bean, beanName, cacheKey);
        } else {
            AdvisedSupport advised = SpringProxyUtils.getAdvisedSupport(bean);
            Advisor[] advisor = buildAdvisors(beanName, getAdvicesAndAdvisorsForBean(null, null, null));
            for (Advisor avr : advisor) {
                advised.addAdvisor(0, avr);
            }
        }
        PROXYED_SET.add(beanName);
        return bean;
    }
- Step1:检查当前
beanName是否已经处理过 如果处理过本次就不处理。 - Step2:根据注解,找到对应模式的
Inteceptor,这里有三种情况第一个TCC,第二个是全局事务管理TM的拦截器,第三个是没有注解,如果没有那么直接返回即可。 - Step3:将对应的
interceptor添加进入当前Bean。
然后再看从InitializingBean中实现的afterPropertiesSet,也就是对Seata的初始化:
    public void afterPropertiesSet() {
        initClient();

    }
    private void initClient() {

        //init TM
        TMClient.init(applicationId, txServiceGroup);
        //init RM
        RMClient.init(applicationId, txServiceGroup);
        registerSpringShutdownHook();
    }
    private void registerSpringShutdownHook() {
        if (applicationContext instanceof ConfigurableApplicationContext) {
            ((ConfigurableApplicationContext) applicationContext).registerShutdownHook();
            ShutdownHook.removeRuntimeShutdownHook();
        }
        ShutdownHook.getInstance().addDisposable(TmRpcClient.getInstance(applicationId, txServiceGroup));
        ShutdownHook.getInstance().addDisposable(RmRpcClient.getInstance(applicationId, txServiceGroup));
    }
上面的代码逻辑比较清楚:
- Step1:初始化
TM客户端,这里会向Server注册该TM。 - Step2:初始化
RM客户端,这里会向Server注册该RM。 - Step3:注册
ShutdownHook,后续将TM和RM优雅关闭。
注意这里初始化的时候会初始化两个客户端,分别是TM客户端和RM客户端,很多人认为TM和RM是用的同一个客户端,这里需要注意一下。
2.1 Interceptor
再上面的第一部分逻辑中我们看到我们有两个业务核心Interceptor,一个是GlobalTransactionalInterceptor用来处理全局事务的管理(开启,提交,回滚),另外一个是TccActionInterceptor用来处理TCC模式。熟悉Seata的朋友会问AT模式呢,为什么只有TCC模式,这里AT模式代表着就是自动处理事务,我们不需要有切面
2.1.1 GlobalTransactionalInterceptor
首先来看看GlobalTransactionalInterceptor#invoke:
    public Object invoke(final MethodInvocation methodInvocation) throws Throwable {
        Class<?> targetClass = (methodInvocation.getThis() != null ? AopUtils.getTargetClass(methodInvocation.getThis()) : null);
        Method specificMethod = ClassUtils.getMostSpecificMethod(methodInvocation.getMethod(), targetClass);
        final Method method = BridgeMethodResolver.findBridgedMethod(specificMethod);

        final GlobalTransactional globalTransactionalAnnotation = getAnnotation(method, GlobalTransactional.class);
        final GlobalLock globalLockAnnotation = getAnnotation(method, GlobalLock.class);
        if (globalTransactionalAnnotation != null) {
            return handleGlobalTransaction(methodInvocation, globalTransactionalAnnotation);
        } else if (globalLockAnnotation != null) {
            return handleGlobalLock(methodInvocation);
        } else {
            return methodInvocation.proceed();
        }
    }
- Step1:从代理类中获取到原始的
Method - Step2: 获取
Method中的注解 - Step3: 如果有
@GlobalTransactional注解执行handleGlobalTransaction切面逻辑,这个也是我们全局事务的逻辑。 - Step4: 如果有
@GlobalLock注解,则执行handleGlobalLock切面逻辑,这个注解是用于一些非AT模式的数据库加锁,加上这个注解之后再执行Sql语句之前会查询对应的数据是否加锁,但是他不会加入全局事务。
handleGlobalTransaction逻辑如下:
    private Object handleGlobalTransaction(final MethodInvocation methodInvocation,
                                           final GlobalTransactional globalTrxAnno) throws Throwable {

        return transactionalTemplate.execute(new TransactionalExecutor() {

            @Override
            public Object execute() throws Throwable {
                return methodInvocation.proceed();
            }

        });
    }
    TransactionalTemplate#execute
        public Object execute(TransactionalExecutor business) throws Throwable {
        // 1. get or create a transaction
        GlobalTransaction tx = GlobalTransactionContext.getCurrentOrCreate();
        // 1.1 get transactionInfo
        TransactionInfo txInfo = business.getTransactionInfo();
        if (txInfo == null) {
            throw new ShouldNeverHappenException("transactionInfo does not exist");
        }
        try {
            // 2. begin transaction
            beginTransaction(txInfo, tx);
            Object rs = null;
            try {
                // Do Your Business
                rs = business.execute();

            } catch (Throwable ex) {
                // 3.the needed business exception to rollback.
                completeTransactionAfterThrowing(txInfo,tx,ex);
                throw ex;
            }
            // 4. everything is fine, commit.
            commitTransaction(tx);
            return rs;
        } finally {
            //5. clear
            triggerAfterCompletion();
            cleanUp();
        }
    }
在handleGlobalTransaction中将具体的实现交给了TransactionalTemplate#execute去做了,其中具体的步骤如下:
- Step1:获取当前的全局事务,如果没有则创建。
- Step2:获取业务中的事务信息包含超时时间等。
- Step3:开启全局事务
- Step4:如果有异常抛出处理异常,rollback。
- Step5:如果没有异常那么commit全局事务。
- Step6:清除当前事务上下文信息。
2.1.2 TccActionInterceptor
我们先看看TccActionInterceptor是如何使用:
    @TwoPhaseBusinessAction(name = "TccActionOne" , commitMethod = "commit", rollbackMethod = "rollback")
    public boolean prepare(BusinessActionContext actionContext, int a);

    public boolean commit(BusinessActionContext actionContext);

    public boolean rollback(BusinessActionContext actionContext);
一般来说会定义三个方法一个是阶段的try方法,另外一个是二阶段的commit和rollback,每个方法的第一个参数是我们事务上下文,这里我们不需要关心他在我们切面中会自行填充处理。
接下来我们再看看TCC相关的拦截器是如何处理的:
public Object invoke(final MethodInvocation invocation) throws Throwable {
		Method method = getActionInterfaceMethod(invocation);
		TwoPhaseBusinessAction businessAction = method.getAnnotation(TwoPhaseBusinessAction.class);
		//try method
	    if(businessAction != null) {
			if(StringUtils.isBlank(RootContext.getXID())){
				//not in distribute transaction
				return invocation.proceed();
			}
	    	Object[] methodArgs = invocation.getArguments();
	    	//Handler the TCC Aspect
			Map<String, Object> ret = actionInterceptorHandler.proceed(method, methodArgs, businessAction, new Callback<Object>(){
				@Override
				public Object execute() throws Throwable {
					return invocation.proceed();
				}
	    	});
	    	//return the final result
	    	return ret.get(Constants.TCC_METHOD_RESULT);
	    }
		return invocation.proceed();
	}
- Step1:获取原始
Method。 - Step2:判断是否再全局事务中,也就是整个逻辑服务最外层是否执行了
GlobalTransactionalInterceptor。如果不再直接执行即可。 - Step3:执行
TCC切面,核心逻辑在actionInterceptorHandler#proceed中。
再来看看actionInterceptorHandler#proceed这个方法:
 public Map<String, Object> proceed(Method method, Object[] arguments, TwoPhaseBusinessAction businessAction, Callback<Object> targetCallback) throws Throwable {
		Map<String, Object> ret = new HashMap<String, Object>(16);

		//TCC name
        String actionName = businessAction.name();
        String xid = RootContext.getXID();
        BusinessActionContext actionContext = new BusinessActionContext();
        actionContext.setXid(xid);
        //set action anme
        actionContext.setActionName(actionName)

        //Creating Branch Record
        String branchId = doTccActionLogStore(method, arguments, businessAction, actionContext);
        actionContext.setBranchId(branchId);

        //set the parameter whose type is BusinessActionContext
        Class<?>[] types = method.getParameterTypes();
        int argIndex = 0;
        for (Class<?> cls : types) {
            if (cls.getName().equals(BusinessActionContext.class.getName())) {
            	arguments[argIndex] = actionContext;
                break;
            }
            argIndex++;
        }
        //the final parameters of the try method
        ret.put(Constants.TCC_METHOD_ARGUMENTS, arguments);
        //the final result
        ret.put(Constants.TCC_METHOD_RESULT, targetCallback.execute());
        return ret;
	}
- Step1:获取一些事务信息,比如
TCC名字,本次事务XID等。 - Step2:创建
Branch事务,一个是在本地的context上下文中将它的commit和rollback信息保存起来,另一个是向我们的Seata-Server注册分支事务,用于后续的管理。 - Step3:填充方法参数,也就是我们的
BusinessActionContext。
2.2 小结
Spring的几个总要的内容已经剖析完毕,核心类主要是三个,一个Scanner,两个Interceptor。整体来说比较简单,Spring做的基本上也是我们客户端一些初始化的事,接下来我们深入了解一下TM这个角色。
3. TM 事务管理器
在上面章节中我们讲了GlobalTransactionalInterceptor这个切面拦截器,我们知道了这个拦截器中做了我们TM应该做的事,事务的开启,事务的提交,事务的回滚。这里只是我们整体逻辑的发起点,其中具体的客户端逻辑在我们的DefaultTransactionManager中,这个类中的代码如下所示:
public class DefaultTransactionManager implements TransactionManager {

    @Override
    public String begin(String applicationId, String transactionServiceGroup, String name, int timeout)
        throws TransactionException {
        GlobalBeginRequest request = new GlobalBeginRequest();
        request.setTransactionName(name);
        request.setTimeout(timeout);
        GlobalBeginResponse response = (GlobalBeginResponse)syncCall(request);
        return response.getXid();
    }

    @Override
    public GlobalStatus commit(String xid) throws TransactionException {
        GlobalCommitRequest globalCommit = new GlobalCommitRequest();
        globalCommit.setXid(xid);
        GlobalCommitResponse response = (GlobalCommitResponse)syncCall(globalCommit);
        return response.getGlobalStatus();
    }

    @Override
    public GlobalStatus rollback(String xid) throws TransactionException {
        GlobalRollbackRequest globalRollback = new GlobalRollbackRequest();
        globalRollback.setXid(xid);
        GlobalRollbackResponse response = (GlobalRollbackResponse)syncCall(globalRollback);
        return response.getGlobalStatus();
    }

    @Override
    public GlobalStatus getStatus(String xid) throws TransactionException {
        GlobalStatusRequest queryGlobalStatus = new GlobalStatusRequest();
        queryGlobalStatus.setXid(xid);
        GlobalStatusResponse response = (GlobalStatusResponse)syncCall(queryGlobalStatus);
        return response.getGlobalStatus();
    }

    private AbstractTransactionResponse syncCall(AbstractTransactionRequest request) throws TransactionException {
        try {
            return (AbstractTransactionResponse)TmRpcClient.getInstance().sendMsgWithResponse(request);
        } catch (TimeoutException toe) {
            throw new TransactionException(TransactionExceptionCode.IO, toe);
        }
    }
}
在DefaultTransactionManager中整体逻辑比较简单有四个方法:
begin:向Server发起GlobalBeginRequest请求,用于开启全局事务。commit:向Server发起GlobalCommitRequest请求,用于提交全局事务。rollback:向Server发起GlobalRollbackRequest请求,用于回滚全局事务。getStatus:向Server发起GlobalStatusRequest请求,用于查询全局事务状态信息。
4. RM 资源管理器
在Seata中目前管理RM有两种模式:一种是AT模式,需要事务性数据库支持,会自动记录修改前快照和修改后的快照,用于提交和回滚;还有一种是TCC模式,也可以看作是MT模式,用于AT模式不支持的情况,手动进行提交和回滚。接下来将会深入剖析一下这两种模式的实现原理。
4.1 AT 资源管理
AT模式下需要使用Seata提供的数据源代理,其整体实现逻辑如下图所示:
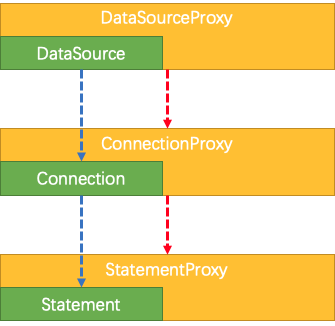
在我们的程序中执行一个sql语句,无论你是使用mybatis,还是直接使用jdbcTemplate,都会遵循下面的步骤:
- Step 1:从数据源中获取数据库连接。
- Step 2: 从连接中获取
Statement。 - Step 3: 通过Statement执行我们的
sql语句
所以我们可以将DataSource,Connection,Statement代理起来然后执行我们的一些特殊的逻辑,完成我们的AT模式。
4.1.1 DataSourceProxy
在DataSourceProxy中没有太多的业务逻辑,只是简单的将获取Connection用我们的ConnectionProxy代理类进行了封装,代码如下:
    public ConnectionProxy getConnection() throws SQLException {
        Connection targetConnection = targetDataSource.getConnection();
        return new ConnectionProxy(this, targetConnection);
    }
首先通过我们代理之前的DataSource获取连接,然后用ConnectionProxy将其代理起来。
4.1.2 ConnectionProxy
ConnectionProxy主要做三件事,第一个是生成代理的Statement,第二个是保存我们的连接上下文:加锁的Key,undoLog等,第三个是代理执行我们的本地事务的commit和rollback。
首先来看看代理生成的Statement:
    @Override
    public Statement createStatement() throws SQLException {
        Statement targetStatement = getTargetConnection().createStatement();
        return new StatementProxy(this, targetStatement);
    }

    @Override
    public PreparedStatement prepareStatement(String sql) throws SQLException {
        PreparedStatement targetPreparedStatement = getTargetConnection().prepareStatement(sql);
        return new PreparedStatementProxy(this, targetPreparedStatement, sql);
    }
这里也是通过我们原来的连接直接生成Statement,然后将其进行代理。
接下来看看对我们上下文的管理,大家都知道我们的一个事务其实对应的是一个数据库连接,在这个事务中的所有sql的undolog和lockKey都会在连接的上下文中记录。如下面代码所示:
    /**
     * append sqlUndoLog
     *
     * @param sqlUndoLog the sql undo log
     */
    public void appendUndoLog(SQLUndoLog sqlUndoLog) {
        context.appendUndoItem(sqlUndoLog);
    }

    /**
     * append lockKey
     *
     * @param lockKey the lock key
     */
    public void appendLockKey(String lockKey) {
        context.appendLockKey(lockKey);
    }
这里的代码很简单,lockKey和undolog都是用list保存,直接add即可。
当我们的本地事务完成的时候,需要调用Connection的commit或rollback来进行事务的提交或回滚。这里我们也需要代理这两个方法来完成我们对分支事务的处理,先来看看commit方法。
    public void commit() throws SQLException {
        if (context.inGlobalTransaction()) {
            processGlobalTransactionCommit();
        } else if (context.isGlobalLockRequire()) {
            processLocalCommitWithGlobalLocks();
        } else {
            targetConnection.commit();
        }
    }
    private void processGlobalTransactionCommit() throws SQLException {
        try {
            register();
        } catch (TransactionException e) {
            recognizeLockKeyConflictException(e);
        }
        try {
            if (context.hasUndoLog()) {
                UndoLogManager.flushUndoLogs(this);
            }
            targetConnection.commit();
        } catch (Throwable ex) {
            report(false);
            if (ex instanceof SQLException) {
                throw new SQLException(ex);
            }
        }
        report(true);
        context.reset();
    }
- Step 1:判断
context是否再全局事务中,如果在则进行提交,到Step2。 - Step 2: 注册分支事务并加上全局锁,如果全局锁加锁失败则抛出异常。
- Step 3: 如果
context中有undolog,那么将Unlog刷至数据库。 - Step 4: 提交本地事务。
- Step 5:报告本地事务状态,如果出现异常则报告失败,如果没有问题则报告正常。
上面介绍了提交事务的流程,当context在全局锁的流程中,会进行全局锁的查询,这里比较简单就不做赘述,如果context都没有在上述的情况中那么会直接进行事务提交。
对于我们rollback来说代码比较简单:
    public void rollback() throws SQLException {
        targetConnection.rollback();
        if (context.inGlobalTransaction()) {
            if (context.isBranchRegistered()) {
                report(false);
            }
        }
        context.reset();
    }
- Step 1:首先提交本地事务。
- Step 2:判断是否在全局事务中。
- Step 3:如果在则判断分支事务是否已经注册。
- Step 4: 如果已经注册那么直接向客户端报告该事务失败异常。
细心的小伙伴可能发现如果我们的本地事务提交或者回滚之后失败,那我们的分布式事务运行结果还能正确吗?这里完全不用担心,再我们的服务端有完善的超时检测,重试等机制,来帮助我们应对这些特殊情况。
4.1.3 StatementProxy
我们一般用statement会调用executeXXX方法来执行我们的sql语句,所以在我们的Proxy中可以利用这个方法,再执行sql的时候做一些我们需要做的逻辑,下面看看execute方法的代码:
    public boolean execute(String sql) throws SQLException {
        this.targetSQL = sql;
        return ExecuteTemplate.execute(this, new StatementCallback<Boolean, T>() {
            @Override
            public Boolean execute(T statement, Object... args) throws SQLException {
                return statement.execute((String) args[0]);
            }
        }, sql);
    }
这里直接将逻辑交给我们的ExecuteTemplate去执行,有如下代码:
    public static <T, S extends Statement> T execute(SQLRecognizer sqlRecognizer,
                                                     StatementProxy<S> statementProxy,
                                                     StatementCallback<T, S> statementCallback,
                                                     Object... args) throws SQLException {

        if (!RootContext.inGlobalTransaction() && !RootContext.requireGlobalLock()) {
            // Just work as original statement
            return statementCallback.execute(statementProxy.getTargetStatement(), args);
        }

        if (sqlRecognizer == null) {
            sqlRecognizer = SQLVisitorFactory.get(
                    statementProxy.getTargetSQL(),
                    statementProxy.getConnectionProxy().getDbType());
        }
        Executor<T> executor = null;
        if (sqlRecognizer == null) {
            executor = new PlainExecutor<T, S>(statementProxy, statementCallback);
        } else {
            switch (sqlRecognizer.getSQLType()) {
                case INSERT:
                    executor = new InsertExecutor<T, S>(statementProxy, statementCallback, sqlRecognizer);
                    break;
                case UPDATE:
                    executor = new UpdateExecutor<T, S>(statementProxy, statementCallback, sqlRecognizer);
                    break;
                case DELETE:
                    executor = new DeleteExecutor<T, S>(statementProxy, statementCallback, sqlRecognizer);
                    break;
                case SELECT_FOR_UPDATE:
                    executor = new SelectForUpdateExecutor<T, S>(statementProxy, statementCallback, sqlRecognizer);
                    break;
                default:
                    executor = new PlainExecutor<T, S>(statementProxy, statementCallback);
                    break;
            }
        }
        T rs = null;
        try {
            rs = executor.execute(args);
        } catch (Throwable ex) {
            if (!(ex instanceof SQLException)) {
                // Turn other exception into SQLException
                ex = new SQLException(ex);
            }
            throw (SQLException)ex;
        }
        return rs;
    }
}
这里是我们代理执行sql的核心逻辑,步骤如下:
- Step 1:如果不在全局事务且不需要查询全局锁,那么就直接执行原始的
Statement。 - Step 2: 如果没有传入
sql识别器,那么我们需要生成sql识别器,这里我们会借用Druid中对sql的解析,我们获取sql的识别器,我们通过这个识别器可以获取到不同类型的sql语句的一些条件,比如说SQLUpdateRecognizer是用于update的sql识别器,我们可以直接获取到表名,条件语句,更新的字段,更新字段的值等。 - Step 3:根据
sql识别器的类型,来生成我们不同类型的执行器。 - Step 4:通过第三步中的执行器来执行我们的sql语句。
这里有五种Executor:INSERT,UPDATE,DELETE的执行器会进行undolog记录并且记录全局锁,SELECT_FOR_UPDATE只会进行查询全局锁,有一个默认的代表我们现在还不支持,什么都不会做直接执行我们的sql语句。
对于INSERT,UPDATE,DELETE的执行器会继承我们的AbstractDMLBaseExecutor:
    protected T executeAutoCommitFalse(Object[] args) throws Throwable {
        TableRecords beforeImage = beforeImage();
        T result = statementCallback.execute(statementProxy.getTargetStatement(), args);
        TableRecords afterImage = afterImage(beforeImage);
        prepareUndoLog(beforeImage, afterImage);
        return result;
    }

    protected abstract TableRecords beforeImage() throws SQLException;


    protected abstract TableRecords afterImage(TableRecords beforeImage) throws SQLException;
在AbstractDMLBaseExecutor中执行逻辑在executeAutoCommitFalse这个方法,步骤如下:
- Step 1:获取执行当前
sql之前所受影响行的快照,这里beforeImage会被不同类型的sql语句重新实现。 - Step 2:执行当前
sql语句,并获取结果。 - Step 3:获取执行
sql之后的快照,这里的afterIamge也会被不同类型的sql语句重新实现。 - Step 4:将
undolog准备好,这里会保存到我们的ConnectionContext中。
    protected void prepareUndoLog(TableRecords beforeImage, TableRecords afterImage) throws SQLException {
        if (beforeImage.getRows().size() == 0 && afterImage.getRows().size() == 0) {
            return;
        }

        ConnectionProxy connectionProxy = statementProxy.getConnectionProxy();

        TableRecords lockKeyRecords = sqlRecognizer.getSQLType() == SQLType.DELETE ? beforeImage : afterImage;
        String lockKeys = buildLockKey(lockKeyRecords);
        connectionProxy.appendLockKey(lockKeys);

        SQLUndoLog sqlUndoLog = buildUndoItem(beforeImage, afterImage);
        connectionProxy.appendUndoLog(sqlUndoLog);
    }
准备UndoLog的时候会获取我们的ConnectionProxy,将我们的Undolog和LockKey保存起来,给后面的本地事务commit和rollback使用,上面已经讲过。
4.1.4 分支事务的提交和回滚
上面的4.1.1-4.1.3都是说的是我们分布式事务的第一阶段,也就是将我们的分支事务注册到Server,而第二阶段分支提交和分支回滚都在我们的DataSourceManager中,对于分支事务提交有如下代码:
public BranchStatus branchCommit(BranchType branchType, String xid, long branchId, String resourceId, String applicationData) throws TransactionException {
        return asyncWorker.branchCommit(branchType, xid, branchId, resourceId, applicationData);
    }
public BranchStatus branchCommit(BranchType branchType, String xid, long branchId, String resourceId, String applicationData) throws TransactionException {
        if (!ASYNC_COMMIT_BUFFER.offer(new Phase2Context(branchType, xid, branchId, resourceId, applicationData))) {
            LOGGER.warn("Async commit buffer is FULL. Rejected branch [" + branchId + "/" + xid + "] will be handled by housekeeping later.");
        }
        return BranchStatus.PhaseTwo_Committed;
    }
这里将我们的分支事务提交的信息,放到一个队列中,异步去处理,也就是异步删除我们的undolog数据,因为提交之后undolog数据没用了。
这里有人可能会问如果当你将这个信息异步提交到队列中的时候,机器宕机,那么就不会执行异步删除undolog的逻辑,那么这条undolog是不是就会成为永久的脏数据呢?这里Seata为了防止这种事出现,会定时扫描某些较老的undolog数据然后进行删除,不会污染我们的数据。
对于我们的分支事务回滚有如下代码:
    public BranchStatus branchRollback(BranchType branchType, String xid, long branchId, String resourceId, String applicationData) throws TransactionException {
        DataSourceProxy dataSourceProxy = get(resourceId);
        if (dataSourceProxy == null) {
            throw new ShouldNeverHappenException();
        }
        try {
            UndoLogManager.undo(dataSourceProxy, xid, branchId);
        } catch (TransactionException te) {
            if (te.getCode() == TransactionExceptionCode.BranchRollbackFailed_Unretriable) {
                return BranchStatus.PhaseTwo_RollbackFailed_Unretryable;
            } else {
                return BranchStatus.PhaseTwo_RollbackFailed_Retryable;
            }
        }
        return BranchStatus.PhaseTwo_Rollbacked;

    }
这里会先获取到我们的数据源,接下来调用我们的重做日志管理器的undo方法进行日志重做,undo方法较长这里就不贴上来了,其核心逻辑是查找到我们的undolog然后将里面的快照在我们数据库进行重做。
4.2 TCC 资源管理
TCC没有AT模式资源管理这么复杂,部分核心逻辑在之前的Interceptor中已经讲解过了,比如二阶段方法的保存等。这里主要看看TCC的分支事务提交和分支事务回滚,在TCCResourceManager中有:
	public BranchStatus branchCommit(BranchType branchType, String xid, long branchId, String resourceId,
									 String applicationData) throws TransactionException {
		TCCResource tccResource = (TCCResource) tccResourceCache.get(resourceId);
		if (tccResource == null) {
			throw new ShouldNeverHappenException("TCC resource is not exist, resourceId:" + resourceId);
		}
		Object targetTCCBean = tccResource.getTargetBean();
		Method commitMethod = tccResource.getCommitMethod();
		if (targetTCCBean == null || commitMethod == null) {
			throw new ShouldNeverHappenException("TCC resource is not available, resourceId:" + resourceId);
		}
		boolean result = false;
		//BusinessActionContext
		BusinessActionContext businessActionContext =
				getBusinessActionContext(xid, branchId, resourceId, applicationData);
		Object ret = commitMethod.invoke(targetTCCBean, businessActionContext);
		LOGGER.info("TCC resource commit result :" + ret + ", xid:" + xid + ", branchId:" + branchId + ", resourceId:" +
				resourceId);
		if (ret != null && ret instanceof TwoPhaseResult) {
			result = ((TwoPhaseResult) ret).isSuccess();
		} else {
			result = (boolean) ret;
		}
		return result ? BranchStatus.PhaseTwo_Committed : BranchStatus.PhaseTwo_CommitFailed_Retryable;
	}
步骤如下:
- Step 1:首先查找当前服务是否有该
TCC资源,如果没有抛出异常。 - Step 2:然后找到我们的TCC对象和对应的
commit方法。 - Step 3:然后执行我们的
commit方法。 - Step 4:最后将结果返回给我们的
Server,由Server决定是否重试。
这里的branchRollback方法也比较简单,这里就不做过多分析了。
总结
通过上面分析我们知道,Seata的初始化是依赖Spring去进行,我们的全局事务的开启/提交/回滚都是依赖我们的TM事务管理器,而我们的分支事务的管理是依靠我们的RM,其中提供了两个模式AT和TCC,AT模式必须使用数据库,其核心实现是实现数据源的代理,将我们自己的逻辑注入进去。而我们的TCC能弥补我们没有使用数据库的情况,将提交和回滚都交由我们自己实现,其核心实现逻辑是依赖将一个资源的二阶段的方法和我们的目标对象在我们的资源上下文中保存下来,方便我们后续使用。
最后如果大家对分布式事务感兴趣,欢迎大家使用并阅读Seata的代码,并给我们提出建议。
如果大家觉得这篇文章对你有帮助,你的关注和转发是对我最大的支持,O(∩_∩)O: