

前言
看vue源码已经有一段时间了,但是很多东西都是看的时候当时记住了,过段时间不去使用或者回顾又忘记了,所以现在开始以博客的方式写一下自己的理解,也方便后续自己的回顾。
这一篇主要讲的是Vue源码解析parse的相关内容,主要分成三大块
- 从编译入口到parse函数(封装思想,柯里化)
- parse中的词法分析(把template模板解析成js对象)
- parse中的语法分析(处理解析出的js对象生成ast)
从编译入口到parse函数
编译入口
让我们开始直入主题吧,在vue源码开始入口的entry-runtime-with-compiler.js文件中,我们可以看到$mount的定义,下面是精简后的源码,这边可以看到先是判断我们传入的options上面是不是有render方法,没有的话才会走template生成render函数的过程,最后都是执行render函数。
Vue.prototype.$mount = function (
  el?: string | Element,
  hydrating?: boolean
): Component {
  el = el && query(el)

  const options = this.$options
  // 是否有render方法,目前是没有
  if (!options.render) {
    let template = options.template
    if (template) {
    } else if (el) {
      template = getOuterHTML(el)
    }
    if (template) {
      // 拿到temp后,编译成render函数
      const { render, staticRenderFns } = compileToFunctions(template, {
        outputSourceRange: process.env.NODE_ENV !== 'production',
        shouldDecodeNewlines,
        shouldDecodeNewlinesForHref,
        delimiters: options.delimiters,
        comments: options.comments
      }, this)
      options.render = render
      options.staticRenderFns = staticRenderFns
    }
  }
  return mount.call(this, el, hydrating)
}
compileToFunctions
这边可以看到主要生成render的函数就是compileToFunctions,这个函数定义在src/platforms/web/compiler/index.js中,这个文件就四行代码
import { baseOptions } from './options'
import { createCompiler } from 'compiler/index'

const { compile, compileToFunctions } = createCompiler(baseOptions)

export { compile, compileToFunctions }
createCompiler
这时又发现compileToFunctions实际上是createCompiler这个地方解构出来的,那我们还是继续向上找,这个时候已经找到了src/compiler/index.js这个文件下,这个就是编译三步走的主文件了
import { parse } from './parser/index'
import { optimize } from './optimizer'
import { generate } from './codegen/index'
import { createCompilerCreator } from './create-compiler'

export const createCompiler = createCompilerCreator(function baseCompile (
  template: string,
  options: CompilerOptions
): CompiledResult {
  // 模版解释器,功能为从HTML模版转换为AST
  const ast = parse(template.trim(), options)
  // AST优化,处理静态不参与重复渲染的模版片段
  if (options.optimize !== false) {
    optimize(ast, options)
  }
  // 代码生成器。基于AST,生成js函数,延迟到运行时运行,生成纯HTML。
  const code = generate(ast, options)
  return {
    ast,
    render: code.render,
    staticRenderFns: code.staticRenderFns
  }
})
createCompilerCreator
这里可以看到createCompiler是createCompilerCreator这个函数接收了baseCompile作为参数,真正的编译过程都在这个baseCompile函数中执行的,所有需要继续看createCompilerCreator这个函数里是在哪调用baseCompile的,下面的伪代码一看不是有点眼熟,返回的compileToFunctions这个就是和入口的函数相对应,还是继续深入下去吧,马上就要到头了😁
export function createCompilerCreator (baseCompile: Function): Function {
  return function createCompiler (baseOptions: CompilerOptions) {
    funtion compile {
        //省略
    }

    return {
      compile,
      compileToFunctions: createCompileToFunctionFn(compile)
    }
  }
}
createCompileToFunctionFn
看到createCompileToFunctionFn这个函数里面可以看到先判断了下缓存然后执行了我们传入的compile函数,入参为template,options。
export function createCompileToFunctionFn (compile: Function): Function {
  const cache = Object.create(null)

  return function compileToFunctions (
    template: string,
    options?: CompilerOptions,
    vm?: Component
  ): CompiledFunctionResult {
    options = extend({}, options)
    // check cache
    const key = options.delimiters
      ? String(options.delimiters) + template
      : template
    if (cache[key]) {
      return cache[key]
    }

    // compile
    const compiled = compile(template, options)

    // turn code into functions
    const res = {}
    const fnGenErrors = []
    res.render = createFunction(compiled.render, fnGenErrors)
    res.staticRenderFns = compiled.staticRenderFns.map(code => {
      return createFunction(code, fnGenErrors)
    })

    return (cache[key] = res)
  }
}
终点compile
终于要执行到compile了,我自己都快要晕了,这边主要处理了些options后,终于执行了baseCompile,这个函数就是在上面说三步走的主要函数了,到这个地方可以松一口气了,不用继续深入下去了。
function compile (
      template: string,
      options?: CompilerOptions
    ): CompiledResult {
      const finalOptions = Object.create(baseOptions)
      const errors = []
      const tips = []

      if (options) {
        // merge custom modules
        if (options.modules) {
          finalOptions.modules =
            (baseOptions.modules || []).concat(options.modules)
        }
        // merge custom directives
        if (options.directives) {
          finalOptions.directives = extend(
            Object.create(baseOptions.directives || null),
            options.directives
          )
        }
        // copy other options
        for (const key in options) {
          if (key !== 'modules' && key !== 'directives') {
            finalOptions[key] = options[key]
          }
        }
      }

      const compiled = baseCompile(template.trim(), finalOptions)
      compiled.errors = errors
      compiled.tips = tips
      return compiled
    }
这边从入口到真正执行parse已经经历了四五个步骤,这么做主要是利用柯里化的思想,把多平台的baseOptions,缓存处理,编译配置处理等进行了拆分封装。这边从编译入口到parse函数就已经结束了,接下来让我们来看看parse中做了些什么。
parse中的词法分析
parser简介
首先让我们简单的了解一下parser,简单来说就是把源代码转换为目标代码的工具。引用下基维百科对于parser的解释。
语法分析器(parser)通常是作为编译器或解释器的组件出现的,它的作用是进行语法检查、并构建由输入的单词组成的数据结构(一般是语法分析树、抽象语法树等层次化的数据结构)。语法分析器通常使用一个独立的词法分析器从输入字符流中分离出一个个的“单词”,并将单词流作为其输入。
vue其实也是使用解析器来对模板代码进行解析。
/*!
 * HTML Parser By John Resig (ejohn.org)
 * Modified by Juriy "kangax" Zaytsev
 * Original code by Erik Arvidsson, Mozilla Public License
 * http://erik.eae.net/simplehtmlparser/simplehtmlparser.js
 */
它的源代码上有这样一段注释,是Vue fork 自 John Resig 所写的一个开源项目:erik.eae.net/simplehtmlp… 然后在这个解析器上面做了一些扩展。
流程总览
大概了解了解析器后让我们来看看parse的整体流程,这边通过精简后的代码可以看到parse实际上就是先处理了一些传入的options,然后执行了parseHTML函数,传入了template,options和相关钩子。
export function parse (
  template: string,
  options: CompilerOptions
): ASTElement | void {
   // 处理传入的options合并的实例vm的options上
  dealOptions(options)
  // 模板和相关的配置和钩子传入到parseHTML中
  parseHTML(template, {
    someOptions,
    start (tag, attrs, unary, start) {...},
    end (tag, start, end) {...},
    chars (text: string, start: number, end: number) {...},
    comment (text: string, start, end) {}...,
 })
}
这边我们继续看parseHTML函数里面做了什么?
parseHTML是定义在src/compiler/parser/html-parser.js这个文件中,首先文件头部是定义了一些后续需要使用的正则,不太懂正则的可以先看看正则先关的知识。
// Regular Expressions for parsing tags and attributes
// 匹配标签的属性
const attribute = /^\s*([^\s"'<>\/=]+)(?:\s*(=)\s*(?:"([^"]*)"+|'([^']*)'+|([^\s"'=<>`]+)))?/
const ncname = `[a-zA-Z_][\\-\\.0-9_a-zA-Z${unicodeLetters}]*`
const qnameCapture = `((?:${ncname}\\:)?${ncname})`
const startTagOpen = new RegExp(`^<${qnameCapture}`)
const startTagClose = /^\s*(\/?)>/
const endTag = new RegExp(`^<\\/${qnameCapture}[^>]*>`)
const doctype = /^<!DOCTYPE [^>]+>/i
// #7298: escape - to avoid being pased as HTML comment when inlined in page
const comment = /^<!\--/
const conditionalComment = /^<!\[/
然后先看看parseHTML的伪代码,大概流程就是先定义需要的变量,然后循环遍历template,通过正则匹配到对应的标签后,通过进行处理通过传入的钩子函数把处理后的对象转换成ast。
export function parseHTML (html, options) {
  const stack = []
  const expectHTML = options.expectHTML
  const isUnaryTag = options.isUnaryTag || no
  const canBeLeftOpenTag = options.canBeLeftOpenTag || no
  let index = 0
  let last, lastTag
  while (html) {
    if (!lastTag || !isPlainTextElement(lastTag)){
      let textEnd = html.indexOf('<')
      if (textEnd === 0) {
         if(matchComment) {
           advance(commentLength)
           continue
         }
         if(matchDoctype) {
           advance(doctypeLength)
           continue
         }
         if(matchEndTag) {
           advance(endTagLength)
           parseEndTag()
           continue
         }
         if(matchStartTag) {
           parseStartTag()
           handleStartTag()
           continue
         }
      }
      handleText()
      advance(textLength)
    } else {
       handlePlainTextElement()
       parseEndTag()
    }
  }
}
辅助函数分析
让我们分别看看parseHTML中的四个辅助函数他们的实现。
首先advance主要是把处理过后的html给截取掉,直到在上面代码while (html)中判断为空,代表所有的模板已经处理完成。
// 为计数index加上n,同时,使html到n个字符以后到位置作为起始位
function advance (n) {
    index += n
    html = html.substring(n)
}
首先是通过正则匹配开始标签,简单处理成对象后,把开始标签存储到数组中,后续在匹配到闭合标签的时候就会把这个数组中的数据取出。
// 解析开始标签
function parseStartTag () {
  //正则匹配获取HTML开始标签
  const start = html.match(startTagOpen)
  if (start) {
    const match = {
      tagName: start[1],
      attrs: [],
      start: index
    }
    advance(start[0].length)
    let end, attr
    // 开始标签中的属性都保存到一个数组中
    while (!(end = html.match(startTagClose)) && (attr = html.match(attribute))) {
      advance(attr[0].length)
      match.attrs.push(attr)
    }
    if (end) {
      match.unarySlash = end[1]
      advance(end[0].length)
      match.end = index
      return match
    }
  }
}
把上面parseStartTag这个函数简单处理的对象再进行一次处理
// 处理开始标签,将开始标签中的属性提取出来。
function handleStartTag (match) {
  const tagName = match.tagName
  const unarySlash = match.unarySlash

  // 解析结束标签
  if (expectHTML) {
    if (lastTag === 'p' && isNonPhrasingTag(tagName)) {
      parseEndTag(lastTag)
    }
    if (canBeLeftOpenTag(tagName) && lastTag === tagName) {
      parseEndTag(tagName)
    }
  }

  const unary = isUnaryTag(tagName) || !!unarySlash

  // 解析开始标签的属性名和属性值
  const l = match.attrs.length
  const attrs = new Array(l)
  for (let i = 0; i < l; i++) {
    const args = match.attrs[i]
    // hackish work around FF bug https://bugzilla.mozilla.org/show_bug.cgi?id=369778
    if (IS_REGEX_CAPTURING_BROKEN && args[0].indexOf('""') === -1) {
      if (args[3] === '') { delete args[3] }
      if (args[4] === '') { delete args[4] }
      if (args[5] === '') { delete args[5] }
    }
    const value = args[3] || args[4] || args[5] || ''
    const shouldDecodeNewlines = tagName === 'a' && args[1] === 'href'
      ? options.shouldDecodeNewlinesForHref
      : options.shouldDecodeNewlines
    attrs[i] = {
      name: args[1],
      value: decodeAttr(value, shouldDecodeNewlines)
    }
  }

  // 将标签及其属性推如堆栈中
  if (!unary) {
    stack.push({ tag: tagName, lowerCasedTag: tagName.toLowerCase(), attrs: attrs })
    lastTag = tagName
  }
  // 触发 options.start 方法。
  if (options.start) {
    options.start(tagName, attrs, unary, match.start, match.end)
  }
}
匹配结束标签,找到刚刚开始标签存放的数组取出。
// 解析结束TAG
function parseEndTag (tagName, start, end) {
  let pos, lowerCasedTagName
  if (start == null) start = index
  if (end == null) end = index

  if (tagName) {
    lowerCasedTagName = tagName.toLowerCase()
  }

  // 找到同类的开始 TAG 在堆栈中的位置
  if (tagName) {
    for (pos = stack.length - 1; pos >= 0; pos--) {
      if (stack[pos].lowerCasedTag === lowerCasedTagName) {
        break
      }
    }
  } else {
    // If no tag name is provided, clean shop
    pos = 0
  }

  // 对堆栈中的大于等于 pos 的开始标签使用 options.end 方法。
  if (pos >= 0) {
    // Close all the open elements, up the stack
    for (let i = stack.length - 1; i >= pos; i--) {
      if (process.env.NODE_ENV !== 'production' &&
        (i > pos || !tagName) &&
        options.warn
      ) {
        options.warn(
          `tag <${stack[i].tag}> has no matching end tag.`
        )
      }
      if (options.end) {
        options.end(stack[i].tag, start, end)
      }
    }

    // Remove the open elements from the stack
    // 从栈中移除元素,并标记为 lastTag
    stack.length = pos
    lastTag = pos && stack[pos - 1].tag
  } else if (lowerCasedTagName === 'br') {
    // 回车标签
    if (options.start) {
      options.start(tagName, [], true, start, end)
    }
  } else if (lowerCasedTagName === 'p') {
    // 段落标签
    if (options.start) {
      options.start(tagName, [], false, start, end)
    }
    if (options.end) {
      options.end(tagName, start, end)
    }
  }
}
html解析详解
这边详细讲解html解析,下面简单的template模板就是作为这次详解的例子,有可能不能覆盖全部场景。
<div id="app">
    <!-- 注释 -->
    <div v-if="show" class="message">{{message}}</div>
</div>
上面这一段是作为字符串来处理,首先我们的开头是<app,所有这个是会走到parseStartTag这个函数中
const startTagMatch = parseStartTag()
  if (startTagMatch) {
    handleStartTag(startTagMatch)
    if (shouldIgnoreFirstNewline(lastTag, html)) {
      advance(1)
    }
    continue
  }
}
返回值就是一个这样的简单匹配出来的js对象,然后再通过handleStartTag这个函数把这里面一些无用的和需要添加的处理的数据处理后,执行最开始的start钩子函数,这个在后面的ast生成中描述。
{
    attrs: [
        {
            0: " id="app"",
            1: "id",
            2: "=",
            3: "app",
            4: undefined,
            5: undefined,
            end: 13,
            groups: undefined,
            index: 0,
            input: " id="app">↵        <!-- 注释 -->↵        <div v-if="show" class="message">{{message}}</div>↵    </div>",
            start: 4,
        }
    ],
    end: 14,
    start: 0,
    tagName: "div",
    unarySlash: "",
}
因为有advanceh函数,现在我们的代码已经变成下面这样了,然后继续循环。
<!-- 注释 -->
    <div v-if="show" class="message">{{message}}</div>
</div>
现在就是走到了注释节点这一块,匹配到后执行开始传入的comment钩子函数创建注释节点ast
// 注释匹配
  if (comment.test(html)) {
    const commentEnd = html.indexOf('-->')

    if (commentEnd >= 0) {
      // 如果需要保留注释,执行 option.comment 方法
      if (options.shouldKeepComment) {
        options.comment(html.substring(4, commentEnd))
      }
      advance(commentEnd + 3)
      continue
    }
}
这个时候我们的代码已经变成了下面这个样子,有没有观察到一个细节,就是注释虽然没有了,但是注释距离下一个<div这个中间还是有留白的。
    <div v-if="show" class="message">{{message}}</div>
</div>
这样的话html.indexOf('<')这个匹配出来的就不是0,会走到else逻辑,然后作为文本节点给处理掉。
继续走一次处理开始标签<div v-if="show" class="message">,文本标签`{{message}}后我们的template变成了
</div>
</div>
这个时候就会通过结束标签的判断走到parseEndTag函数,调用开始传入的end钩子函数。
// End tag: 结束标签
  const endTagMatch = html.match(endTag)
  if (endTagMatch) {
    const curIndex = index
    advance(endTagMatch[0].length)
    // 解析结束标签
    parseEndTag(endTagMatch[1], curIndex, index)
    continue
  }
这样我们的template已经被全部解析完成了,可能还有一些别的匹配没有在这个例子中,但是思路都是一样的,就是正则匹配到后解析成js对象然后交给传入的钩子函数生成ast,下面是循环处理html的详解。
while (html) {
  last = html
  // 如果没有lastTag,且不是纯文本内容元素中:script、style、textarea
  if (!lastTag || !isPlainTextElement(lastTag)) {
    // 文本结束,通过<查找。
    let textEnd = html.indexOf('<')
    // 文本结束位置在第一个字符,即第一个标签为<
    if (textEnd === 0) {
      // 注释匹配
      if (comment.test(html)) {
        const commentEnd = html.indexOf('-->')

        if (commentEnd >= 0) {
          // 如果需要保留注释,执行 option.comment 方法
          if (options.shouldKeepComment) {
            options.comment(html.substring(4, commentEnd))
          }
          advance(commentEnd + 3)
          continue
        }
      }

      // http://en.wikipedia.org/wiki/Conditional_comment#Downlevel-revealed_conditional_comment
      // 条件注释
      if (conditionalComment.test(html)) {
        const conditionalEnd = html.indexOf(']>')

        if (conditionalEnd >= 0) {
          advance(conditionalEnd + 2)
          continue
        }
      }

      // Doctype:
      const doctypeMatch = html.match(doctype)
      if (doctypeMatch) {
        advance(doctypeMatch[0].length)
        continue
      }

      // End tag: 结束标签
      const endTagMatch = html.match(endTag)
      if (endTagMatch) {
        const curIndex = index
        advance(endTagMatch[0].length)
        // 解析结束标签
        parseEndTag(endTagMatch[1], curIndex, index)
        continue
      }

      // Start tag: 开始标签
      const startTagMatch = parseStartTag()
      if (startTagMatch) {
        handleStartTag(startTagMatch)
        if (shouldIgnoreFirstNewline(lastTag, html)) {
          advance(1)
        }
        continue
      }
    }

    // < 标签位置大于等于0,即标签中有内容
    let text, rest, next
    if (textEnd >= 0) {
      // 截取从 0 - textEnd 的字符串
      rest = html.slice(textEnd)
      // 获取在普通字符串中的<字符,而不是开始标签、结束标签、注释、条件注释
      while (
        !endTag.test(rest) &&
        !startTagOpen.test(rest) &&
        !comment.test(rest) &&
        !conditionalComment.test(rest)
      ) {
        // < in plain text, be forgiving and treat it as text
        next = rest.indexOf('<', 1)
        if (next < 0) break
        textEnd += next
        rest = html.slice(textEnd)
      }
      // 最终截取字符串内容
      text = html.substring(0, textEnd)
      advance(textEnd)
    }

    if (textEnd < 0) {
      text = html
      html = ''
    }
    // 绘制文本内容,使用 options.char 方法。
    if (options.chars && text) {
      options.chars(text)
    }
  } else {
    // 如果lastTag 为 script、style、textarea
    let endTagLength = 0
    const stackedTag = lastTag.toLowerCase()
    const reStackedTag = reCache[stackedTag] || (reCache[stackedTag] = new RegExp('([\\s\\S]*?)(</' + stackedTag + '[^>]*>)', 'i'))
    const rest = html.replace(reStackedTag, function (all, text, endTag) {
      endTagLength = endTag.length
      if (!isPlainTextElement(stackedTag) && stackedTag !== 'noscript') {
        text = text
          .replace(/<!\--([\s\S]*?)-->/g, '$1') // <!--xxx-->
          .replace(/<!\[CDATA\[([\s\S]*?)]]>/g, '$1') //<!CDATAxxx>
      }
      if (shouldIgnoreFirstNewline(stackedTag, text)) {
        text = text.slice(1)
      }
      // 处理文本内容,并使用 options.char 方法。
      if (options.chars) {
        options.chars(text)
      }
      return ''
    })
    index += html.length - rest.length
    html = rest
    // 解析结束tag
    parseEndTag(stackedTag, index - endTagLength, index)
  }

  // html文本到最后
  if (html === last) {
    // 执行 options.chars
    options.chars && options.chars(html)
    if (process.env.NODE_ENV !== 'production' && !stack.length && options.warn) {
      options.warn(`Mal-formatted tag at end of template: "${html}"`)
    }
    break
  }
}
这个地方附上个流程示意图。
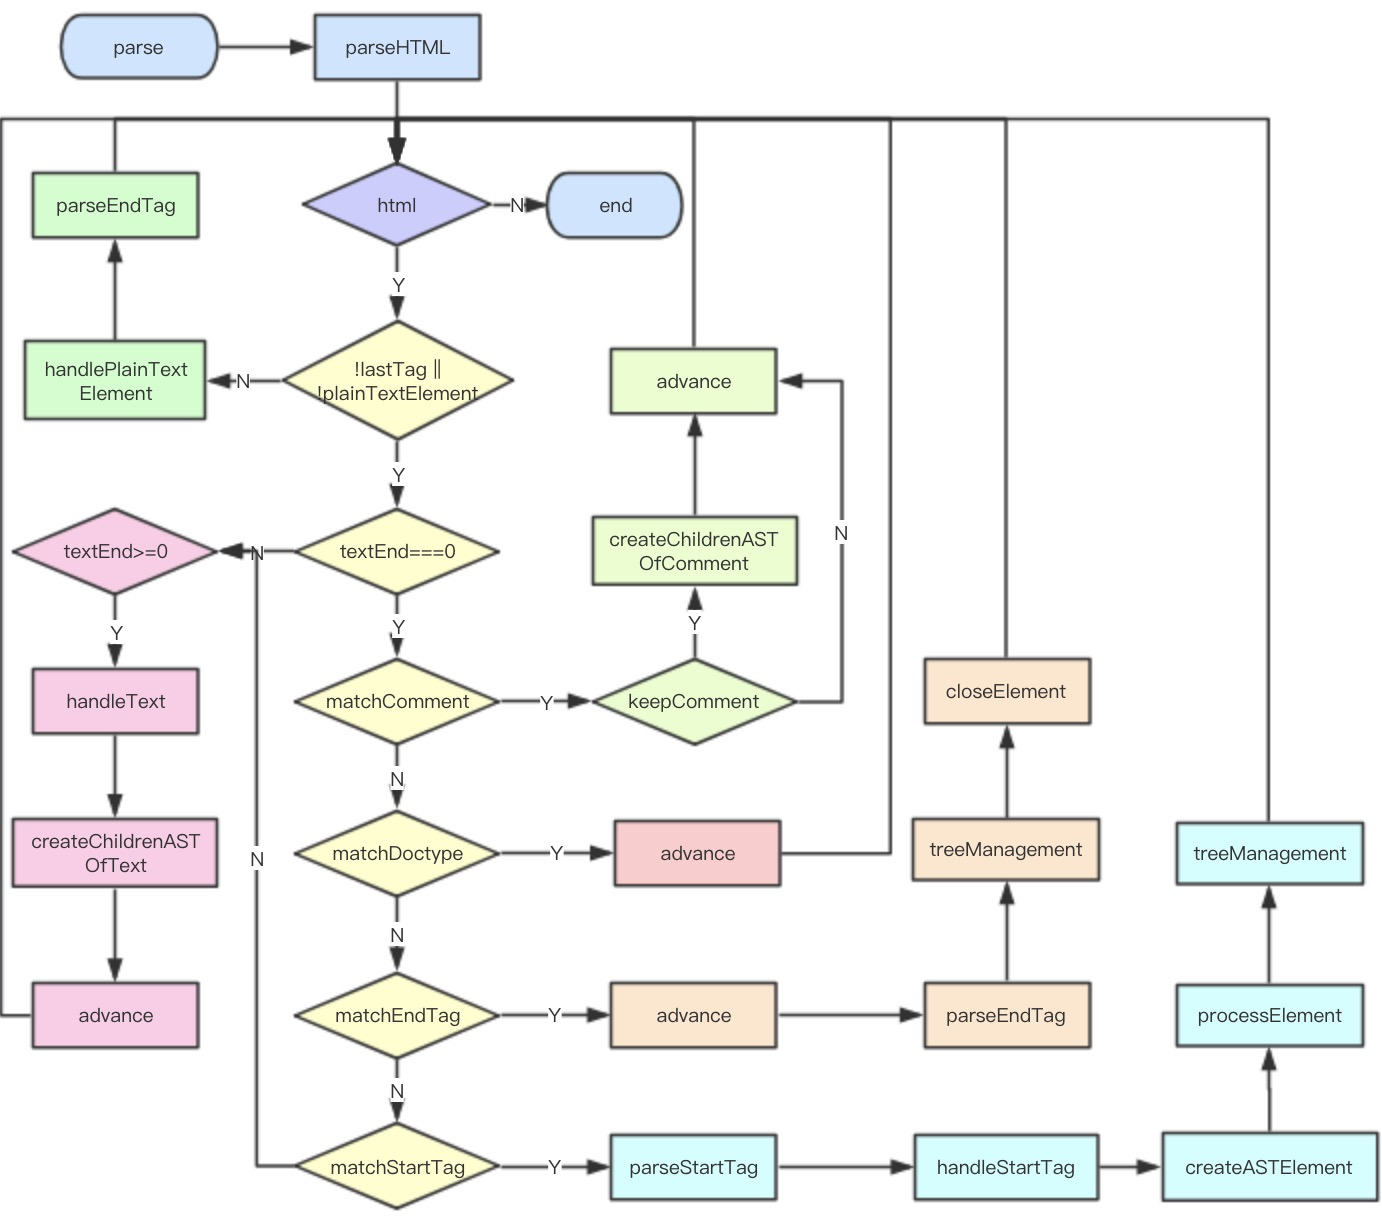
到这个地方其实已经把整个html解析完成了,后面我们就开始说传入的那几个钩子函数是怎么把我们解析生成的js对象变成ast的。
parse中的语法分析
当html解析完成后就需要进行词法分析,把处理好的js对象变成一个ast。我们首先来看看createASTElement这个函数,看名字就是一个创建ast元素,在vue里面ast其实就一个有特定格式的js对象。
export function createASTElement (
  tag: string,
  attrs: Array<ASTAttr>,
  parent: ASTElement | void
): ASTElement {
  return {
    type: 1,                            // 节点类型 type = 1 为dom节点
    tag,                                // 节点标签
    attrsList: attrs,                   // 节点属性
    attrsMap: makeAttrsMap(attrs),      // 节点映射
    parent,                             // 父节点
    children: []                        // 子节点
  }
}
start
start这个钩子函数就是慢慢地给这个AST进行装饰,添加更多的属性和标志,现在让我们具体看看这个函数,首先接着上面的例子,start现在接收的四个参数分别为
tag: div (元素的标签名)
attrs: [ {end: 13, name: "id", start: 5, value: "app"} ] (元素上面的属性)
unary: false (是否是一元)
start: 0 (开始位置)
start (tag, attrs, unary, start) {
  // 获取命名空间
  const ns = (currentParent && currentParent.ns) || platformGetTagNamespace(tag)

  // handle IE svg bug
  /* istanbul ignore if */
  if (isIE && ns === 'svg') {
    attrs = guardIESVGBug(attrs)
  }

  // 创建一个ast基础元素
  let element: ASTElement = createASTElement(tag, attrs, currentParent)
  if (ns) {
    element.ns = ns
  }

  // 服务端渲染的情况下是否存在被禁止标签
  if (isForbiddenTag(element) && !isServerRendering()) {
    element.forbidden = true
    process.env.NODE_ENV !== 'production' && warn(
      'Templates should only be responsible for mapping the state to the ' +
      'UI. Avoid placing tags with side-effects in your templates, such as ' +
      `<${tag}>` + ', as they will not be parsed.',
      { start: element.start }
    )
  }

  // 预处理一些动态类型:v-model
  for (let i = 0; i < preTransforms.length; i++) {
    element = preTransforms[i](element, options) || element
  }

  // 对vue的指令进行处理v-pre、v-if、v-for、v-once、slot、key、ref这里就不细说了
  if (!inVPre) {
    processPre(element)
    if (element.pre) {
      inVPre = true
    }
  }
  if (platformIsPreTag(element.tag)) {
    inPre = true
  }
  if (inVPre) {
    processRawAttrs(element)
  } else if (!element.processed) {
    // structural directives
    processFor(element)
    processIf(element)
    processOnce(element)
  }

 // 限制根节点不能是slot,template,v-for这类标签
 if (!root) {
    root = element
    if (process.env.NODE_ENV !== 'production') {
      checkRootConstraints(root)
    }
  }

  // 不是单标签就入栈,是的话结束这个元素的
  if (!unary) {
    currentParent = element
    stack.push(element)
  } else {
    closeElement(element)
  }
},
处理完成之后element元素就变成了,就是上面说的ast对象的格式。
{
    attrsList: [{name: "id", value: "app", start: 5, end: 13}]
    attrsMap: {id: "app"}
    children: []
    parent: undefined
    start: 0
    tag: "div"
    type: 1
}
char
然后是我们代码里面的一串空格进入了char方法,这个空格被trim后就变成空了,走到判断text的地方直接跳过了,这个钩子char函数在我们列子中{{message}}这个也会作为文本进入。
chars (text: string, start: number, end: number) {
  // 判断有没有父元素
  if (!currentParent) {
    if (process.env.NODE_ENV !== 'production') {
      if (text === template) {
        warnOnce(
          'Component template requires a root element, rather than just text.',
          { start }
        )
      } else if ((text = text.trim())) {
        warnOnce(
          `text "${text}" outside root element will be ignored.`,
          { start }
        )
      }
    }
    return
  }
  // IE textarea placeholder bug
  /* istanbul ignore if */
  if (isIE &&
    currentParent.tag === 'textarea' &&
    currentParent.attrsMap.placeholder === text
  ) {
    return
  }
  // 储存下currentParent的子元素
  const children = currentParent.children
  if (inPre || text.trim()) {
    text = isTextTag(currentParent) ? text : decodeHTMLCached(text)
  } else if (!children.length) {
    // remove the whitespace-only node right after an opening tag
    text = ''
  } else if (whitespaceOption) {
    if (whitespaceOption === 'condense') {
      // in condense mode, remove the whitespace node if it contains
      // line break, otherwise condense to a single space
      text = lineBreakRE.test(text) ? '' : ' '
    } else {
      text = ' '
    }
  } else {
    text = preserveWhitespace ? ' ' : ''
  }
  if (text) {
    if (whitespaceOption === 'condense') {
      // condense consecutive whitespaces into single space
      text = text.replace(whitespaceRE, ' ')
    }
    let res
    let child: ?ASTNode
    // 解析文本,动态属性情况
    if (!inVPre && text !== ' ' && (res = parseText(text, delimiters))) {
      child = {
        type: 2,
        expression: res.expression,
        tokens: res.tokens,
        text
      }
    } else if (text !== ' ' || !children.length || children[children.length - 1].text !== ' ') {
      child = {
        type: 3,
        text
      }
    }
    if (child) {
      if (process.env.NODE_ENV !== 'production' && options.outputSourceRange) {
        child.start = start
        child.end = end
      }
      children.push(child)
    }
  }
}
comment
生成注释ast的函数还是比较简单的,设置type=3为注释类型,把text放入对象中然后push到currentParent.children
comment (text: string, start, end) {
  const child: ASTText = {
    type: 3,
    text,
    isComment: true
  }
  if (process.env.NODE_ENV !== 'production' && options.outputSourceRange) {
    child.start = start
    child.end = end
  }
  currentParent.children.push(child)
}
end
最后例子进入到end钩子
end (tag, start, end) {
  const element = stack[stack.length - 1]
  if (!inPre) {
    // 删除无用的最后一个空注释节点
    const lastNode = element.children[element.children.length - 1]
    if (lastNode && lastNode.type === 3 && lastNode.text === ' ') {
      element.children.pop()
    }
  }
  // 修改栈,让父级变成上一级
  stack.length -= 1
  currentParent = stack[stack.length - 1]
  if (process.env.NODE_ENV !== 'production' && options.outputSourceRange) {
    element.end = end
  }
  // 关闭当前元素
  closeElement(element)
},
到这个结尾可以看一下现在返回的root也就是ast是什么样子,和预想中的基本一致。
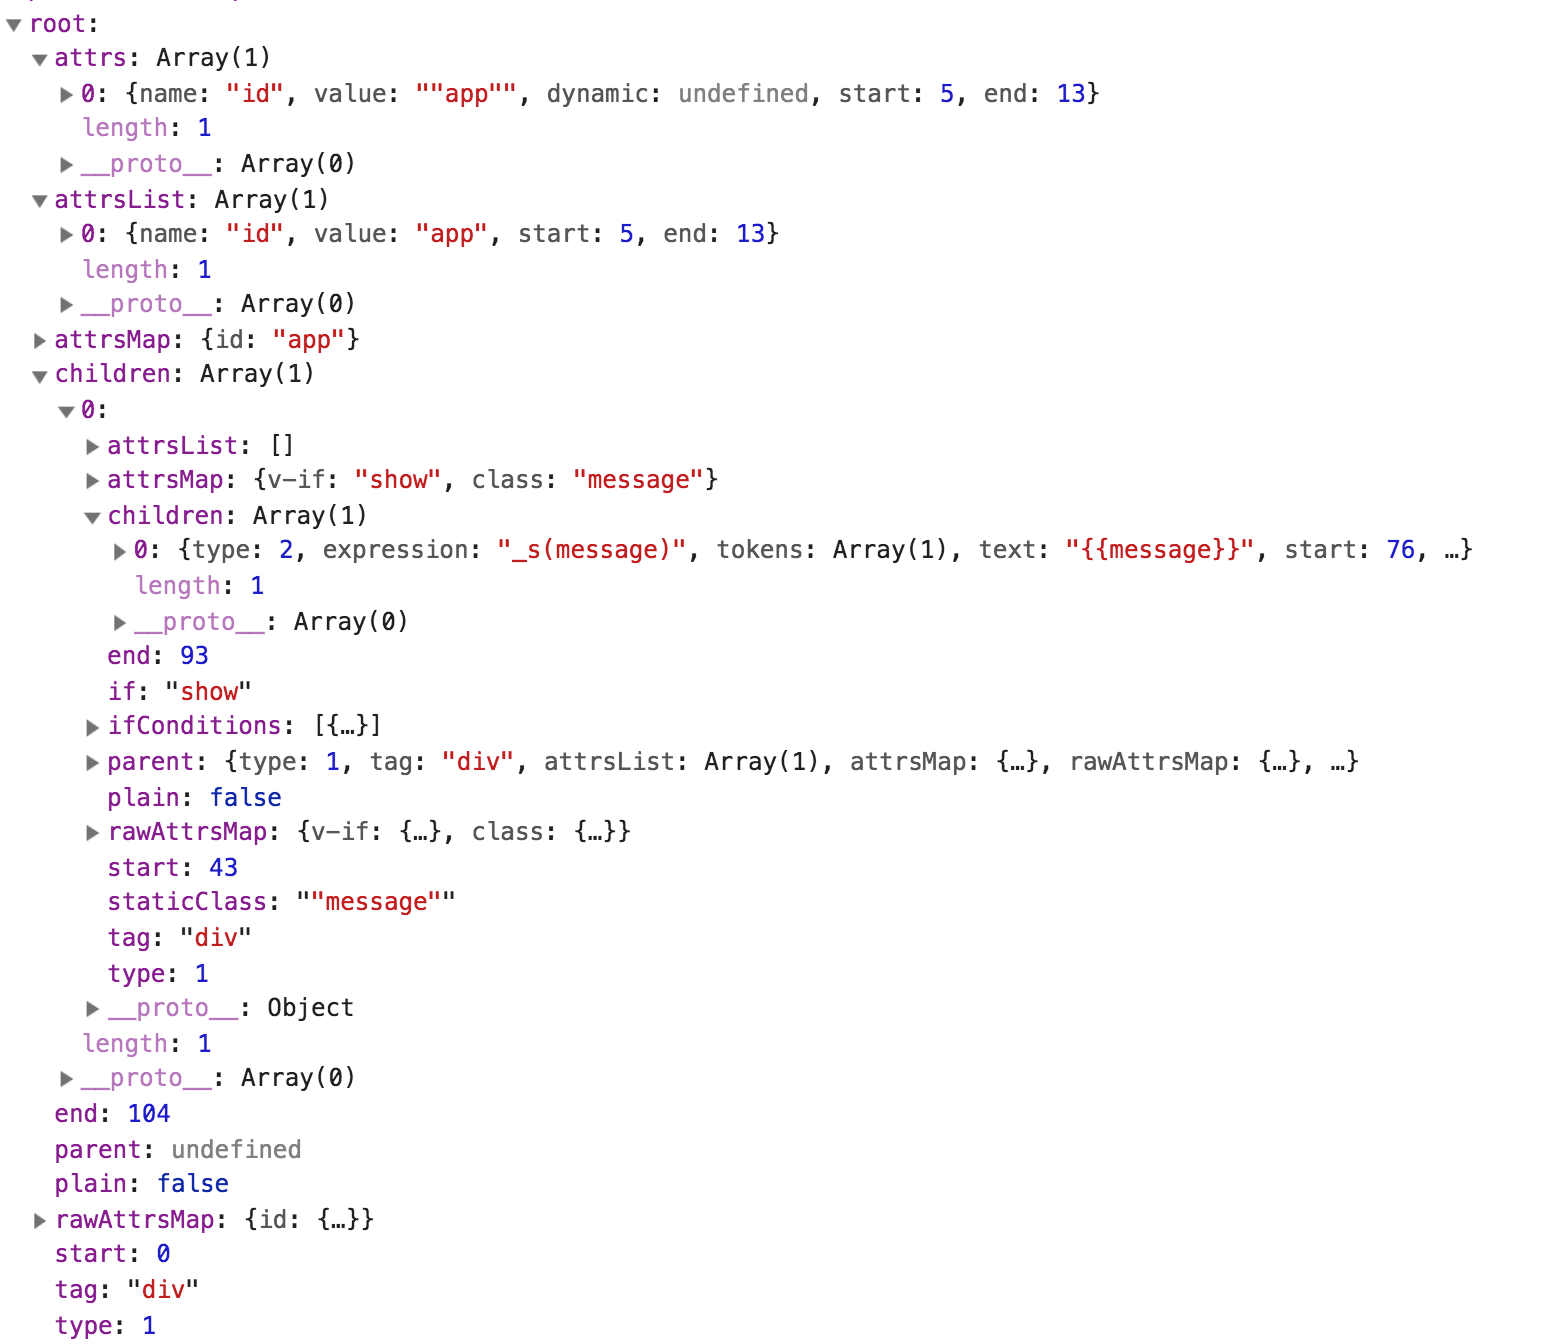
这样其实我们已经把js对象生成ast的过程已经完整的走了一遍,我建议大家还是自己去对着源码跑一个例子看一下,看看整个流程会对自身对源码理解更加深入一些。
结尾
本文主要围绕着Vue的parse过程进行解析,这个文中肯定会有一些不够严谨的思考和错误,欢迎大家指正,有兴趣欢迎一起探讨和改进~
