

在这篇文章里,我将向你展示在 BottomNavigationBar 里如何使用 Flutter 的 Provider。
什么是 Provider?
Provider 是 Flutter 团队推荐的新的状态管理方法。
虽然 setState 可以用于大多数场景,但是建议你不要用。尤其是你用了 FlutterBuilder,然后在用 setState,就会使你的代码很混乱,会造成很多问题。
接下来让我们看如何在 BottomNavigationBar 里使用 Provider。
Step 1: 在 pubspec.yaml 里添加 Provider 的依赖
provider: ^3.0.0+1
Step2: 创建一个 Provider 的类
class BottomNavigationBarProvider with ChangeNotifier {
  int _currentIndex = 0;

  get currentIndex => _currentIndex;

  set currentIndex(int index) {
    _currentIndex = index;
    notifyListeners();
  }
}
在这个 Provider 里,我存储了 BottomNavigationBar 的当前表示展示第几个页面的索引的值,当设置新的索引的值之后,BottomNavigationBar 将会受到最新的值,并且刷新 tab。
Step 3:使用 BottomNavigationBarProvider 来包 Widget
home: ChangeNotifierProvider<BottomNavigationBarProvider>(
  child: BottomNavigationBarExample(),
  builder: (BuildContext context) => BottomNavigationBarProvider(),
),
因为使用 ChangeNotifierProvider 包了 Widget,所以当 ChangeNotifierProvider 里的 _currentIndex 值发生变化的时候,Widget 就会收到通知。
Step 4:实现 BottomNavigationBar 的 tabs
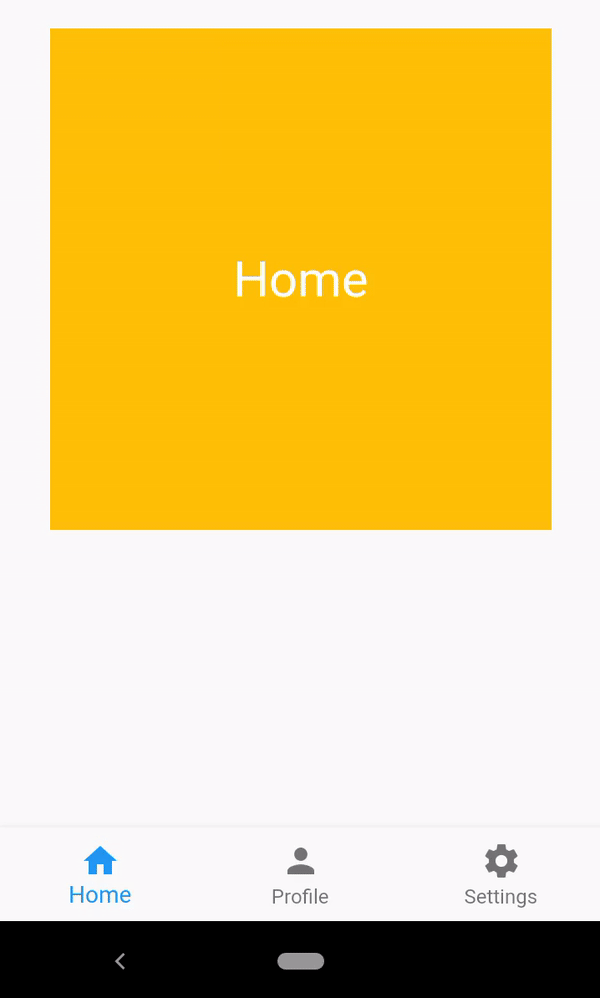
class Home extends StatelessWidget {
  @override
  Widget build(BuildContext context) {
    return Scaffold(
      body: Center(
          child: Container(
        alignment: Alignment.center,
        height: 300,
        width: 300,
        child: Text(
          "Home",
          style: TextStyle(color: Colors.white, fontSize: 30),
        ),
        color: Colors.amber,
      )),
    );
  }
}
class Profile extends StatelessWidget {
  @override
  Widget build(BuildContext context) {
    return Scaffold(
      body: Center(
        child: Container(
          alignment: Alignment.center,
          height: 300,
          width: 300,
          child: Text(
            "Profile",
            style: TextStyle(color: Colors.white, fontSize: 30),
          ),
          color: Colors.blue,
        ),
      ),
    );
  }
}
class Setting extends StatelessWidget {
  @override
  Widget build(BuildContext context) {
    return Scaffold(
      body: Center(
          child: Container(
        alignment: Alignment.center,
        height: 300,
        width: 300,
        child: Text(
          "Settings",
          style: TextStyle(color: Colors.white, fontSize: 30),
        ),
        color: Colors.cyan,
      )),
    );
  }
}
这里创建里 BottomNavigationBar 里要使用的 3 个 tabs。
Step 5:使用 Provider 创建 BottomNavigationBarExample
class BottomNavigationBarExample extends StatefulWidget {
  @override
  _BottomNavigationBarExampleState createState() =>
      _BottomNavigationBarExampleState();
}

class _BottomNavigationBarExampleState
    extends State<BottomNavigationBarExample> {
  var currentTab = [
    Home(),
    Profile(),
    Setting(),
  ];

  @override
  Widget build(BuildContext context) {
    var provider = Provider.of<BottomNavigationBarProvider>(context);
    return Scaffold(
      body: currentTab[provider.currentIndex],
      bottomNavigationBar: BottomNavigationBar(
        currentIndex: provider.currentIndex,
        onTap: (index) {
          provider.currentIndex = index;
        },
        items: [
          BottomNavigationBarItem(
            icon: new Icon(Icons.home),
            title: new Text('Home'),
          ),
          BottomNavigationBarItem(
            icon: new Icon(Icons.person),
            title: new Text('Profile'),
          ),
          BottomNavigationBarItem(
            icon: Icon(Icons.settings),
            title: Text('Settings'),
          )
        ],
      ),
    );
  }
}
这里使用 Provider 的代码为:
 @override
  Widget build(BuildContext context) {
    var provider = Provider.of<BottomNavigationBarProvider>(context);
    return Scaffold(
      ...
      bottomNavigationBar: BottomNavigationBar(
        ...
        onTap: (index) {
          provider.currentIndex = index;
        },
        ...
      )
    )
  }
至此,创建了一个使用底部导航栏切换页面的应用,而且底部导航栏的切换使用到的当前页面的索引的值由 Provider 更新。
Github 代码
这里是本篇文章涉及到的代码:github.com/flutter-dev…
持续化 BottomNavigationBar
Provide 不需要使用 setState 就可以变化显示的 tabs,但是如果你想持久化当前页面的状态,例如,下次打开 APP 时记住上次打开的是哪个页面,可以使用 PageStorageBucket,可以看我另外的一个实例,地址是: github.com/tensor-prog…
