

需求
解析文件中的音视频流以解码同步并将视频渲染到屏幕上,音频通过扬声器输出.对于仅仅需要单纯播放一个视频文件可直接使用AVFoundation中上层播放器,这里是用最底层的方式实现,可获取原始音视频帧数据.
实现原理
本文主要分为三大块,解析模块使用FFmpeg parse文件中的音视频流,解码模块使用FFmpeg或苹果原生解码器解码音视频,渲染模块使用OpenGL将视频流渲染到屏幕,使用Audio Queue Player将音频以扬声器形式输出.
阅读前提
注意: 本文涉及到的所有模块具体实现均在如下链接中,可根据需求自行查看讲解部分.
- 音视频基础
- iOS FFmpeg环境搭建
- FFmpeg解析视频数据
- VideoToolbox实现视频硬解码
- Audio Converter音频解码
- FFmpeg音频解码
- FFmpeg视频解码
- OpenGL渲染视频数据
- H.264,H.265码流结构
- 传输音频数据队列实现
- Audio Queue 播放器
代码地址 : iOS File Player
掘金地址 : iOS File Player
简书地址 : iOS File Player
博客地址 : iOS File Player
总体架构
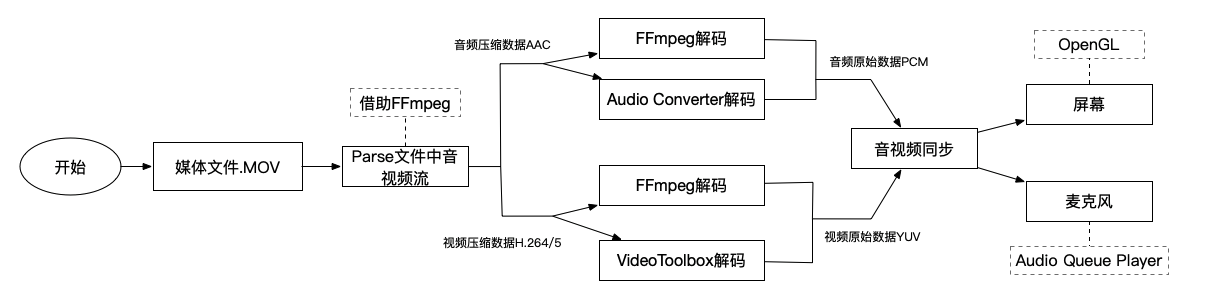
本文以解码一个.MOV媒体文件为例, 该文件中包含H.264编码的视频数据, AAC编码的音频数据,首先要通过FFmpeg去parse文件中的音视频流信息,parse出来的结果保存在AVPacket结构体中,然后分别提取音视频帧数据,音频帧通过FFmpeg解码器或苹果原生框架中的Audio Converter进行解码,视频通过FFmpeg或苹果原生框架VideoToolbox中的解码器可将数据解码,解码后的音频数据格式为PCM,解码后的视频数据格式为YUV原始数据,根据时间戳对音视频数据进行同步,最后将PCM数据音频传给Audio Queue以实现音频的播放,将YUV视频原始数据封装为CMSampleBufferRef数据结构并传给OpenGL以将视频渲染到屏幕上,至此一个完整拉取文件视频流的操作完成.
注意: 通过网址拉取一个RTMP流进行解码播放的流程与拉取文件流基本相同, 只是需要通过socket接收音视频数据后再完成解码及后续流程.
简易流程
Parse
- 创建
AVFormatContext上下文对象:AVFormatContext *avformat_alloc_context(void); - 从文件中获取上下文对象并赋值给指定对象:
int avformat_open_input(AVFormatContext **ps, const char *url, AVInputFormat *fmt, AVDictionary **options) - 读取文件中的流信息:
int avformat_find_stream_info(AVFormatContext *ic, AVDictionary **options); - 获取文件中音视频流:
m_formatContext->streams[audio/video index]e - 开始parse以获取文件中视频帧帧:
int av_read_frame(AVFormatContext *s, AVPacket *pkt); - 如果是视频帧通过
av_bitstream_filter_filter生成sps,pps等关键信息. - 读取到的
AVPacket即包含文件中所有的音视频压缩数据.
解码
通过FFmpeg解码
- 获取文件流的解码器上下文:
formatContext->streams[a/v index]->codec; - 通过解码器上下文找到解码器:
AVCodec *avcodec_find_decoder(enum AVCodecID id); - 打开解码器:
int avcodec_open2(AVCodecContext *avctx, const AVCodec *codec, AVDictionary **options); - 将文件中音视频数据发送给解码器:
int avcodec_send_packet(AVCodecContext *avctx, const AVPacket *avpkt); - 循环接收解码后的音视频数据:
int avcodec_receive_frame(AVCodecContext *avctx, AVFrame *frame); - 如果是音频数据可能需要重新采样以便转成设备支持的格式播放.(借助
SwrContext)
通过VideoToolbox解码视频
- 将从FFmpeg中parse到的extra data中分离提取中NALU头关键信息sps,pps等
- 通过上面提取的关键信息创建视频描述信息:
CMVideoFormatDescriptionRef,CMVideoFormatDescriptionCreateFromH264ParameterSets / CMVideoFormatDescriptionCreateFromHEVCParameterSets - 创建解码器:
VTDecompressionSessionCreate,并指定一系列相关参数. - 将压缩数据放入CMBlockBufferRef中:
CMBlockBufferCreateWithMemoryBlock - 开始解码:
VTDecompressionSessionDecodeFrame - 在回调中接收解码后的视频数据
通过AudioConvert解码音频
- 通过原始数据与解码后数据格式的ASBD结构体创建解码器:
AudioConverterNewSpecific - 指定解码器类型
AudioClassDescription - 开始解码:
AudioConverterFillComplexBuffer - 注意: 解码的前提是每次需要有1024个采样点才能完成一次解码操作.
同步
因为这里解码的是本地文件中的音视频, 也就是说只要本地文件中音视频的时间戳打的完全正确,我们解码出来的数据是可以直接播放以实现同步的效果.而我们要做的仅仅是保证音视频解码后同时渲染.
注意: 比如通过一个RTMP地址拉取的流因为存在网络原因可能造成某个时间段数据丢失,造成音视频不同步,所以需要有一套机制来纠正时间戳.大体机制即为视频追赶音频,后面会有文件专门介绍,这里不作过多说明.
渲染
通过上面的步骤获取到的视频原始数据即可通过封装好的OpenGL ES直接渲染到屏幕上,苹果原生框架中也有GLKViewController可以完成屏幕渲染.音频这里通过Audio Queue接收音频帧数据以完成播放.
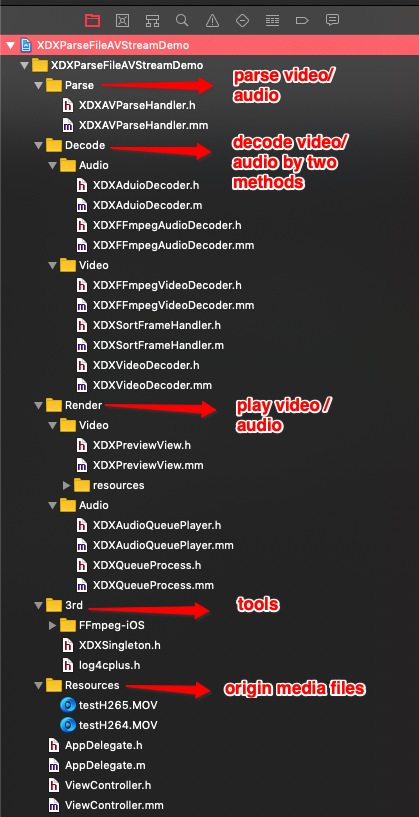
文件结构
快速使用
使用FFmpeg解码
首先根据文件地址初始化FFmpeg以实现parse音视频流.然后利用FFmpeg中的解码器解码音视频数据,这里需要注意的是,我们将从读取到的第一个I帧开始作为起点,以实现音视频同步.解码后的音频要先装入传输队列中,因为audio queue player设计模式是不断从传输队列中取数据以实现播放.视频数据即可直接进行渲染.
- (void)startRenderAVByFFmpegWithFileName:(NSString *)fileName {
    NSString *path = [[NSBundle mainBundle] pathForResource:fileName ofType:@"MOV"];

    XDXAVParseHandler *parseHandler = [[XDXAVParseHandler alloc] initWithPath:path];

    XDXFFmpegVideoDecoder *videoDecoder = [[XDXFFmpegVideoDecoder alloc] initWithFormatContext:[parseHandler getFormatContext] videoStreamIndex:[parseHandler getVideoStreamIndex]];
    videoDecoder.delegate = self;

    XDXFFmpegAudioDecoder *audioDecoder = [[XDXFFmpegAudioDecoder alloc] initWithFormatContext:[parseHandler getFormatContext] audioStreamIndex:[parseHandler getAudioStreamIndex]];
    audioDecoder.delegate = self;

    static BOOL isFindIDR = NO;

    [parseHandler startParseGetAVPackeWithCompletionHandler:^(BOOL isVideoFrame, BOOL isFinish, AVPacket packet) {
        if (isFinish) {
            isFindIDR = NO;
            [videoDecoder stopDecoder];
            [audioDecoder stopDecoder];
            dispatch_async(dispatch_get_main_queue(), ^{
                self.startWorkBtn.hidden = NO;
            });
            return;
        }

        if (isVideoFrame) { // Video
            if (packet.flags == 1 && isFindIDR == NO) {
                isFindIDR = YES;
            }

            if (!isFindIDR) {
                return;
            }

            [videoDecoder startDecodeVideoDataWithAVPacket:packet];
        }else {             // Audio
            [audioDecoder startDecodeAudioDataWithAVPacket:packet];
        }
    }];
}

-(void)getDecodeVideoDataByFFmpeg:(CMSampleBufferRef)sampleBuffer {
    CVPixelBufferRef pix = CMSampleBufferGetImageBuffer(sampleBuffer);
    [self.previewView displayPixelBuffer:pix];
}

- (void)getDecodeAudioDataByFFmpeg:(void *)data size:(int)size pts:(int64_t)pts isFirstFrame:(BOOL)isFirstFrame {
//    NSLog(@"demon test - %d",size);
    // Put audio data from audio file into audio data queue
    [self addBufferToWorkQueueWithAudioData:data size:size pts:pts];

    // control rate
    usleep(14.5*1000);
}
使用原生框架解码
首先根据文件地址初始化FFmpeg以实现parse音视频流.这里首先根据文件中实际的音频流数据构造ASBD结构体以初始化音频解码器,然后将解码后的音视频数据分别渲染即可.这里需要注意的是,如果要拉取的文件视频是H.265编码格式的,解码出来的数据的因为含有B帧所以时间戳是乱序的,我们需要借助一个链表对其排序,然后再将排序后的数据渲染到屏幕上.
- (void)startRenderAVByOriginWithFileName:(NSString *)fileName {
    NSString *path = [[NSBundle mainBundle] pathForResource:fileName ofType:@"MOV"];
    XDXAVParseHandler *parseHandler = [[XDXAVParseHandler alloc] initWithPath:path];

    XDXVideoDecoder *videoDecoder = [[XDXVideoDecoder alloc] init];
    videoDecoder.delegate = self;

    // Origin file aac format
    AudioStreamBasicDescription audioFormat = {
        .mSampleRate         = 48000,
        .mFormatID           = kAudioFormatMPEG4AAC,
        .mChannelsPerFrame   = 2,
        .mFramesPerPacket    = 1024,
    };

    XDXAduioDecoder *audioDecoder = [[XDXAduioDecoder alloc] initWithSourceFormat:audioFormat
                                                                     destFormatID:kAudioFormatLinearPCM
                                                                       sampleRate:48000
                                                              isUseHardwareDecode:YES];

    [parseHandler startParseWithCompletionHandler:^(BOOL isVideoFrame, BOOL isFinish, struct XDXParseVideoDataInfo *videoInfo, struct XDXParseAudioDataInfo *audioInfo) {
        if (isFinish) {
            [videoDecoder stopDecoder];
            [audioDecoder freeDecoder];

            dispatch_async(dispatch_get_main_queue(), ^{
                self.startWorkBtn.hidden = NO;
            });
            return;
        }

        if (isVideoFrame) {
            [videoDecoder startDecodeVideoData:videoInfo];
        }else {
            [audioDecoder decodeAudioWithSourceBuffer:audioInfo->data
                                     sourceBufferSize:audioInfo->dataSize
                                      completeHandler:^(AudioBufferList * _Nonnull destBufferList, UInt32 outputPackets, AudioStreamPacketDescription * _Nonnull outputPacketDescriptions) {
                                          // Put audio data from audio file into audio data queue
                                          [self addBufferToWorkQueueWithAudioData:destBufferList->mBuffers->mData size:destBufferList->mBuffers->mDataByteSize pts:audioInfo->pts];

                                          // control rate
                                          usleep(16.8*1000);
                                      }];
        }
    }];
}

- (void)getVideoDecodeDataCallback:(CMSampleBufferRef)sampleBuffer isFirstFrame:(BOOL)isFirstFrame {
    if (self.hasBFrame) {
        // Note : the first frame not need to sort.
        if (isFirstFrame) {
            CVPixelBufferRef pix = CMSampleBufferGetImageBuffer(sampleBuffer);
            [self.previewView displayPixelBuffer:pix];
            return;
        }

        [self.sortHandler addDataToLinkList:sampleBuffer];
    }else {
        CVPixelBufferRef pix = CMSampleBufferGetImageBuffer(sampleBuffer);
        [self.previewView displayPixelBuffer:pix];
    }
}

#pragma mark - Sort Callback
- (void)getSortedVideoNode:(CMSampleBufferRef)sampleBuffer {
    int64_t pts = (int64_t)(CMTimeGetSeconds(CMSampleBufferGetPresentationTimeStamp(sampleBuffer)) * 1000);
    static int64_t lastpts = 0;
//    NSLog(@"Test marigin - %lld",pts - lastpts);
    lastpts = pts;

    [self.previewView displayPixelBuffer:CMSampleBufferGetImageBuffer(sampleBuffer)];
}
具体实现
本文中每一部分的具体实现均有详细介绍, 如需帮助请参考阅读前提中附带的链接地址.
注意
因为不同文件中压缩的音视频数据格式不同,这里仅仅兼容部分格式,可自定义进行扩展.
