前言
树形组件的需求,很多人遇到都觉得头疼、逻辑复杂,除了展示之外,还要有增删该查的逻辑。一般树形组件具有多个层级,如果当前层级有下一个层级,会有像
children、list等属性,数据结构一般就是
const tree = [
    {
        name: 'a',
        id: 1,
    },
    {
        name: 'b',
        id: 2,
        children: [
            {
                name: 'c',
                id: 3
            }
        ]
    },
]
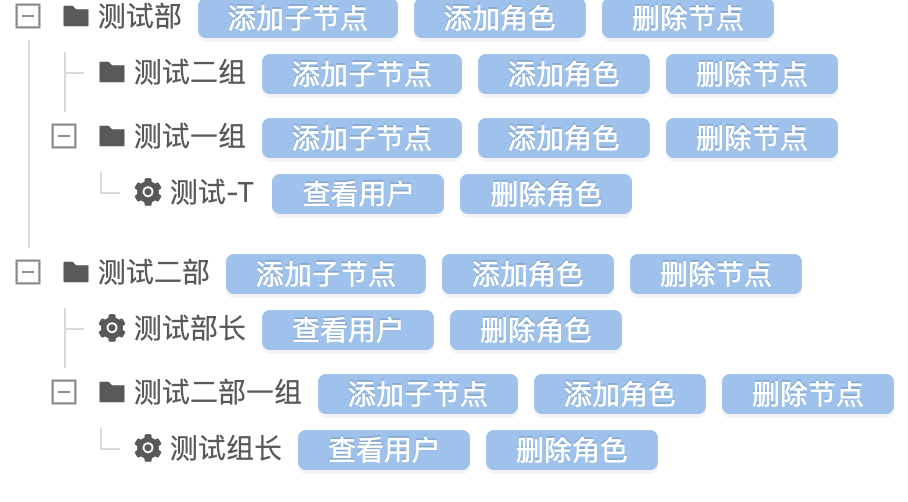
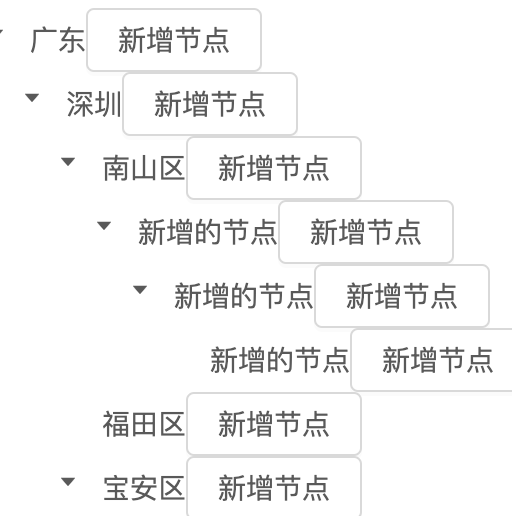
界面大概就是这种:
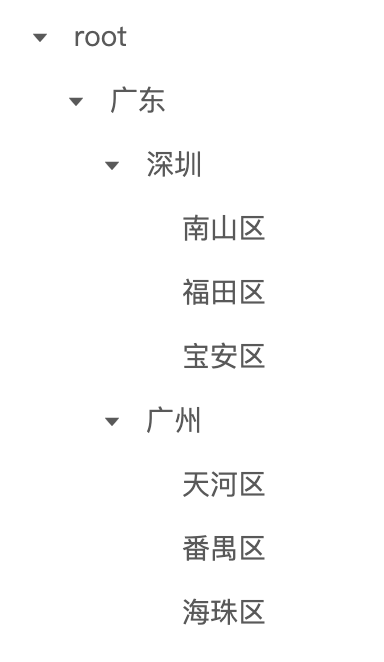
这里先给出下文数据源:
const data = [{"name":"广东","id":1,"children":[{"name":"深圳","id":2,"children":[{"name":"南山区","id":3},{"name":"福田区","id":4},{"name":"宝安区","id":5}]},{"name":"广州","id":6,"children":[{"name":"天河区","id":7},{"name":"番禺区","id":8},{"name":"海珠区","id":9}]}]}]
递归渲染与记录节点信息
递归就是最常规的方式了,以antd的tree组件为例,大家都会这样做:
// 放在react的class组件里面
renderTree = (data = []) => {
  return data.map(item => (
    <TreeNode title={item.name}>
      {renderTree(item.children)}
    </TreeNode>
  ))
}

  render() {
    return (
      <React.Fragment>
        <Tree defaultExpandAll={true} selectable={false}>
          <TreeNode
            title="root"
          >
            {this.renderTree(this.state.data)}
          </TreeNode>
        </Tree>
      </React.Fragment>
    );
  }
先把名字作为节点title,然后如果有子节点,就用同样的方法渲染子节点。
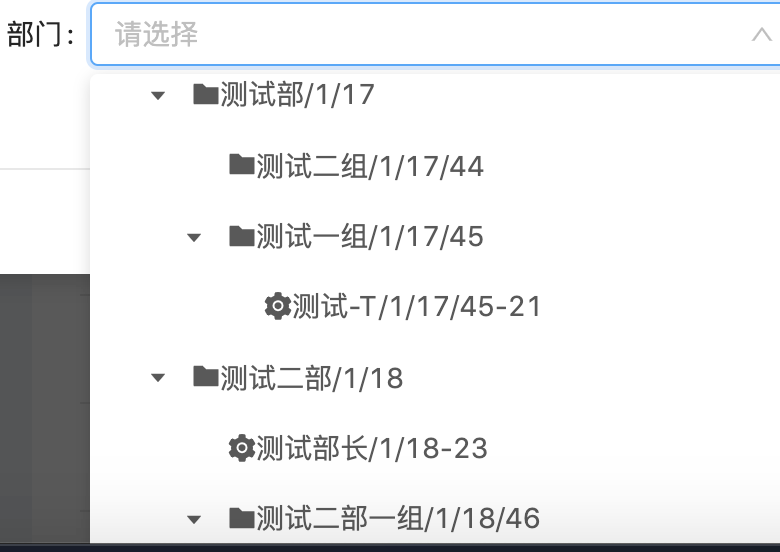
组件已经好了,如果我们要点击,我们怎么知道哪个层级的哪个节点被点了呢?是不是会写一个搜索算法,传入当前节点id,然后回溯去记录路径展示出来?这虽然可以做到,但显然是不优雅的,我们只需要牺牲空间换时间的方法就可以大大优化这个过程,即是在遍历的过程中把节点信息带到下一个递归函数里面去。
renderTree = (data = [], info = { path: '', id: '' }) => {
    return data.map(item => (
      <TreeNode title={
        <Button onClick={() => console.log(`${info.path}/${item.name}`)}>{item.name}</Button>
      }>
        {this.renderTree(item.children, { path: `${info.path}/${item.name}`, id: `${info.id}/${item.id}` })}
      </TreeNode>
    ));
}
现在,我们点击哪一个,就打印当前节点路径了
增删改查操作
如果遇到了增删改查,基于前面的条件,我们记录了要用到的信息,所以可以借助这些信息进行增删改查。
点击查看一般的增删改查规则
- 增:需要知道父节点id(父.push)
- 删:需要知道父节点id和当前节点id(父.splice(子))
- 改:需要知道父节点id和当前节点id(父.子 = newVal)
- 查:需要知道父节点id((父) => 父.所有子)
后台一般是id,对前端一般是key
我们删掉刚刚的按钮,把id去掉(因为我们现在仅仅用前端测试,只用key即可,如果需要传到后台,则需要遵守上面的规则传id),然后用同样的方法记录每一层的key
renderTree = (data = [], info = { path: '', key: '' }) => {
    return data.map((item, index) => (
      <TreeNode title={
        <React.Fragment>
          {item.name}
          <Button onClick={() => { console.log(`${info.key}.${index}`.slice(1)) }}>新增节点</Button>
        </React.Fragment>
      }>
        {this.renderTree(item.children, { path: `${info.path}/${item.name}`, key: `${info.key}.${index}` })}
      </TreeNode>
    ));
}
此时,我们点击天河区,打印出来的是0.1.0,也就是我们所点的是data[0].children[1].children[0],要给data[0].children[1].children[0]的children push一个新元素。所以我们还要写一个类似lodash.get的方法:
function get(target, keysStr) {
    const keys = keysStr.split('.')
    let res = target[keys.shift()]
    while (res && keys.length) {
        res = res.children[keys.shift()]
    }
    return res
}
Button里面的onclik方法改一下:
  <Button onClick={() => {
    const currentKeyPath = `${info.key}.${index}`.slice(1)
    this.setState(({ data }) => {
      const current = get(data, currentKeyPath) // 拿到当前节点
      // 给children属性追加一个新节点
      ;(current.children || (current.children = [])).push({ name: '新增的节点' })
      return data
    })
  }}>新增节点</Button>
  <Button onClick={() => {
    const currentKeyPath = `${info.key}`.slice(1) // 父节点key路径
    this.setState(({ data }) => {
      const current = get(data, currentKeyPath)
      current.children.splice(index, 1) // 删除当前节点第index个元素
      return data
    })
  }}>删除节点</Button>
我们新增的了节点后,首先就是把系统默认名字改掉,改和删都是差不多的,但是改需要维护一个输入框来填写新节点名字。常规的方法是另外控制一个Modal组件,这个Modal里面有一个Input。点击确定即可修改。为了更好的体验,我通常是直接行内修改。先写一个Edit组件,这个组件正常情况下是一个按钮,点击了变成一个Input,失去焦点的时候修改完成
function Edit(props) {
  const [value, setValue] = React.useState(props.value)
  const [isEdit, setIsEdit] = React.useState(false)
  const handleChange = React.useCallback((e) => {
    setValue(e.target.value)
  }, [setValue])
  const handleBlur = React.useCallback((e) => {
    const current = get(props.target, props.currentKeyPath)
    current.name = value // 给当前节点的name赋值
    props.setState(current) // 上层的setstate方法
    setIsEdit(false)
  }, [setValue, value])
  return (
    isEdit ?
    <Input
      autoFocus={true}
      value={value}
      onChange={handleChange}
      onBlur={handleBlur}
    /> :
    <Button onClick={() => setIsEdit(true)}>修改节点</Button>
  )
}
有了Edit组件,我们在title的元素里面加上Edit组件:
  <Edit
    target={this.state.data}
    value={item.value}
    currentKeyPath={`${info.key}.${index}`.slice(1)}
    setState={(state) => this.setState(state)}
  />
点击查看以上全部代码
import { Input, Tree, Button } from 'antd';
import * as React from 'react';

const { TreeNode } = Tree;

function get(target, keysStr) {
  const keys = keysStr.split('.')
  let res = target[keys.shift()]
  while (res && keys.length) {
    res = res.children[keys.shift()]
  }
  return res
}

function Edit(props) {
  const [value, setValue] = React.useState(props.value)
  const [isEdit, setIsEdit] = React.useState(false)
  const handleChange = React.useCallback((e) => {
    setValue(e.target.value)
  }, [setValue])
  const handleBlur = React.useCallback((e) => {
    const currnet = get(props.target, props.currentKeyPath)
    console.log(props.target,  currnet, props.currentKeyPath)
    currnet.name = value
    props.setState(currnet)
    setIsEdit(false)
  }, [setValue, value])
  return (
    isEdit ?
    <Input
      autoFocus={true}
      value={value}
      onChange={handleChange}
      onBlur={handleBlur}
    /> :
    <Button onClick={() => setIsEdit(true)}>修改节点</Button>
  )
}

const data = [
  { name: '广东', id: 1, children: [
    { name: '深圳', id: 2, children: [
      { name: '南山区', id: 3 },
      { name: '福田区', id: 4 },
      { name: '宝安区', id: 5 },
    ] },
    {
      name: '广州',
      id: 6,
      children: [
        { name: '天河区', id: 7 },
        { name: '番禺区', id: 8 },
        { name: '海珠区', id: 9 },
      ]
    }
  ] }
];

export default class Test extends React.Component {
  state = {
    data,
  };
  render() {
    return (
      <React.Fragment>
        <Tree defaultExpandAll={true} selectable={false}>
          <TreeNode
            title="root"
          >
            {this.renderTree(this.state.data)}
          </TreeNode>
        </Tree>
      </React.Fragment>
    );
  }

 renderTree = (data = [], info = { path: '', key: '' }) => {
    return data.map((item, index) => (
      <TreeNode title={
        <React.Fragment>
          {item.name}
          <Button onClick={() => {
            const currentKeyPath = `${info.key}.${index}`.slice(1)
            this.setState(({ data }) => {
              const current = get(data, currentKeyPath)
              ;(current.children || (current.children = [])).push({ name: '新增的节点' })
              return data
            })
          }}>新增节点</Button>
          <Button onClick={() => {
            const currentKeyPath = `${info.key}`.slice(1)
            this.setState(({ data }) => {
              const current = get(data, currentKeyPath)
              current.children.splice(index, 1)
              return data
            })
          }}>删除节点</Button>
          <Edit
            target={this.state.data}
            value={item.value}
            currentKeyPath={`${info.key}.${index}`.slice(1)}
            setState={(state) => this.setState(state)}
          />
        </React.Fragment>
      }>
        {this.renderTree(item.children, { path: `${info.path}/${item.name}`, key: `${info.key}.${index}` })}
      </TreeNode>
    ));
  }
}
搜索
不一定所有的场景都是空间换时间,只要不是频繁操作树结构的,只需要少量的搜索即可。树搜索就两种,广度优先搜索(bfs)、深度优先搜索(dfs)
栈和队列
栈的规律是,先进后出;队列的规律是,先进先出,在数组上的表现就是:
- 栈:arr.push(item);arr.pop()
- 队列:arr.push(item);arr.shift()
bfs是基于队列实现,dfs是基于栈(递归也算是栈的一种体现)实现
对于文章最前面那个结构
数据源
const data = [
  { name: '广东', id: 1, children: [
    { name: '深圳', id: 2, children: [
      { name: '南山区', id: 3 },
      { name: '福田区', id: 4 },
      { name: '宝安区', id: 5 },
    ] },
    {
      name: '广州',
      id: 6,
      children: [
        { name: '天河区', id: 7 },
        { name: '番禺区', id: 8 },
        { name: '海珠区', id: 9 },
      ]
    }
  ] }
];
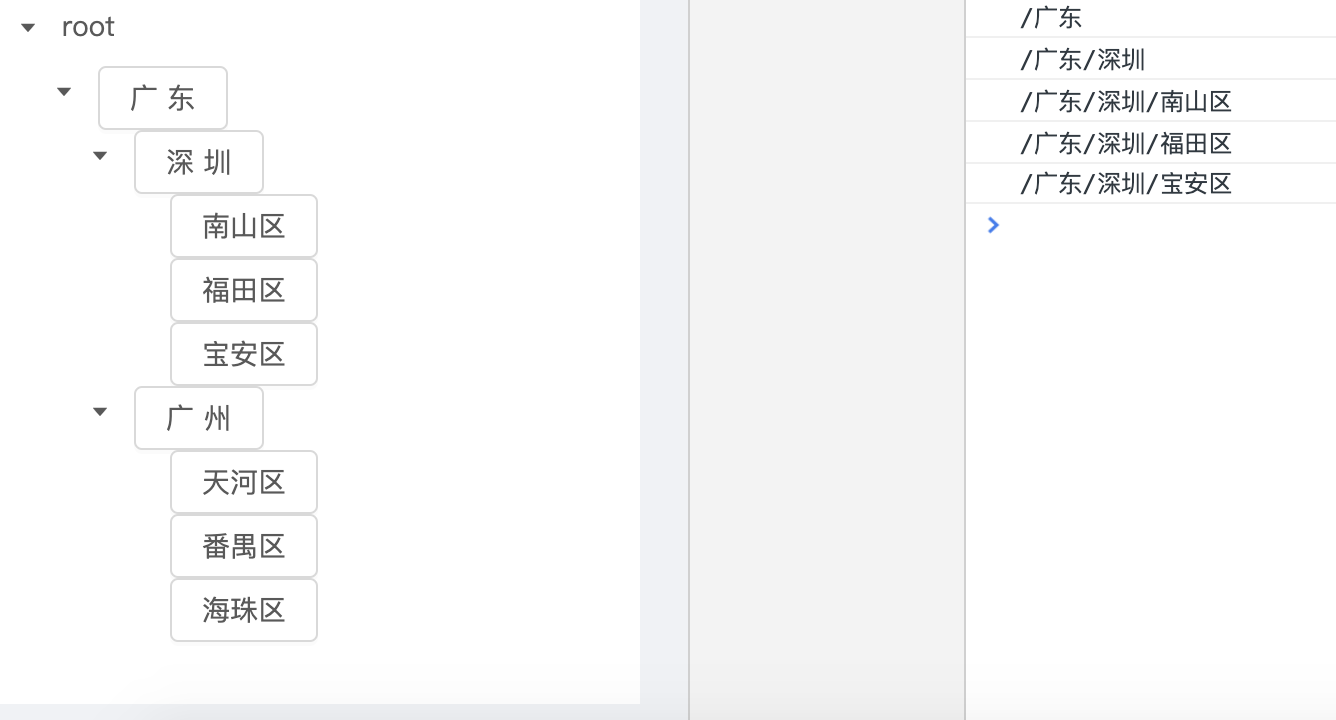
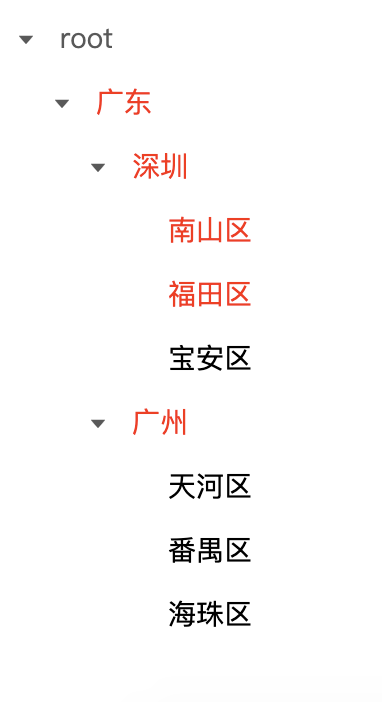
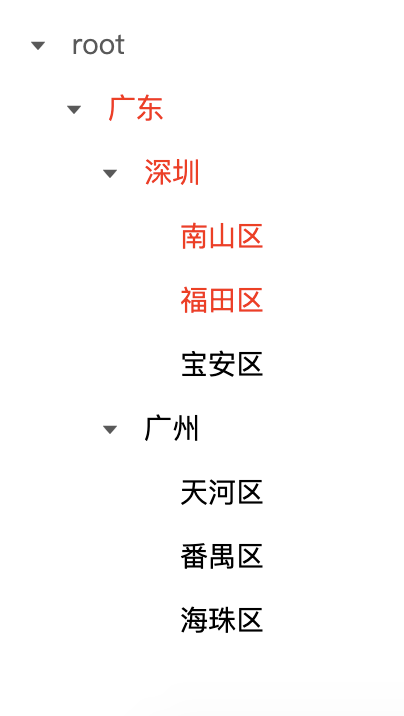
使用bfs遍历的顺序(下文假设全是从左到右遍历顺序)是:广东、深圳、广州、南山区、福田区、宝安区、天河区、番禺区、海珠区;使用dfs的顺序是:广东、深圳、南山区、福田区、宝安区、广州、天河区、番禺区、海珠区
bfs
以搜索"福田区"为例
function bfs(target, name) {
  const quene = [...target]
  do {
    const current = quene.shift() // 取出队列第一个元素
    current.isTravel = true // 标记为遍历过
    if (current.children) {
      quene.push(...current.children) // 子元追加到队列后面
    }
    if (current.name === name) {
      return current
    }
  } while(quene.length)
  return undefined
}
再把renderTree方法里面的操作取掉,加上遍历过标红逻辑,再加上bfs的逻辑:
componentDidMount() {
  bfs(this.state.data, '福田区')
  this.forceUpdate()
}

renderTree = (data = [], info = { path: '', key: '' }) => {
    return data.map((item, index) => (
      <TreeNode title={
        <React.Fragment>
          <span style={{ color: item.isTravel ? '#f00' : '#000' }}>{item.name}</span>
        </React.Fragment>
      }>
        {this.renderTree(item.children, { path: `${info.path}/${item.name}`, key: `${info.key}.${index}` })}
      </TreeNode>
    ));
  }
遍历过程是:
dfs
以搜索"福田区"为例。基于前面的bfs,可以很容易过渡到基于循环实现的dfs
function dfs(target, name) {
  const quene = [...target]
  do {
    const current = quene.pop() // 改成pop,取最后一个,后入先出
    current.isTravel = true
    if (current.children) {
      quene.push(...[...current.children].reverse()) // 保证从左到右遍历
    }
    if (current.name === name) {
      return current
    }
  } while(quene.length)
  return undefined
}

// 基于递归实现
function dfs(target = [], name) {
  return target.find(x => {
    x.isTravel = true
    const isFind = x.name === name
    return isFind ? x : dfs(x.children, name)
  })
}
遍历过程是:
这种方案满足的场景是:只能操作该节点的归属路径,比如只能操作广东和深圳两个节点其他节点disabled
自上而下dfs和自下而上dfs
先提一下,二叉树前中后序遍历,在代码上的差别就在于处理语句放在哪个位置:
function tree(node) {
    if (node) {
        console.log('前序遍历')
        tree(node.left)
        console.log('中序遍历')
        tree(node.right)
        console.log('后序遍历')
    }
}
对于dfs,也是有同样的道理,我们先把上面的改一下。以搜索"福田区"为例
function dfs(target = [], name) {
  return target.find(x => {
    x.isTravel = true
    const isFind = x.name === name
    console.log('自上而下', x)
    const ret = isFind ? x : dfs(x.children, name)
    return ret
  })
}
// => 广东、深圳、南山区、福田区

// 自下而上
function dfs(target = [], name) {
  return target.find(x => {
    x.isTravel = true
    const isFind = x.name === name
    const ret = isFind ? x : dfs(x.children, name)
    console.log('自下而上', x)
    return ret
  })
}
// => 南山区、福田区、深圳、广东
大部分场景不需要讲究哪种dfs遍历方式。如果这个数据结构有很多省,我们想快速找到广东省的时候,使用自上而下更容易;如果这个数据结构市下面有很多区,想快速找到属于哪个市则使用自下而上更容易
总结
- 遇到树结构组件,我们先使用递归渲染
- 递归遍历的同时,记录下当前节点信息到节点里面,把当前节点信息带到下一个递归函数的参数里面去,供后续的curd操作使用
- 如果递归渲染的时候,不提前记录节点信息到节点里面,某些后续的特殊操作就需要使用bfs或者dfs
- 最后在遍历同时记录信息和不记录信息后面使用dfs、bfs之间权衡哪个方案更优
- 如果使用dfs,还可以考虑一下自上而下dfs还是自下而上dfs哪个更优
只要我们按照这样的套路,如果再来树结构相关需求,那么,来一个秒一个,毫无压力
关注公众号《不一样的前端》,以不一样的视角学习前端,快速成长,一起把玩最新的技术、探索各种黑科技