

1. 前言
作为一个Android开发者对OkHttp这个网络请求框架一定不会陌生,它早已成为Android在网络请求方面的统治者,不关你是直接使用OkHttp还是使用Retrofit又或者其它对OkHttp的封装,说到底都是基于OkHttp。所以学会使用并且深入了解OkHttp的原理就变得很有必要。
2. OkHttp的基础用法
了解原理的前提是要先会运用,根据其使用步骤才能进一步分析学习其运行的原理。那么OkHttp最基础使用步骤如下:
// 1、创建OkHttpClient对象
OkHttpClient okHttpClient = new OkHttpClient();
// 2、创建Request对象
Request request = new Request.Builder().url(url).build();
// 3、通过okHttpClient的newCall方法获得一个Call对象
Call call = okHttpClient.newCall(request);
// 4、请求
// 同步请求
Response response = call.execute();
// 异步请求
call.enqueue(new Callback() {
@Override
public void onFailure(Call call, IOException e) {
 // 子线程
}

@Override
public void onResponse(Call call, Response response) throws IOException {
  // 子线程
}
});
当然OkHttp支持各种网络请求相关配置,其具有的拦截器机制方便使用者可以对所有请求做统一的配置处理。这里只是展示最基础使用方法,没什么好说的非常简单,并且OkHttp也支持同步和异步请求。
3. 源码运行流程
本篇文章中所有源码基于OkHttp3.11.0版本,下面就开始看源码。
3.1 创建OkHttpClient对象
和之前说的一样,按照OkHttp的使用方法流程来读源码搞清运行流程原理,使用时我们首先是构建一个OkHttpClient对象。来看源码是怎样构建的。
 public OkHttpClient() {
    this(new Builder());
  }
OkHttpClient的实现是一个建造者模式。构造方法里创建了一个Builder对象,来看这个Builder类。
 public static final class Builder {
    Dispatcher dispatcher;
    Proxy proxy;
    List<Protocol> protocols;
    List<ConnectionSpec> connectionSpecs;
    final List<Interceptor> interceptors = new ArrayList<>();
    final List<Interceptor> networkInterceptors = new ArrayList<>();
    ProxySelector proxySelector;
    CookieJar cookieJar;
    Cache cache;
    InternalCache internalCache;
    SocketFactory socketFactory;
    SSLSocketFactory sslSocketFactory;
    CertificateChainCleaner certificateChainCleaner;
    HostnameVerifier hostnameVerifier;
    CertificatePinner certificatePinner;
    Authenticator proxyAuthenticator;
    Authenticator authenticator;
    ConnectionPool connectionPool;
    Dns dns;
    ......
  public Builder() {
      //请求分发器
      dispatcher = new Dispatcher();
      protocols = DEFAULT_PROTOCOLS;
      connectionSpecs = DEFAULT_CONNECTION_SPECS;
      proxySelector = ProxySelector.getDefault();
      cookieJar = CookieJar.NO_COOKIES;
      socketFactory = SocketFactory.getDefault();
      hostnameVerifier = OkHostnameVerifier.INSTANCE;
      certificatePinner = CertificatePinner.DEFAULT;
      proxyAuthenticator = Authenticator.NONE;
      authenticator = Authenticator.NONE;
      // 连接池
      connectionPool = new ConnectionPool();
      dns = Dns.SYSTEM;
      followSslRedirects = true;
      followRedirects = true;
      retryOnConnectionFailure = true;
      connectTimeout = 10_000;
      readTimeout = 10_000;
      writeTimeout = 10_000;
    }
    ......
}
Builder这里是OkHttpClient的内部类,构造函数里主要是初始化了默认的一些成员属性对象,可以看出来有超时时间、cookie、DNS等等,主要留意Dispatcher请求分发器和ConnectionPool连接池这两个对象比较重要,在之后的流程中有很大的作用。因为建造者模式可以通过OkHttpClient.Builder.build方法来获得,所以来看它的build方法。
    public OkHttpClient build() {
      return new OkHttpClient(this);
    }
build方法中非常简单,就是new了一个OkHttpClient对象。
3.2 创建Request对象
public final class Request {
  private final HttpUrl url;
  private final String method;
  private final Headers headers;
  private final RequestBody body;
  private final Object tag;

  private volatile CacheControl cacheControl; // Lazily initialized.

  private Request(Builder builder) {
    this.url = builder.url;
    this.method = builder.method;
    this.headers = builder.headers.build();
    this.body = builder.body;
    this.tag = builder.tag != null ? builder.tag : this;
  }
  ......
  public Builder newBuilder() {
    return new Builder(this);
  }
  ......
  public static class Builder {
    private HttpUrl url;
    private String method;
    private Headers.Builder headers;
    private RequestBody body;
    private Object tag;

    public Builder() {
      // 默认Get请求
      this.method = "GET";
      this.headers = new Headers.Builder();
    }

    private Builder(Request request) {
      this.url = request.url;
      this.method = request.method;
      this.body = request.body;
      this.tag = request.tag;
      this.headers = request.headers.newBuilder();
    }

    public Builder url(HttpUrl url) {
      if (url == null) throw new NullPointerException("url == null");
      this.url = url;
      return this;
    }
    ......
}
从Request源码可以看出它也是基于建造者模式,它的Builder默认构造方法里就两行设置默认请求方式是GET,另外初始化请求头。通常我们会使用new Request.Builder().url().build()方法构建Request来传入url等一些参数。
3.3 调用OkHttpClient.newCall创建Call对象
接下来第三步就是通过OkHttpClient对象的newCall方法创建一个Call对象。来看OkHttpClient的newCall方法。
 @Override public Call newCall(Request request) {
    return RealCall.newRealCall(this, request, false /* for web socket */);
  }
在这个方法中实际上调用的RealCall这个类的newRealCall方法,并把request传进去。于是再进入RealCall类查看newRealCall方法。
 static RealCall newRealCall(OkHttpClient client, Request originalRequest, boolean forWebSocket) {
    RealCall call = new RealCall(client, originalRequest, forWebSocket);
    call.eventListener = client.eventListenerFactory().create(call);
    return call;
  }
可以看到newRealCall方法里只是创建了一个RealCall对象和一个eventListener返回。接下来看RealCall的构造函数。
  private RealCall(OkHttpClient client, Request originalRequest, boolean forWebSocket) {
    this.client = client;
    this.originalRequest = originalRequest;
    this.forWebSocket = forWebSocket;
    //初始化重试重定向拦截器
    this.retryAndFollowUpInterceptor = new RetryAndFollowUpInterceptor(client, forWebSocket);
  }
RealCall的构造函数中可以看到除了传入的三个参数外,还新初始化一个RetryAndFollowUpInterceptor这么一个重试重定向拦截器,这里涉及到OkHttp里的拦截器机制,先不管还是先记下有这么一个拦截器是在这里初始化的。至此为止,第三步结束,进入最后一个步骤通过call.execute()或者call.enqueue方法发送同步或者异步请求。
3.4 同步请求方法execute
先来看同步的execute方法。
  @Override public Response execute() throws IOException {
    synchronized (this) {
     // 判断是否执行过这个call
      if (executed) throw new IllegalStateException("Already Executed");
      executed = true;
    }
    captureCallStackTrace();
    eventListener.callStart(this);
    try {
      // 通过dispatcher分发请求call
      client.dispatcher().executed(this);
      // 调用拦截器链返回一个Response响应
      Response result = getResponseWithInterceptorChain();
      if (result == null) throw new IOException("Canceled");
      return result;
    } catch (IOException e) {
      eventListener.callFailed(this, e);
      throw e;
    } finally {
      // 调用dispatcher的finish方法
      client.dispatcher().finished(this);
    }
  }
首先看到在同步代码块中判断了executed是否为true,executed是用来标识这个Call对象是否执行过的,所以每个Call只能执行一次,否则就会抛出异常。接着调用client.dispatcher().executed(this)这个方法,这个dispatcher就是之前在OkHttpClient构造函数里初始化的那个请求分发器,来看这个dispatcher。
public final class Dispatcher {
  //最大请求数
  private int maxRequests = 64;
  //主机最大请求数
  private int maxRequestsPerHost = 5;
  //请求执行线程池,懒加载
  private @Nullable ExecutorService executorService;
  ......
 //准备运行的异步请求队列
  private final Deque<AsyncCall> readyAsyncCalls = new ArrayDeque<>();
  //正在运行的异步请求队列
  private final Deque<AsyncCall> runningAsyncCalls = new ArrayDeque<>();
  //正在运行的同步请求队列
  private final Deque<RealCall> runningSyncCalls = new ArrayDeque<>();
  ....
}
首先看这个dispatcher类中的成员变量。默认规定了最大请求数、每个主机最大请求数,一个线程池用来执行Call,一个准备运行的异步请求队列,一个正在运行的异步请求队列,一个正在运行的同步请求队列。紧接着回到之前调用的executed方法代码:
  synchronized void executed(RealCall call) {
    runningSyncCalls.add(call);
  }
executed方法很简单,就是把Call添加到正在运行的同步请求队列中。
  @Override public Response execute() throws IOException {
    synchronized (this) {
     //判断是否执行过这个call
      if (executed) throw new IllegalStateException("Already Executed");
      executed = true;
    }
    captureCallStackTrace();
    eventListener.callStart(this);
    try {
    //通过dispatcher分发请求call
      client.dispatcher().executed(this);
    // 调用拦截器链返回一个Response响应
      Response result = getResponseWithInterceptorChain();
      if (result == null) throw new IOException("Canceled");
      return result;
    } catch (IOException e) {
      eventListener.callFailed(this, e);
      throw e;
    } finally {
    //调用dispatcher的finish方法
      client.dispatcher().finished(this);
    }
  }
再回到call.execute方法中,client.dispatcher().executed(this)结束后执行了getResponseWithInterceptorChain()这个方法,返回的是请求结果Response,这个方法里面是调用执行OkHttp的拦截器链,通过一个个拦截器执行完成组装请求所需参数、设置缓存策略等等最终完成请求返回响应结果数据,涉及到OkHttp的拦截器机制,先暂时不管,简单地理解通过这个方法得到了返回的Response。最后在finally代码块中执行了client.dispatcher().finished(this)方法。
 void finished(RealCall call) {
    finished(runningSyncCalls, call, false);
  }

  private <T> void finished(Deque<T> calls, T call, boolean promoteCalls) {
    int runningCallsCount;
    Runnable idleCallback;
    synchronized (this) {
      if (!calls.remove(call)) throw new AssertionError("Call wasn't in-flight!");
      //同步这里为false
      if (promoteCalls) promoteCalls();
      //计算正在运行请求总数
      runningCallsCount = runningCallsCount();
      idleCallback = this.idleCallback;
    }

    if (runningCallsCount == 0 && idleCallback != null) {
      idleCallback.run();
    }
  }
注意同步请求finished方法这里传入参数类型是RealCall。可以看到finished又调用重载方法,首先从同步运行队列中remove了这个call对象,然后因为重载传入的promoteCalls为false,没有执行promoteCalls这个重新整理排序队列的方法,直接执行了runngCallsCount方法,这个方法用来计算正在运行的请求总数。
 public synchronized int runningCallsCount() {
    //正在运行的请求总数 = 正在运行的异步请求 + 正在运行的同步请求
    return runningAsyncCalls.size() + runningSyncCalls.size();
  }
至此同步请求流程执行结束。
3.5 异步请求方法enqueue
接下来看异步请求,调用的是call.enqueue方法:
  @Override public void enqueue(Callback responseCallback) {
    synchronized (this) {
     // 判断是否运行过
      if (executed) throw new IllegalStateException("Already Executed");
      executed = true;
    }
    captureCallStackTrace();
    eventListener.callStart(this);、
    //调用dispatcher的enqueue方法,创建了一个AsyncCall并将获取结果的回调传入
    client.dispatcher().enqueue(new AsyncCall(responseCallback));
  }
这里可以看到和同步方法一样先判断是否执行过,然后调用client.dispatcher().enqueue(new AsyncCall(responseCallback))方法,把传进来的callback封装成一个AsyncCall对象。进入dispatcher的enqueue方法中:
 synchronized void enqueue(AsyncCall call) {
    // 判断正在运行的异步请求数是否小于最大请求数和主机请求数是否小于主机最大请求数
    if (runningAsyncCalls.size() < maxRequests && runningCallsForHost(call) < maxRequestsPerHost) {
      runningAsyncCalls.add(call);
      executorService().execute(call);
    } else {
      readyAsyncCalls.add(call);
    }
  }
方法中首先判断正在运行的异步请求队列是否达到最大请求数和每个主机的最大请求数,达到了就把call加入到准备队列中,否则加入运行队列并且交给消费者线程池executorService处理。所以很容易想到AsyncCall实际上是个Runnable。先进入executorService方法来看这个线程池是怎样创建的。
  public Dispatcher(ExecutorService executorService) {
    this.executorService = executorService;
  }

  public synchronized ExecutorService executorService() {
    if (executorService == null) {
      executorService = new ThreadPoolExecutor(0, Integer.MAX_VALUE, 60, TimeUnit.SECONDS,
          new SynchronousQueue<Runnable>(), Util.threadFactory("OkHttp Dispatcher", false));
    }
    return executorService;
  }
在初始化Dispatcher时候可以传入一个线程池,在执行请求时默认也会调用executorService方法,如果线程池为空,则创建一个核心线程数为0,最大线程数为
Integer.MAX_VALUE,线程超时时间为60秒的一个线程池,虽然最大线程数虽然为Integer.MAX_VALUE但是由于运行队列限制了最大请求数默认为64个,所以也就不会因为一直创建新线程而导致内存问题。
再来看AsyncCall的代码:
  final class AsyncCall extends NamedRunnable {
   ......
  }
AsyncCall是RealCall的一个内部类,它果然继承了一个叫NameRunnable的抽象类。
public abstract class NamedRunnable implements Runnable {
  protected final String name;

  public NamedRunnable(String format, Object... args) {
    this.name = Util.format(format, args);
  }

  @Override public final void run() {
    String oldName = Thread.currentThread().getName();
    Thread.currentThread().setName(name);
    try {
      execute();
    } finally {
      Thread.currentThread().setName(oldName);
    }
  }

  protected abstract void execute();
}
NamedRunnable抽象类继承了Runnable接口,在run方法中调用了execute方法,而NamedRunnable中的execute方法又是抽象方法,它的实现在其子类AsyncCall中。
    @Override protected void execute() {
      boolean signalledCallback = false;
      try {
        // 调用getResponseWithInterceptorChain方法获取响应
        Response response = getResponseWithInterceptorChain();
        // 判断是否取消
        if (retryAndFollowUpInterceptor.isCanceled()) {
          signalledCallback = true;
          responseCallback.onFailure(RealCall.this, new IOException("Canceled"));
        } else {
          signalledCallback = true;
          responseCallback.onResponse(RealCall.this, response);
        }
      } catch (IOException e) {
        ......
      } finally {
        client.dispatcher().finished(this);
      }
    }
AsyncCall中的execute方法里同样执行了getResponseWithInterceptorChain这个方法获得到Response,然后判断请求是否取消,取消回调onFailure抛出异常,没取消回调onResponse方法将请求响应传递出去。最后在finally代码块中依旧调用了dispatcher().finished(this)方法。
  void finished(AsyncCall call) {
    //promoteCalls为true
    finished(runningAsyncCalls, call, true);
  }

  private <T> void finished(Deque<T> calls, T call, boolean promoteCalls) {
    int runningCallsCount;
    Runnable idleCallback;
    synchronized (this) {
      if (!calls.remove(call)) throw new AssertionError("Call wasn't in-flight!");
      //异步请求会调用此方法
      if (promoteCalls) promoteCalls();
      runningCallsCount = runningCallsCount();
      idleCallback = this.idleCallback;
    }

    if (runningCallsCount == 0 && idleCallback != null) {
      idleCallback.run();
    }
  }
看清楚这次传入的是AysncCall类型,所以调用的是这个重载的finished方法,同样的从运行队列中移除当前call对象,但是此时promoteCalls是true就会执行promoteCalls这个方法了。
  private void promoteCalls() {
    //正在运行的异步请求队列长度大于等于最大请求数直接return
    if (runningAsyncCalls.size() >= maxRequests) return;
    //准备运行的异步请求队列为空也就直接return
    if (readyAsyncCalls.isEmpty()) return;
    //否则就开始循环准备运行的异步请求队列
    for (Iterator<AsyncCall> i = readyAsyncCalls.iterator(); i.hasNext(); ) {
      AsyncCall call = i.next();

      if (runningCallsForHost(call) < maxRequestsPerHost) {
        //移除请求
        i.remove();
        //将准备队列中的请求添加到正在运行的请求队列中
        runningAsyncCalls.add(call);
        //将请求任务加入运行线程池
        executorService().execute(call);
      }
      //如果正在运行的请求队列长度超过最大请求数return跳出循环
      if (runningAsyncCalls.size() >= maxRequests) return;
    }
  }
promoteCalls方法作用是将准备队列里的请求放入到正在运行队列并将请求加入运行线程池。首先判断正在运行的异步请求队列请求是否已满和准备运行的异步请求队列是否为空的情况,如果都不满足,说明此时运行队列未满且还有请求在准备队列中,就从准备队列中取出请求放入运行队列中交给线程池处理并从准备队列中移除。promoteCalls执行完后又重新计正在运行的请求总数。至此异步请求流程结束。以下是OkHttp的运行逻辑流程图。
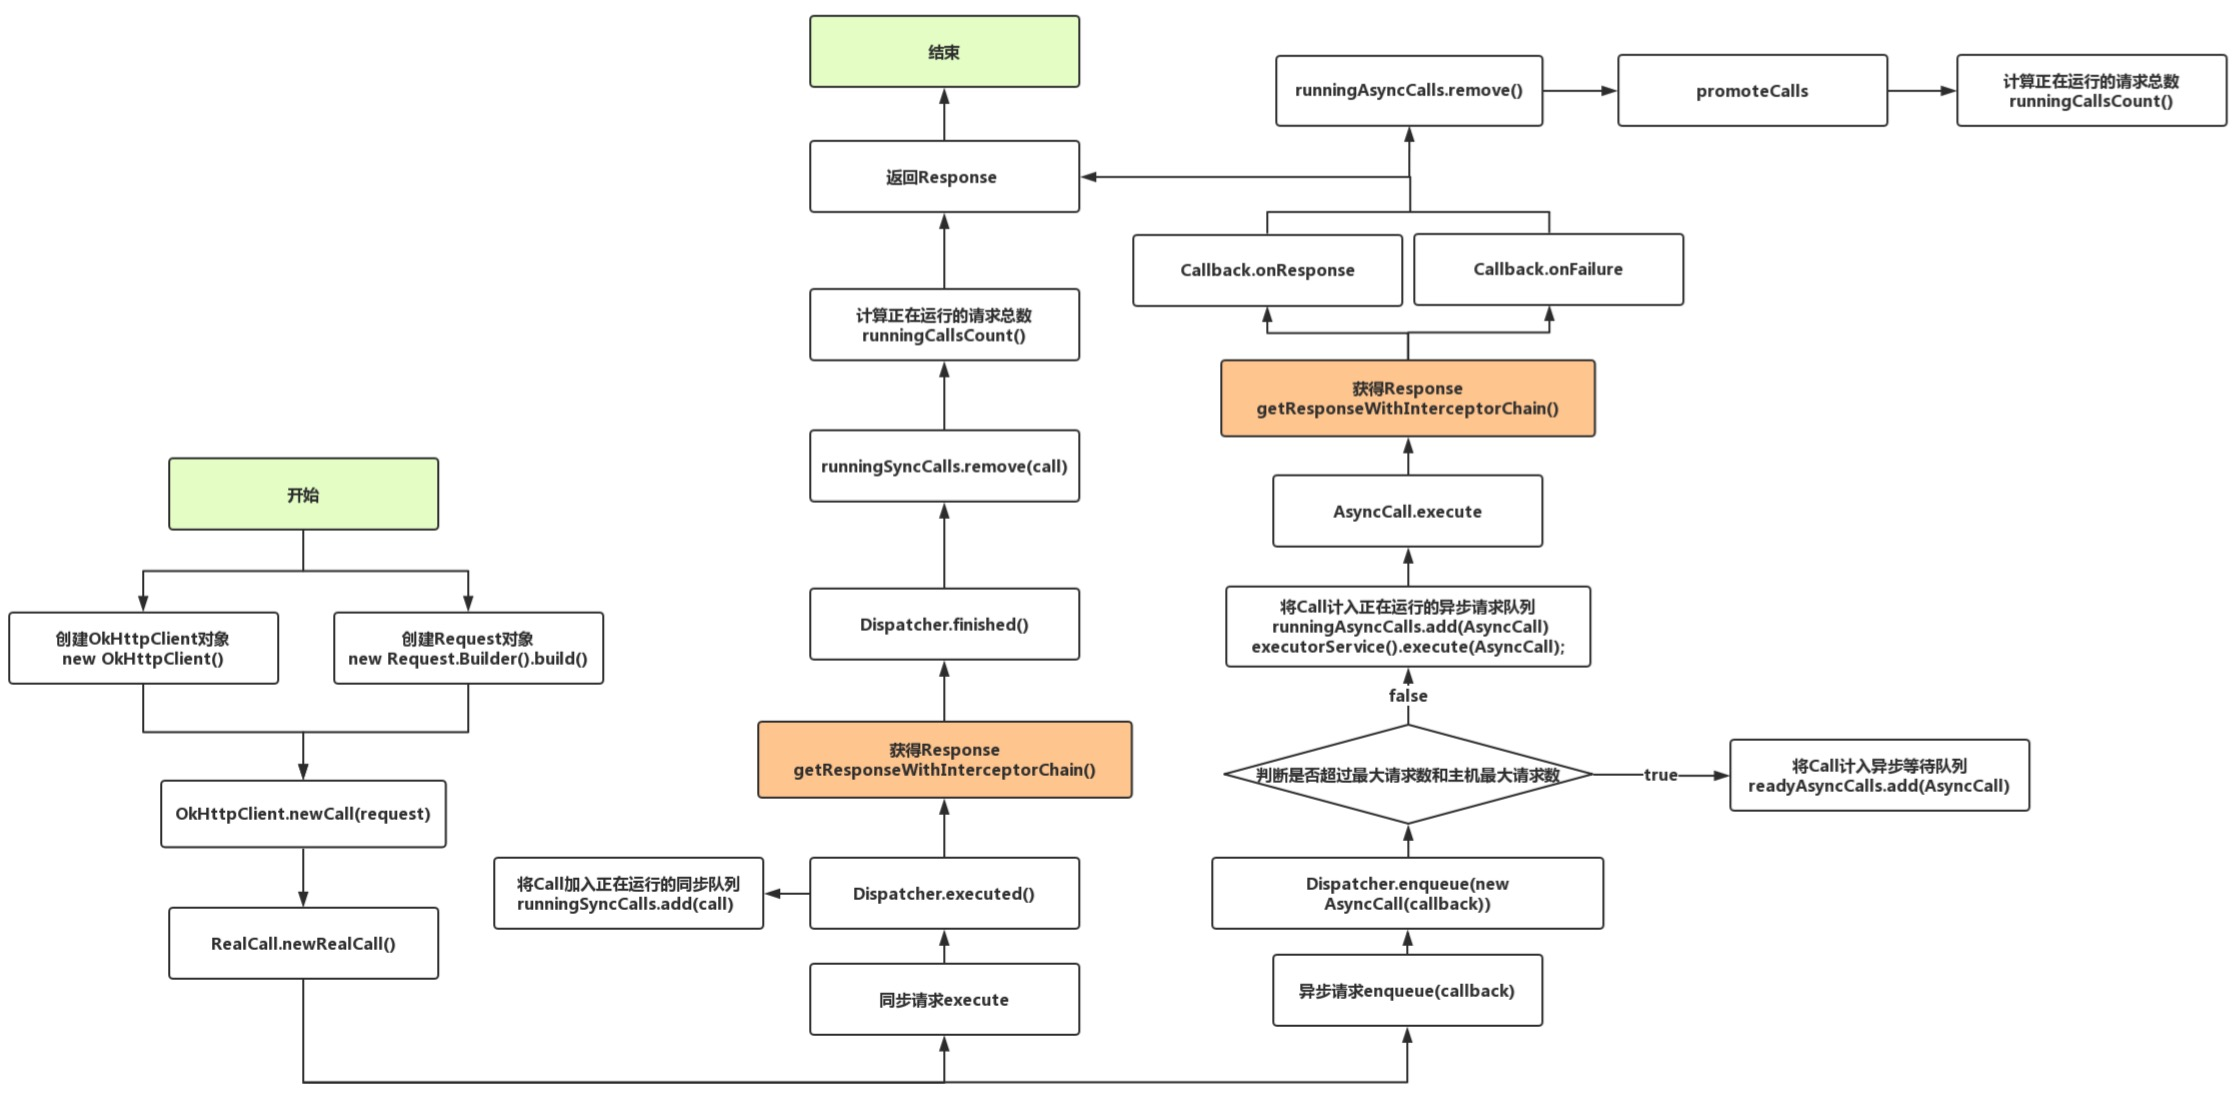
简单的总结下创建OkHttpClient和Request从而获得请求Call,Call通过Dispatcher调度加入对应队列,异步请求会由线程池从队列中取出执行,调用拦截器链获得响应结果返回这么一个过程。
4. 拦截器机制
接下来来看之前一直忽略的getResponseWithInterceptorChain方法,来看看拦截器机制是怎么实现的,这个拦截器链到底是什么。
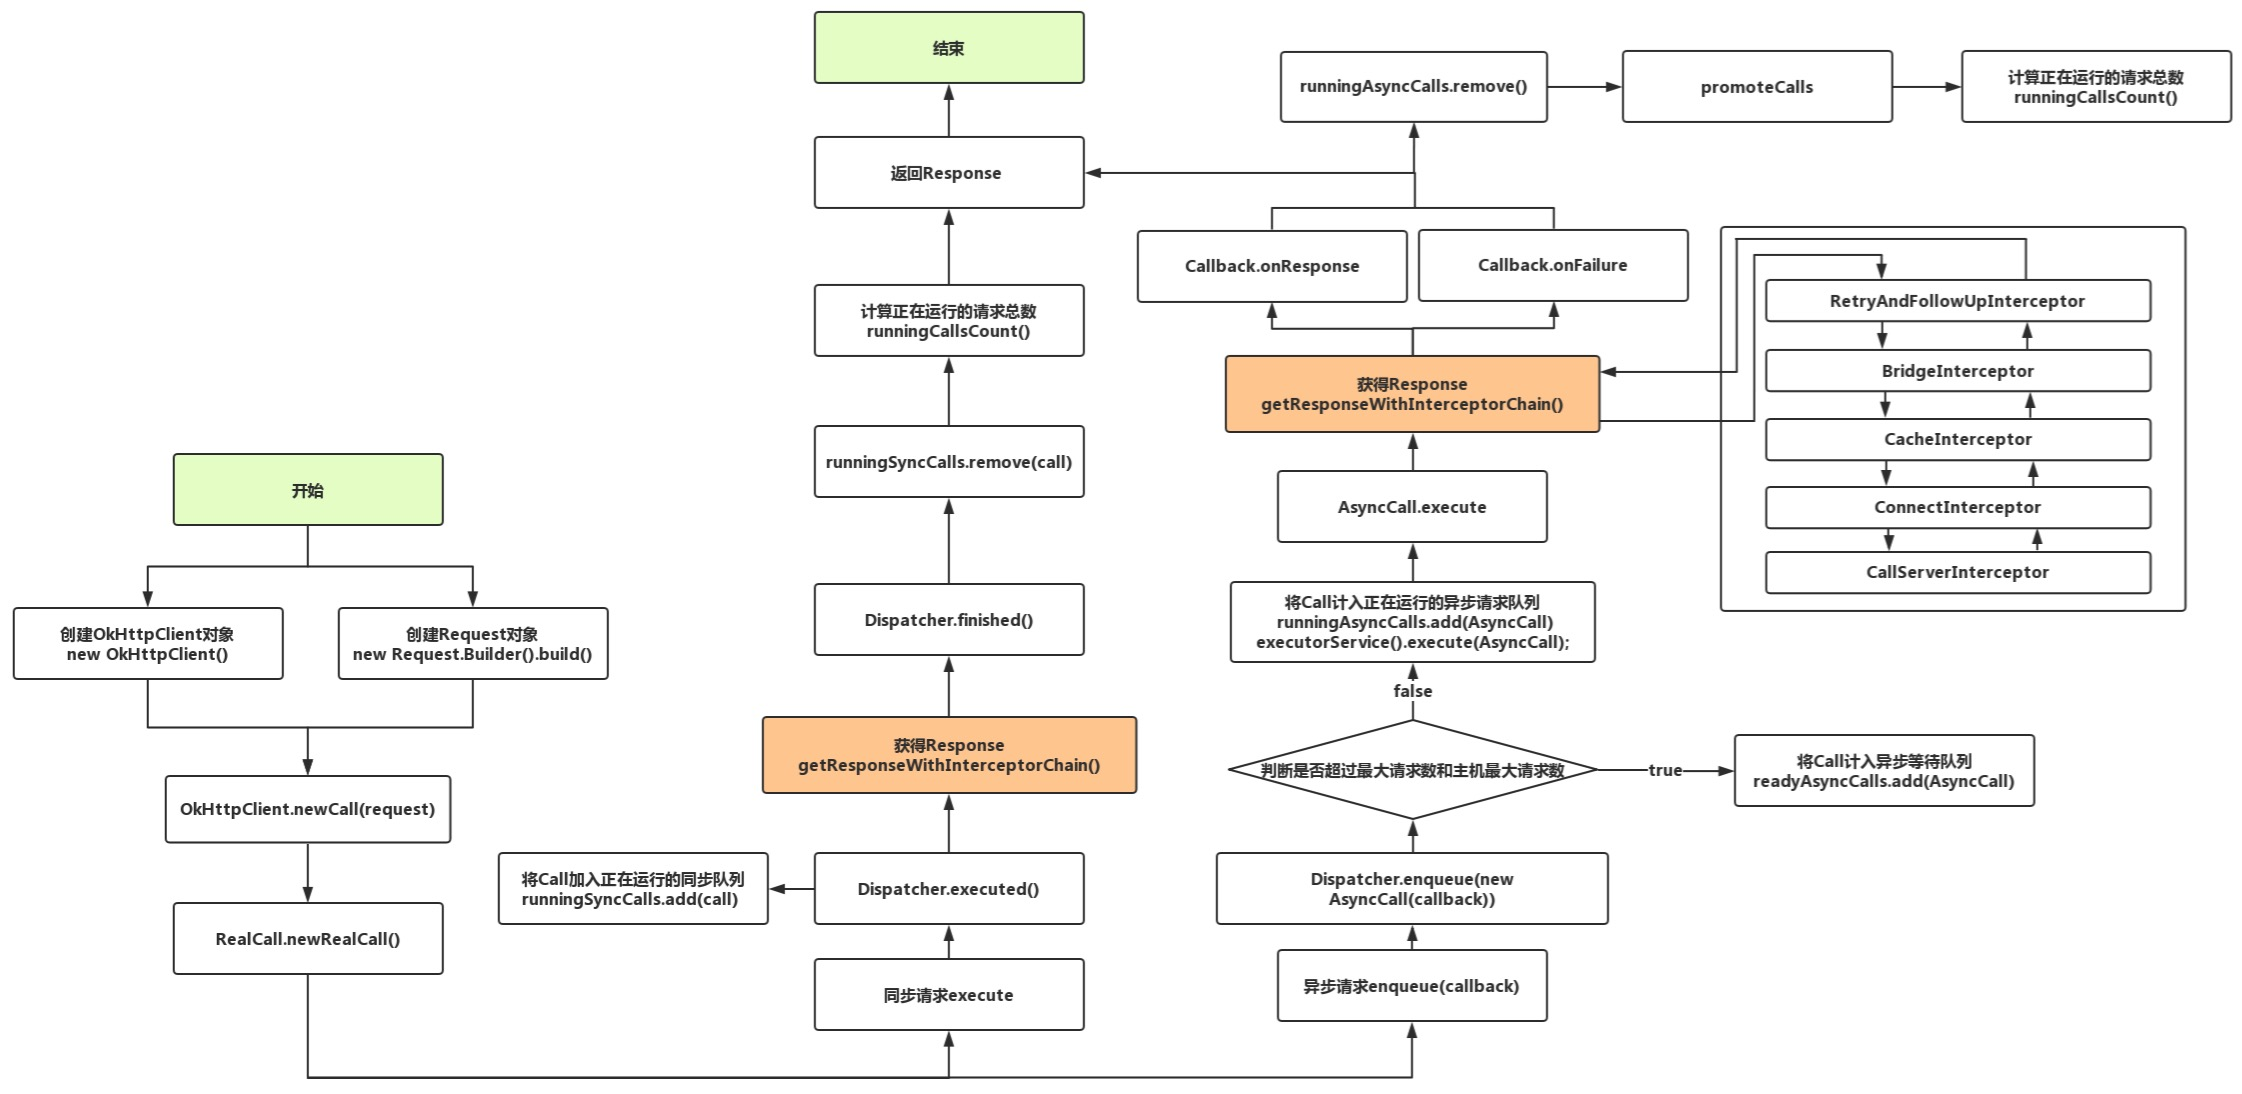
 Response getResponseWithInterceptorChain() throws IOException {
    // 创建一个存放拦截器的List集合
    List<Interceptor> interceptors = new ArrayList<>();
    // 将拦截器添加入集合
    interceptors.addAll(client.interceptors());
    interceptors.add(retryAndFollowUpInterceptor);
    interceptors.add(new BridgeInterceptor(client.cookieJar()));
    interceptors.add(new CacheInterceptor(client.internalCache()));
    interceptors.add(new ConnectInterceptor(client));
    if (!forWebSocket) {
      interceptors.addAll(client.networkInterceptors());
    }
    interceptors.add(new CallServerInterceptor(forWebSocket));
    //创建拦截器链对象
    Interceptor.Chain chain = new RealInterceptorChain(interceptors, null, null, null, 0,
        originalRequest, this, eventListener, client.connectTimeoutMillis(),
        client.readTimeoutMillis(), client.writeTimeoutMillis());
    //调用拦截器链的proceed方法返回
    return chain.proceed(originalRequest);
  }
getResponseWithInterceptorChain方法里的代码也不是很多,首先创建了一个存放interceptor拦截器的List集
合,并往里添加了许多拦截器,包括在RealCall构造函数中创建retryAndFollowUpInterceptor拦截器,之后创建了一个RealInterceptorChain真正的拦截器链对象,把刚才的List传入,最后调用了chain.proceed方法获得响应Respone返回。下面直接来看这个proceed方法。
  @Override public Response proceed(Request request) throws IOException {
    return proceed(request, streamAllocation, httpCodec, connection);
  }
  public Response proceed(Request request, StreamAllocation streamAllocation, HttpCodec httpCodec,
      RealConnection connection) throws IOException {
    ......
    // 创建下一个拦截器链
    RealInterceptorChain next = new RealInterceptorChain(interceptors, streamAllocation, httpCodec,
        connection, index + 1, request, call, eventListener, connectTimeout, readTimeout,
        writeTimeout);
     // 获得list中第index个拦截器
    Interceptor interceptor = interceptors.get(index);
    // 调用它的intercept方法将next拦截器链传入
    Response response = interceptor.intercept(next);
    ......
    return response;
  }
可以看到proceed(request)方法又调用了一个四个参数的重载方法,撇开抛异常的判断看主要的实现,这里同样再次创建了一个叫next拦截器链对象。接着获取到拦截器集合中的第index个拦截器,调用了拦截器的intercept方法并将新的这个next拦截器链传入,进而获取道返回的Response。这里就要仔细看一下了,先看看这个index,它是拦截器链创建时传入的。
  public RealInterceptorChain(List<Interceptor> interceptors, StreamAllocation streamAllocation,
      HttpCodec httpCodec, RealConnection connection, int index, Request request, Call call,
      EventListener eventListener, int connectTimeout, int readTimeout, int writeTimeout) {
    //所有拦截器集合
    this.interceptors = interceptors;
    this.connection = connection;
    this.streamAllocation = streamAllocation;
    this.httpCodec = httpCodec;
    //传入的index
    this.index = index;
    this.request = request;
    this.call = call;
    this.eventListener = eventListener;
    this.connectTimeout = connectTimeout;
    this.readTimeout = readTimeout;
    this.writeTimeout = writeTimeout;
  }
构造函数中传入了index和所有拦截器的List,来看下在getResponseWithInterceptorChain方法里第一次传入的值。
    // getResponseWithInterceptorChain方法中创建拦截器链
    // 第一次传入的index为0
    Interceptor.Chain chain = new RealInterceptorChain(interceptors, null, null, null, 0,
        originalRequest, this, eventListener, client.connectTimeoutMillis(),
        client.readTimeoutMillis(), client.writeTimeoutMillis());
    // chain.proceed`方法中创建下一个拦截器链,index为index+1
    RealInterceptorChain next = new RealInterceptorChain(interceptors, streamAllocation, httpCodec,
        connection, index + 1, request, call, eventListener, connectTimeout, readTimeout,
        writeTimeout);
    // 这里第一次拿到的是第0个拦截器
    Interceptor interceptor = interceptors.get(index);
    Response response = interceptor.intercept(next);
这里第一次传入的Index是0,然后在拦截器链chain.proceed方法中创建的next拦截器链传入的是index+1即为1。然后获得到的interceptor就是拦截器集合中下标为0的拦截器,调用它的intercept方法,从上面拦截器集合添加可以看出,默认第一个是RetryAndFollowUpInterceptor拦截器,于是再进入去看它的intercept方法。
 @Override public Response intercept(Chain chain) throws IOException {
       Request request = chain.request();
       RealInterceptorChain realChain = (RealInterceptorChain) chain;
       ......
        response = realChain.proceed(request, streamAllocation, null, null);
       ......
  }
这里对intercept方法中拦截器本身功能相关实现代码先行省略,只关心对拦截器机制实现的代码。看到其中有这样一行realChain.proceed,这个realChain就是传入的之前新创建的next拦截器链,这样就又调用回到RealInterceptorChain的proceed方法中,从而又会创建一个新的拦截器链,将index再加一传入,之后又会调用拦截器集合中下标为1的拦截器的intercept方法,然后又会调用到传入index为2的拦截器链的proceed方法,如此循环往复,直到拦截器集合中的所有拦截器都执行完毕,最终会执行到最后一个拦截器CallServerInterceptor,在其中会获得请求返回结果封装成Response返回。以上就是OkHttp中的拦截器机制的核心逻辑,通过代码逻辑看出来这里实际是使用了责任链设计模式。
5. 拦截器
在存放拦截器的List中除了添加client里的应用拦截器和网络拦截器之外,还有五个默认要加的拦截器,这五个拦截器很重要,也是主要实现功能的拦截器,接下来分别来看看这五个拦截器的作用。
5.1 重试重定向拦截器(RetryAndFollowUpInterceptor)
看名字就能猜到这个拦截器的功能,就是用来重试和重定向的,来看它的intercept方法源码:
  @Override public Response intercept(Chain chain) throws IOException {
    Request request = chain.request();
    RealInterceptorChain realChain = (RealInterceptorChain) chain;
    Call call = realChain.call();
    EventListener eventListener = realChain.eventListener();
    // 创建StreamAllocation
    StreamAllocation streamAllocation = new StreamAllocation(client.connectionPool(),
        createAddress(request.url()), call, eventListener, callStackTrace);
    this.streamAllocation = streamAllocation;

    int followUpCount = 0;
    Response priorResponse = null;
      // 判断是否被取消
      while (true) {
      if (canceled) {
        streamAllocation.release();
        throw new IOException("Canceled");
      }

      Response response;
      boolean releaseConnection = true;
      try {
        // 调用下一个拦截器
        response = realChain.proceed(request, streamAllocation, null, null);
        releaseConnection = false;
      } catch (RouteException e) {
        // The attempt to connect via a route failed. The request will not have been sent.
        if (!recover(e.getLastConnectException(), streamAllocation, false, request)) {
          throw e.getFirstConnectException();
        }
        releaseConnection = false;
        continue;
      } catch (IOException e) {
        // An attempt to communicate with a server failed. The request may have been sent.
        boolean requestSendStarted = !(e instanceof ConnectionShutdownException);
        if (!recover(e, streamAllocation, requestSendStarted, request)) throw e;
        releaseConnection = false;
        continue;
      } finally {
        if (releaseConnection) {
          streamAllocation.streamFailed(null);
          streamAllocation.release();
        }
      }

      // Attach the prior response if it exists. Such responses never have a body.
      if (priorResponse != null) {
        response = response.newBuilder()
            .priorResponse(priorResponse.newBuilder()
                    .body(null)
                    .build())
            .build();
      }

      Request followUp;
     try {
        //判断是否要重定向,获取重定向后的request
        followUp = followUpRequest(response, streamAllocation.route());
      } catch (IOException e) {
        streamAllocation.release();
        throw e;
      }

      if (followUp == null) {
        if (!forWebSocket) {
          streamAllocation.release();
        }
        return response;
      }

      closeQuietly(response.body());

      if (++followUpCount > MAX_FOLLOW_UPS) {
        streamAllocation.release();
        throw new ProtocolException("Too many follow-up requests: " + followUpCount);
      }

      if (followUp.body() instanceof UnrepeatableRequestBody) {
        streamAllocation.release();
        throw new HttpRetryException("Cannot retry streamed HTTP body", response.code());
      }

      if (!sameConnection(response, followUp.url())) {
        streamAllocation.release();
        streamAllocation = new StreamAllocation(client.connectionPool(),
            createAddress(followUp.url()), call, eventListener, callStackTrace);
        this.streamAllocation = streamAllocation;
      } else if (streamAllocation.codec() != null) {
        throw new IllegalStateException("Closing the body of " + response
            + " didn't close its backing stream. Bad interceptor?");
      }

      request = followUp;
      priorResponse = response;
    }
  }
来梳理下这个拦截器的工作流程,intercept方法里主要做了这样几件事:
1. 创建StreamAllocation对象。
    Request request = chain.request();
    RealInterceptorChain realChain = (RealInterceptorChain) chain;
    Call call = realChain.call();
    EventListener eventListener = realChain.eventListener();
    //创建StreamAllocation
    StreamAllocation streamAllocation = new StreamAllocation(client.connectionPool(),
        createAddress(request.url()), call, eventListener, callStackTrace);
    this.streamAllocation = streamAllocation;
方法开始先从拦截器链中获得请求的Request、eventListener和call对象,接着就创建了一个StreamAllocation对象,构造函数中传递了OkhttpClient中的connectionPool、Address、call、eventListener和callStackTrace。其中Address又由createAddress方法创建,createAddress方法中判断了是否为HTTPS类型请求,并根据传入的url和client中参数创建了一个Address对象返回。
  private Address createAddress(HttpUrl url) {
    SSLSocketFactory sslSocketFactory = null;
    HostnameVerifier hostnameVerifier = null;
    CertificatePinner certificatePinner = null;
    if (url.isHttps()) {
      sslSocketFactory = client.sslSocketFactory();
      hostnameVerifier = client.hostnameVerifier();
      certificatePinner = client.certificatePinner();
    }

    return new Address(url.host(), url.port(), client.dns(), client.socketFactory(),
        sslSocketFactory, hostnameVerifier, certificatePinner, client.proxyAuthenticator(),
        client.proxy(), client.protocols(), client.connectionSpecs(), client.proxySelector());
  }
2. 开启循环判断请求是否被取消。
 while (true) {
      if (canceled) {
        streamAllocation.release();
        throw new IOException("Canceled");
      }
开启了一个while循环,首先判断如果被取消了就将streamAllocation释放并抛出异常。
3. 调用RealInterceptorChain的proceed方法进入下一个拦截器处理请求。
 try {
        response = realChain.proceed(request, streamAllocation, null, null);
        releaseConnection = false;
      } catch (RouteException e) {
        // The attempt to connect via a route failed. The request will not have been sent.
        if (!recover(e.getLastConnectException(), streamAllocation, false, request)) {
          throw e.getFirstConnectException();
        }
        releaseConnection = false;
        continue;
      } catch (IOException e) {
        // An attempt to communicate with a server failed. The request may have been sent.
        boolean requestSendStarted = !(e instanceof ConnectionShutdownException);
        if (!recover(e, streamAllocation, requestSendStarted, request)) throw e;
        releaseConnection = false;
        continue;
      } finally {
        if (releaseConnection) {
          streamAllocation.streamFailed(null);
          streamAllocation.release();
        }
      }
在调用realChain.proceed中如果发生异常会被捕获,RouteException表示路由连接失败,IOException说明与服务器连接失败,不管哪个异常被捕获后会调用recover方法判断是否可重试,不可重试会直接抛出异常。
4. 判断进行重定向操作
      Request followUp;
      try {
        // followUpRequest方法判断是否要重定向,返回重定向后的request
        followUp = followUpRequest(response, streamAllocation.route());
      } catch (IOException e) {
        streamAllocation.release();
        throw e;
      }
        // 重定向的request为空说明不需要重定向直接返回response
      if (followUp == null) {
        if (!forWebSocket) {
          streamAllocation.release();
        }
        return response;
      }

      closeQuietly(response.body());
      // 判断重定向次数,大于最大次数释放streamAllocation抛出异常
      if (++followUpCount > MAX_FOLLOW_UPS) {
        streamAllocation.release();
        throw new ProtocolException("Too many follow-up requests: " + followUpCount);
      }
       // 重定向的body是不可重复的同样也释放streamAllocation抛出异常
      if (followUp.body() instanceof UnrepeatableRequestBody) {
        streamAllocation.release();
        throw new HttpRetryException("Cannot retry streamed HTTP body", response.code());
      }
        // 判断是否是同一个连接,不是同一个就释放原来的streamAllocation,重新创建streamAllocation
      if (!sameConnection(response, followUp.url())) {
        streamAllocation.release();
        streamAllocation = new StreamAllocation(client.connectionPool(),
            createAddress(followUp.url()), call, eventListener, callStackTrace);
        this.streamAllocation = streamAllocation;
      } else if (streamAllocation.codec() != null) {
        throw new IllegalStateException("Closing the body of " + response
            + " didn't close its backing stream. Bad interceptor?");
      }
重定向时候会先通过followUpRequest方法判断是否要重定向。
  private Request followUpRequest(Response userResponse, Route route) throws IOException {
    if (userResponse == null) throw new IllegalStateException();
    int responseCode = userResponse.code();

    final String method = userResponse.request().method();
    switch (responseCode) {
      case HTTP_PROXY_AUTH:
        Proxy selectedProxy = route != null
            ? route.proxy()
            : client.proxy();
        if (selectedProxy.type() != Proxy.Type.HTTP) {
          throw new ProtocolException("Received HTTP_PROXY_AUTH (407) code while not using proxy");
        }
        return client.proxyAuthenticator().authenticate(route, userResponse);

      case HTTP_UNAUTHORIZED:
        return client.authenticator().authenticate(route, userResponse);

      case HTTP_PERM_REDIRECT:
      case HTTP_TEMP_REDIRECT:
        // "If the 307 or 308 status code is received in response to a request other than GET
        // or HEAD, the user agent MUST NOT automatically redirect the request"
        if (!method.equals("GET") && !method.equals("HEAD")) {
          return null;
        }
        // fall-through
      case HTTP_MULT_CHOICE:
      case HTTP_MOVED_PERM:
      case HTTP_MOVED_TEMP:
      case HTTP_SEE_OTHER:
        // Does the client allow redirects?
        if (!client.followRedirects()) return null;

        String location = userResponse.header("Location");
        if (location == null) return null;
        HttpUrl url = userResponse.request().url().resolve(location);

        // Don't follow redirects to unsupported protocols.
        if (url == null) return null;

        // If configured, don't follow redirects between SSL and non-SSL.
        boolean sameScheme = url.scheme().equals(userResponse.request().url().scheme());
        if (!sameScheme && !client.followSslRedirects()) return null;

        Request.Builder requestBuilder = userResponse.request().newBuilder();
        if (HttpMethod.permitsRequestBody(method)) {
          final boolean maintainBody = HttpMethod.redirectsWithBody(method);
          if (HttpMethod.redirectsToGet(method)) {
            requestBuilder.method("GET", null);
          } else {
            RequestBody requestBody = maintainBody ? userResponse.request().body() : null;
            requestBuilder.method(method, requestBody);
          }
          if (!maintainBody) {
            requestBuilder.removeHeader("Transfer-Encoding");
            requestBuilder.removeHeader("Content-Length");
            requestBuilder.removeHeader("Content-Type");
          }
        }

        // When redirecting across hosts, drop all authentication headers. This
        // is potentially annoying to the application layer since they have no
        // way to retain them.
        if (!sameConnection(userResponse, url)) {
          requestBuilder.removeHeader("Authorization");
        }
        return requestBuilder.url(url).build();
      case HTTP_CLIENT_TIMEOUT:
        // 408 s are rare in practice, but some servers like HAProxy use this response code. The
        // spec says that we may repeat the request without modifications. Modern browsers also
        // repeat the request (even non-idempotent ones.)
        if (!client.retryOnConnectionFailure()) {
          // The application layer has directed us not to retry the request.
          return null;
        }
        if (userResponse.request().body() instanceof UnrepeatableRequestBody) {
          return null;
        }
        if (userResponse.priorResponse() != null
            && userResponse.priorResponse().code() == HTTP_CLIENT_TIMEOUT) {
          // We attempted to retry and got another timeout. Give up.
          return null;
        }

        if (retryAfter(userResponse, 0) > 0) {
          return null;
        }
        return userResponse.request();
      case HTTP_UNAVAILABLE:
        if (userResponse.priorResponse() != null
            && userResponse.priorResponse().code() == HTTP_UNAVAILABLE) {
          // We attempted to retry and got another timeout. Give up.
          return null;
        }

        if (retryAfter(userResponse, Integer.MAX_VALUE) == 0) {
          // specifically received an instruction to retry without delay
          return userResponse.request();
        }
        return null;
      default:
        return null;
    }
  }
followUpRequest方法中通过响应Response中的响应码判断,HTTP中响应码为3XX的表示需要重定向,方法中的switch-case就是根据不同响应码做的处理,需要重定向会从Header中获取Location重定向的位置,创建新的Request返回,不需要重定向直接返回null。
获取到重定向的Request后接着判断其是否为空,若为空说明不需要重定向,则直接返回Response并释放streamAllocation。接着继续判断重定向次数是否超过最大次数(默认20次)和重定向的body是否是不可重复的,超过最大次数或者是不可重复的,就同样释放streamAllocation且抛出异常。最后再调用sameConnection方法判断是否为同一个连接,不是同一个就释放原来的streamAllocation·重新创建新的streamAllocation对象。
5.2 桥接拦截器(BridgeInterceptor)
还是进入intercept方法。
  @Override public Response intercept(Chain chain) throws IOException {
    Request userRequest = chain.request();
    Request.Builder requestBuilder = userRequest.newBuilder();
    RequestBody body = userRequest.body();
    if (body != null) {
      MediaType contentType = body.contentType();
      //设置contentType
      if (contentType != null) {
        requestBuilder.header("Content-Type", contentType.toString());
      }
      long contentLength = body.contentLength();
      //设置contentLength或Transfer-Encoding
      if (contentLength != -1) {
        requestBuilder.header("Content-Length", Long.toString(contentLength));
        requestBuilder.removeHeader("Transfer-Encoding");
      } else {
        requestBuilder.header("Transfer-Encoding", "chunked");
        requestBuilder.removeHeader("Content-Length");
      }
    }
    //设置host
    if (userRequest.header("Host") == null) {
      requestBuilder.header("Host", hostHeader(userRequest.url(), false));
    }
    //设置Connection头
    if (userRequest.header("Connection") == null) {
      requestBuilder.header("Connection", "Keep-Alive");
    }

    boolean transparentGzip = false;
    //设置Accept-Encoding为gzip
    if (userRequest.header("Accept-Encoding") == null && userRequest.header("Range") == null) {
      transparentGzip = true;
      requestBuilder.header("Accept-Encoding", "gzip");
    }
    List<Cookie> cookies = cookieJar.loadForRequest(userRequest.url());
    //设置cookies
    if (!cookies.isEmpty()) {
      requestBuilder.header("Cookie", cookieHeader(cookies));
    }
    //设置User-Agent
    if (userRequest.header("User-Agent") == null) {
      requestBuilder.header("User-Agent", Version.userAgent());
    }
    //调用chain.proceed进入下一个拦截器
    Response networkResponse = chain.proceed(requestBuilder.build());
    //响应头
    HttpHeaders.receiveHeaders(cookieJar, userRequest.url(), networkResponse.headers());
    Response.Builder responseBuilder = networkResponse.newBuilder()
        .request(userRequest);
        //如果支持gzip压缩则进行gzip解压
    if (transparentGzip
        && "gzip".equalsIgnoreCase(networkResponse.header("Content-Encoding"))
        && HttpHeaders.hasBody(networkResponse)) {
      GzipSource responseBody = new GzipSource(networkResponse.body().source());
      //解压后移除Content-Encoding、Content-Length这两个响应头
      Headers strippedHeaders = networkResponse.headers().newBuilder()
          .removeAll("Content-Encoding")
          .removeAll("Content-Length")
          .build();
      responseBuilder.headers(strippedHeaders);
      String contentType = networkResponse.header("Content-Type");
      responseBuilder.body(new RealResponseBody(contentType, -1L, Okio.buffer(responseBody)));
    }
    //构建Response返回
    return responseBuilder.build();
  }
BridgeInterceptor的intercept方法逻辑比较简单,正如它的名字一样,这个拦截器的主要功能是给请求添加请求头,如果支持gzip则对响应体进行gizp解压,最后返回body解压后的Response。这里注释应该还算清楚就不多讲了。
5.3 缓存拦截器(CacheInterceptor)
  @Override public Response intercept(Chain chain) throws IOException {
	// cache不为空,将request作为key传入获取缓存的Response
    Response cacheCandidate = cache != null
        ? cache.get(chain.request())
        : null;
    long now = System.currentTimeMillis();
	// 创建缓存策略
    CacheStrategy strategy = new CacheStrategy.Factory(now, chain.request(), cacheCandidate).get();
    Request networkRequest = strategy.networkRequest;
    Response cacheResponse = strategy.cacheResponse;
    if (cache != null) {
      cache.trackResponse(strategy);
    }
    if (cacheCandidate != null && cacheResponse == null) {
      closeQuietly(cacheCandidate.body());
    }
    // 根据缓存策略判断,如果不使用网络且缓存为空,则返回一个504的Response错误
    if (networkRequest == null && cacheResponse == null) {
      return new Response.Builder()
          .request(chain.request())
          .protocol(Protocol.HTTP_1_1)
          .code(504)
          .message("Unsatisfiable Request (only-if-cached)")
          .body(Util.EMPTY_RESPONSE)
          .sentRequestAtMillis(-1L)
          .receivedResponseAtMillis(System.currentTimeMillis())
          .build();
    }
    // 如果不使用网络,就直接返回缓存的Response
    if (networkRequest == null) {
      return cacheResponse.newBuilder()
          .cacheResponse(stripBody(cacheResponse))
          .build();
    }
    Response networkResponse = null;
    try {
	  // 走到这说明要使用网络,就继续进入下一个拦截器
      networkResponse = chain.proceed(networkRequest);
    } finally {
      // If we're crashing on I/O or otherwise, don't leak the cache body.
      if (networkResponse == null && cacheCandidate != null) {
        closeQuietly(cacheCandidate.body());
      }
    }
    // 获得网络响应,同时又有缓存
    if (cacheResponse != null) {
	  // 根据网络响应的响应码如果是304就使用缓存
      if (networkResponse.code() == HTTP_NOT_MODIFIED) {
        Response response = cacheResponse.newBuilder()
            .headers(combine(cacheResponse.headers(), networkResponse.headers()))
            .sentRequestAtMillis(networkResponse.sentRequestAtMillis())
            .receivedResponseAtMillis(networkResponse.receivedResponseAtMillis())
            .cacheResponse(stripBody(cacheResponse))
            .networkResponse(stripBody(networkResponse))
            .build();
        networkResponse.body().close();

        // Update the cache after combining headers but before stripping the
        // Content-Encoding header (as performed by initContentStream()).
        cache.trackConditionalCacheHit();
        cache.update(cacheResponse, response);
        return response;
      } else {
        closeQuietly(cacheResponse.body());
      }
    }
	// 走到这里就说明要使用网络返回的响应结果了
    Response response = networkResponse.newBuilder()
        .cacheResponse(stripBody(cacheResponse))
        .networkResponse(stripBody(networkResponse))
        .build();

    if (cache != null) {
      if (HttpHeaders.hasBody(response) && CacheStrategy.isCacheable(response, networkRequest)) {
        // 将网络请求加入缓存
        CacheRequest cacheRequest = cache.put(response);
        return cacheWritingResponse(cacheRequest, response);
      }

      if (HttpMethod.invalidatesCache(networkRequest.method())) {
        try {
          cache.remove(networkRequest);
        } catch (IOException ignored) {
          // The cache cannot be written.
        }
      }
    }
    return response;
  }
缓存拦截器顾名思义一定是设置缓存相关的操作,它具体做了以下几个操作。
1. 读取缓存
   // 缓存不为空,将request作为key传入获取缓存的Response
    Response cacheCandidate = cache != null
        ? cache.get(chain.request())
        : null;
2.创建缓存策略
    // 创建缓存策略
    CacheStrategy strategy = new CacheStrategy.Factory(now, chain.request(), cacheCandidate).get();
    Request networkRequest = strategy.networkRequest;
    Response cacheResponse = strategy.cacheResponse;
3. 根据缓存策略判断缓存使用
    // 根据缓存策略判断,如果不使用网络且缓存为空,则返回一个504的Response错误
    if (networkRequest == null && cacheResponse == null) {
      return new Response.Builder()
          .request(chain.request())
          .protocol(Protocol.HTTP_1_1)
          .code(504)
          .message("Unsatisfiable Request (only-if-cached)")
          .body(Util.EMPTY_RESPONSE)
          .sentRequestAtMillis(-1L)
          .receivedResponseAtMillis(System.currentTimeMillis())
          .build();
    }

    // 如果不使用网络,就直接返回缓存的Response
    if (networkRequest == null) {
      return cacheResponse.newBuilder()
          .cacheResponse(stripBody(cacheResponse))
          .build();
    }
这里根据缓存策略判断不使用网络且没有缓存,就直接返回一个错误的Response,不使用网络有缓存则返回缓存的Response。
4. 使用网络响应则继续进入下一个拦截器处理
    Response networkResponse = null;
    try {
     // 走到这说明要使用网络,就继续进入下一个拦截器
      networkResponse = chain.proceed(networkRequest);
    } finally {
      // If we're crashing on I/O or otherwise, don't leak the cache body.
      if (networkResponse == null && cacheCandidate != null) {
        closeQuietly(cacheCandidate.body());
      }
    }
5.获取到网络响应同时又有缓存
    // 获得网络响应,同时又有缓存
    if (cacheResponse != null) {
	// 根据网络响应的响应码如果是304就使用缓存
      if (networkResponse.code() == HTTP_NOT_MODIFIED) {
        Response response = cacheResponse.newBuilder()
            .headers(combine(cacheResponse.headers(), networkResponse.headers()))
            .sentRequestAtMillis(networkResponse.sentRequestAtMillis())
            .receivedResponseAtMillis(networkResponse.receivedResponseAtMillis())
            .cacheResponse(stripBody(cacheResponse))
            .networkResponse(stripBody(networkResponse))
            .build();
        networkResponse.body().close();
        // Update the cache after combining headers but before stripping the
        // Content-Encoding header (as performed by initContentStream()).
        cache.trackConditionalCacheHit();
        cache.update(cacheResponse, response);
        return response;
      } else {
        closeQuietly(cacheResponse.body());
      }
    }
获得到网络响应结果,同时又有缓存,再根据网络响应码判断,如果响应吗为304则使用缓存,返回缓存的Response。
6.使用网络响应结果,并加入缓存
    // 走到这里就说明要使用网络返回的响应结果了
    Response response = networkResponse.newBuilder()
        .cacheResponse(stripBody(cacheResponse))
        .networkResponse(stripBody(networkResponse))
        .build();
    if (cache != null) {
      if (HttpHeaders.hasBody(response) && CacheStrategy.isCacheable(response, networkRequest)) {
        // 将网络请求加入缓存
        CacheRequest cacheRequest = cache.put(response);
        return cacheWritingResponse(cacheRequest, response);
      }
      if (HttpMethod.invalidatesCache(networkRequest.method())) {
        try {
          cache.remove(networkRequest);
        } catch (IOException ignored) {
          // The cache cannot be written.
        }
      }
    }
到这里就要使用网络响应结果了,接着再判断cache不为空且有响应体缓存策略也允许缓存,就将网络响应结果存入缓存。
5.4 网络连接拦截器(ConnectInterceptor)
  @Override public Response intercept(Chain chain) throws IOException {
    RealInterceptorChain realChain = (RealInterceptorChain) chain;
    Request request = realChain.request();
    StreamAllocation streamAllocation = realChain.streamAllocation();
    // We need the network to satisfy this request. Possibly for validating a conditional GET.
    boolean doExtensiveHealthChecks = !request.method().equals("GET");

    HttpCodec httpCodec = streamAllocation.newStream(client, chain, doExtensiveHealthChecks);
    RealConnection connection = streamAllocation.connection();

    return realChain.proceed(request, streamAllocation, httpCodec, connection);
  }
ConnectInterceptor的intercept方法中代码意外的少。主要做了三件事,一是通过streamAllocation的newStream方法获取到了一个HttpCodec对象。二是再调用了streamAllocation的connection方法获取到一个RealConnection连接对象。最后是照例调用realChain.proceed进入下一个拦截器。还记得StreamAllocation对象吗?是在RetryAndFollowUpInterceptor的intercept方法中的创建的实例,并在realChain.proceed方法中传入。
 @Override public Response intercept(Chain chain) throws IOException {
    ......
    StreamAllocation streamAllocation = new StreamAllocation(client.connectionPool(),
        createAddress(request.url()), call, eventListener, callStackTrace);
    this.streamAllocation = streamAllocation;
    ......
    response = realChain.proceed(request, streamAllocation, null, null);
    ......
    }
现在再来仔细看一下拦截器链的proceed方法的四个参数。
 //只有Request一个传参的proceed方法
 @Override public Response proceed(Request request) throws IOException {
    return proceed(request, streamAllocation, httpCodec, connection);
  }
 //四个传参的proceed方法
 public Response proceed(Request request, StreamAllocation streamAllocation, HttpCodec httpCodec,
      RealConnection connection) throws IOException {
    .....
    RealInterceptorChain next = new RealInterceptorChain(interceptors, streamAllocation, httpCodec,
        connection, index + 1, request, call, eventListener, connectTimeout, readTimeout,
        writeTimeout);
    Interceptor interceptor = interceptors.get(index);
    Response response = interceptor.intercept(next);
    ......
    return response;
  }

  //RealInterceptorChain构造函数
  public RealInterceptorChain(List<Interceptor> interceptors, StreamAllocation streamAllocation,
      HttpCodec httpCodec, RealConnection connection, int index, Request request, Call call,
      EventListener eventListener, int connectTimeout, int readTimeout, int writeTimeout) {
    this.interceptors = interceptors;
    this.connection = connection;
    this.streamAllocation = streamAllocation;
    this.httpCodec = httpCodec;
    this.index = index;
    this.request = request;
    this.call = call;
    this.eventListener = eventListener;
    this.connectTimeout = connectTimeout;
    this.readTimeout = readTimeout;
    this.writeTimeout = writeTimeout;
  }
    Response getResponseWithInterceptorChain() throws IOException {
    ......
    Interceptor.Chain chain = new RealInterceptorChain(interceptors, null, null, null, 0,
        originalRequest, this, eventListener, client.connectTimeoutMillis(),
        client.readTimeoutMillis(), client.writeTimeoutMillis());
    return chain.proceed(originalRequest);
  }

  //RetryAndFollowUpInterceptor中intercept方法
  @Override public Response intercept(Chain chain) throws IOException {
    ......
    StreamAllocation streamAllocation = new StreamAllocation(client.connectionPool(),
        createAddress(request.url()), call, eventListener, callStackTrace);
    this.streamAllocation = streamAllocation;
    ......
    response = realChain.proceed(request, streamAllocation, null, null);
    ......
  }

   //BridgeInterceptor中intercept方法
  @Override public Response intercept(Chain chain) throws IOException {
    ......
    Response networkResponse = chain.proceed(requestBuilder.build());
    ......
    return responseBuilder.build();
  }

 //CacheInterceptor中intercept方法
  @Override public Response intercept(Chain chain) throws IOException {
    ......
    networkResponse = chain.proceed(networkRequest);
    ......
    return response;
  }

    //ConnectInterceptor中intercept方法
  @Override public Response intercept(Chain chain) throws IOException {
    .......
    HttpCodec httpCodec = streamAllocation.newStream(client, chain, doExtensiveHealthChecks);
    RealConnection connection = streamAllocation.connection();

    return realChain.proceed(request, streamAllocation, httpCodec, connection);
  }
RealInterceptorChain中有两个重载的proceed方法,四个参数的proceed方法参数分别为Request、StreamAllocation、httpCodec和RealConnection这四个类型,而单个参数的方法只传了一个Request,剩下的,其余三个参数传递全是取的成员变量中的对应值。proceed方法里会创建新的next拦截器链,将接收到的这四个类型对象传入到新建的拦截器链中。又因为成员变量的值是在初始化对象时传入的,可以看到在getResponseWithInterceptorChain方法中初始化第一个拦截器链时除了Request其余三个类型全部传的null,在RetryAndFollowUpInterceptor的intercept方法中创建了StreamAllocation对象,继而在它调用四个传参的chain.proceed方法时将Request和streamAllocation传入,其余两个传参依旧为空。在
BridgeInterceptor和CacheInterceptor的intercept方法中没有创建新的类型对象只是对Request做了修改包装,所以都是调用的一个传参的方法,到了刚才看到的ConnectInterceptor的intercept方法里才获得了httpCodec和RealConnection两个对象,所以这四个类型对象到此才全部创建完成实例,最终传到最后一个CallServerInterceptor拦截器中进行向服务器发送网络请求。
继续回到ConnectInterceptor里来,先来看StreamAllocation这个类。
/**
 * This class coordinates the relationship between three entities:
 *
 * <ul>
 *     <li><strong>Connections:</strong> physical socket connections to remote servers. These are
 *         potentially slow to establish so it is necessary to be able to cancel a connection
 *         currently being connected.
 *     <li><strong>Streams:</strong> logical HTTP request/response pairs that are layered on
 *         connections. Each connection has its own allocation limit, which defines how many
 *         concurrent streams that connection can carry. HTTP/1.x connections can carry 1 stream
 *         at a time, HTTP/2 typically carry multiple.
 *     <li><strong>Calls:</strong> a logical sequence of streams, typically an initial request and
 *         its follow up requests. We prefer to keep all streams of a single call on the same
 *         connection for better behavior and locality.
 * </ul>
 **/
从类的注释可以看出这个类是用来协调Connections、Streams、Calls这三个实体间的关系的。来看newStream方法。
public HttpCodec newStream(
      OkHttpClient client, Interceptor.Chain chain, boolean doExtensiveHealthChecks) {
    //获取设置的连接超时时间、读取超时时间和写入超时时间
    int connectTimeout = chain.connectTimeoutMillis();
    int readTimeout = chain.readTimeoutMillis();
    int writeTimeout = chain.writeTimeoutMillis();
    //ping的耗时
    int pingIntervalMillis = client.pingIntervalMillis();
    //连接失败是否重连
    boolean connectionRetryEnabled = client.retryOnConnectionFailure();
    try {
    //找到一个健康的连接
      RealConnection resultConnection = findHealthyConnection(connectTimeout, readTimeout,
          writeTimeout, pingIntervalMillis, connectionRetryEnabled, doExtensiveHealthChecks);
      //从连接中获取一个HttpCodec流
      HttpCodec resultCodec = resultConnection.newCodec(client, chain, this);

      synchronized (connectionPool) {
        codec = resultCodec;
        return resultCodec;
      }
    } catch (IOException e) {
      throw new RouteException(e);
    }
  }
从方法名就能看出这个方法是用来创建一个流,返回的是一个HttpCodec类型。方法中第一步先调用findHealthyConnection获得一个连接,来看这个findHealthyConnection方法。
   private RealConnection findHealthyConnection(int connectTimeout, int readTimeout,
      int writeTimeout, int pingIntervalMillis, boolean connectionRetryEnabled,
      boolean doExtensiveHealthChecks) throws IOException {
	// 开启循环
    while (true) {
	   // 通过findConnection方法找到一个连接
      RealConnection candidate = findConnection(connectTimeout, readTimeout, writeTimeout,
          pingIntervalMillis, connectionRetryEnabled);
      // 如果连接的successCount等于0,说明是一个新的连接,就直接返回
      synchronized (connectionPool) {
        if (candidate.successCount == 0) {
          return candidate;
        }
      }
      // 走到这说明不是新的连接要先判断是否是一个健康的连接,如果不是就跳过这次继续寻找
      if (!candidate.isHealthy(doExtensiveHealthChecks)) {
        noNewStreams();
        continue;
      }
	  // 到这就是健康的连接于是返回
      return candidate;
    }
  }
findHealthyConnection方法中开启了一个循环不停地调用findConnection方法寻找连接,找到之后进行判断,如果是一个新的连接直接返回,否则需要判断连接是否“健康”,满足“健康”条件就会作为结果返回,不满足则跳过这次循环继续寻找。接着进入findConnection查看一下连接是怎么找到的。
  private RealConnection findConnection(int connectTimeout, int readTimeout, int writeTimeout,
      int pingIntervalMillis, boolean connectionRetryEnabled) throws IOException {
    boolean foundPooledConnection = false;
    RealConnection result = null;
    Route selectedRoute = null;
    Connection releasedConnection;
    Socket toClose;
    synchronized (connectionPool) {
	  //异常判断
      if (released) throw new IllegalStateException("released");
      if (codec != null) throw new IllegalStateException("codec != null");
      if (canceled) throw new IOException("Canceled");
      // 先获得当前的连接
      releasedConnection = this.connection;
	  //releaseIfNoNewStreams方法里会判断当前连接是否为空和是否能创建新流,不满足就会释放连接关闭socket
      toClose = releaseIfNoNewStreams();
	  // 如果当前连接不为空就将连接赋给result
	 if (this.connection != null) {
        // We had an already-allocated connection and its good.
        result = this.connection;
        releasedConnection = null;
      }
      if (!reportedAcquired) {
        // If the connection was never reported acquired, dont report it as released!
        releasedConnection = null;
      }
      if (result == null) {
        //这里如果result为空就从连接池中获取一个连接
        Internal.instance.get(connectionPool, address, this, null);
        if (connection != null) {//从连接池中找到连接将它赋给result
          foundPooledConnection = true;
          result = connection;
        } else {
		 //没找到就将路由route赋给selectedRoute
          selectedRoute = route;
        }
      }
    }
    closeQuietly(toClose);
    if (releasedConnection != null) {
      eventListener.connectionReleased(call, releasedConnection);
    }
    if (foundPooledConnection) {
      eventListener.connectionAcquired(call, result);
    }
    if (result != null) {
      //如果连接池里找到就直接返回
      return result;
    }
    // 如果需要一个路由选择就创建一个
    boolean newRouteSelection = false;
    if (selectedRoute == null && (routeSelection == null || !routeSelection.hasNext())) {
      newRouteSelection = true;
      routeSelection = routeSelector.next();
    }
    synchronized (connectionPool) {
      if (canceled) throw new IOException("Canceled");
      if (newRouteSelection) {
        // 根据之前路由选择获取所有的路由
        List<Route> routes = routeSelection.getAll();
		//循环路由,再根据这些路由去连接池中获取连接
        for (int i = 0, size = routes.size(); i < size; i++) {
          Route route = routes.get(i);
          Internal.instance.get(connectionPool, address, this, route);
          if (connection != null) {
            foundPooledConnection = true;
			//找到了就将连接赋给result
            result = connection;
            this.route = route;
            break;
          }
        }
      }
      if (!foundPooledConnection) {
        if (selectedRoute == null) {
          selectedRoute = routeSelection.next();
        }
        route = selectedRoute;
        refusedStreamCount = 0;
		//到这还没找到就创建一个连接
        result = new RealConnection(connectionPool, selectedRoute);
        acquire(result, false);
      }
    }
    // If we found a pooled connection on the 2nd time around, were done.
    if (foundPooledConnection) {
      eventListener.connectionAcquired(call, result);
      return result;
    }
	//通过connect方法进行连接,进行握手
    // Do TCP + TLS handshakes. This is a blocking operation.
    result.connect(connectTimeout, readTimeout, writeTimeout, pingIntervalMillis,
        connectionRetryEnabled, call, eventListener);
    routeDatabase().connected(result.route());

    Socket socket = null;
    synchronized (connectionPool) {
      reportedAcquired = true;

      // 将连接放入到连接池
      Internal.instance.put(connectionPool, result);

      // If another multiplexed connection to the same address was created concurrently, then
      // release this connection and acquire that one.
      if (result.isMultiplexed()) {
        socket = Internal.instance.deduplicate(connectionPool, address, this);
        result = connection;
      }
    }
    closeQuietly(socket);
    eventListener.connectionAcquired(call, result);
    return result;
  }
findConnection方法比较长,大体逻辑是先从连接池寻找,找不到才会创建连接。还是一点一点来看。
      // 先获得当前的连接
      releasedConnection = this.connection;
	  //releaseIfNoNewStreams方法里会判断当前连接是否为空和是否能创建新流,不满足就会释放连接关闭socket
      toClose = releaseIfNoNewStreams();
	  // 如果当前连接不为空就将连接赋给result
	 if (this.connection != null) {
        // We had an already-allocated connection and its good.
        result = this.connection;
        releasedConnection = null;
      }
首先使用当前的连接,当前连接不为空且能创建新流就把它赋给结果result。
      if (result == null) {
        //这里如果result为空就从连接池中获取一个连接
        Internal.instance.get(connectionPool, address, this, null);
        if (connection != null) {//从连接池中找到连接将它赋给result
          foundPooledConnection = true;
          result = connection;
        } else {
		 //没找到就将路由route赋给selectedRoute
          selectedRoute = route;
        }
      }
第二步是当前连接不可用就从连接池中获取一个连接。这里Internal.instance.get方法会从连接池中寻找连接,深入进去看一下。
/**
 * Escalate internal APIs in {@code okhttp3} so they can be used from OkHttp's implementation
 * packages. The only implementation of this interface is in {@link OkHttpClient}.
 */
public abstract class Internal {
}
Internal是个抽象类根据注释它的唯一实现在OkHttpClient中。
   Internal.instance = new Internal() {
      ......
      @Override public RealConnection get(ConnectionPool pool, Address address,
          StreamAllocation streamAllocation, Route route) {
        return pool.get(address, streamAllocation, route);
      }
      ......
   }
OkHttpClient中的Internal.instance的get方法会调用连接池的get方法获取一个连接。
 @Nullable RealConnection get(Address address, StreamAllocation streamAllocation, Route route) {
    assert (Thread.holdsLock(this));
    for (RealConnection connection : connections) {
      if (connection.isEligible(address, route)) {
        streamAllocation.acquire(connection, true);
        return connection;
      }
    }
    return null;
  }
在ConnetionPool的get方法中获取连接后会调用streamAllocation.acquire方法,于是又回到StreamAllocation类中。
  public void acquire(RealConnection connection, boolean reportedAcquired) {
    assert (Thread.holdsLock(connectionPool));
    if (this.connection != null) throw new IllegalStateException();
    this.connection = connection;
    this.reportedAcquired = reportedAcquired;
    connection.allocations.add(new StreamAllocationReference(this, callStackTrace));
  }
acquire方法又会把这个连接赋给成员变量,这样StreamAllocation中就获取到了连接池中的这个连接。再回到findConnection方法,继续第三步。
  if (result != null) {
      //如果连接池里找到就直接返回
      return result;
    }

    // 如果需要一个路由选择就创建一个
    boolean newRouteSelection = false;
    if (selectedRoute == null && (routeSelection == null || !routeSelection.hasNext())) {
      newRouteSelection = true;
      routeSelection = routeSelector.next();
    }
    synchronized (connectionPool) {
      if (canceled) throw new IOException("Canceled");
      if (newRouteSelection) {
        // 根据之前路由选择获取所有的路由
        List<Route> routes = routeSelection.getAll();
		// 循环路由,再根据这些路由去连接池中获取连接
        for (int i = 0, size = routes.size(); i < size; i++) {
          Route route = routes.get(i);
          Internal.instance.get(connectionPool, address, this, route);
          if (connection != null) {
            foundPooledConnection = true;
			//找到了就将连接赋给result
            result = connection;
            this.route = route;
            break;
          }
        }
      }
此时如果从连接池找到连接就直接返回结果,否则继续向下创建一个路由选择,然后再循环其中所有路由再次在连接池中获取一次连接。
    //到这还没找到就创建一个连接
    result = new RealConnection(connectionPool, selectedRoute);
    ......
    //通过connect方法进行连接,进行握手
    // Do TCP + TLS handshakes. This is a blocking operation.
    result.connect(connectTimeout, readTimeout, writeTimeout, pingIntervalMillis,
        connectionRetryEnabled, call, eventListener);
    routeDatabase().connected(result.route());

    Socket socket = null;
    synchronized (connectionPool) {
    reportedAcquired = true;

    // 将连接放入到连接池
    Internal.instance.put(connectionPool, result);
如果还没有找到就创建一个新连接,接着调用connect方法进行连接,最后将新连接放入连接池。至此寻找获取连接这个步骤就结束了这里再继续看一下RealConnection的connect这个连接方法。
  public void connect(int connectTimeout, int readTimeout, int writeTimeout,
      int pingIntervalMillis, boolean connectionRetryEnabled, Call call,
      EventListener eventListener) {
	......
    while (true) {
      try {
		// 这里从路由判断是否进行隧道传输
        if (route.requiresTunnel()) {
		 // 是则进行隧道连接
          connectTunnel(connectTimeout, readTimeout, writeTimeout, call, eventListener);
          if (rawSocket == null) {
            // We were unable to connect the tunnel but properly closed down our resources.
            break;
          }
        } else {
		 // 否则进行socket连接
          connectSocket(connectTimeout, readTimeout, call, eventListener);
        }
     ......
  }
connect方法中省略各种判断只看连接相关代码,这里从路由中先判断是否需要进行隧道连接,根据结果调用连接隧道或者连接套接字socket。这里只看socket连接,进入connectSocket方法。
  private void connectSocket(int connectTimeout, int readTimeout, Call call,
      EventListener eventListener) throws IOException {
    // 获取代理
    Proxy proxy = route.proxy();
    // 获取地址
    Address address = route.address();
    // 根据代理类型创建socket
    rawSocket = proxy.type() == Proxy.Type.DIRECT || proxy.type() == Proxy.Type.HTTP
        ? address.socketFactory().createSocket()
        : new Socket(proxy);
    eventListener.connectStart(call, route.socketAddress(), proxy);
    rawSocket.setSoTimeout(readTimeout);
    try {
      //进行socket
      Platform.get().connectSocket(rawSocket, route.socketAddress(), connectTimeout);
    } catch (ConnectException e) {
      ConnectException ce = new ConnectException("Failed to connect to " + route.socketAddress());
      ce.initCause(e);
      throw ce;
    }
    // The following try/catch block is a pseudo hacky way to get around a crash on Android 7.0
    // More details:
    // https://github.com/square/okhttp/issues/3245
    // https://android-review.googlesource.com/#/c/271775/
    try {
      //通过Okio获取socket输入输出
      source = Okio.buffer(Okio.source(rawSocket));
      sink = Okio.buffer(Okio.sink(rawSocket));
    } catch (NullPointerException npe) {
      if (NPE_THROW_WITH_NULL.equals(npe.getMessage())) {
        throw new IOException(npe);
      }
    }
  }
connectSocket方法中其实最核心的就是Platform.get().connectSocket方法,这里Platform类是为了多平台适配,最终会调用到AndroidPlatform中的connectSocket方法,其中就会调用socket的connect方法。
@Override public void connectSocket(Socket socket, InetSocketAddress address,
      int connectTimeout) throws IOException {
    ......
     socket.connect(address, connectTimeout);
    ......
  }
了解完连接建立的过程后,再回到StreamAllocation的newStream方法中来。
  public HttpCodec newStream(
      OkHttpClient client, Interceptor.Chain chain, boolean doExtensiveHealthChecks) {
      ......
      RealConnection resultConnection = findHealthyConnection(connectTimeout, readTimeout,
          writeTimeout, pingIntervalMillis, connectionRetryEnabled, doExtensiveHealthChecks);
      HttpCodec resultCodec = resultConnection.newCodec(client, chain, this);
      synchronized (connectionPool) {
        codec = resultCodec;
        return resultCodec;
      }
      .......
  }
接着调用resultConnection的newCodec方法。
public HttpCodec newCodec(OkHttpClient client, Interceptor.Chain chain,
      StreamAllocation streamAllocation) throws SocketException {
    if (http2Connection != null) {
      return new Http2Codec(client, chain, streamAllocation, http2Connection);
    } else {
      socket.setSoTimeout(chain.readTimeoutMillis());
      source.timeout().timeout(chain.readTimeoutMillis(), MILLISECONDS);
      sink.timeout().timeout(chain.writeTimeoutMillis(), MILLISECONDS);
      return new Http1Codec(client, streamAllocation, source, sink);
    }
  }
newCodec方法里判断如果是用HTTP2.0就创建Http2Codec返回否则创建Http1Codec返回,这两个类都是HttpCodec的实现类。再回到一开始的ConnectInterceptor的intercept方法中。
 @Override public Response intercept(Chain chain) throws IOException {
    ......
    HttpCodec httpCodec = streamAllocation.newStream(client, chain, doExtensiveHealthChecks);
    RealConnection connection = streamAllocation.connection();

    return realChain.proceed(request, streamAllocation, httpCodec, connection);
  }
newStream后调用streamAllocation.connection方法获取到了需要的连接。
  public synchronized RealConnection connection() {
    return connection;
  }
5.5 向服务器发送获取响应的拦截器(CallServerInterceptor)
最后一个拦截器就要向服务器发送请求读取响应了。
  @Override public Response intercept(Chain chain) throws IOException {
    RealInterceptorChain realChain = (RealInterceptorChain) chain;
    HttpCodec httpCodec = realChain.httpStream();
    StreamAllocation streamAllocation = realChain.streamAllocation();
    RealConnection connection = (RealConnection) realChain.connection();
    Request request = realChain.request();
    long sentRequestMillis = System.currentTimeMillis();
    realChain.eventListener().requestHeadersStart(realChain.call());
    // 写入请求头
    httpCodec.writeRequestHeaders(request);
    realChain.eventListener().requestHeadersEnd(realChain.call(), request);
    Response.Builder responseBuilder = null;
    // 判断是否允许发送请求体和是否有请求体
    if (HttpMethod.permitsRequestBody(request.method()) && request.body() != null) {
    // 判断请求头中有Expect:100-continue
      if ("100-continue".equalsIgnoreCase(request.header("Expect"))) {
    // 发送请求头
        httpCodec.flushRequest();
        realChain.eventListener().responseHeadersStart(realChain.call());
    // 接收响应头
        responseBuilder = httpCodec.readResponseHeaders(true);
      }
      if (responseBuilder == null) {
    // 如果服务器允许发送请求体
        realChain.eventListener().requestBodyStart(realChain.call());
        long contentLength = request.body().contentLength();
        CountingSink requestBodyOut =
            new CountingSink(httpCodec.createRequestBody(request, contentLength));
        BufferedSink bufferedRequestBody = Okio.buffer(requestBodyOut);
  	// 写入请求体
        request.body().writeTo(bufferedRequestBody);
        bufferedRequestBody.close();
        realChain.eventListener()
            .requestBodyEnd(realChain.call(), requestBodyOut.successfulCount);
      } else if (!connection.isMultiplexed()) {
        // If the "Expect: 100-continue" expectation wasn't met, prevent the HTTP/1 connection
        // from being reused. Otherwise we're still obligated to transmit the request body to
        // leave the connection in a consistent state.
        streamAllocation.noNewStreams();
      }
    }
    // 结束请求发送
    httpCodec.finishRequest();
    if (responseBuilder == null) {
      realChain.eventListener().responseHeadersStart(realChain.call());
	// 读取响应头
      responseBuilder = httpCodec.readResponseHeaders(false);
    }
	// 构建响应结果Response
    Response response = responseBuilder
        .request(request)
        .handshake(streamAllocation.connection().handshake())
        .sentRequestAtMillis(sentRequestMillis)
        .receivedResponseAtMillis(System.currentTimeMillis())
        .build();
	// 获取响应码
    int code = response.code();
	// 响应码为100,再次读取响应头构建响应结果
    if (code == 100) {
      // server sent a 100-continue even though we did not request one.
      // try again to read the actual response
      responseBuilder = httpCodec.readResponseHeaders(false);
      response = responseBuilder
              .request(request)
              .handshake(streamAllocation.connection().handshake())
              .sentRequestAtMillis(sentRequestMillis)
              .receivedResponseAtMillis(System.currentTimeMillis())
              .build();

      code = response.code();
    }
    realChain.eventListener()
            .responseHeadersEnd(realChain.call(), response);
	//WebSocket或者响应码为101,构建一个响应体为空的response
    if (forWebSocket && code == 101) {
      // Connection is upgrading, but we need to ensure interceptors see a non-null response body.
      response = response.newBuilder()
          .body(Util.EMPTY_RESPONSE)
          .build();
    } else {
	 // 否则将响应体添加到response对象中
      response = response.newBuilder()
          .body(httpCodec.openResponseBody(response))
          .build();
    }
	......
    return response;
  }
还是梳理一下主要流程,看intercept方法做了哪些步骤。
1. 写入请求头
    //写入请求头
    httpCodec.writeRequestHeaders(request);
首先是通过httpCodec对象写入请求头。
2. 发送请求体
  Response.Builder responseBuilder = null;
	// 判断是否允许发送请求体和是否有请求体
    if (HttpMethod.permitsRequestBody(request.method()) && request.body() != null) {
	   // 判断请求头中有Expect:100-continue
      if ("100-continue".equalsIgnoreCase(request.header("Expect"))) {
	// 发送请求头
        httpCodec.flushRequest();
        realChain.eventListener().responseHeadersStart(realChain.call());
	// 接收响应头
        responseBuilder = httpCodec.readResponseHeaders(true);
      }
      if (responseBuilder == null) {
        // 如果服务器可以接收处理请求体
        realChain.eventListener().requestBodyStart(realChain.call());
        long contentLength = request.body().contentLength();
        CountingSink requestBodyOut =
            new CountingSink(httpCodec.createRequestBody(request, contentLength));
        BufferedSink bufferedRequestBody = Okio.buffer(requestBodyOut);
	// 写入请求体
        request.body().writeTo(bufferedRequestBody);
        bufferedRequestBody.close();
        realChain.eventListener()
            .requestBodyEnd(realChain.call(), requestBodyOut.successfulCount);
      } else if (!connection.isMultiplexed()) {
        // If the "Expect: 100-continue" expectation wasn't met, prevent the HTTP/1 connection
        // from being reused. Otherwise we're still obligated to transmit the request body to
        // leave the connection in a consistent state.
        streamAllocation.noNewStreams();
      }
    }
// 结束请求发送
    httpCodec.finishRequest();
发送请求体前先判断请求方法是否运行发送请求体和是否有请求体,如果有请求体且支持发送,再判断请求头中是否有Expect:100-continue这个头,如果含有这个请求头就先读取服务器的响应头,这个请求头的作用是询问服务器是否可以接收处理请求体的数据,具体解释可以看这篇文章。服务器可以接受就将请求体写入,最后调用httpCodec.finishRequest结束请求发送。
3. 获取响应
 if (responseBuilder == null) {
      realChain.eventListener().responseHeadersStart(realChain.call());
	// 读取响应头
      responseBuilder = httpCodec.readResponseHeaders(false);
    }
	// 构建响应结果Response
    Response response = responseBuilder
        .request(request)
        .handshake(streamAllocation.connection().handshake())
        .sentRequestAtMillis(sentRequestMillis)
        .receivedResponseAtMillis(System.currentTimeMillis())
        .build();
	// 获取响应码
    int code = response.code();
	// 响应码为100,再次读取响应头构建响应结果
    if (code == 100) {
      // server sent a 100-continue even though we did not request one.
      // try again to read the actual response
      responseBuilder = httpCodec.readResponseHeaders(false);
      response = responseBuilder
              .request(request)
              .handshake(streamAllocation.connection().handshake())
              .sentRequestAtMillis(sentRequestMillis)
              .receivedResponseAtMillis(System.currentTimeMillis())
              .build();

      code = response.code();
    }
    realChain.eventListener()
            .responseHeadersEnd(realChain.call(), response);
	//forWebSocket为true且响应码为101,构建一个响应体为空的response
    if (forWebSocket && code == 101) {
      // Connection is upgrading, but we need to ensure interceptors see a non-null response body.
      response = response.newBuilder()
          .body(Util.EMPTY_RESPONSE)
          .build();
    } else {
	 // 否则将响应体添加到response对象中
      response = response.newBuilder()
          .body(httpCodec.openResponseBody(response))
          .build();
    }
	......
    return response;
发送完请求最后一步就是接收响应了,首先还是通过httpCodec读取响应头,构建一个供返回的响应结果对象Response,接着从Response中获取到响应码判断如果响应码为100,则再次读取响应头,重新构建一个响应结果对象Response,获取响应码。最后再判断forWebSocket和响应码是否为101,如果forWebS为true且响应码为101,就将一个空的响应体添加到之前构建的Response对象中,否则将解码后的响应体添加到Response对象中。方法的最后返回响应Response对象。
6. Cache
在之前的5.3缓存拦截器CacheInterceptor中,描述了缓存栏解器中的工作过程对缓存本身的没有深究,接下来就来看看这一部分内容。OkHttp的缓存是建立在HTTP协议的缓存机制上的。关于HTTP协议的缓存不清楚的建议看下这篇文章,这里就直接去研究OkHttp中相关的实现类了。
6.1 CacheControl类
CacheControl这个类是OkHttp中对应HTTP协议的Cache-Control头的一个描述,对Cache-Control头的各种取值做了封装。
  private CacheControl(boolean noCache, boolean noStore, int maxAgeSeconds, int sMaxAgeSeconds,
      boolean isPrivate, boolean isPublic, boolean mustRevalidate, int maxStaleSeconds,
      int minFreshSeconds, boolean onlyIfCached, boolean noTransform, boolean immutable,
      @Nullable String headerValue) {
    this.noCache = noCache;
    this.noStore = noStore;
    this.maxAgeSeconds = maxAgeSeconds;
    this.sMaxAgeSeconds = sMaxAgeSeconds;
    this.isPrivate = isPrivate;
    this.isPublic = isPublic;
    this.mustRevalidate = mustRevalidate;
    this.maxStaleSeconds = maxStaleSeconds;
    this.minFreshSeconds = minFreshSeconds;
    this.onlyIfCached = onlyIfCached;
    this.noTransform = noTransform;
    this.immutable = immutable;
    this.headerValue = headerValue;
  }

  CacheControl(Builder builder) {
    this.noCache = builder.noCache;
    this.noStore = builder.noStore;
    this.maxAgeSeconds = builder.maxAgeSeconds;
    this.sMaxAgeSeconds = -1;
    this.isPrivate = false;
    this.isPublic = false;
    this.mustRevalidate = false;
    this.maxStaleSeconds = builder.maxStaleSeconds;
    this.minFreshSeconds = builder.minFreshSeconds;
    this.onlyIfCached = builder.onlyIfCached;
    this.noTransform = builder.noTransform;
    this.immutable = builder.immutable;
  }
CacheControl类中提供了两个默认的实现FORCE_NETWORK和FORCE_CACHE,分表表示强制只使用网络响应和强制只使用缓存中的响应。
  public static final CacheControl FORCE_NETWORK = new Builder().noCache().build();

  public static final CacheControl FORCE_CACHE = new Builder()
      .onlyIfCached()
      .maxStale(Integer.MAX_VALUE, TimeUnit.SECONDS)
      .build();
在创建请求的时候可以为每个请求设置CacheControl。
    Request request = request.newBuilder()
                .cacheControl(CacheControl.FORCE_CACHE)
                .build();
6.2 CacheStrategy类
CacheStrategy表示缓存策略,在CacheInterceptor的intercept方法中创建了这个对象实例,之后也根据这个对象中的networkRequest和cacheResponse判断缓存的策略。
    // CacheInterceptor中创建CacheStrategy
    CacheStrategy strategy = new CacheStrategy.Factory(now, chain.request(), cacheCandidate).get();
    Request networkRequest = strategy.networkRequest;
    Response cacheResponse = strategy.cacheResponse;
下面就来看它的创建方法。
  public Factory(long nowMillis, Request request, Response cacheResponse) {
      this.nowMillis = nowMillis;
      this.request = request;
      this.cacheResponse = cacheResponse;
      if (cacheResponse != null) {
        this.sentRequestMillis = cacheResponse.sentRequestAtMillis();
        this.receivedResponseMillis = cacheResponse.receivedResponseAtMillis();
        Headers headers = cacheResponse.headers();
        for (int i = 0, size = headers.size(); i < size; i++) {
          String fieldName = headers.name(i);
          String value = headers.value(i);
          if ("Date".equalsIgnoreCase(fieldName)) {
            servedDate = HttpDate.parse(value);
            servedDateString = value;
          } else if ("Expires".equalsIgnoreCase(fieldName)) {
            expires = HttpDate.parse(value);
          } else if ("Last-Modified".equalsIgnoreCase(fieldName)) {
            lastModified = HttpDate.parse(value);
            lastModifiedString = value;
          } else if ("ETag".equalsIgnoreCase(fieldName)) {
            etag = value;
          } else if ("Age".equalsIgnoreCase(fieldName)) {
            ageSeconds = HttpHeaders.parseSeconds(value, -1);
          }
        }
      }
    }
创建CacheStrategy.Factory只是将传入的参数赋值,并且从传入的缓存响应中获取有关的响应头的值,赋值到成员变量。接着调用了get方法获取到CacheStrategy实例。
    public CacheStrategy get() {
      CacheStrategy candidate = getCandidate();
      if (candidate.networkRequest != null && request.cacheControl().onlyIfCached()) {
        // We're forbidden from using the network and the cache is insufficient.
        return new CacheStrategy(null, null);
      }
      return candidate;
    }
get方法中先调用getCandidate获得一个当前的缓存策略candidate,然后判断candidate.networkRequest不为空且当前请求的CacheControl设置只用缓存,就返回一个networkRequest和cacheResponse皆为空的缓存策略,否则返回getCandidate方法获得的策略。下面先看networkRequest和cacheResponse这俩到底表示个啥?
 /** The request to send on the network, or null if this call doesn't use the network. */
  public final @Nullable Request networkRequest;

  /** The cached response to return or validate; or null if this call doesn't use a cache. */
  public final @Nullable Response cacheResponse;
根据注释看来就是说如果请求调用不使用网络networkRequest就为null,不使用缓存cacheResponse就为null。所以之前的判断表示的是如果缓存策略要使用网络但这个请求的cacheControl设置只用缓存,就返回一个networkRequest和cacheResponse皆为空的策略,从而在CacheInterceptor中会判断到缓存策略既不用网络也不用缓存进而返回一个504错误的响应结果。
  if (networkRequest == null && cacheResponse == null) {
      return new Response.Builder()
          .request(chain.request())
          .protocol(Protocol.HTTP_1_1)
          .code(504)
          .message("Unsatisfiable Request (only-if-cached)")
          .body(Util.EMPTY_RESPONSE)
          .sentRequestAtMillis(-1L)
          .receivedResponseAtMillis(System.currentTimeMillis())
          .build();
    }
接着进入getCandidate方法。
    private CacheStrategy getCandidate() {
      // 本身传入的cacheResponse为空
      if (cacheResponse == null) {
	  // 返回一个cacheResponse为空的CacheStrategy
        return new CacheStrategy(request, null);
      }
      // 如果请求是https并且缺少必要的握手
      if (request.isHttps() && cacheResponse.handshake() == null) {
	  // 返回一个cacheResponse为空的CacheStrategy
        return new CacheStrategy(request, null);
      }
	  // 如果不允许缓存
      if (!isCacheable(cacheResponse, request)) {
	  // 返回一个cacheResponse为空的CacheStrategy
        return new CacheStrategy(request, null);
      }
      CacheControl requestCaching = request.cacheControl();
	  // 如果请求中CacheControl设置不用缓存
      if (requestCaching.noCache() || hasConditions(request)) {
	  // 返回一个cacheResponse为空的CacheStrategy
        return new CacheStrategy(request, null);
      }
      CacheControl responseCaching = cacheResponse.cacheControl();
	  // 如果响应中CacheControl设置是不变的
      if (responseCaching.immutable()) {
	  // 返回一个networkRequest为空的CacheStrategy
        return new CacheStrategy(null, cacheResponse);
      }
	  // 获取缓存响应年龄 毫秒值
      long ageMillis = cacheResponseAge();
	  // 获取返回响应新鲜毫秒数
      long freshMillis = computeFreshnessLifetime();

      if (requestCaching.maxAgeSeconds() != -1) {
        freshMillis = Math.min(freshMillis, SECONDS.toMillis(requestCaching.maxAgeSeconds()));
      }
	  // 获取最小新鲜毫秒数
      long minFreshMillis = 0;
      if (requestCaching.minFreshSeconds() != -1) {
        minFreshMillis = SECONDS.toMillis(requestCaching.minFreshSeconds());
      }
	  // 获取最大已过期时间
      long maxStaleMillis = 0;
      if (!responseCaching.mustRevalidate() && requestCaching.maxStaleSeconds() != -1) {
        maxStaleMillis = SECONDS.toMillis(requestCaching.maxStaleSeconds());
      }
	// 如果满足没有noCache即强制不缓存并且满足ageMillis + minFreshMillis < freshMillis + maxStaleMillis
      if (!responseCaching.noCache() && ageMillis + minFreshMillis < freshMillis + maxStaleMillis) {
        Response.Builder builder = cacheResponse.newBuilder();
        if (ageMillis + minFreshMillis >= freshMillis) {
          builder.addHeader("Warning", "110 HttpURLConnection \"Response is stale\"");
        }
        long oneDayMillis = 24 * 60 * 60 * 1000L;
        if (ageMillis > oneDayMillis && isFreshnessLifetimeHeuristic()) {
          builder.addHeader("Warning", "113 HttpURLConnection \"Heuristic expiration\"");
        }
	// 返回一个networkRequest为空的CacheStrategy
        return new CacheStrategy(null, builder.build());
      }
      // Find a condition to add to the request. If the condition is satisfied, the response body
      // will not be transmitted.
      String conditionName;
      String conditionValue;
      if (etag != null) {
        conditionName = "If-None-Match";
        conditionValue = etag;
      } else if (lastModified != null) {
        conditionName = "If-Modified-Since";
        conditionValue = lastModifiedString;
      } else if (servedDate != null) {
        conditionName = "If-Modified-Since";
        conditionValue = servedDateString;
      } else {
        return new CacheStrategy(request, null); // No condition! Make a regular request.
      }
      Headers.Builder conditionalRequestHeaders = request.headers().newBuilder();
      Internal.instance.addLenient(conditionalRequestHeaders, conditionName, conditionValue);

      Request conditionalRequest = request.newBuilder()
          .headers(conditionalRequestHeaders.build())
          .build();
      return new CacheStrategy(conditionalRequest, cacheResponse);
    }
方法中是根据传入的networkRequest和cacheResponse头中信息判断创建不同要求缓存策略此处的逻辑都是基于HTTP协议文档要求的。
6.3 Cache类
Cache是用来缓存的类。在初始化OkHttpClient时,可以为其设置一个Cache并设置缓存位置和缓存大小。
 OkHttpClient client = new OkHttpClient.Builder()
                .cache(new Cache(new File(getExternalCacheDir(), "cache"), 10 * 1024 * 1024))
                .build();
还是先来看Cache构造函数。
  final DiskLruCache cache;

  public Cache(File directory, long maxSize) {
    this(directory, maxSize, FileSystem.SYSTEM);
  }

  Cache(File directory, long maxSize, FileSystem fileSystem) {
    this.cache = DiskLruCache.create(fileSystem, directory, VERSION, ENTRY_COUNT, maxSize);
  }
看到构造函数最终会调用DiskLruCache.create方法创建一个cache,从这就可以看出来这个Cache缓存类是基于DiskLruCache实现的。那么接下来先看它的添加方法。
 @Nullable CacheRequest put(Response response) {
    String requestMethod = response.request().method();
    // 判断是否是无效的缓存
    if (HttpMethod.invalidatesCache(response.request().method())) {
      try {
    //无效的则remove
        remove(response.request());
      } catch (IOException ignored) {
        // The cache cannot be written.
      }
      return null;
    }
    // 不是get请求不缓存直接返回null
    if (!requestMethod.equals("GET")) {
      return null;
    }
    // 请求头中包含*号不缓存直接返回null
    if (HttpHeaders.hasVaryAll(response)) {
      return null;
    }
    // 创建Entry传入response
    Entry entry = new Entry(response);
    DiskLruCache.Editor editor = null;
    try {
      editor = cache.edit(key(response.request().url()));
      if (editor == null) {
        return null;
      }
    // 写入缓存
      entry.writeTo(editor);
      return new CacheRequestImpl(editor);
    } catch (IOException e) {
      abortQuietly(editor);
      return null;
    }
  }
put方法中先判断无效的缓存将其remove,invalidatesCache方法中判断请求的请求类型,若请求类型为POST、PATCH、PUT、DELETE、MOVE中一个就将该响应remove。
 public static boolean invalidatesCache(String method) {
    return method.equals("POST")
        || method.equals("PATCH")
        || method.equals("PUT")
        || method.equals("DELETE")
        || method.equals("MOVE");     // WebDAV
  }
之后判断请求不为GET就不缓存,请求头重带有*号也不缓存,之后就创建Entry实体,调用key方法生成key然后写入缓存。
添加缓存结束了接着看取缓存get方法。
  @Nullable Response get(Request request) {
	// 调用key方法发生成key
    String key = key(request.url());
    DiskLruCache.Snapshot snapshot;
    Entry entry;
    try {
	  // cache中根据key获取快照snapshot
      snapshot = cache.get(key);
	  // 快照为空直接返回空
      if (snapshot == null) {
        return null;
      }
    } catch (IOException e) {
      // Give up because the cache cannot be read.
      return null;
    }

    try {
	  // 从快照中获取到缓存内容创建Entry对象
      entry = new Entry(snapshot.getSource(ENTRY_METADATA));
    } catch (IOException e) {
      Util.closeQuietly(snapshot);
      return null;
    }
	// 调用entry.response方法获取到缓存的response
    Response response = entry.response(snapshot);
	// request与response匹配校验
    if (!entry.matches(request, response)) {
      Util.closeQuietly(response.body());
      return null;
    }
	// 返回缓存结果
    return response;
  }
get方法中同样还是先根据请求的url生成key,然后从缓存中根据key拿到一个snapshot快照,从快照中取出缓存内容创建一个Entry,接着调用entry.response方法将获得的快照传入得到缓存的Response,对request与response进行匹配校验,最后返回获得的缓存的结果。
7. 总结
通过上面对源码流程的阅读,关于OkHttp的使用运行流程和工作原理应该已经基本了解。从中可以发现OkHttp底层是基于Socket连接,依据HTTP协议规范封装的一套网络请求框架。相较于基于HttpURLonnection和httpclient封装的Volley又或者基于OkHttp封装的Retrofit来说OkHttp更加“底层”一些,并且OkHttp底层使用了Okio进行读写会更加的高效迅速。
