

😊😊😊Alamofire专题目录,欢迎及时反馈交流 😊😊😊
Alamofire 目录直通车 --- 和谐学习,不急不躁!
非常高兴,这个
Alamofire篇章马上也结束了!那么这也作为Alamofire的终章,给大家介绍整个Alamofire剩余的内容,以及下载器封装,最后总结一下!
一、NetworkReachabilityManager
这个类主要对 SystemConfiguration.framework 中的 SCNetworkReachability 相关的东西进行封装的,主要用来管理和监听网络状态的变化
1️⃣:首先我们来使用监听网络状态
let networkManager = NetworkReachabilityManager(host: "www.apple.com")

func application(_ application: UIApplication, didFinishLaunchingWithOptions launchOptions: [UIApplication.LaunchOptionsKey: Any]?) -> Bool {
    /// 网络监控
    networkManager!.listener = {
        status in
        var message = ""
        switch status {
        case .unknown:
            message = "未知网络,请检查..."
        case .notReachable:
            message = "无法连接网络,请检查..."
        case .reachable(.wwan):
            message = "蜂窝移动网络,注意节省流量..."
        case .reachable(.ethernetOrWiFi):
            message = "WIFI-网络,使劲造吧..."
        }
        print("***********\(message)*********")
        let alertVC = UIAlertController(title: "网络状况提示", message: message, preferredStyle: .alert)
        alertVC.addAction(UIAlertAction(title: "我知道了", style: .default, handler: nil))
        self.window?.rootViewController?.present(alertVC, animated: true, completion: nil)
    }
    networkManager!.startListening()

    return true
}
- 用法非常简单,因为考虑到全局监听,一般都会写在
didFinishLaunchingWithOptions - 创建
NetworkReachabilityManager对象 - 设置回调,通过回调的
status来处理事务 - 最后一定要记得开启监听(内部重点封装)
2️⃣:底层源码分析
1:我们首先来看看 NetworkReachabilityManager 的初始化
public convenience init?(host: String) {
    guard let reachability = SCNetworkReachabilityCreateWithName(nil, host) else { return nil }
    self.init(reachability: reachability)
}

private init(reachability: SCNetworkReachability) {
    self.reachability = reachability
    // 将前面的标志设置为无保留值,以表示未知状态
    self.previousFlags = SCNetworkReachabilityFlags(rawValue: 1 << 30)
}
- 底层源码里面调用
SCNetworkReachabilityCreateWithName创建了reachability对象,这也是我们SystemConfiguration下非常非常重要的类! - 保存在这个
reachability对象,方便后面持续使用 - 将前面的标志设置为无保留值,以表示未知状态
- 其中初始化方法中,也提供了默认创建,该实例监视地址
0.0.0.0 - 可达性将
0.0.0.0地址视为一个特殊的token,它可以监视设备的一般路由状态,包括IPv4和IPv6。
2:open var listener: Listener?
- 这里也就是对外提供的状态回调闭包
3:networkManager!.startListening() 开启监听
这里也是这个内容点的重点所在
open func startListening() -> Bool {
    // 获取上下文结构信息
    var context = SCNetworkReachabilityContext(version: 0, info: nil, retain: nil, release: nil, copyDescription: nil)
    context.info = Unmanaged.passUnretained(self).toOpaque()
    // 将客户端分配给目标,当目标的可达性发生更改时,目标将接收回调
    let callbackEnabled = SCNetworkReachabilitySetCallback(
        reachability,
        { (_, flags, info) in
            let reachability = Unmanaged<NetworkReachabilityManager>.fromOpaque(info!).takeUnretainedValue()
            reachability.notifyListener(flags)
        },
        &context
    )
    // 在给定分派队列上为给定目标调度或取消调度回调
    let queueEnabled = SCNetworkReachabilitySetDispatchQueue(reachability, listenerQueue)
    // 异步执行状态,以及通知
    listenerQueue.async {
        guard let flags = self.flags else { return }
        self.notifyListener(flags)
    }
    return callbackEnabled && queueEnabled
}
- 调用
SCNetworkReachabilityContext的初始化,这个结构体包含用户指定的数据和回调函数. Unmanaged.passUnretained(self).toOpaque()就是将非托管类引用转换为指针SCNetworkReachabilitySetCallback:将客户端分配给目标,当目标的可达性发生更改时,目标将接收回调。(这也是只要我们的网络状态发生改变时,就会响应的原因)- 在给定分派队列上为给定目标调度或取消调度回调
- 异步执行状态信息处理,并发出通知
4:self.notifyListener(flags) 我们看看状态处理以及回调
- 调用了
listener?(networkReachabilityStatusForFlags(flags))在回调的时候还内部处理了flags - 这也是可以理解的,我们需要不是一个标志位,而是蜂窝网络、WIFI、无网络!
func networkReachabilityStatusForFlags(_ flags: SCNetworkReachabilityFlags) -> NetworkReachabilityStatus {
    guard isNetworkReachable(with: flags) else { return .notReachable }

    var networkStatus: NetworkReachabilityStatus = .reachable(.ethernetOrWiFi)

#if os(iOS)
    if flags.contains(.isWWAN) { networkStatus = .reachable(.wwan) }
#endif
    return networkStatus
}
- 通过
isNetworkReachable判断有无网络 - 通过
.reachable(.ethernetOrWiFi)是否存在 WIFI 网络 - iOS端 还增加了
.reachable(.wwan)判断蜂窝网络
3️⃣:小结
网络监听处理,还是非常简单的!代码的思路也没有太恶心,就是通过 SCNetworkReachabilityRef 这个一个内部类去处理网络状态,然后通过对 flags 分情况处理,确定是无网络、还是WIFI、还是蜂窝
三、AFError错误处理
AFError中将错误定义成了五个大类型
// 当“URLConvertible”类型无法创建有效的“URL”时返回。
case invalidURL(url: URLConvertible)
// 当参数编码对象在编码过程中抛出错误时返回。
case parameterEncodingFailed(reason: ParameterEncodingFailureReason)
// 当多部分编码过程中的某个步骤失败时返回。
case multipartEncodingFailed(reason: MultipartEncodingFailureReason)
// 当“validate()”调用失败时返回。
case responseValidationFailed(reason: ResponseValidationFailureReason)
// 当响应序列化程序在序列化过程中遇到错误时返回。
case responseSerializationFailed(reason: ResponseSerializationFailureReason)
这里通过对枚举拓展了计算属性,来直接对错误类型进行 if判断,不用在 switch 一个一个判断了
extension AFError {
    // 返回AFError是否为无效URL错误
    public var isInvalidURLError: Bool {
        if case .invalidURL = self { return true }
        return false
    }
    // 返回AFError是否是参数编码错误。
    // 当“true”时,“underlyingError”属性将包含关联的值。
    public var isParameterEncodingError: Bool {
        if case .parameterEncodingFailed = self { return true }
        return false
    }
    // 返回AFError是否是多部分编码错误。
    // 当“true”时,“url”和“underlyingError”属性将包含相关的值。
    public var isMultipartEncodingError: Bool {
        if case .multipartEncodingFailed = self { return true }
        return false
    }
    // 返回“AFError”是否为响应验证错误。
    // 当“true”时,“acceptableContentTypes”、“responseContentType”和“responseCode”属性将包含相关的值。
    public var isResponseValidationError: Bool {
        if case .responseValidationFailed = self { return true }
        return false
    }
    // 返回“AFError”是否为响应序列化错误。
    // 当“true”时,“failedStringEncoding”和“underlyingError”属性将包含相关的值。
    public var isResponseSerializationError: Bool {
        if case .responseSerializationFailed = self { return true }
        return false
    }
}
小结
AFError 错误处理,这个类的代码也是非常简单的!大家自行阅读以下应该没有太多疑问,这里也就不花篇幅去啰嗦了!
四、Notifications & Validation
Notifications 核心重点
extension Notification.Name {
    /// Used as a namespace for all `URLSessionTask` related notifications.
    public struct Task {
        /// Posted when a `URLSessionTask` is resumed. The notification `object` contains the resumed `URLSessionTask`.
        public static let DidResume = Notification.Name(rawValue: "org.alamofire.notification.name.task.didResume")
        /// Posted when a `URLSessionTask` is suspended. The notification `object` contains the suspended `URLSessionTask`.
        public static let DidSuspend = Notification.Name(rawValue: "org.alamofire.notification.name.task.didSuspend")
        /// Posted when a `URLSessionTask` is cancelled. The notification `object` contains the cancelled `URLSessionTask`.
        public static let DidCancel = Notification.Name(rawValue: "org.alamofire.notification.name.task.didCancel")
        /// Posted when a `URLSessionTask` is completed. The notification `object` contains the completed `URLSessionTask`.
        public static let DidComplete = Notification.Name(rawValue: "org.alamofire.notification.name.task.didComplete")
    }
}
Notification.Name通过扩展了一个Task这样的结构体,把跟task相关的通知都绑定在这个Task上,因此,在代码中就可以这么使用:
NotificationCenter.default.post(
                name: Notification.Name.Task.DidComplete,
                object: strongSelf,
                userInfo: [Notification.Key.Task: task]
            )
Notification.Name.Task.DidComplete表达的非常清晰,一般都能知道是task请求完成之后的通知。再也不需要恶心的字符串,需要匹配,万一写错了,那么也是一种隐藏的危机!
Notification userinfo&key 拓展
extension Notification {
    /// Used as a namespace for all `Notification` user info dictionary keys.
    public struct Key {
        /// User info dictionary key representing the `URLSessionTask` associated with the notification.
        public static let Task = "org.alamofire.notification.key.task"
        /// User info dictionary key representing the responseData associated with the notification.
        public static let ResponseData = "org.alamofire.notification.key.responseData"
    }
}
- 扩展了
Notification,新增了一个Key结构体,这个结构体用于取出通知中的userInfo。 - 使用
userInfo[Notification.Key.ResponseData] = data
NotificationCenter.default.post(
    name: Notification.Name.Task.DidResume,
    object: self,
    userInfo: [Notification.Key.Task: task]
)
- 设计的本质就是为了更加简洁!大家也可以从这种思维得出一些想法运用到实际开发中: 按照自己的业务创建不同的结构体就可以了。
小结
Notifications其实是一个Task结构体,该结构体中定义了一些字符串,这些字符串就是所需通知的key,当网络请求DidResume、DIdSuspend、DIdCancel、DidComplete都会发出通知。Validation主要是用来验证请求是否成功,如果出错了就做相应的处理
五、下载器
这里的下载器笔者是基于 Alamofire(2)— 后台下载 继续给大家分析几个关键点
1️⃣:暂停&继续&取消
//MARK: - 暂停/继续/取消
func suspend() {
    self.currentDownloadRequest?.suspend()
}
func resume() {
    self.currentDownloadRequest?.resume()
}
func cancel() {
    self.currentDownloadRequest?.cancel()
}
- 通过我们的下载事务管理者:
Request管理task任务的生命周期 - 其中task事务就是通过调用
suspend和resume方法 cancel里面调用:downloadDelegate.downloadTask.cancel { self.downloadDelegate.resumeData = $0 }保存了取消时候的resumeData
2️⃣:断点续传
断点续传的重点:就是保存响应 resumeData,然后调用:manager.download(resumingWith: resumeData)
if let resumeData = currentDownloadRequest?.resumeData {
    let documentUrl = FileManager.default.urls(for: .documentDirectory, in: .userDomainMask).first
    let fileUrl     = documentUrl?.appendingPathComponent("resumeData.tmp")
    try! resumeData.write(to: fileUrl!)
    currentDownloadRequest = LGDowloadManager.shared.manager.download(resumingWith: resumeData)
}
- 看到这里大家也就能感受到其实断点续传最重要的是保存
resumeData - 然后处理文件路径,保存
- 最后调用
download(resumingWith: resumeData)就可以轻松实现断点续传
3️⃣:应用程序被用户kill的时候
1:准备条件
我们们在前面Alamofire(2)— 后台下载处理的时候,针对 URLSession 是由要求的
- 必须使用
background(withIdentifier:)方法创建URLSessionConfiguration,其中这个identifier必须是固定的,而且为了避免跟其他App冲突,建议这个identifier跟应用程序的Bundle ID相关,保证唯一 - 创建URLSession的时候,必须传入delegate
- 必须在App启动的时候创建
Background Sessions,即它的生命周期跟App几乎一致,为方便使用,最好是作为AppDelegate的属性,或者是全局变量。
2:测试反馈
OK,准备好了条件,我们开始测试!当应用程序被用户杀死的时候,再回来!
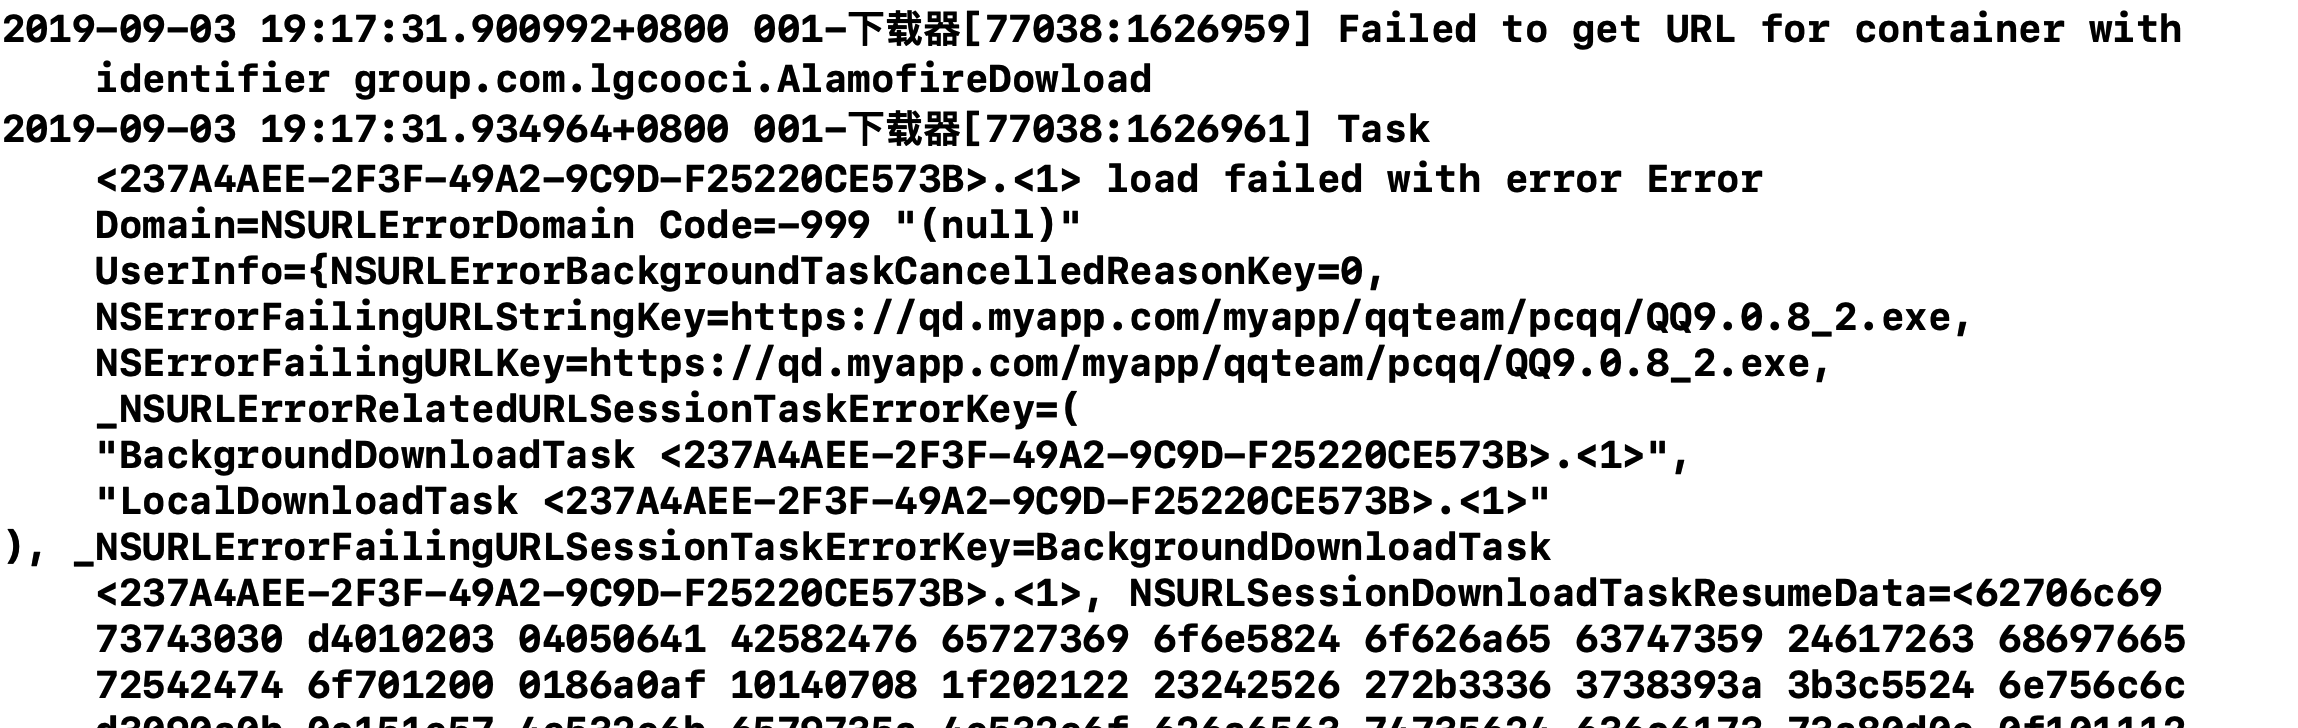
⚠️ 我们惊人的发现,会报错:load failed with error Error Domain=NSURLErrorDomain Code=-999, 这个BUG 我可是经常看见,于是飞快定位:
urlSession(_ session: URLSession, task: URLSessionTask, didCompleteWithError error: Error?)
😲 果然应用程序会回到完成代理,大家如果细心想一想也是可以理解的:应用程序被用户kill,也是舒服用户取消,这个任务执行失败啊! 😲
3:处理事务
if let error = error {
    if let resumeData = (error as NSError).userInfo[NSURLSessionDownloadTaskResumeData] as? Data {
        LGDowloadManager.shared.resumeData = resumeData
        print("保存完毕,你可以断点续传!")
    }
}
- 错误获取,然后转成相应
NSError - 通过
error获取里面inifo, 再通过key拿到相应的resumeData - 因为前面这个已经保证了生命周期的单利,就可以启动应用程序的时候保存
- 下次点击同一个
URL下载的时候,只要取出对应的task保存的resumeData - 执行
download(resumingWith: resumeData)完美!
当然如果你有特殊封装也可以执行调用 Alamofire 封装的闭包
manager.delegate.taskDidComplete = { (session, task, error) in
    print("**************")
    if let error = error {
        if let resumeData = (error as NSError).userInfo[NSURLSessionDownloadTaskResumeData] as? Data {
            LGDowloadManager.shared.resumeData = resumeData
            print("保存完毕,你可以断点续传!")
        }
    }
    print("**************")
}
4️⃣:APP Crash或者被系统关闭时候
问题
这里我们在实际开发过程中,也会遇到各种各样的BUG,那么在下载的时候 APP Crash 也是完全可能的!问题在于:我们这个时候怎么办?
思考
我们通过上面的条件,发现其实 apple 针对下载任务是有特殊处理的!我把它理解是在另一进程处理的!下载程序的代理方法还是会继续执行!那么我在直接把所有下载相关代理方法全部断点
测试结果
// 告诉委托下载任务已完成下载
func urlSession(
        _ session: URLSession,
        downloadTask: URLSessionDownloadTask,
        didFinishDownloadingTo location: URL)
// 下载进度也会不断执行
func urlSession(
        _ session: URLSession,
        downloadTask: URLSessionDownloadTask,
        didWriteData bytesWritten: Int64,
        totalBytesWritten: Int64,
        totalBytesExpectedToWrite: Int64)
- 我们的程序回来,会在后台默默执行
urlSession(_ session: URLSession, task: URLSessionTask, didCompleteWithError error: Error?)完成也会调用
问题一:OK,看似感觉一切都完美(不需要处理),但是错了:我们用户不知道你已经在后台执行了,他有可能下次进来有点击下载(还有UI页面,也没有显示的进度)
问题二:因为 Alamofire 的 request 没有创建,所以没有对应的 task
思路:重重压力,我找到了一个非常重要的闭包(URLSession 的属性)-- getTasksWithCompletionHandler 于是有下面这么一段代码
manager.session.getTasksWithCompletionHandler({ (dataTasks, uploadTasks, downloadTasks) in
    print(dataTasks)
    print(uploadTasks)
    print(downloadTasks)
})
- 这个闭包能够监听到当前
session里正在执行的任务,我们只需要便利找到响应的Task - 然后利用缓存把
task对应url保存起来 - 下次用户再点击相同
url的时候,就判断读取就OK,如果存在就不需要开启新的任务,只要告诉用户已经开始下载就OK,UI页面处理而已 - 进度呢?也很简单毕竟代理在后台持续进行,我们只需要在
func urlSession(_ session: URLSession, downloadTask: URLSessionDownloadTask, didWriteData bytesWritten: Int64, totalBytesWritten: Int64, totalBytesExpectedToWrite: Int64)代理里面匹配downloadTask保存进度,然后更新界面就OK! - 细节:
didFinishDownloadingTo记得对下载回来的文件进行路径转移!
5️⃣:如果应用程序creash,但是下载完成
首先这里非常感谢 iOS原生级别后台下载详解 提供的测试总结!Tiercel2 框架一个非常强大的下载框架,推荐大家使用
- 在前台:跟普通的
downloadTask一样,调用相关的session代理方法 - 在后台:当
Background Sessions里面所有的任务(注意是所有任务,不单单是下载任务)都完成后,会调用AppDelegate的application(_:handleEventsForBackgroundURLSession:completionHandler:)方法,激活App,然后跟在前台时一样,调用相关的session代理方法,最后再调用urlSessionDidFinishEvents(forBackgroundURLSession:)方法 crash或者App被系统关闭:当Background Sessions里面所有的任务(注意是所有任务,不单单是下载任务)都完成后,会自动启动App,调用AppDelegate的application(_:didFinishLaunchingWithOptions:)方法,然后调用application(_:handleEventsForBackgroundURLSession:completionHandler:)方法,当创建了对应的Background Sessions后,才会跟在前台时一样,调用相关的session代理方法,最后再调用urlSessionDidFinishEvents(forBackgroundURLSession:)方法crash或者App被系统关闭,打开App保持前台,当所有的任务都完成后才创建对应的Background Sessions:没有创建session时,只会调用AppDelegate的application(_:handleEventsForBackgroundURLSession:completionHandler:)方法,当创建了对应的Background Sessions后,才会跟在前台时一样,调用相关的session代理方法,最后再调用urlSessionDidFinishEvents(forBackgroundURLSession:)方法crash或者App被系统关闭,打开App,创建对应的Background Sessions后所有任务才完成:跟在前台的时候一样
到这里,这个篇章就分析完毕了!看到这里估计你也对
Alamofire有了一定的了解。这个篇章完毕,我还是会继续更新(尽管现在掘进iOS人群不多,阅读量不多)但这是我的执着!希望还在iOS行业奋斗的小伙伴,继续加油,守的云开见日出!💪💪💪就问此时此刻还有谁?45度仰望天空,该死!我这无处安放的魅力!
