


首先是一些说明
- 动画效果是原生 js 实现,不可能为了这么一个动画引用 Jquery 这么大一个库
- 因为是在 vue-router 的 hash 模式下,所以就不能用
herf="#contentx"这样的方式来跳转了,这里用 js 来滚动到指定元素位置
文章整体思路是先布局,然后把内容和导航联动起来,最后来实现点击导航滚动到指定内容
布局
话不多说,上代码
navs.vue
<template>
  <div>
    <!-- 内容区域 -->
    <div class="content">
      <div>
        content-0
      </div>
      <div>
        content-1
      </div>
      <div>
        content-2
      </div>
      <div>
        content-3
      </div>
      <div>
        content-4
      </div>
    </div>
    <!-- 导航区域 -->
    <ul class="navs">
      <li :class="{active: active===0}">
        content-0
      </li>
      <li :class="{active: active===1}">
        content-1
      </li>
      <li :class="{active: active===2}">
        content-2
      </li>
      <li :class="{active: active===3}">
        content-3
      </li>
      <li :class="{active: active===4}">
        content-4
      </li>
    </ul>
  </div>
</template>

<script>
export default {
  props: {},
  data() {
    return {
      active: 0 // 当前激活的导航索引
    }
  },
  methods: {}
}
</script>

<style scoped>
  /* 内容区的样式 */
  .content {
    background-color: white;
    width: 500px;
  }
  .content div {
    width: 100%;
    height: 600px;
    font-size: 36px;
    padding: 20px;
    background-color: #7ec384;
  }
  .content div:nth-child(2n) {
    background-color: #847ec3;
  }
  /* 导航栏的样式 */
  .navs {
    position: fixed;
    top: 80px;
    left: 700px;
    background-color: #efefef;
  }
  .navs li {
    padding: 0 20px;
    line-height: 1.6;
    font-size: 24px;
  }
  /* 当导航被点亮后改变颜色 */
  .navs .active{
    color: #847ec3;
    background-color: #e2e2e2;
  }
</style>
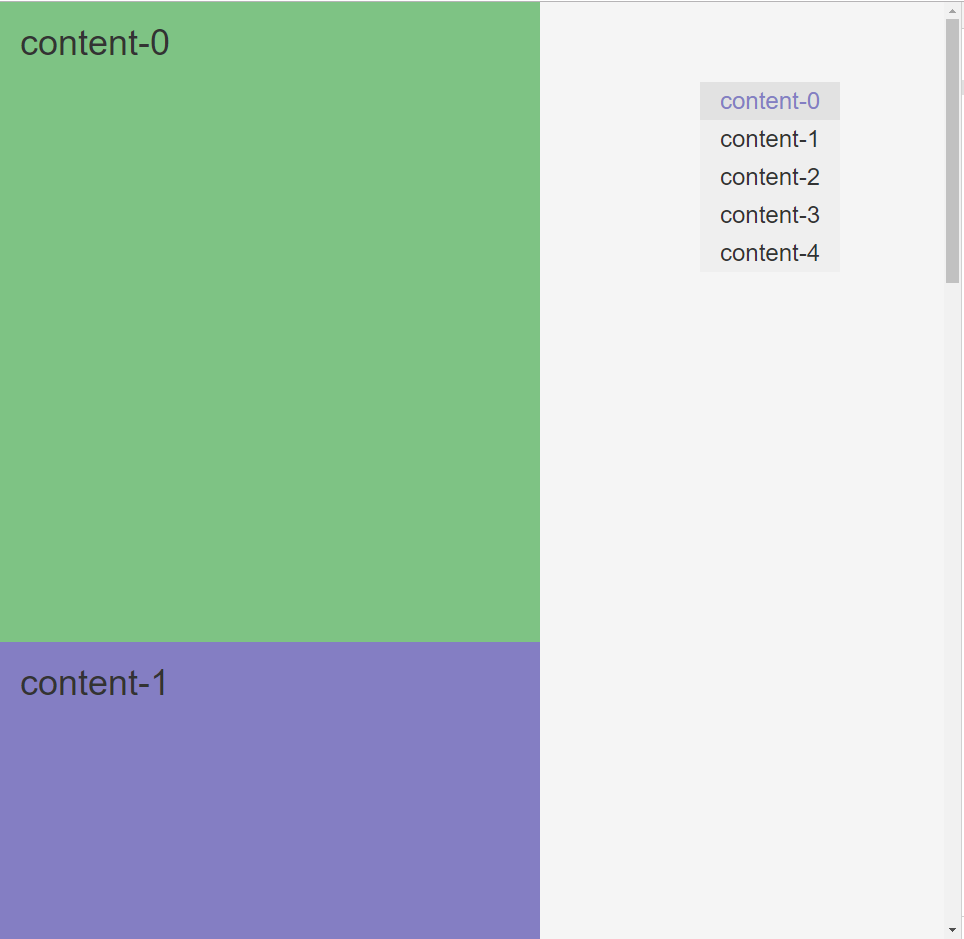
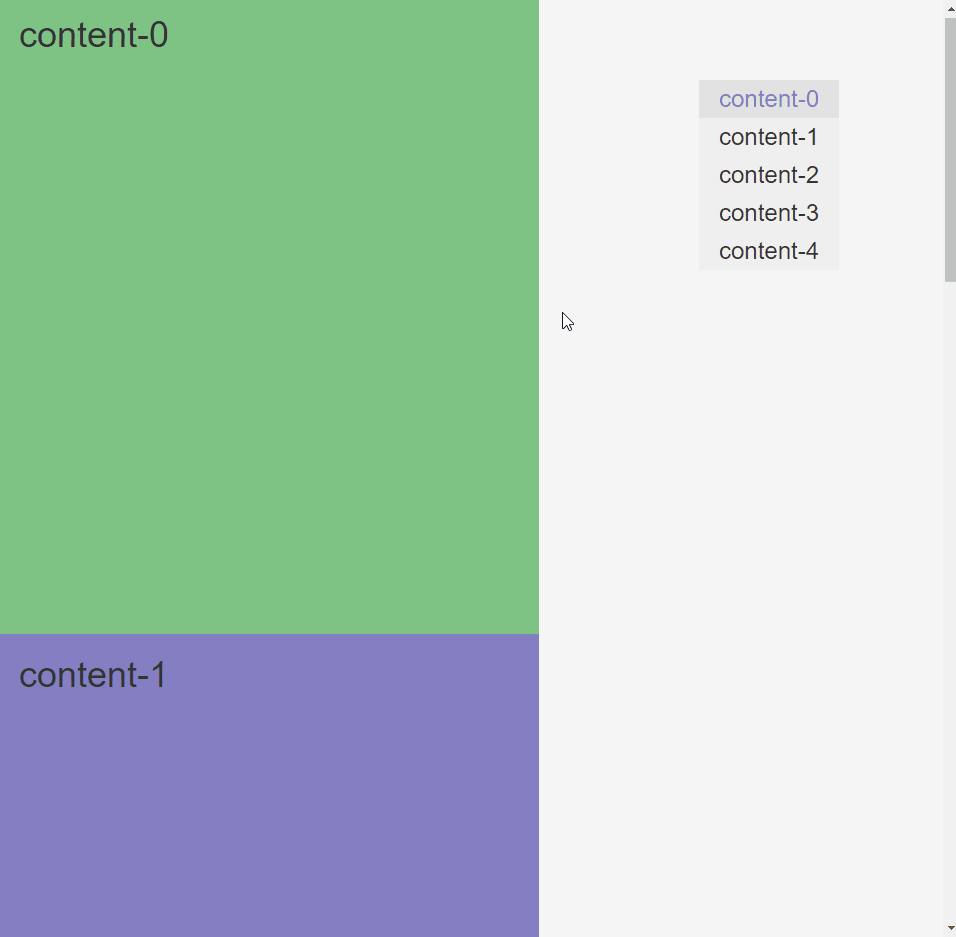
布局很简单,就左边内容,右边导航。导航和内容本来可以用 v-for 来生成的,但是为了看起来更简单明了,我就没那么写。先来看看布局效果吧!
内容导航联动
这一块开始变得有意思了起来,首先我们要搞懂元素的两个属性:
- scrollTop
- offsetTop
scrollTop
先看看一句话定义吧
一个元素的
scrollTop值是这个元素的顶部到视口可见内容(的顶部)的距离的度量。当一个元素的内容没有产生垂直方向的滚动条,那么它的scrollTop 值为0。
引用自 developer.mozilla.org/zh-CN/docs/…
如果还不理解,那么我画张图,大概就懂了,相信读者也知道文档流是个啥,我们先来个文档流
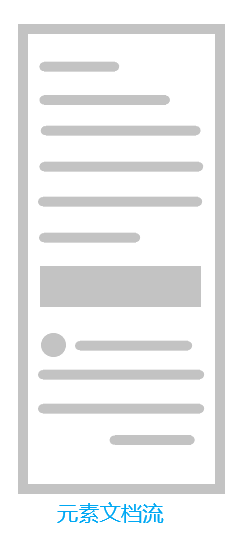
好了,现在这个文档流有点长,我们的视口不够高,于是只能显示一部分,其余的要滚动查看,看起来像这样
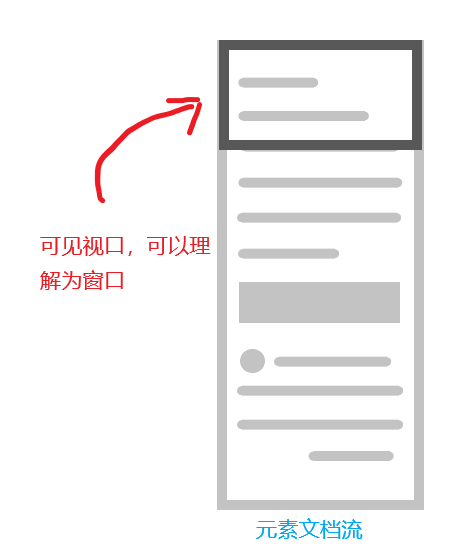
这个时候我们看见的是最顶部的内容,这个文档流的 scrollTop 此时等于 0,让我们把视口往下移一点,也就是滚动一下窗口,查看下面的内容。
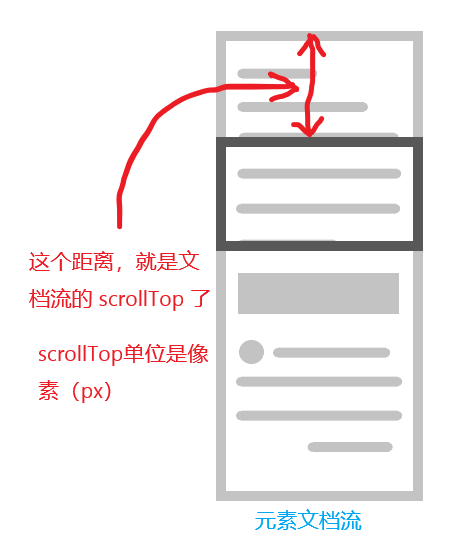
OK,到这里我相信你一定已经理解了 scrollTop
offsetTop
还是先一句话定义吧
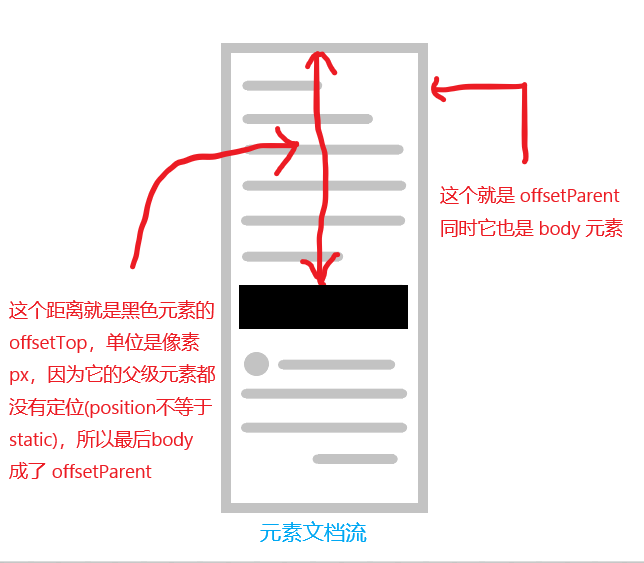
HTMLElement.offsetTop为只读属性,它返回当前元素相对于其offsetParent元素的顶部内边距的距离。
引用自 developer.mozilla.org/zh-CN/docs/…
关于 offsetParent 网上有的定义是
与当前元素最近的经过定位( position 不等于 static )的父级元素
具体情况分为以下几种:
-
position为fixed时,offsetParent为null,offsettop的值和top相等。此时元素是以视口来定位的。
-
position非fixed,父级元素无定位(static)时,offsetParent为body。
-
position非fixed,父级元素有定位时,offsetParent为最近的有定位的父级元素。
-
body元素,offsetParent为null,offsettop为0(似乎是废话)。
引用自 www.jianshu.com/p/135731ec1…
我们这里是属于第二种情况。
可能到这里你有点蒙,那还是拿刚才那张图来举例
好了,关于 offsetTop 你也了解了,我们就可以开始写代码了。
监听滚动
当元素发生滚动时,会触发 scroll事件,我们就在 vue 的 mounted 钩子中添加监听好了,修改 vans.vue 文件
<script>
export default {
  props: {},
  data() {
    return {
      active: 0 // 当前激活的导航索引
    }
  },
  mounted() {
    // 监听滚动事件
    window.addEventListener('scroll', this.onScroll)
  },
  destroy() {
    // 必须移除监听器,不然当该vue组件被销毁了,监听器还在就会出错
    window.removeEventListener('scroll', this.onScroll)
  },
  methods: {
    onScroll() {
      // 滚动监听器
    }
  }
}
</script>
现在我们开始写监听回调
// 滚动监听器
onScroll() {
  // 获取所有锚点元素
  const navContents = document.querySelectorAll('.content div')
  // 所有锚点元素的 offsetTop
  const offsetTopArr = []
  navContents.forEach(item => {
    offsetTopArr.push(item.offsetTop)
  })
  // 获取当前文档流的 scrollTop
  const scrollTop = document.documentElement.scrollTop || document.body.scrollTop
  // 定义当前点亮的导航下标
  let navIndex = 0
  for (let n = 0; n < offsetTopArr.length; n++) {
    // 如果 scrollTop 大于等于第 n 个元素的 offsetTop 则说明 n-1 的内容已经完全不可见
    // 那么此时导航索引就应该是 n 了
    if (scrollTop >= offsetTopArr[n]) {
      navIndex = n
    }
  }
  // 把下标赋值给 vue 的 data
  this.active = navIndex
}
到了这里,我们的导航已经可以跟着滚动来变化了,看效果图
用JS来滚动到指定元素
scrollTop 是可读可写的,我们只需要把目标元素的 offsetTop 赋值给 scrollTop 就可以让视口自动跳过去,但是直接跳过去是很生硬的,所以我们要一点一点的跳过去,只要速度够快,人眼看上去就是动画效果。好了,开始码代码。
给导航添加点击点击事件
<!-- 导航区域 -->
<ul class="navs">
  <li :class="{active: active===0}" @click="scrollTo(0)">
    content-0
  </li>
  <li :class="{active: active===1}" @click="scrollTo(1)">
    content-1
  </li>
  <li :class="{active: active===2}" @click="scrollTo(2)">
    content-2
  </li>
  <li :class="{active: active===3}" @click="scrollTo(3)">
    content-3
  </li>
  <li :class="{active: active===4}" @click="scrollTo(4)">
    content-4
  </li>
</ul>
新增滚动函数
methods: {
    ...
    // 跳转到指定索引的元素
    scrollTo(index) {
      // 获取目标的 offsetTop
      // css选择器是从 1 开始计数,我们是从 0 开始,所以要 +1
      const targetOffsetTop = document.querySelector(`.content div:nth-child(${index + 1})`).offsetTop
      // 获取当前 offsetTop
      let scrollTop = document.documentElement.scrollTop || document.body.scrollTop
      // 定义一次跳 50 个像素,数字越大跳得越快,但是会有掉帧得感觉,步子迈大了会扯到蛋
      const STEP = 50
      // 判断是往下滑还是往上滑
      if (scrollTop > targetOffsetTop) {
        // 往上滑
        smoothUp()
      } else {
        // 往下滑
        smoothDown()
      }
      // 定义往下滑函数
      function smoothDown() {
        // 如果当前 scrollTop 小于 targetOffsetTop 说明视口还没滑到指定位置
        if (scrollTop < targetOffsetTop) {
          // 如果和目标相差距离大于等于 STEP 就跳 STEP
          // 否则直接跳到目标点,目标是为了防止跳过了。
          if (targetOffsetTop - scrollTop >= STEP) {
            scrollTop += STEP
          } else {
            scrollTop = targetOffsetTop
          }
          document.body.scrollTop = scrollTop
          document.documentElement.scrollTop = scrollTop
          // 屏幕在绘制下一帧时会回调传给 requestAnimationFrame 的函数
          // 关于 requestAnimationFrame 可以自己查一下,在这种场景下,相比 setInterval 性价比更高
          requestAnimationFrame(smoothDown)
        }
      }
      // 定义往上滑函数
      function smoothUp() {
        if (scrollTop > targetOffsetTop) {
          if (scrollTop - targetOffsetTop >= STEP) {
            scrollTop -= STEP
          } else {
            scrollTop = targetOffsetTop
          }
          document.body.scrollTop = scrollTop
          document.documentElement.scrollTop = scrollTop
          requestAnimationFrame(smoothUp)
        }
      }
    }
    }
}
最终局
好了,我们看看最终效果
最终代码
<template>
  <div>
    <!-- 内容区域 -->
    <div class="content">
      <div>
        content-0
      </div>
      <div>
        content-1
      </div>
      <div>
        content-2
      </div>
      <div>
        content-3
      </div>
      <div>
        content-4
      </div>
    </div>
    <!-- 导航区域 -->
    <ul class="navs">
      <li :class="{active: active===0}" @click="scrollTo(0)">
        content-0
      </li>
      <li :class="{active: active===1}" @click="scrollTo(1)">
        content-1
      </li>
      <li :class="{active: active===2}" @click="scrollTo(2)">
        content-2
      </li>
      <li :class="{active: active===3}" @click="scrollTo(3)">
        content-3
      </li>
      <li :class="{active: active===4}" @click="scrollTo(4)">
        content-4
      </li>
    </ul>
  </div>
</template>

<script>
export default {
  props: {},
  data() {
    return {
      active: 0 // 当前激活的导航索引
    }
  },
  mounted() {
    // 监听滚动事件
    window.addEventListener('scroll', this.onScroll, false)
  },
  destroy() {
    // 必须移除监听器,不然当该vue组件被销毁了,监听器还在就会出错
    window.removeEventListener('scroll', this.onScroll)
  },
  methods: {
    // 滚动监听器
    onScroll() {
      // 获取所有锚点元素
      const navContents = document.querySelectorAll('.content div')
      // 所有锚点元素的 offsetTop
      const offsetTopArr = []
      navContents.forEach(item => {
        offsetTopArr.push(item.offsetTop)
      })
      // 获取当前文档流的 scrollTop
      const scrollTop = document.documentElement.scrollTop || document.body.scrollTop
      // 定义当前点亮的导航下标
      let navIndex = 0
      for (let n = 0; n < offsetTopArr.length; n++) {
        // 如果 scrollTop 大于等于第n个元素的 offsetTop 则说明 n-1 的内容已经完全不可见
        // 那么此时导航索引就应该是n了
        if (scrollTop >= offsetTopArr[n]) {
          navIndex = n
        }
      }
      this.active = navIndex
    },
    // 跳转到指定索引的元素
    scrollTo(index) {
      // 获取目标的 offsetTop
      // css选择器是从 1 开始计数,我们是从 0 开始,所以要 +1
      const targetOffsetTop = document.querySelector(`.content div:nth-child(${index + 1})`).offsetTop
      // 获取当前 offsetTop
      let scrollTop = document.documentElement.scrollTop || document.body.scrollTop
      // 定义一次跳 50 个像素,数字越大跳得越快,但是会有掉帧得感觉,步子迈大了会扯到蛋
      const STEP = 50
      // 判断是往下滑还是往上滑
      if (scrollTop > targetOffsetTop) {
        // 往上滑
        smoothUp()
      } else {
        // 往下滑
        smoothDown()
      }
      // 定义往下滑函数
      function smoothDown() {
        // 如果当前 scrollTop 小于 targetOffsetTop 说明视口还没滑到指定位置
        if (scrollTop < targetOffsetTop) {
          // 如果和目标相差距离大于等于 STEP 就跳 STEP
          // 否则直接跳到目标点,目标是为了防止跳过了。
          if (targetOffsetTop - scrollTop >= STEP) {
            scrollTop += STEP
          } else {
            scrollTop = targetOffsetTop
          }
          document.body.scrollTop = scrollTop
          document.documentElement.scrollTop = scrollTop
          // 关于 requestAnimationFrame 可以自己查一下,在这种场景下,相比 setInterval 性价比更高
          requestAnimationFrame(smoothDown)
        }
      }
      // 定义往上滑函数
      function smoothUp() {
        if (scrollTop > targetOffsetTop) {
          if (scrollTop - targetOffsetTop >= STEP) {
            scrollTop -= STEP
          } else {
            scrollTop = targetOffsetTop
          }
          document.body.scrollTop = scrollTop
          document.documentElement.scrollTop = scrollTop
          requestAnimationFrame(smoothUp)
        }
      }
    }
  }
}
</script>

<style scoped>
  /* 内容区的样式 */
  .content {
    background-color: white;
    width: 500px;
  }
  .content div {
    width: 100%;
    height: 600px;
    font-size: 36px;
    padding: 20px;
    background-color: #7ec384;
  }
  .content div:nth-child(2n) {
    background-color: #847ec3;
  }
  /* 导航栏的样式 */
  .navs {
    position: fixed;
    top: 80px;
    left: 700px;
    background-color: #efefef;
  }
  .navs li {
    padding: 0 20px;
    line-height: 1.6;
    font-size: 24px;
  }
  /* 当导航被点亮后改变颜色 */
  .navs .active{
    color: #847ec3;
    background-color: #e2e2e2;
  }
</style>
