

到现在为止,Java IO可分为三类:BIO、NIO、AIO。最早出现的是BIO,然后是NIO,最近的是AIO,BIO即Blocking IO,NIO有的文章说是New NIO,也有的文章说是No Blocking IO,我查了一些资料,官网说的应该是No Blocking IO,提供了Selector,Channle,SelectionKey抽象,AIO即Asynchronous IO(异步IO),提供了Fauture等异步操作。
1 BIO
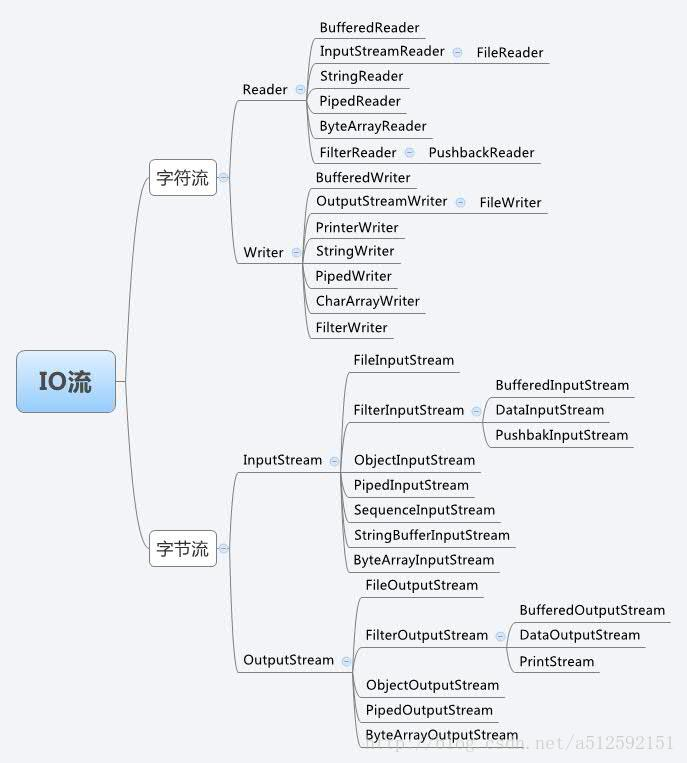
上图是BIO的架构体系图。可以看到BIO主要分为两类IO,即字符流IO和字节流IO,字符流即把输入输出数据当做字符来看待,Writer和Reader是其继承体系的最高层,字节流即把输入输出当做字节来看待,InputStream和OutputStream是其继承体系的最高层。下面以文件操作为例,其他的实现类也非常类似。
顺便说一下,整个BIO体系大量使用了装饰者模式,例如BufferedInputStream包装了InputStream,使其拥有了缓冲的能力。
1.1 字节流
public class Main {

    public static void main(String[] args) throws IOException {
		//写入文件
        FileOutputStream out = new FileOutputStream("E:\\Java_project\\effective-java\\src\\top\\yeonon\\io\\bio\\test.txt");
        out.write("hello,world".getBytes("UTF-8"));
        out.flush();
        out.close();

        //读取文件
        FileInputStream in = new FileInputStream("E:\\Java_project\\effective-java\\src\\top\\yeonon\\io\\bio\\test.txt");
        byte[] buffer = new byte[in.available()];
        in.read(buffer);
        System.out.println(new String(buffer, "UTF-8"));
        in.close();
    }
}
向FileOutputStream构造函数中传入文件名来创建FileOutputStream对象,即打开了一个字节流,之后使用write方法向字节流中写入数据,完成之后调用flush刷新缓冲区,最后记得要关闭字节流。读取文件也是类似的,先打开一个字节流,然后从字节流中读取数据并存入内存中(buffer数组),然后再关闭字节流。
因为InputStream和OutputStream都继承了AutoCloseable接口,所以如果使用的是try-resource的语法来进行字节流的IO操作,可不需要手动显式调用close方法了,这也是非常推荐的做法,在示例中我没有这样做只是为了方便。
1.2 字符流
字节流主要使用的是InputStream和OutputStream,而字符流主要使用的就是与之对应的Reader和Writer。下面来看一个示例,该示例的功能和上述示例的一样,只不过实现手段不同:
public class Main {

    public static void main(String[] args) throws IOException {
        Writer writer = new FileWriter("E:\\Java_project\\effective-java\\src\\top\\yeonon\\io\\bio\\test.txt");
        writer.write("hello,world\n");
        writer.write("hello,yeonon\n");
        writer.flush();
        writer.close();

        BufferedReader reader = new BufferedReader(new FileReader("E:\\Java_project\\effective-java\\src\\top\\yeonon\\io\\bio\\test.txt"));

        String line = "";
        int lineCount = 0;
        while ((line = reader.readLine()) != null) {
            System.out.println(line);
            lineCount++;
        }
        reader.close();
        System.out.println(lineCount);
    }
}
Writer非常简单,无法就是打开字符流,然后向字符流中写入字符,然后关闭。关键是Reader,示例代码中使用了BufferedReader来包装FileReader,使得原本没有缓冲功能的FileReader有了缓冲功能,这就是上面提到过的装饰者模式,BufferedReader还提供了方便使用的API,例如readLine(),这个方法每次调用会读取文件中的一行。
以上就是BIO的简单使用,源码的话因为涉及太多的底层,所以如果对底层不是很了解的话会很难理解源码。
2 NIO
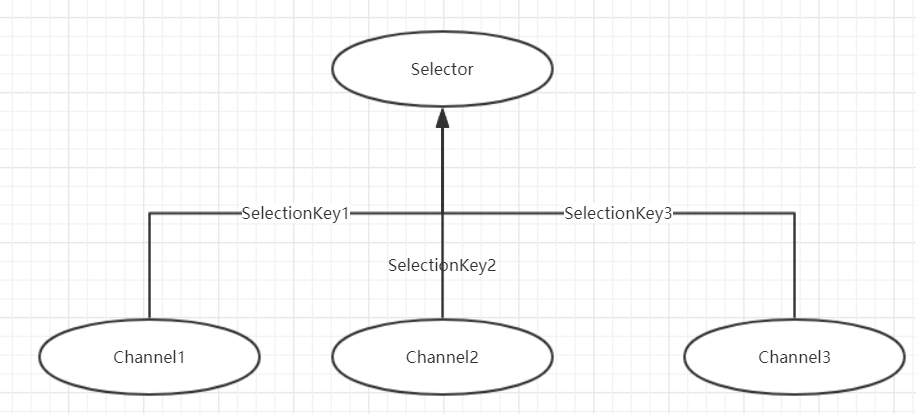
BIO是同步阻塞的IO,而NIO是同步非阻塞的IO。NIO中有几个比较重要的组件:Selector,SelectionKey,Channel,ByteBuffer,其中Selector就是所谓的选择器,SelectionKey可以简单理解为选择键,这个键将Selector和Channle进行一个绑定(或者所Channle注册到Selector上),当有数据到达Channel的时候,Selector会从阻塞状态中恢复过来,并对该Channle进行操作,并且,我们不能直接对Channle进行读写操作,只能对ByteBuffer操作。如下图所示:
下面是一个Socket网络编程的例子:
//服务端
public class SocketServer {

    private Selector selector;
    private final static int port = 9000;
    private final static int BUF = 10240;

    private void init() throws IOException {
        //获取一个Selector
        selector = Selector.open();
	    //获取一个服务端socket Channel
        ServerSocketChannel channel = ServerSocketChannel.open();
        //设置为非阻塞模式
        channel.configureBlocking(false);
        //绑定端口
        channel.socket().bind(new InetSocketAddress(port));
	    //把channle注册到Selector上,并表示对ACCEPT事件感兴趣
        SelectionKey selectionKey = channel.register(selector, SelectionKey.OP_ACCEPT);

        while (true) {
            //该方法会阻塞,直到和其绑定的任何一个channel有数据过来
            selector.select();
            //获取该Selector绑定的SelectionKey
            Set<SelectionKey> selectionKeys = selector.selectedKeys();
            Iterator<SelectionKey> iterator = selectionKeys.iterator();
            while (iterator.hasNext()) {
                SelectionKey key = iterator.next();
                //记得删除,否则就无限循环了
                iterator.remove();
                //如果该事件是一个ACCEPT,那么就执行doAccept方法,其他的也一样
                if (key.isAcceptable()) {
                    doAccept(key);
                } else if (key.isReadable()) {
                    doRead(key);
                } else if (key.isWritable()) {
                    doWrite(key);
                } else if (key.isConnectable()) {
                    System.out.println("连接成功!");
                }
            }
        }
    }

    //写方法,注意不能直接对channle进行读写操作,只能对ByteBuffer进行操作
    private void doWrite(SelectionKey key) throws IOException {
        ByteBuffer buffer = ByteBuffer.allocate(BUF);
        buffer.flip();
        SocketChannel socketChannel = (SocketChannel) key.channel();
        while (buffer.hasRemaining()) {
            socketChannel.write(buffer);
        }
        buffer.compact();
    }

    //读取消息
    private void doRead(SelectionKey key) throws IOException {
        SocketChannel socketChannel = (SocketChannel) key.channel();
        ByteBuffer buffer = ByteBuffer.allocate(BUF);
        long reads = socketChannel.read(buffer);
        while (reads > 0) {
            buffer.flip();
            byte[] data = buffer.array();
            System.out.println("读取到消息: " + new String(data, "UTF-8"));
            buffer.clear();
            reads = socketChannel.read(buffer);
        }
        if (reads == -1) {
            socketChannel.close();
        }
    }

    //当有连接过来的时候,获取连接过来的channle,然后注册到Selector上,并设置成对读消息感兴趣,当客户端有消息过来的时候,Selector就可以让其执行doRead方法,然后读取消息并打印。
    private void doAccept(SelectionKey key) throws IOException {
        ServerSocketChannel serverChannel = (ServerSocketChannel) key.channel();
        System.out.println("服务端监听中...");
        SocketChannel socketChannel = serverChannel.accept();
        socketChannel.configureBlocking(false);
        socketChannel.register(key.selector(), SelectionKey.OP_READ);
    }

    public static void main(String[] args) throws IOException {
        SocketServer server = new SocketServer();
        server.init();
    }
}

//客户端,写得比较简单
public class SocketClient {

    private final static int port = 9000;
    private final static int BUF = 10240;


    private void init() throws IOException {
        //获取channel
        SocketChannel channel = SocketChannel.open();
        //连接到远程服务器
        channel.connect(new InetSocketAddress(port));
        //设置非阻塞模式
        channel.configureBlocking(false);
        //往ByteBuffer里写消息
        ByteBuffer buffer = ByteBuffer.allocate(BUF);
        buffer.put("Hello,Server".getBytes("UTF-8"));
        buffer.flip();
        //将ByteBuffer内容写入Channle,即发送消息
        channel.write(buffer);
        channel.close();
    }


    public static void main(String[] args) throws IOException {
        SocketClient client = new SocketClient();
            client.init();
    }
}
尝试启动一个服务端,多个客户端,结果大致如下所示:
服务端监听中...
读取到消息: Hello,Server
服务端监听中...
读取到消息: Hello,Server
注释写得挺清楚了,我这里只是简单使用了NIO,但实际上NIO远远不止这些东西,光一个ByteBuffer就能说一天,如果有机会,我会在后面Netty相关的文章中详细说一下这几个组件。在此就不再多说了。
吐槽一些,纯NIO写的服务端和客户端实在是太麻烦了,一不小心就会写错,还是使用Netty类似的框架好一些啊。
3 AIO
在JDK7中新增了一些IO相关的API,这些API称作AIO。因为其提供了一些异步操作IO的功能,但本质是其实还是NIO,所以可以简单的理解为是NIO的扩充。AIO中最重要的就是Future了,Future表示将来的意思,即这个操作可能会持续很长时间,但我不会等,而是到将来操作完成的时候,再过来通知我,这就是异步的意思。下面是两个使用AIO的例子:
    public static void main(String[] args) throws ExecutionException, InterruptedException, IOException {
        Path path = Paths.get("E:\\Java_project\\effective-java\\src\\top\\yeonon\\io\\aio\\test.txt");
        AsynchronousFileChannel channel = AsynchronousFileChannel.open(path);
        ByteBuffer buffer = ByteBuffer.allocate(1024);
        Future<Integer> future = channel.read(buffer,0);
        Integer readNum = future.get(); //阻塞,如果不调用该方法,main方法会继续执行
        buffer.flip();
        System.out.println(new String(buffer.array(), "UTF-8"));
        System.out.println(readNum);
    }
第一个例子使用AsynchronousFileChannel来异步的读取文件内容,在代码中,我使用了future.get()方法,该方法会阻塞当前线程,在例子中即主线程,当工作线程,即读取文件的线程执行完毕后才会从阻塞状态中恢复过来,并将结果返回。之后就可以从ByteBuffer中读取数据了。这是使用将来时的例子,下面来看看使用回调的例子:
public class Main {

    public static void main(String[] args) throws ExecutionException, InterruptedException, IOException {
        Path path = Paths.get("E:\\Java_project\\effective-java\\src\\top\\yeonon\\io\\aio\\test.txt");
        AsynchronousFileChannel channel = AsynchronousFileChannel.open(path);
        ByteBuffer buffer = ByteBuffer.allocate(1024);
        channel.read(buffer, 0, buffer, new CompletionHandler<Integer, ByteBuffer>() {
            @Override
            public void completed(Integer result, ByteBuffer attachment) {
                System.out.println("完成读取");
                try {
                    System.out.println(new String(attachment.array(), "UTF-8"));
                } catch (UnsupportedEncodingException e) {
                    e.printStackTrace();
                }
            }

            @Override
            public void failed(Throwable exc, ByteBuffer attachment) {
                System.out.println("读取失败");
            }
        });
        System.out.println("继续执行主线程");
        //调用完成之后不需要等待任务完成,会直接继续执行主线程
        while (true) {
            Thread.sleep(1000);
        }
    }
}
输出的结果大致如下所示,但不一定,这取决于线程调度:
继续执行主线程
完成读取

hello,world
hello,yeonon
当任务完成,即读取文件完毕的时候,会调用completed方法,失败会调用failed方法,这就是回调。详细接触过回调的朋友应该不难理解。
4 BIO、NIO、AIO的区别
- BIO是同步阻塞的IO,NIO是同步非阻塞IO,AIO异步非阻塞IO,这是最基本的区别。阻塞模式会导致其他线程被IO线程阻塞,必须等待IO线程执行完毕才能继续执行逻辑,非阻塞和异步并不等同,非阻塞模式下,一般会采用事件轮询的方式来执行IO,即IO多路复用,虽然仍然是同步的,但执行效率比传统的BIO要高很多,AIO则是异步IO,如果把IO工作当做一个任务的话,在当前线程中提交一个任务之后,不会有阻塞,会继续执行当前线程的后续逻辑,在任务完成之后,当前线程会收到通知,然后再决定如何处理,这种方式的IO,CPU效率是最高的,CPU几乎没有发生过停顿,而时一直至于忙状态,所以效率非常高,但编程难度会比较大。
- BIO面向的是流,无论是字符流还是字节流,通俗的讲,BIO在读写数据的时候会按照一个接一个的方式读写,而NIO和AIO(因为AIO实际上是NIO的扩充,所以从这个方面来看,可以把他们放在一块)读写数据的时候是按照一块一块的读取的,读取到的数据会缓存在内存中,然后在内存中对数据进行处理,这种方式的好处是减少了硬盘或者网络的读写次数,从而降低了由于硬盘或网络速度慢带来的效率影响。
- BIO的API虽然比较底层,但如果熟悉之后编写起来会比较容易,NIO或者AIO的API抽象层次高,一般来说应该更容易使用才是,但实际上却很难“正确”的编写,而且DEBUG的难度也较大,这也是为什么Netty等NIO框架受欢迎的原因之一。
以上就是我理解的BIO、NIO和AIO区别。
5 小结
本文简单粗略的讲了一下BIO、NIO、AIO的使用,并未涉及源码,也没有涉及太多的原理,如果读者希望了解更多关于三者的内容,建议参看一些书籍,例如老外写的《Java NIO》,该书全面系统的讲解了NIO的各种组件和细节,非常推荐。
