

Ansible基本架构
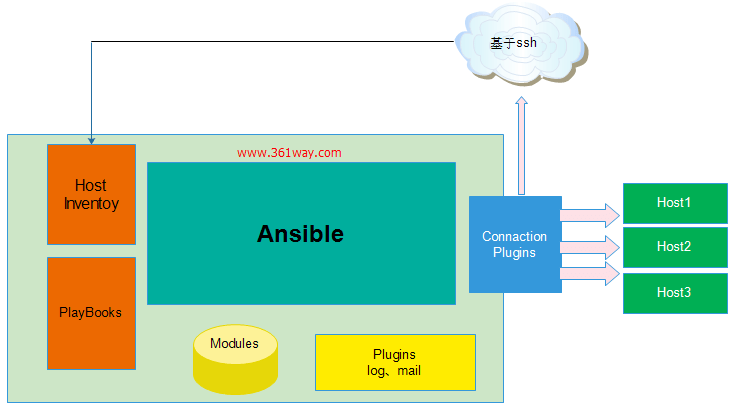
核心:ansible
核心模块(Core Modules):这些都是ansible自带的模块
扩展模块(Custom Modules):如果核心模块不足以完成某种功能,可以添加扩展模块
插件(Plugins):完成模块功能的补充
剧本(Playbooks):ansible的任务配置文件,将多个任务定义在剧本中,由ansible自动执行。
连接插件(Connetior Plugins):ansible基于连接插件连接到各个主机上,虽然ansible是使用ssh连接到各个主机的,但是它还支持其他的连接方法,所以需要有连接插件
主机群(Host Inventory):定义ansible管理的主机
ansible的工作原理

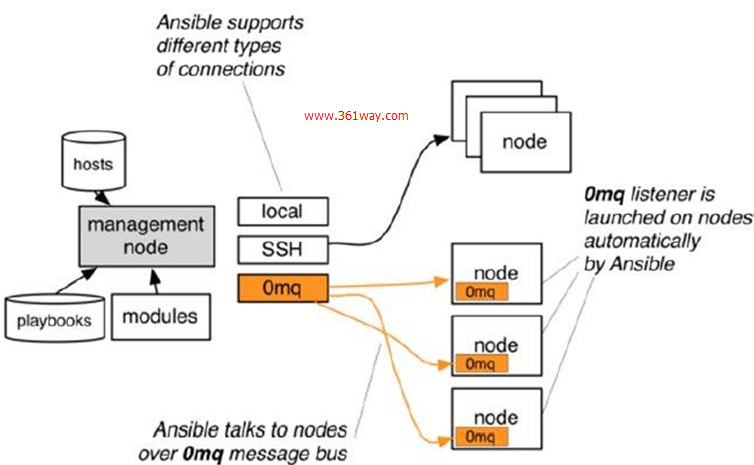
1.管理端支持local,ssh,zeromq三种方式连接被管理端,默认使用基于ssh的连接---这部分对应基本架构图中的连接模块;
2.可以按应用类型等方式进行Host Inventory(主机群)分类,管理节点通过各类模块实现相应的操作---单个模块,单条命令的批量执行,我们可以称之为ad-hoc;
3.管理节点可以通过playbooks实现多个task的集合实现一类功能,如web服务的安装部署,数据库服务器的批量备份等。playbooks我们可以简单的理解为,系统通过组合多条ad-hoc操作的配置文件。
ansible的安装和配置
ansible的安装来源于epel仓库,因此在安装前需确保安装了正确的epel源。
[root@localhost ~]# yum install -y epel-release
[root@localhost ~]# yum install -y ansible
ansible的配置文件
ansible的配置文件为/etc/ansible/ansible.cfg,包含着下面几个配置段,每个配置段下都有自己默认的配置,多数配置保持默认即可:
(1)[defaults]
    #inventory      = /etc/ansible/hosts  # 主机列表配置文件
    #library        = /usr/share/my_modules/ # 库文件存放目录
    #remote_tmp     = $HOME/.ansible/tmp  # 生成的临时py命令文件存放在远程主机的目录
    #local_tmp      = $HOME/.ansible/tmp # 本机的临时命令执行目录
    #forks          = 5   # 默认并发数
    #poll_interval  = 15   # 默认的线程池
    #sudo_user      = root  # 默认sudo 用户
    #ask_sudo_pass = True
    #ask_pass      = True
    #transport      = smart
    #remote_port    = 22
    #module_lang    = C
    #module_set_locale = False

    host_key_checking = False  ### 检查对应服务器的host_key

(2)[privilege_escalation]
(3)[paramiko_connection]
(4)[ssh_connection]
(5)[accelerate]
(6)[selinux]
(7)[colors]
ansible的主机清单
/etc/ansible/hosts文件为ansible用于定义管理主机的配置,其定义方式包括: 直接指明主机地址或主机名
node1
10.10.10.11
或者定义一个主机组,把主机地址或者主机名写进去,然后通过组名来调用主机组:
[webservers]
10.10.10.11
10.10.10.12
[dbservers]
db1
10.10.10.13
inventory 文件
Ansible 是通过 inventory 文件来管理资产的
静态 Inventory
主机清单文件,基于文本的方式来记录 inventory 配置信息即所有主机和组的信息的文件。 静态 Inventory 指的是在/etc/ansible/hosts文件中指定的主机和组,文件支持使用以下变量设置相关的远程主机信息:
ansible_ssh_host     #用于指定被管理的主机的真实IP和将要连接的远程主机名.与你想要设定的主机的别名不同的话,可通过此变量设置.
ansible_ssh_port     #用于指定连接到被管理主机的ssh端口号,默认是22,如果不是默认的端口号,通过此变量设置.
ansible_ssh_user     #ssh连接时默认使用的用户名
ansible_ssh_pass     #ssh连接时的密码,(这种方式并不安全,我们强烈建议使用 --ask-pass(交互密码)或 SSH 密钥)
ansible_sudo_pass     #使用sudo连接用户时的密码,(这种方式并不安全,我们强烈建议使用 --ask-sudo-pass)
ansible_sudo_exec     #如果sudo命令不在默认路径,需要指定sudo命令路径(适用于1.8及以上版本)
ansible_ssh_private_key_file     #秘钥文件路径,秘钥文件如果不想使用ssh-agent管理时可以使用此选项
ansible_shell_type     #目标系统的shell的类型,默认sh,可设置为 'csh' 或 'fish'.
ansible_connection     #SSH 连接的类型: local , ssh , paramiko,在 ansible 1.2 之前默认是 paramiko ,后来智能选择,优先使用基于 ControlPersist 的 ssh (支持的前提)
ansible_python_interpreter     #用来指定python解释器的路径,默认为/usr/bin/python 同样可以指定ruby 、perl 的路径
ansible_*_interpreter     #其他解释器路径,用法与ansible_python_interpreter类似,这里"*"可以是ruby或才perl等其他语言
动态 Inventory
动态 Inventory 指通过外部脚本获取主机列表,并按照 ansible 所要求的格式返回给 ansilbe 命令的。这部分一般会结合 CMDB 资管系统、云计算平台等获取主机信息。由于主机资源一般会动态的进行增减,而这些系统一般会智能更新。
1、首先你得会编程,而且新增和减少了主机,你的脚本还能用
2、如果你公司没这个资源管理系统 那这玩意 你还不如 手动去编辑那个hosts文件
综述:所以不是大神,使用静态inventory文件吧!
ansible的管理远程主机
默认情况下ansible使用ssh连接到远程主机上去进行管理,此时需要提供相应的ssh认证才能完成远程管理。
ansible可以通过以下两种方式完成ssh认证:
1、通过在主机清单中配置对应主机的ssh账号及密码来完成认证:
[root@Monitor ansible]# vim /etc/ansible/hosts
[webserver]
#192.168.180.4
192.168.180.5 ansible_ssh_port=10022 ansible_ssh_user=root ansible_ssh_pass='123456'
192.168.180.6 ansible_ssh_user=root ansible_ssh_pass='123456'
192.168.180.23 ansible_ssh_user=appuser ansible_ssh_pass='123456'
但是这种方式在管理大量的远程主机的配置会显得特别麻烦,而且容易泄露账号密码信息,因此通常只作为测试使用。在生产环境中,ansible_ssh_pass参数的password不能使用明文,需要加密,password的加密值需要使用双引号。
#echo "123"| openssl passwd -1 -stdin (生成一串加密的密码)
$1$rziVk1ca$Fd/c7hSMJNbfLTc4kmr9d0
然后填入hosts文件中即可
192.168.180.6 ansible_ssh_user=root ansible_ssh_pass="$1$rziVk1ca$Fd/c7hSMJNbfLTc4kmr9d0"
2、使用ssh的免密钥登录方式来远程管理主机。 首先需要在ansible主机上生成ssh的公钥和私钥文件:
[root@ansible ~]# ssh-keygen -t rsa -N ''
Generating public/private rsa key pair.
Enter file in which to save the key (/root/.ssh/id_rsa):
/root/.ssh/id_rsa already exists.
Overwrite (y/n)? y
Your identification has been saved in /root/.ssh/id_rsa.
Your public key has been saved in /root/.ssh/id_rsa.pub.
The key fingerprint is:
eb:74:58:83:93:11:3a:fa:9b:8f:3f:88:4a:94:16:a0 root@ansible
The key's randomart image is:
+--[ RSA 2048]----+
|.       .        |
|..     . .       |
|E .   o .        |
|   o . . +       |
|  + .   S o      |
| o   .   = .     |
|  .  ...+ .      |
| .  . .*..       |
|  ..  +o+.       |
+-----------------+
[root@ansible ~]# ll /root/.ssh/
总用量 12
-rw-------. 1 root root 1675 6月   4 17:44 id_rsa  #生成的私钥文件
-rw-r--r--. 1 root root  394 6月   4 17:44 id_rsa.pub  #生成的公钥文件
-rw-r--r--. 1 root root  348 6月   4 17:12 known_hosts
接着将生成的公钥文件送往远程主机:
[root@ansible ~]# ssh-copy-id -i ~/.ssh/id_rsa.pub root@192.168.0.83
/usr/bin/ssh-copy-id: INFO: attempting to log in with the new key(s), to filter out any that are already installed
/usr/bin/ssh-copy-id: INFO: 1 key(s) remain to be installed -- if you are prompted now it is to install the new keys
root@192.168.0.83's password:

Number of key(s) added: 1

Now try logging into the machine, with:   "ssh 'root@192.168.0.83'"
and check to make sure that only the key(s) you wanted were added.
[root@ansible ~]# ssh-copy-id -i ~/.ssh/id_rsa.pub root@192.168.0.84
/usr/bin/ssh-copy-id: INFO: attempting to log in with the new key(s), to filter out any that are already installed
/usr/bin/ssh-copy-id: INFO: 1 key(s) remain to be installed -- if you are prompted now it is to install the new keys
root@192.168.0.84's password:

Number of key(s) added: 1

Now try logging into the machine, with:   "ssh 'root@192.168.0.84'"
and check to make sure that only the key(s) you wanted were added.
关于ssh免密登录的问题可以参考https://blog.csdn.net/jeikerxiao/article/details/84105529
分发之后默认会在远程主机的/root/.ssh下生成authorized_keys这个文件。随后即可使用ansible对远程主机进行管理操作:
[root@ansible ~]# ansible webservers -m ping
192.168.0.83 | SUCCESS => {
    "changed": false,
    "ping": "pong"
}
192.168.0.84 | SUCCESS => {
    "changed": false,
    "ping": "pong"
}
