什么是Weex-gcances?
GCanvas是一个跨平台的画布解决方案,它实现了图形2d和WebGL API。GCanvas使其用户能够直接访问OpenGL ES API。GCanvas旨在解决JavaScript开发人员的画布的性能问题和兼容性问题。它也是跨平台原生框架的功能扩展,如weex、react-native,这些没有自己的画布元素的开发体系。
目前,GCanvas正在与weex和react-native合作。
注意: weex-gcanvas目前为止不适用于0.18以上版本(2019.5.10)
如何集成Weex-gvanves?
安装JS库
GCanvas使用npm安装一个它的js的库:
npm install weex-gcanvas
或者也可以在GCanvas的项目中找到它们: js仓库地址
获得上下文(context)
要使用gcanvas,你需要在执行任何其他操作之前获取上下文(2d或3d )。平台之间存在一些差异,但在获取上下文后,代码应该相同。
原生端集成
Android :
-
环境配置
确保完成以下配置:
JDK > = 1.7,并配置环境变量
安装Android SDK并配置环境变量
Android SDK版本23(build.gradle中的compileSdkVersion)
SDK构建工具版本21.1.2(的的build.gradle中的buildToolsVersion)
Android支持库> = 17(适用于Android支持库)
Weex SDK> = 0.16.X
-
集成步骤
a、创建一个安卓的项目。根据你的习惯,没有什么要说明的。
b、通过添加以下依赖项来更新的的build.gradle:
    compile "com.taobao.gcanvas:corelib:1.0.4"
    compile "com.taobao.gcanvas.adapters:img_fresco:1.0.1"
    compile "com.taobao.gcanvas.bridges:spec:1.0.1"
    compile "com.taobao.gcanvas.bridges:weex:1.0.2"
c、如果您使用的fresco作为图像加载器,请添加fresco适配器依赖项:
complie "com.taobao.gcanvas.adapters:img_fresco:1.0.1"或者,如果您选择picasso作为图像加载器,请添加picasso适配器依赖项:
complie "com.taobao.gcanvas.adapters:img_picasso:1.0.1"d、将GCanvas模块和组件注册到Weex应用程序。
   WXSDKEngine.registerModule(“gcanvas”,GCanvasWeexModule.class);
   WXSDKEngine.registerComponent(“gcanvas”,WXGCanvasWeexComponent.class);
e、修改AndroidManifest.xml,添加以下行以获取OpenGL ES功能。
<uses-feature android:glEsVersion =“0x00020000”/>
iOS:
-
环境配置
确保已安装iOS开发环境和CocoaPods。
确保您已集成WeexSDK
确保您已将的NodeJS 4.0+中的weex-toolkit安装完毕
-
集成步骤
a、使用的CocoaPods安装组件
pod'WeexGcanvas'
pod'WeexPluginLoader'
b、WeexPluginLoader会动态注册Weex Module和ComponentGCanvas,所以我们不需要手动注册
集成过程中可能会遇到一些问题,可以参考原生中的报错信息进行修改。
怎么使用Weex-gcanves?
首先说明一下,官网上提供的weex端的写法不是完全正确的,我们安装完最新的weex-GCanvas,它所提供的一些接口已经与官方文档有所出入。因此,我们需要结合原生端对应的component和module的代码和weex-GCanvas提供的js插件进行使用,适当时可以按照自己的需求对js端源码进行一定的修改,如果熟悉node.js的语法,并且对原生代码有一定的了解,也可以自己封装一下自己的GCanvas插件。
目前安装最新的版本按照以下写法是没有问题的。
<template>
<div ref="test" style="background-color: #1ba1e2">
<gcanvas @touchstart="touchstart" @touchmove="touchmove" @touchend="touchend" ref="gcanvess"
style="width: 650px;height: 1000px;background-color: yellow;margin-left: 50px"></gcanvas>
</div>
</template>
<style type="text/css" scoped>
</style>
<script>
var libGCanvas=require("weex-gcanvas")
var modal=weex.requireModule("modal");
module.exports = {
data:{
startX:0,
startY:0,
currentX:0,
currentY:0,
context:{},
canvasObj:{}
},
methods:{
touchstart(event){
this.startX=event.changedTouches[0].pageX;
this.startY=event.changedTouches[0].pageY;
this.context.strokeStyle = "#17acf6" ; //设置线的颜色状态
this.context.lineWidth = 10; //设置线宽状态
},
touchmove(event){
this.currentX=event.changedTouches[0].pageX;
this.currentY=event.changedTouches[0].pageY;
//进行绘制
this.context.moveTo(this.startX,this.startY);
this.context.lineTo(this.currentX,this.currentY);
this.context.stroke();
this.startX=event.changedTouches[0].pageX;
this.startY=event.changedTouches[0].pageY;
},
touchend(event){
},
},
created: function () {
var self=this;
//以下是核心代代码,需在合适的时机调用,我这里在自己定义的界面加载完成的全局事件中调用了
/*获取元素引用*/
var ref=self.$refs.gcanvess;
/*通过元素引用获取canvas对象*/
self.canvasObj =libGCanvas.start(ref);
/*获取绘图所需的上下文,目前不支持3d*/
self.context = self.canvasObj.getContext('2d');
/*设置字体大小*/
self.context.font='34px';
/*在指定位置绘制文字*/
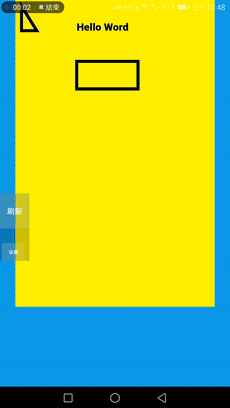
self.context.fillText('Hello Word',200,100);
/*指定绘制图形的线的宽度*/
self.context.lineWidth=10;
/*在指定位置绘制矩形*/
self.context.strokeRect(200,200,200,90);
/*绘制三角形*/
self.context.beginPath();
self.context.moveTo(20,20);
self.context.lineTo(20,100);
self.context.lineTo(70,100);
self.context.closePath();
self.context.stroke();
}
}
</ script >
绘制结果: