

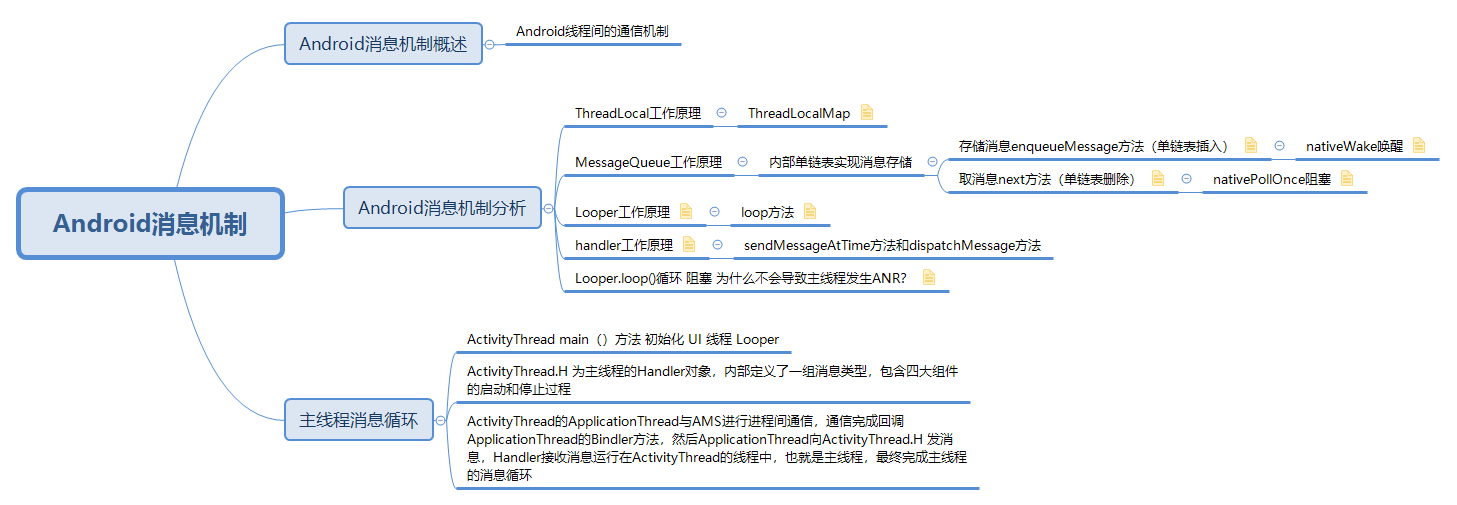
谈起Android 消息机制,相信各位会首先想到Handler,Handler是Android 提供给给开发者实现线程间通信的工具。Android的消息机制包含四大内容,ThreadLocal保证每个线程都有自己的消息轮询器Looper,MessageQueue用来存放消息,Looper负责取消息,最后Handler负责消息的发送与消息的处理。
- 先来一张脑图回顾整体知识
ThreadLocal
- 我们知道,每个Handler 都有其所在线程对应的Looper,查看Handler构造方法
/**Handler 构造方法*/
public Handler(Callback callback, boolean async) {
      .......
        mLooper = Looper.myLooper();
        if (mLooper == null) {
            throw new RuntimeException(
                "Can't create handler inside thread " + Thread.currentThread()
                        + " that has not called Looper.prepare()");
        }
      ......
    }
/** Looper 中 sThreadLocal 声明*/
static final ThreadLocal<Looper> sThreadLocal = new ThreadLocal<Looper>();
/** Looper 中 myLooper方法*/
public static @Nullable Looper myLooper() {
        return sThreadLocal.get();
    }
/** Looper 中 prepare方法*/
private static void prepare(boolean quitAllowed) {
       ....
        sThreadLocal.set(new Looper(quitAllowed));
    }
- 通过以上源码,可以知道,Looper.myLooper()获取不到Looper则会抛异常,所以创建Handler之前都要调用一下Looper.prepare方法,也就是在该方法中新建了Looper并存放到ThreadLocal中。这里就会产生一个疑问,ThreadLocal能保证每个线程有自己对应的Looper?没错,它就真能保证,接下来就看看什么是ThreadLocal。
什么是ThreadLocal
-
ThreadLocal是一个线程内部数据存储类,但存放数据并不是它实现的,它只是帮助类,真正存放数据的是ThreadLocalMap。
-
先看一个简单的例子
public class Test {

    static ThreadLocal<String> name =new ThreadLocal<>();

    public static void main(String[] args) {

        new Thread(new Runnable() {
            @Override
            public void run() {
                name.set("xiaoming");
                System.out.println("---------------"+name.get()+"-------------------");
            }
        }).start();

        new Thread(new Runnable() {
            @Override
            public void run() {

     System.out.println("---------------"+name.get()+"-------------------");
            }
        }).start();
    }
}

### 运行结果
> Task :Test.main()
---------------xiaoming-------------------
---------------null-------------------
- 上面例子当中,两个线程访问的都是一个ThreadLocal对象,但是第二个线程没有设置初始值,则获取为null,也就可以说明每个线程操作的是自己对应的一份数据,虽然都是从ThreadLocal的get方法获取,但是get方法则是获取对应线程的ThreadLocal.ThreadLocalMap来获取值。
ThreadLocal分析
ThreadLocal的set方法
/**
     * Sets the current thread's copy of this thread-local variable
     * to the specified value.  Most subclasses will have no need to
     * override this method, relying solely on the {@link #initialValue}
     * method to set the values of thread-locals.
     *
     * @param value the value to be stored in the current thread's copy of
     *        this thread-local.
     */
    public void set(T value) {
        Thread t = Thread.currentThread();
        ThreadLocalMap map = getMap(t);
        if (map != null)
            map.set(this, value);
        else
            createMap(t, value);
    }

     /**
     * Get the map associated with a ThreadLocal. Overridden in
     * InheritableThreadLocal.
     *
     * @param  t the current thread
     * @return the map
     */
    ThreadLocalMap getMap(Thread t) {
        return t.threadLocals;
    }

    /**
     * Create the map associated with a ThreadLocal. Overridden in
     * InheritableThreadLocal.
     *
     * @param t the current thread
     * @param firstValue value for the initial entry of the map
     */
    void createMap(Thread t, T firstValue) {
        t.threadLocals = new ThreadLocalMap(this, firstValue);
    }
- 通过以上代码,代码层面首先获取当前线程,然后获取 ThreadLocalMap,如果存在,则获取当前线程的ThreadLocalMap;如果不存在则根据当前线程和当前需要存入的数据新建ThreadLocalMap来存放线程内部数据,也就是当前ThreadLocal作为key,而存储的值最为value来存储。
ThreadLocal的get方法
 /**
     * Returns the value in the current thread's copy of this
     * thread-local variable.  If the variable has no value for the
     * current thread, it is first initialized to the value returned
     * by an invocation of the {@link #initialValue} method.
     *
     * @return the current thread's value of this thread-local
     */
    public T get() {
        Thread t = Thread.currentThread();
        ThreadLocalMap map = getMap(t);
        if (map != null) {
            ThreadLocalMap.Entry e = map.getEntry(this);
            if (e != null) {
                @SuppressWarnings("unchecked")
                T result = (T)e.value;
                return result;
            }
        }
        return setInitialValue();
    }

    /**
     * Variant of set() to establish initialValue. Used instead
     * of set() in case user has overridden the set() method.
     *
     * @return the initial value
     */
    private T setInitialValue() {
        T value = initialValue();
        Thread t = Thread.currentThread();
        ThreadLocalMap map = getMap(t);
        if (map != null)
            map.set(this, value);
        else
            createMap(t, value);
        return value;
    }

    protected T initialValue() {
        return null;
    }
- 从以上代码,ThreadLocal的get方法根据当前线程来获取对应的ThreadLocalMap,如果获取不到,说明还没有创建,由createMap方法来创建ThreadLocalMap,initialValue方法则设置了value的初始值为null,也呼应前面的例子打印结果。
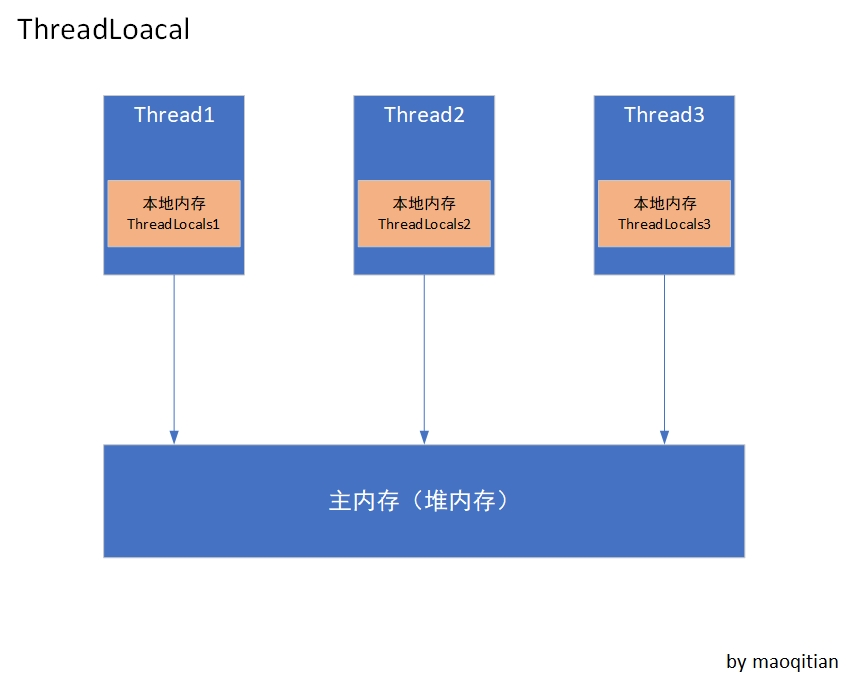
ThreadLocal原理
-
Thread类有一个类型为ThreadLocal.ThreadLocalMap的成员变量threadLocals,如果你了解Java内存结构,threadLocals的值都是new出来的话,很容易明白threadLocals是存放在堆内存中的,而每一个线程只是在堆内存中存放了自己的threadLocals,也就是每个线程本地内存(逻辑上),物理上本地内存只是在堆内存中占有一块区域,每个线程只玩自己对应的threadLocals,各个线程的对应ThreadLocal互不干扰,这也就实现了各个线程间数据的隔离,也就是每个Handler所在线程都有其对应的Looper对象。
-
Thread类中 threadLocals 声明
/* ThreadLocal values pertaining to this thread. This map is maintained
     * by the ThreadLocal class. */
    ThreadLocal.ThreadLocalMap threadLocals = null;
-
简单来说就是数据复制很多份存放在堆内存,各个线程获取自己对应的那份数据。
-
这个可以举一个共享汽车的例子,假如刚开始共享汽车试运行,大街上只有一辆,大家都抢着去开,这就会出现问题,而后来发展普及,每辆车复制迅速生产,满大街都是共享汽车,每个人都可以通过专属二维码开对应共享汽车,这里开车人就对应线程,大家互不干扰,共享汽车就对应ThreadLocals,而大街就相当于堆内存。
ThreadLocalMap
- ThreadLocal中真正存放数据的是ThreadLocalMap,他的内部实现是一个环形数组来存放数据,具体分析可以查看以下文章,这里就不在进行展开了。
- ThreadLocal源码解读
MessageQueue消息队列工作原理
- MessageQueue字面意思是消息队列,而他的实现则不是消息队列,它的内部实现数据结构为单链表,单链表在频繁插入删除方面是有优势的,链表的插入删除操作对应消息的存储和取出,方法分别对应enqueueMessage和next方法。
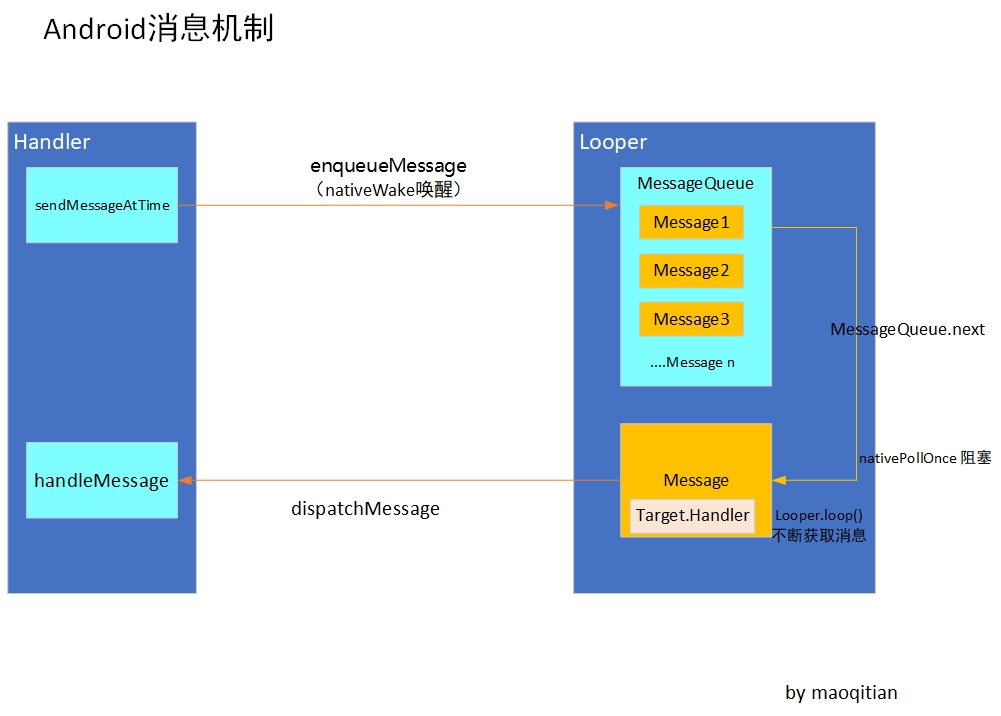
存放消息enqueueMessage
- 查看Handler的源码,很容易发现发消息的方法最终都是调用了sendMessageAtTime方法,uptimeMillis为系统开机时间加上设置消息的延时时间,Handler的enqueueMessage方法将Message的Target设为当前Handler,存放消息则调用了MessageQueue的enqueueMessage方法。
/** Handler的sendMessageAtTime方法*/
public boolean sendMessageAtTime(Message msg, long uptimeMillis) {
        MessageQueue queue = mQueue;
        ......
        return enqueueMessage(queue, msg, uptimeMillis);
    }
/** Handler的enqueueMessage方法*/
private boolean enqueueMessage(MessageQueue queue, Message msg, long uptimeMillis) {
       msg.target = this;
       .......
        return queue.enqueueMessage(msg, uptimeMillis);
    }
- 接着存放消息看到MessageQueue的enqueueMessage方法
/** MessageQueue的enqueueMessage方法*/
boolean enqueueMessage(Message msg, long when) {
        ......
        synchronized (this) {
            if (mQuitting) {
                IllegalStateException e = new IllegalStateException(
                        msg.target + " sending message to a Handler on a dead thread");
                Log.w(TAG, e.getMessage(), e);
                msg.recycle();
                return false;
            }

            msg.markInUse();
            msg.when = when;
            Message p = mMessages;
            boolean needWake;
            if (p == null || when == 0 || when < p.when) {
                // New head, wake up the event queue if blocked.
                msg.next = p;
                mMessages = msg;
                needWake = mBlocked;
            } else {
                // Inserted within the middle of the queue.  Usually we don't have to wake
                // up the event queue unless there is a barrier at the head of the queue
                // and the message is the earliest asynchronous message in the queue.
                needWake = mBlocked && p.target == null && msg.isAsynchronous();
                Message prev;
                for (;;) {
                    prev = p;
                    p = p.next;
                    if (p == null || when < p.when) {
                        break;
                    }
                    if (needWake && p.isAsynchronous()) {
                        needWake = false;
                    }
                }
                msg.next = p; // invariant: p == prev.next
                prev.next = msg;
            }

            // We can assume mPtr != 0 because mQuitting is false.
            if (needWake) {
                nativeWake(mPtr);
            }
        }
        return true;
    }
- 通过以上源码,enqueueMessage逻辑主要为单链表的插入操作,如果链表中没有消息,或者当前存入消息延时为零,又或者当前存入消息延时小于链表P节点的延时,则将当前消息插入到链表的头节点,否则遍历链表中的每个节点,找延时小于当前消息的节点存入消息。话句话说,单链表里面消息是按Message的触发时间顺序排序的。
取消息 next
- 接着看MessageQueue取消息的方法next
Message next() {
        ......
        //省略部分代码
        int pendingIdleHandlerCount = -1; // -1 only during first iteration
        int nextPollTimeoutMillis = 0;
        for (;;) {
            if (nextPollTimeoutMillis != 0) {
                Binder.flushPendingCommands();
            }

            nativePollOnce(ptr, nextPollTimeoutMillis);

            synchronized (this) {
                // Try to retrieve the next message.  Return if found.
                final long now = SystemClock.uptimeMillis();
                Message prevMsg = null;
                Message msg = mMessages;
                if (msg != null && msg.target == null) {
                    // Stalled by a barrier.  Find the next asynchronous message in the queue.
                    do {
                        prevMsg = msg;
                        msg = msg.next;
                    } while (msg != null && !msg.isAsynchronous());
                }
                if (msg != null) {
                    if (now < msg.when) {
                        // Next message is not ready.  Set a timeout to wake up when it is ready.
                        nextPollTimeoutMillis = (int) Math.min(msg.when - now, Integer.MAX_VALUE);
                    } else {
                        // Got a message.
                        mBlocked = false;
                        if (prevMsg != null) {
                            prevMsg.next = msg.next;
                        } else {
                            mMessages = msg.next;
                        }
                        msg.next = null;
                        if (DEBUG) Log.v(TAG, "Returning message: " + msg);
                        msg.markInUse();
                        return msg;
                    }
                } else {
                    // No more messages.
                    nextPollTimeoutMillis = -1;
                }

            //省略部分代码
            }
            // While calling an idle handler, a new message could have been delivered
            // so go back and look again for a pending message without waiting.
            nextPollTimeoutMillis = 0;
        }
    }
- 通过以上代码,nextPollTimeoutMillis字段是关键,它代表next在获取下一个消息时需要等待的时长,他的取值有三种情况:
- 当nextPollTimeoutMillis小于零,表示消息队列中无消息,会一直等待下去
- 当nextPollTimeoutMillis等于零,则不会等待,直接出了取出消息
- 当nextPollTimeoutMillis大于零,则等待nextPollTimeoutMillis值的时间,单位是毫秒
- 通过对nextPollTimeoutMillis的了解,next方法是如何等待呢?换个词可能更准确,应该叫阻塞,这里注意到next方法循环中的nativePollOnce(ptr, nextPollTimeoutMillis)方法,它的实现在native层,可以实现阻塞的功能,具体原理是使用epoll,它是一种linux的I/O事件通知机制,I/O输入输出对象使用的是管道(pipe),具体native层分析请看Gityuan大佬的分析文章Android消息机制2-Handler(Native层)
private native static void nativeWake(long ptr);

private native void nativePollOnce(long ptr, int timeoutMillis); /*non-static for callbacks*/
-
到此,next方法的逻辑就很清晰了,开始nextPollTimeoutMillis的值是等于零的,获取消息过程就不会受到nativePollOnce方法的阻塞,然后判断取出的消息是否延时,有延时则计算nextPollTimeoutMillis进入下一循环进入nativePollOnce方法阻塞,否则返回取出的消息,有阻塞肯定就有唤醒,这个唤醒的方法就是nativeWake(long ptr)方法,它的实现也在native层,它的调用在我们前面分析enqueueMessage方法逻辑有出现,当有消息进入消息队列,如果当前线程正在被阻塞,调用nativeWake方法,nativePollOnce就会立即返回,取消阻塞,这样循环取到没有延时的消息,则直接返回消息;如果没有消息,nextPollTimeoutMillis等于 -1,继续阻塞状态。
-
经过前面的分析,消息插入链表是sendMessageAtTime方法触发的,而接下来就会有一个疑问,那又是谁调用 next() 方法取消息呢?没错,就是接下来要了解的Looper
Looper 工作原理
- Looper在Android消息机制中是消息轮询器的作用,他会不断到MessageQueue中去取消息,取消息根据前面next 方法分析,如果阻塞,则说明没有消息
- 先看Looper源码注释中有一段示例代码
/* This is a typical example of the implementation of a Looper thread,
  * using the separation of {@link #prepare} and {@link #loop} to create an
  * initial Handler to communicate with the Looper. */

    class LooperThread extends Thread {
       public Handler mHandler;

        public void run() {
           Looper.prepare();

            mHandler = new Handler() {
                public void handleMessage(Message msg) {
                    // process incoming messages here
                }
           };

            Looper.loop();
        }
     }
- 由example代码所示,使用 Handler 之前调用了Looper.prepare(),如下代码所示,就是在ThreadLocal中存放当前线程的Looper对象,在Looper构造方法中创建了MessageQueue
 public static void prepare() {
        prepare(true);
    }

 private static void prepare(boolean quitAllowed) {
        if (sThreadLocal.get() != null) {
            throw new RuntimeException("Only one Looper may be created per thread");
        }
        sThreadLocal.set(new Looper(quitAllowed));
    }

 private Looper(boolean quitAllowed) {
        mQueue = new MessageQueue(quitAllowed);
        mThread = Thread.currentThread();
    }
- 接着创建完Handler之后,又调用Looper.loop()方法,如下
 /**
     * Run the message queue in this thread. Be sure to call
     * {@link #quit()} to end the loop.
     */
    public static void loop() {
        final Looper me = myLooper();
        if (me == null) {
            throw new RuntimeException("No Looper; Looper.prepare() wasn't called on this thread.");
        }
        final MessageQueue queue = me.mQueue;

        //省略部分代码.....

        for (;;) {
            Message msg = queue.next(); // might block

            //省略部分代码.....

            try {
                msg.target.dispatchMessage(msg);
                dispatchEnd = needEndTime ? SystemClock.uptimeMillis() : 0;
            } finally {
               //省略部分代码。。。。
            }

            //省略部分代码。。。。
        }
    }
- 首先看到第一行myLooper(),前面在分析ThreadLocal已经了解过,myLooper就是获取ThreadLocal获取我们存储的Looper对象,如果获取不到就会报异常,提示我们我们没有调用Looper.prepare(),这也就是子线程使用Handler必须调用Looper.prepare()的原因。是不是有恍然大悟的感觉。然后就是就是根据构造方法创建的MessageQueue来获取消息queue.next(),该方法经过前面分析在没有消息或者消息延时时间还没到是阻塞的;获取到消息后,根据msg.target.dispatchMessage(msg)调用的便是Handler的dispatchMessage方法(前文分析中msg.target的值为当前Handler)。
主线程Looper.prepare()
- 经过前面的分析,你也许会有一个疑问,在Android使用Handler怎么不用调用Looper.prepare()方法?
- 解下来我们看到Android的主线程ActivityThread的main方法,严格来说,ActivityThread并不是线程类,但是Android主线程肯定是存在的,只是主线程在ActivityThread的 main 方法中创建,并在该方法调用了Looper.prepareMainLooper() 方法和Looper.loop() 方法,所以我们在Android 主线程就可以直接使用Handler
/**ActivityThread 的 main 方法*/
public static void main(String[] args) {
        //省略部分代码....
        Looper.prepareMainLooper();
        //省略部分代码....
        ActivityThread thread = new ActivityThread();
        thread.attach(false, startSeq);
        //省略部分代码....
        // End of event ActivityThreadMain.
        Trace.traceEnd(Trace.TRACE_TAG_ACTIVITY_MANAGER);
        Looper.loop();

    }
    //省略部分代码....
}
/**Looper 的 prepareMainLooper 方法*/
    public static void prepareMainLooper() {
        prepare(false);
        synchronized (Looper.class) {
            if (sMainLooper != null) {
                throw new IllegalStateException("The main Looper has already been prepared.");
            }
            sMainLooper = myLooper();
        }
    }
Handler 工作原理
- 前面已经了解过Handler发送消息的sendMessageAtTime方法,接着我们来看看Handler的dispatchMessage方法
/**
     * Handle system messages here.
     */
    public void dispatchMessage(Message msg) {
        if (msg.callback != null) {
            handleCallback(msg);
        } else {
            if (mCallback != null) {
                if (mCallback.handleMessage(msg)) {
                    return;
                }
            }
            handleMessage(msg);
        }
    }

 private static void handleCallback(Message message) {
        message.callback.run();
    }
- 这里逻辑就很简单了,如果发送的消息设置了Runnable类型的callback对象,则调用他的run方法,没有则判断是否设置了Handler.Callback,设置则调用Handler.Callback接口的handleMessage方法,否则调用Handler空实现方法handleMessage。
Looper.loop()死循环,为什么不会导致主线程发生ANR?
- 根据前面的分析,Looper.loop()的方法获取不到数据,则会阻塞,这个阻塞和卡死是两回事,阻塞是Linux pipe/epoll机制文件读写的等待,等待及休眠,则会释放占用CPU的资源,而我们开发遇见的卡死一般都是在主线程做了太多耗时操作,Activity 5s,BroadcastReceiver 10s和Service 20s未响应引起的ANR,具体背后分析还请看Gityuan的知乎解答Android中为什么主线程不会因为Looper.loop()里的死循环卡死?
参考
书籍
- 《Android开发艺术探索》
