

在分析Retrofit源代码之前,我们首先要弄明白动态代理这个技术的来龙去脉。注意,从代理-到动态代理是整个Retrofit中最重要也是最难理解的部分,很多更加高级的开源框架例如服务端常用的Spring,甚至现在流行的AOP思想都是基于此。能否吃透整个代理(从静态到动态)模式是我们理解其他高级框架的重要基础。
假设我们现在要完成一个功能:阿里的程序员写代码。 就这么一个简单的功能,我们显然可以想到这么写:
//定义一个程序员接口
public interface Programmer {
    void code(String company);
}
public class ProgrammerImpl implements Programmer {
    @Override
    public void code(String company) {
        System.out.println("code:"+company);
    }
}
根据职责单一原则(juejin.cn/post/684490…),我们希望一个类仅仅完成一个单一的功能,而不是一个类完成所有功能。同时这种设计还有个问题就是比如今后我们要写一个腾讯或者百度的程序写代码的功能。到这里难道是加一堆if else么 判断company的名字么?这样的代码耦合性就太强了,而且也不好维护,尤其是腾讯或者百度的code的流程跟你阿里的流程也未必一样啊。于是我们可以这么写(静态代理):
public class AliProgramProxy implements Programmer {

    Programmer programmer;

    public  AliProgramProxy() {        programmer = new ProgrammerImpl();
    }

    @Override
    public void code(String language) {
        before();
        programmer.code(language);
        after();
    }

    void before() {
        System.out.println("概要设计");
    }

    void after() {
        System.out.println("测试");

    }
}
好,你看这样写 脉络就很清晰了,程序员就关注我们的code过程就好,code之前的概要设计阶段和测试 都抽出来 作为proxy的2个方法。其他友商的你就可以定义他们的Proxy了。这样职责划分就清楚了。但是显然这样改也不是特别完美,比如这个Proxy如果定义的太多,以后一点Progra接口发生变更,对应的我们所有Proxy都要修改?那不是累死人了?何况我们在写Proxy的时候本身就要写很多重复代码。静态代理的局限就在于此。所以在这基础之上就诞生了动态代理。
public class DynamicProxy implements InvocationHandler {

    public DynamicProxy(Object target) {
        this.target = target;
    }

    Object target;


    @Override
    public Object invoke(Object proxy, Method method, Object[] args) throws Throwable {
        before();
        Object result=method.invoke(target,args);
        after();
        return result;
    }

    void before() {
        System.out.println("概要设计");
    }

    void after() {
        System.out.println("测试");

    }
}
public class TestMain {
public static void main(String[] args)
{
Programmer programmer=new ProgrammerImpl();
DynamicProxy dynamicProxy=new DynamicProxy(programmer);
Programmer programmerProxy= (Programmer) Proxy.newProxyInstance(programmer.getClass().getClassLoader(),programmer.getClass().getInterfaces(),dynamicProxy);
programmerProxy.code("Ali");
}
}一个简单的动态代理就完成了,当然我们可以把代码写的再简化一点。
public class DynamicProxy implements InvocationHandler {

    public DynamicProxy(Object target) {
        this.target = target;
    }

    Object target;


    @Override
    public Object invoke(Object proxy, Method method, Object[] args) throws Throwable {
        before();
        Object result = method.invoke(target, args);
        after();
        return result;
    }

    void before() {
        System.out.println("概要设计");
    }

    void after() {
        System.out.println("测试");

    }

    public <T> T getProxy() {
        return (T) Proxy.newProxyInstance(target.getClass().getClassLoader(), target.getClass().getInterfaces(), this);
    }
}
public class TestMain {
public static void main(String[] args) {
DynamicProxy dynamicProxy = new DynamicProxy(new ProgrammerImpl());
Programmer programmerProxy = dynamicProxy.getProxy();
programmerProxy.code("vivo");
}
}
所谓代理模式,就是在原有的逻辑调用中,再额外使用一个代理类的方法,使这个逻辑的变化过程尽量全部写在代理类中,这样我们就可以在不改动原有被代理逻辑的情况下,增加新的逻辑。这种无限制更改Proxy 却不会干扰原有被代理类的方法,统称为代理模式。我们将上面的概念结合上面的例子抽象出来就是: 定义一个接口 interface A,然后定义他的实现类 class A im interface A,同时再定义一个proxy类 class ProxyA im interface A。可想而知,这种静态代理的方案在复杂度上升的时候就会生成无数的Proxy类,维护非常困难,这就是动态代理存在的意义,所谓动态代理就是不写代理class类,也就是说我们不要写实际代理class类的.java文件,而是直接得到代理class的类对象(直接在jvm中生成这个代理类的的class对象,这个和你本地写.java文件然后生成.class最后运行时把这个class对象加载到jvm中 本质上是一样的),然后用这个class的类对象来创建代理的实例对象.
这样写的好处就在于,即使今后我们的Programmer 接口发生重大变更,我们都不需要更改我们的代理类了,我们只要改一下我们的实现类就可以。到这里就暂时总结一下:
有了这些概念基础,我们再反过头来看我们的动态代理代码 就很容易理解了。
上面的代码实例中 programmerProxy明显就是一个 基于代理class类 生成的 代理类对象了。我们可以把这个类的名称打印出来
System.out.println("实际的className:"+programmerProxy.getClass().getName());

一目了然了,programmerProxy 这个对象 所映射出来的 class对象就是这个¥Proxy0 ,显然这个类我们没有定义过,自然就是jvm运行时帮我们动态生成的了.那我们就来看看是怎么动态生成的这个代理类的.
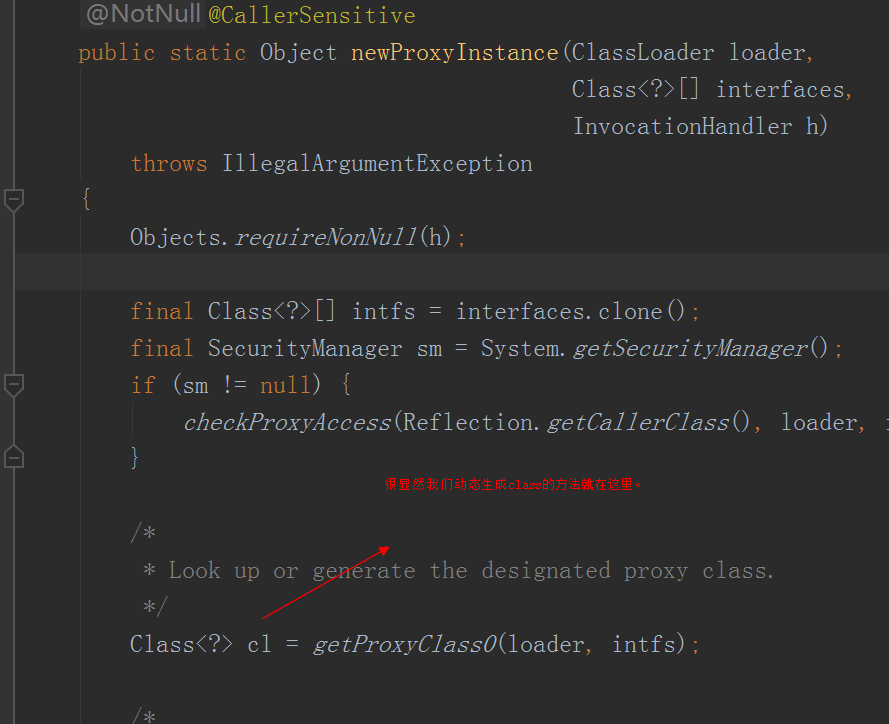
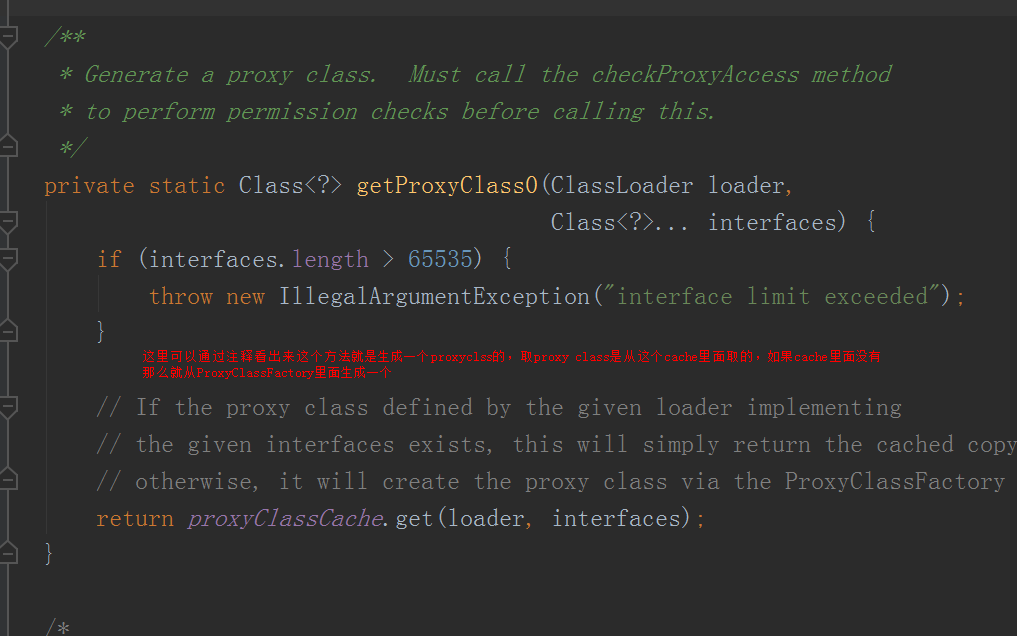
按图索骥我们马上找到这个工程类的源码,其实就是一个私有内部静态类
private static final class ProxyClassFactory
    implements BiFunction<ClassLoader, Class<?>[], Class<?>>
{
    // prefix for all proxy class names
    private static final String proxyClassNamePrefix = "$Proxy";

    // next number to use for generation of unique proxy class names
    private static final AtomicLong nextUniqueNumber = new AtomicLong();

    @Override
    public Class<?> apply(ClassLoader loader, Class<?>[] interfaces) {

        Map<Class<?>, Boolean> interfaceSet = new IdentityHashMap<>(interfaces.length);
        for (Class<?> intf : interfaces) {
            /*
             * Verify that the class loader resolves the name of this
             * interface to the same Class object.
             */
            Class<?> interfaceClass = null;
            try {
                interfaceClass = Class.forName(intf.getName(), false, loader);
            } catch (ClassNotFoundException e) {
            }
            if (interfaceClass != intf) {
                throw new IllegalArgumentException(
                    intf + " is not visible from class loader");
            }
            /*
             * Verify that the Class object actually represents an
             * interface.
             */
            if (!interfaceClass.isInterface()) {
                throw new IllegalArgumentException(
                    interfaceClass.getName() + " is not an interface");
            }
            /*
             * Verify that this interface is not a duplicate.
             */
            if (interfaceSet.put(interfaceClass, Boolean.TRUE) != null) {
                throw new IllegalArgumentException(
                    "repeated interface: " + interfaceClass.getName());
            }
        }

        String proxyPkg = null;     // package to define proxy class in
        int accessFlags = Modifier.PUBLIC | Modifier.FINAL;

        /*
         * Record the package of a non-public proxy interface so that the
         * proxy class will be defined in the same package.  Verify that
         * all non-public proxy interfaces are in the same package.
         */
        for (Class<?> intf : interfaces) {
            int flags = intf.getModifiers();
            if (!Modifier.isPublic(flags)) {
                accessFlags = Modifier.FINAL;
                String name = intf.getName();
                int n = name.lastIndexOf('.');
                String pkg = ((n == -1) ? "" : name.substring(0, n + 1));
                if (proxyPkg == null) {
                    proxyPkg = pkg;
                } else if (!pkg.equals(proxyPkg)) {
                    throw new IllegalArgumentException(
                        "non-public interfaces from different packages");
                }
            }
        }

        if (proxyPkg == null) {
            // if no non-public proxy interfaces, use com.sun.proxy package
            proxyPkg = ReflectUtil.PROXY_PACKAGE + ".";
        }

        /*
         * Choose a name for the proxy class to generate.
         */
        long num = nextUniqueNumber.getAndIncrement();
        String proxyName = proxyPkg + proxyClassNamePrefix + num;

        /*
         * 实际上我们重点关注这个方法就可以,这个方法就是实际生成我们class对象的方法 因为这个生成的class对象在内存里,我们是无法反编译看这个class内容的。
			所以我们可以想个办法 把这个动态生成的类,输出到我们的文件系统中 这样就可以反编译看这个class的内容了
         */
        byte[] proxyClassFile = ProxyGenerator.generateProxyClass(
            proxyName, interfaces, accessFlags);
        try {
            return defineClass0(loader, proxyName,
                                proxyClassFile, 0, proxyClassFile.length);
        } catch (ClassFormatError e) {
            /*
             * A ClassFormatError here means that (barring bugs in the
             * proxy class generation code) there was some other
             * invalid aspect of the arguments supplied to the proxy
             * class creation (such as virtual machine limitations
             * exceeded).
             */
            throw new IllegalArgumentException(e.toString());
        }
    }
}
所以,我们就来试试看看把这个动态生成的proxy 输出到本地文件以后反编译是什么样
public static void writeClassToDisk() {
    byte[] classFile = ProxyGenerator.generateProxyClass("$Proxy0", new Class[]{Programmer.class});
    FileOutputStream fos = null;
    try {
        fos = new FileOutputStream("D:\\$Proxy0.class");
        fos.write(classFile);
        fos.flush();
    } catch (FileNotFoundException e) {
        e.printStackTrace();
    } catch (IOException e) {
        e.printStackTrace();
    } finally {
        if (fos != null) {
            try {
                fos.close();
            } catch (IOException e) {
                e.printStackTrace();
            }
        }
    }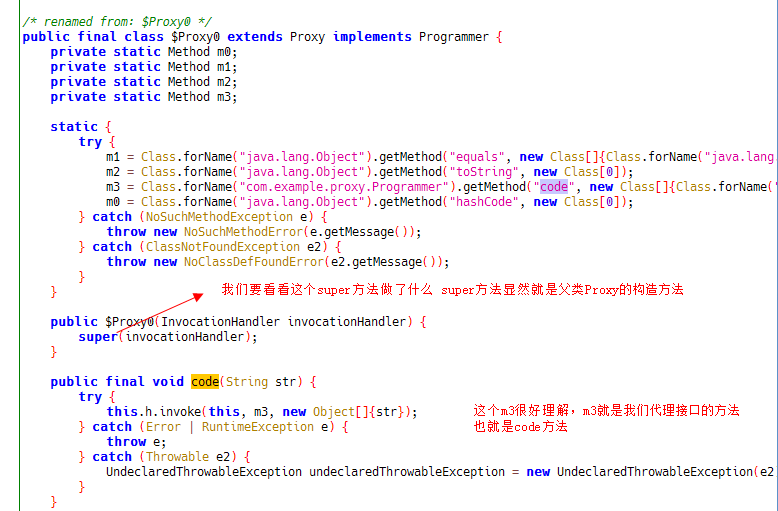
}/* renamed from: $Proxy0 */
public final class $Proxy0 extends Proxy implements Programmer {
private static Method m0;
private static Method m1;
private static Method m2;
private static Method m3;
static {
try {
m1 = Class.forName("java.lang.Object").getMethod("equals", new Class[]{Class.forName("java.lang.Object")});
m2 = Class.forName("java.lang.Object").getMethod("toString", new Class[0]);
m3 = Class.forName("com.example.proxy.Programmer").getMethod("code", new Class[]{Class.forName("java.lang.String")});
m0 = Class.forName("java.lang.Object").getMethod("hashCode", new Class[0]);
} catch (NoSuchMethodException e) {
throw new NoSuchMethodError(e.getMessage());
} catch (ClassNotFoundException e2) {
throw new NoClassDefFoundError(e2.getMessage());
}
}
public $Proxy0(InvocationHandler invocationHandler) {
super(invocationHandler);
}
public final void code(String str) {
try {
this.h.invoke(this, m3, new Object[]{str});
} catch (Error | RuntimeException e) {
throw e;
} catch (Throwable e2) {
UndeclaredThrowableException undeclaredThrowableException = new UndeclaredThrowableException(e2);
}
}
public final boolean equals(Object obj) {
try {
return ((Boolean) this.h.invoke(this, m1, new Object[]{obj})).booleanValue();
} catch (Error | RuntimeException e) {
throw e;
} catch (Throwable e2) {
UndeclaredThrowableException undeclaredThrowableException = new UndeclaredThrowableException(e2);
}
}
public final int hashCode() {
try {
return ((Integer) this.h.invoke(this, m0, null)).intValue();
} catch (Error | RuntimeException e) {
throw e;
} catch (Throwable e2) {
UndeclaredThrowableException undeclaredThrowableException = new UndeclaredThrowableException(e2);
}
}
public final String toString() {
try {
return (String) this.h.invoke(this, m2, null);
} catch (Error | RuntimeException e) {
throw e;
} catch (Throwable e2) {
UndeclaredThrowableException undeclaredThrowableException = new UndeclaredThrowableException(e2);
}
}
}现在我们拿到了最终动态生成的class对象。现在就可以反过来看看到底动态代理是怎么执行的了,回到我们之前的代码,这次我们加上注释
public static void main(String[] args) {
    DynamicProxy dynamicProxy = new DynamicProxy(new ProgrammerImpl());
    //这里的programmerProxy 实际上就是 com.sun.proxy.$Proxy0 这个类的对象
    Programmer programmerProxy = dynamicProxy.getProxy();
    //输出结果:实际的className:com.sun.proxy.$Proxy0
    System.out.println("实际的className:"+programmerProxy.getClass().getName());
    //这里执行的就是 com.sun.proxy.$Proxy0 这个类的对象 的code方法
    //而我们看最终日志 这里的code方法执行的就是 DynamicProxy中的invoke方法
    //所以问题就来了 明明我们调用的是 :com.sun.proxy.$Proxy0的code方法
    //最终为什么会走到DynamicProxy中的invoke方法呢
    programmerProxy.code("vivo");
}
现在我们拿到了最终动态生成的class对象。现在就可以反过来看看到底动态代理是怎么执行的了,回到我们之前的代码,这次我们加上注释
看下proxy类的构造方法
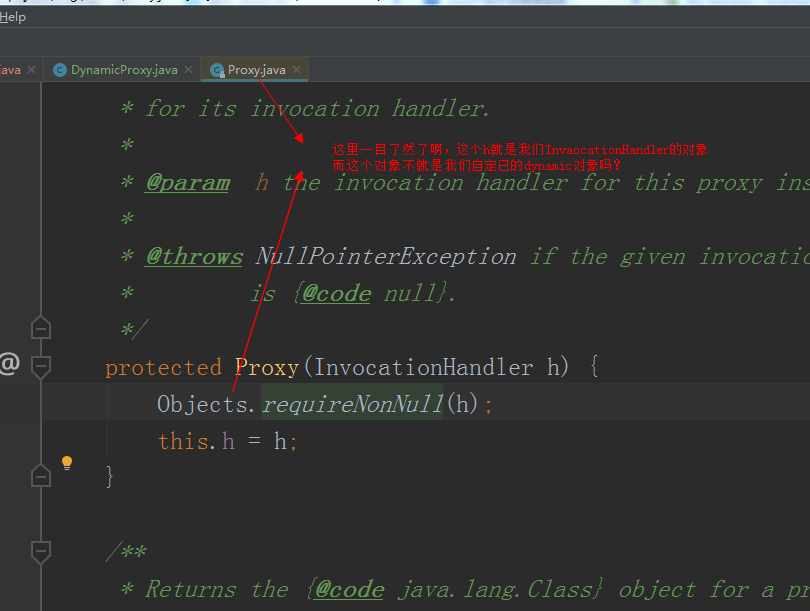
所以最终整个动态代理的脉络就清楚了:
动态代理的原理就是,我们自定义一个实现了InvocationHandler接口的类,在代码运行时,通过Proxy.newProxyInstance动态的生成了我们需要的class对象,整个class对象是在代码运行期生成在jvm中的,所以可以利用这个动态生成的class对象 直接帮助我们生成实际的对象,当调用这个实际的对象的方法时(例子中interface programmer的 code方法) ,本质上就是调用 我们 InvocationHandler 对象(例子中的dynamicproxy对象)的 invoke方法。
到此,我们就把动态代理的前因后果叙述清楚了,基于此分析。我们最终来看看Retrofit到底利用动态代理做了哪些事情。
前面我们说到,Retrofit本身不产生请求,而是使用OkHttp来产生请求。所以我们稍微回顾一下如何使用OkHttp来发送http请求并接收返回值呢?我随便从网上找一段okHttp的教程就弄个最简单的吧。
String url = "http://wwww.baidu.com";
OkHttpClient okHttpClient = new OkHttpClient();
final Request request = new Request.Builder()
        .url(url)
        .get()//默认就是GET请求,可以不写
        .build();
Call call = okHttpClient.newCall(request);
call.enqueue(new Callback() {
    @Override
    public void onFailure(Call call, IOException e) {
        Log.d(TAG, "onFailure: ");
    }

    @Override
    public void onResponse(Call call, Response response) throws IOException {
        Log.d(TAG, "onResponse: " + response.body().string());
    }
});
代码很多,所以这里我们可以猜到所谓Retrofit 就是利用了动态代理的特性来完成这些拼装OkHttp请求的操作,那么下面我们就从动态代理的角度来分析一下Retrofit是如何工作的。首先我们还是写个简单的例子 稍微加点注释:
你看使用Okhttp发送一个最简单的请求,就得写这么多东西,拼装url啊,设置get还是post请求,这是最简单的。如果稍微复杂一点,比如拼装带键值对参数的get请求,post body json请求,返回值要转成json bean的请求,可想而知这段代码会写的非常复杂,可读性和维护性也不好,关键重复代码很多,所以这里我们可以猜到所谓Retrofit 就是利用了动态代理的特性来完成这些拼装OkHttp请求的操作,那么下面我们就从动态代理的角度来分析一下Retrofit是如何工作的。首先我们还是写个简单的例子 稍微加点注释:
//构造一个Retrofit对象 我们重点关注这个对象里面的 Map<Method, ServiceMethod<?>> serviceMethodCache = new ConcurrentHashMap<>() 这部分代码
Retrofit retrofit = new Retrofit.Builder().baseUrl(BASEURL).addConverterFactory(GsonConverterFactory.create()).build();
//这个方法其实内部就是return了一个 由动态代理构造出来的class对象 所产生的一个实体对象了
KeyValueRequest getRequest = retrofit.create(KeyValueRequest.class);
//这里我们调用这个getRequest的list方法其实 本质上就是调用我们InvocationHandler对象的invoke方法
Call<Person> call = getRequest.list(1);
//这个应该熟悉OkHttp的都应该知道
call.enqueue(new Callback<Person>() {
    @Override
    public void onResponse(Call<Person> call, Response<Person> response) {
        Person person = response.body();
        System.out.println("onResponse string==" + person.toString());

    }

    @Override
    public void onFailure(Call<Person> call, Throwable t) {
        System.out.println("onFailure");

    }
});public <T> T create(final Class<T> service) {
Utils.validateServiceInterface(service);
if (validateEagerly) {
eagerlyValidateMethods(service);
}
return (T) Proxy.newProxyInstance(service.getClassLoader(), new Class<?>[] { service },
new InvocationHandler() {
private final Platform platform = Platform.get();
private final Object[] emptyArgs = new Object[0];
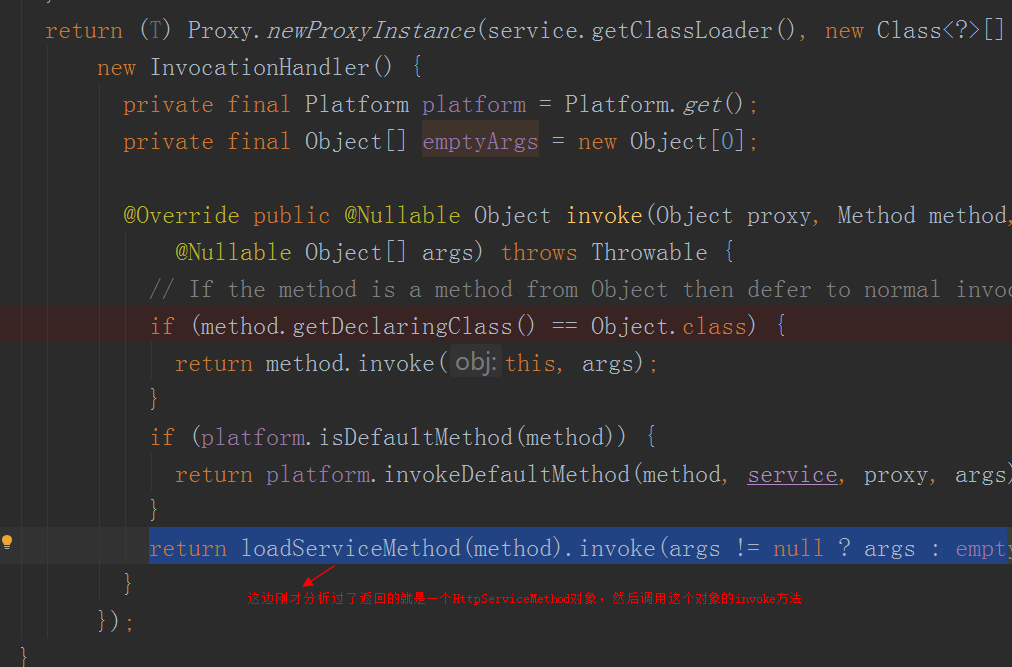
@Override public @Nullable Object invoke(Object proxy, Method method,
@Nullable Object[] args) throws Throwable {
// If the method is a method from Object then defer to normal invocation.
if (method.getDeclaringClass() == Object.class) {
return method.invoke(this, args);
}
if (platform.isDefaultMethod(method)) {
return platform.invokeDefaultMethod(method, service, proxy, args);
}
//有了前面的动态代理的原理分析做基础,我们就可以得知 getRequest.list(1) 这个方法最终是会走到这个invoke方法里面来的 所以重点我们就看看这个invoke方法里做了些什么 凭什么这个方法最终能构造出OkHttp所需要的call
return loadServiceMethod(method).invoke(args != null ? args : emptyArgs);
}
});
}
ServiceMethod<?> loadServiceMethod(Method method) {
ServiceMethod<?> result = serviceMethodCache.get(method);
if (result != null) return result;
synchronized (serviceMethodCache) {
result = serviceMethodCache.get(method);
if (result == null) {
//继续跟 就跟到这里了,每次invoke的时候 都会从缓存里取这个ServiceMethod 如果取不到就生成,所以我们继续跟 看看是如何生成的
result = ServiceMethod.parseAnnotations(this, method);
serviceMethodCache.put(method, result);
}
}
return result;
}
abstract class ServiceMethod<T> {
static <T> ServiceMethod<T> parseAnnotations(Retrofit retrofit, Method method) {
RequestFactory requestFactory = RequestFactory.parseAnnotations(retrofit, method);
Type returnType = method.getGenericReturnType();
if (Utils.hasUnresolvableType(returnType)) {
throw methodError(method,
"Method return type must not include a type variable or wildcard: %s", returnType);
}
if (returnType == void.class) {
throw methodError(method, "Service methods cannot return void.");
}
//最终是在这里生成的
return HttpServiceMethod.parseAnnotations(retrofit, method, requestFactory);
}这个RequestFactory其实没啥好说的,我们debug看一下 解析你的注解以后生成一些请求接口的必要参数
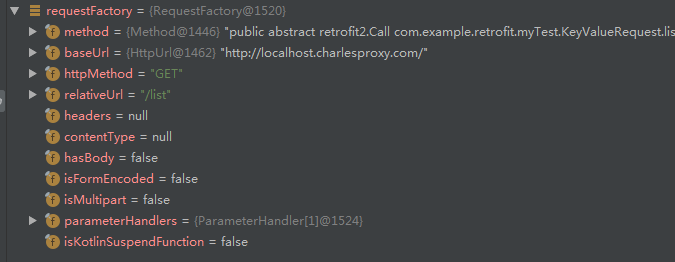
最终生成的实际上是这个东西 HttpServiceMethod
static <ResponseT, ReturnT> HttpServiceMethod<ResponseT, ReturnT> parseAnnotations(
    Retrofit retrofit, Method method, RequestFactory requestFactory) {
  boolean isKotlinSuspendFunction = requestFactory.isKotlinSuspendFunction;
  boolean continuationWantsResponse = false;
  boolean continuationBodyNullable = false;

  Annotation[] annotations = method.getAnnotations();
  Type adapterType;
  if (isKotlinSuspendFunction) {
    Type[] parameterTypes = method.getGenericParameterTypes();
    Type responseType = Utils.getParameterLowerBound(0,
        (ParameterizedType) parameterTypes[parameterTypes.length - 1]);
    if (getRawType(responseType) == Response.class && responseType instanceof ParameterizedType) {
      // Unwrap the actual body type from Response<T>.
      responseType = Utils.getParameterUpperBound(0, (ParameterizedType) responseType);
      continuationWantsResponse = true;
    } else {
      // TODO figure out if type is nullable or not
      // Metadata metadata = method.getDeclaringClass().getAnnotation(Metadata.class)
      // Find the entry for method
      // Determine if return type is nullable or not
    }

    adapterType = new Utils.ParameterizedTypeImpl(null, Call.class, responseType);
    annotations = SkipCallbackExecutorImpl.ensurePresent(annotations);
  } else {
    adapterType = method.getGenericReturnType();
  }

  CallAdapter<ResponseT, ReturnT> callAdapter =
      createCallAdapter(retrofit, method, adapterType, annotations);
  Type responseType = callAdapter.responseType();
  if (responseType == okhttp3.Response.class) {
    throw methodError(method, "'"
        + getRawType(responseType).getName()
        + "' is not a valid response body type. Did you mean ResponseBody?");
  }
  if (responseType == Response.class) {
    throw methodError(method, "Response must include generic type (e.g., Response<String>)");
  }
  // TODO support Unit for Kotlin?
  if (requestFactory.httpMethod.equals("HEAD") && !Void.class.equals(responseType)) {
    throw methodError(method, "HEAD method must use Void as response type.");
  }
  //这个应该很熟悉啊,就是我们返回值的转换器
  Converter<ResponseBody, ResponseT> responseConverter =
      createResponseConverter(retrofit, method, responseType);

  //这边不用多说了吧,看到这个应该很多事情都明白了
  okhttp3.Call.Factory callFactory = retrofit.callFactory;
  if (!isKotlinSuspendFunction) {
	//最终返回的就是这个东西了
    return new CallAdapted<>(requestFactory, callFactory, responseConverter, callAdapter);
  } else if (continuationWantsResponse) {
    //noinspection unchecked Kotlin compiler guarantees ReturnT to be Object.
    return (HttpServiceMethod<ResponseT, ReturnT>) new SuspendForResponse<>(requestFactory,
        callFactory, responseConverter, (CallAdapter<ResponseT, Call<ResponseT>>) callAdapter);
  } else {
    //noinspection unchecked Kotlin compiler guarantees ReturnT to be Object.
    return (HttpServiceMethod<ResponseT, ReturnT>) new SuspendForBody<>(requestFactory,
        callFactory, responseConverter, (CallAdapter<ResponseT, Call<ResponseT>>) callAdapter,
        continuationBodyNullable);
  }
}
然后再回过头去看
到此为止,我们就做一个总结:所谓Retrofit 就是利用了注解和动态代理两大方法 ,注解用来标识一个个不同的Http请求的模型(所谓模型就是一个http请求所必要的参数比如url,是get还是post还是其他方法,参数样式如何,等),然后利用动态代理将注解出来的值一个个组成我们需要的OKhttpCall,等于替代了原生OkHttp拼装url,参数以及返回值解析等大量的重复代码工作,并且可读性更好。
