

前言
正如Nextjs 官网上所说,这个框架是“The React Framework for SEO-Friendly Sites”。React 作为前端最流行的框架之一,虽然并不是为服务端渲染(SSR)而设计的,但基于Nextjs 就能轻松实现SSR。这对于一些需求是良好的SEO的网站来说,是个不错的选择。本文记录了基于Nextjs 的网站构建与发布过程,包括如何在Nextjs 中进行webpack 配置优化。
上手成本
安装方便,只需输入:
npm install --save react react-dom next
对于熟悉React 的同学来说,上手Nextjs 的成本不高。组件的语法并无差异,需要注意的地方如下:
两个固定的文件夹名称
/pages:该目录下存放页面,与路由相关联。/public:该目录下存放静态文件,如图片等。
此处有一坑:public 文件夹从 next 9.1 版本开始支持。我之前没注意版本,按照文档将图片放在public 文件夹下,却一直报错说找不到图片,折腾了半天一看next版本9.0。。><
路由
路由与/pages文件夹下的路径对应
pages/index.js→/pages/blog/index.js→/blog
动态路由:
/pages下的文件可以[...]命名,表示动态路由。
比如
/info/1,/info/2,都会匹配到/pages/info/[id].js。在页面中可以用this.props.router.query.id来获取url 中的参数。
样式
Nextjs 推荐使用CSS-in-Js,语法如下:
<style jsx>{`
    .para-wrapper {
        width: 800px;
        height: 600px;
    }
`}</style>
需要注意的是,写在父组件内的样式,不对子组件生效。
还可以用以下插件支持在文件中引入.scss, .sass, .less, or .styl文件:
以插件@zeit/next-sass为例,使用时需要在项目中新增next.config.js文件,内容如下:
const withSass = require('@zeit/next-sass');
module.exports = withSass({
  /* config options here */
})
next.config.js
项目写好后,可以用插件@next/bundle-analyzer分析一下打包体积。
//next.config.js
const withBundleAnalyzer = require('@next/bundle-analyzer')({
    enabled: process.env.ANALYZE === 'true'
});

module.exports = withBundleAnalyzer({
  /* config options here */
})
这里如果需要同时使用多个插件(如
withSass,withBundleAnalyzer),推荐使用next-compose-plugins,这样看起来条理更清楚。
//next.config.js
const withSass = require('@zeit/next-sass');
const withBundleAnalyzer = require('@next/bundle-analyzer')({
    enabled: process.env.ANALYZE === 'true'
});
const withPlugins = require('next-compose-plugins');

module.exports = withPlugins([withSass, withBundleAnalyzer], {
    /* config options here */
}
打包优化
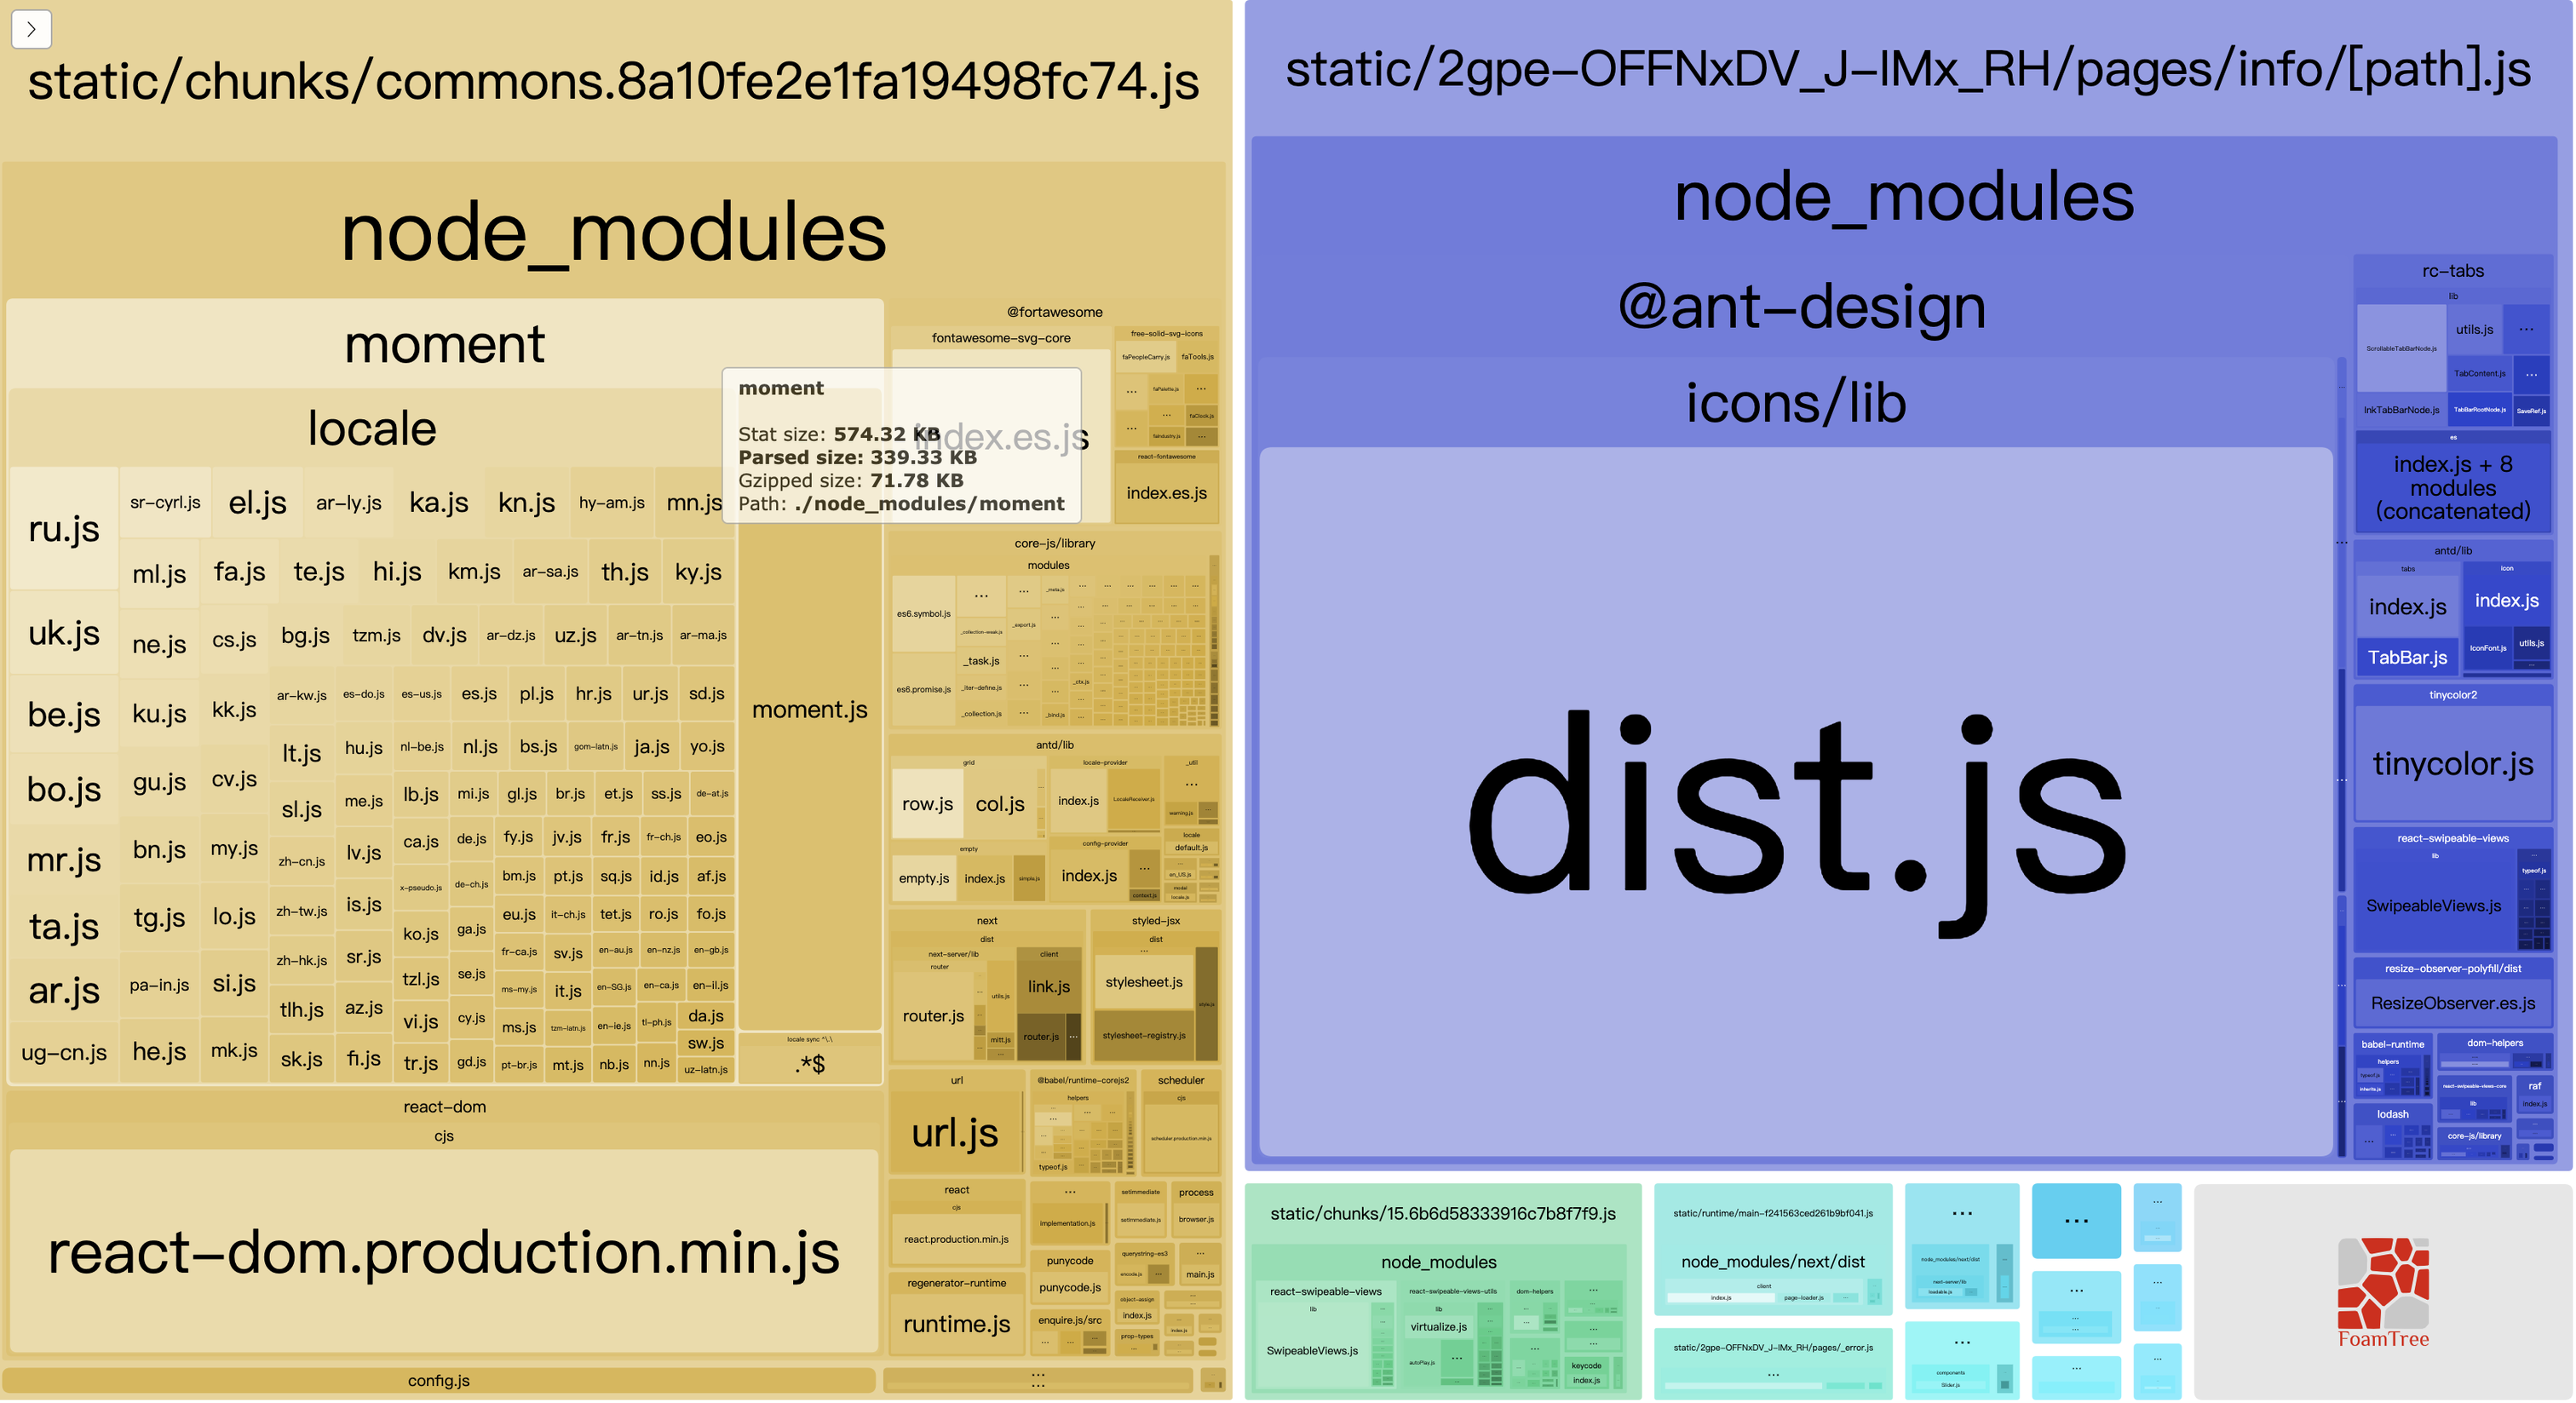
在控制台输入npm run analyze就可以看到打包体积。
拆分chunk
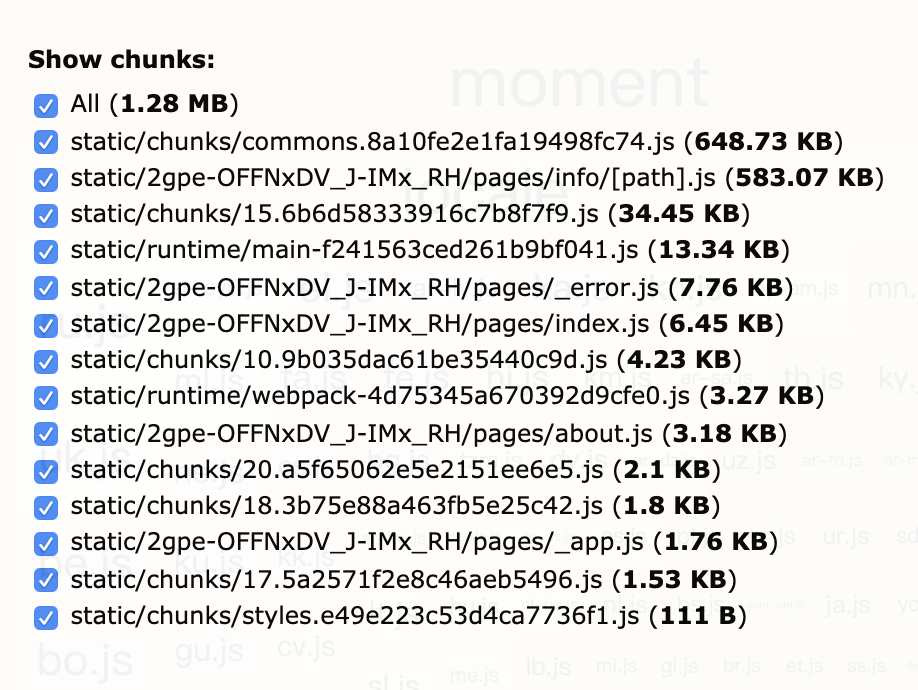
其中pages/info/[path].js的体积很大,因为里面包含了ant-design/icons。虽然已经使用了官网推荐的按需加载,但看来并没有生效。查了一下发现是在引入ant-design 3.x版本后(全量引入@ant-design/icons图标文件),导致打包生成的主文件较大的问题。
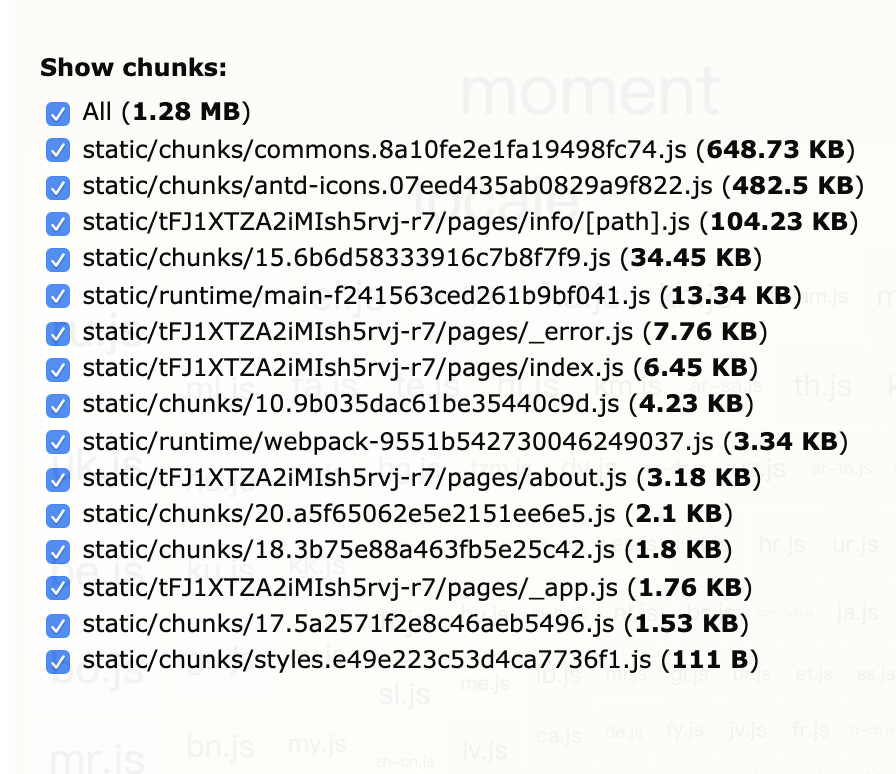
使用webpack-ant-icon-loader插件可将@antd-design/icons/lib/dist的图标文件拆成独立的chunk,从而进行体积优化。
//next.config.js
config.module.rules.push(
    {
        loader: 'webpack-ant-icon-loader',
        enforce: 'pre',
        include: [require.resolve('@ant-design/icons/lib/dist')]
    }
);
可以看到提取出ant-design/icons后,pages/info/[path].js的体积降到了100kb。
[image:C5F95E43-11A8-46F9-9791-9DE5AF04EAA3-60380-0000A9DE9CC4902F/091BFACB-0EBC-4493-AD0E-11158D9B4A7A.png]
过滤不需要的语言包
接下来处理老生常谈的moment,需要这么写:
//next.config.js
config.plugins.push(new webpack.IgnorePlugin(/^\.\/locale$/, /moment$/));
处理完后可以发现,moment 由原来的339 KB降为52 KB。
[image:20EA821E-5106-4C37-ADC3-C8599273BC19-60380-0000AF5E5FDAC71F/A0A49D7D-9AA4-4A36-9B0F-69DE2617CEF3.png]

避免多次打包
为了避免同一文件被多次打包,可以这么写:
//next.config.js
config.optimization.splitChunks.cacheGroups.commons.minChunks = 2;
运行一下,果然报错了:
TypeError: Cannot read property 'commons' of undefined
这是因为这行代码会在服务端和客户端分别执行两遍,在服务端执行时就会报错。因此可以通过webpack提供的isServer参数来判断是否执行:
if (!isServer) {
    config.optimization.splitChunks.cacheGroups.commons.minChunks = 2;
}
最后完整的next.config.js如下:
//next.config.js
const withSass = require('@zeit/next-sass');
const withBundleAnalyzer = require('@next/bundle-analyzer')({
    enabled: process.env.ANALYZE === 'true'
});
const withCss = require('@zeit/next-css');
const withPlugins = require('next-compose-plugins');
const withTM = require('next-transpile-modules');

module.exports = withPlugins([withSass, withCss, withTM, withBundleAnalyzer], {
    transpileModules: ['antd'],
    webpack: (config, { webpack, isServer, dev }) => {
        config.module.rules.push(
            {
                test: /\.(png|svg|jpg|gif)$/,
                use: ['file-loader']
            },
            {
                loader: 'webpack-ant-icon-loader',
                enforce: 'pre',
                include: [require.resolve('@ant-design/icons/lib/dist')]
            }
        );

        config.plugins.push(new webpack.IgnorePlugin(/^\.\/locale$/, /moment$/));

        if (!isServer && !dev) {
            config.optimization.splitChunks.cacheGroups.commons.minChunks = 2;
        }
        return config;
    }
});
发布
最后可以方便地通过 Zeit now 一键部署。输入一行代码即可:
now

//production
//now --prod

