

前言
我们通过和数据库的交互获取数据,但是某些数据加载会严重影响性能,因为查询数据库是一个比较耗时的事情。我们能不能提高查询数据的效率?
这个时候我们就需要使用 redis了。(当然提升查询效率不只有redis)
如果图片链接失效可以直接在github上看,而且更新更及时,也更加有条理。在项目模块有相关文章github.com/leosanqing/…
目前已经有将近300个star
安装和配置
下载
到官网下载redis redis.io/download
然后通过filezilla上传至相应的虚拟机 我上传至/opt文件夹下
安装
- 使用 解压缩命令解压文件
tar -zxvf <压缩包名> - 进入文件夹后 会发现有一个 Makefile文件,使用
make && make install - 安装的时候可能报错,缺少gcc依赖。使用
yum install gcc-c++安装一下就行
配置
-
进入redis目录下,打开
redis.conf文件vim redis.conf -
找到如下参数,并修改
# The working directory.
#
# The DB will be written inside this directory, with the filename specified
# above using the 'dbfilename' configuration directive.
#
# The Append Only File will also be created inside this directory.
#
# Note that you must specify a directory here, not a file name.
#工作目录,持久化 aof rdb都会存放在这个目录下,如果修改了 需要创建相应的目录
dir /opt/redis5/working

# IF YOU ARE SURE YOU WANT YOUR INSTANCE TO LISTEN TO ALL THE INTERFACES
# JUST COMMENT THE FOLLOWING LINE.
# ~~~~~~~~~~~~~~~~~~~~~~~~~~~~~~~~~~~~~~~~~~~~~~~~~~~~~~~~~~~~~~~~~~~~~~~~
# 将127.0.0.1 改成 0.0.0.0 所有ip都能访问
bind 0.0.0.0

# 保护模式关闭
protected-mode no

# By default Redis does not run as a daemon. Use 'yes' if you need it.
# Note that Redis will write a pid file in /var/run/redis.pid when daemonized.
# 是否后台运行,设置成yes
daemonize yes

# 还有其他一下参数,比如 密码什么的,因为是在虚拟机上运行,所以不需要设置
启动
- 将redis目录下的 /utils/ 的
redis_init_script文件复制到/etc/init.d/下 。cp redis_init_script /etc/init.d/ - 进入目录
cd /etc/init.d,修改相应文件vim redis_init_script将其配置文件路径改成 我们的配置文件存放的路径CONF="/opt/redis5/redis.conf" - 赋予权限
chmod 777 redis_init_script。 - 启动
./redis_init_script start
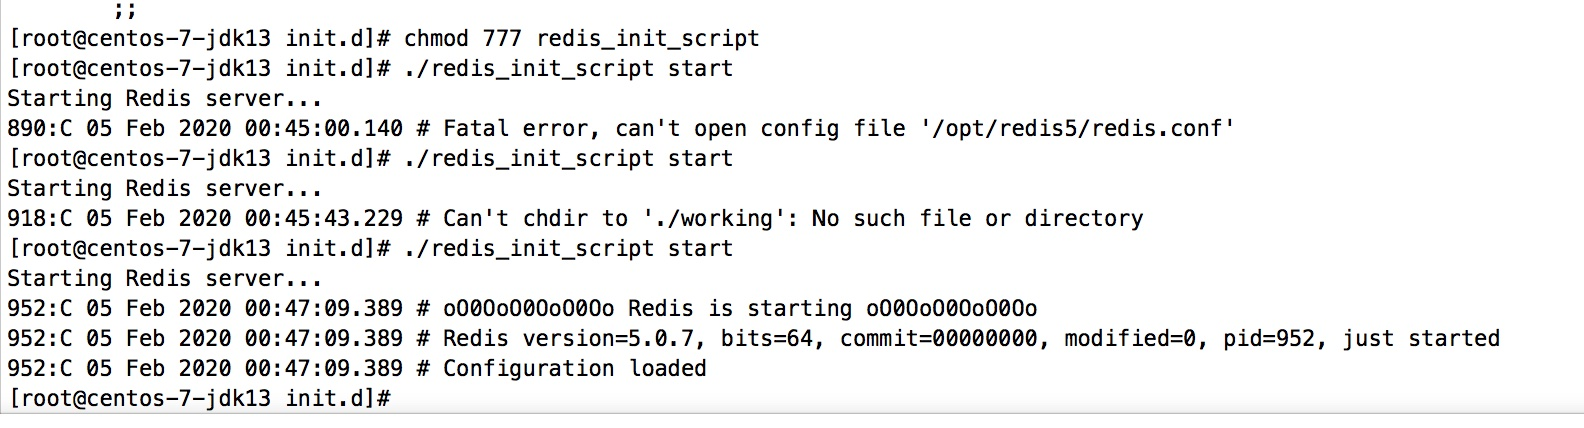
查看是否启动成功
查看进程号 ps -ef|grep redis

设置自启动
-
vim /etc/init.d/redis_init_script添加如下内容#chkconfig: 22345 10 90 #description: Start and Stop redis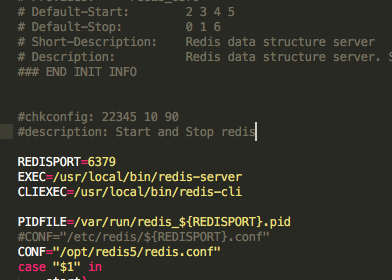
验证
重启虚拟机 reboot。再查看进程号是否存在啊
