

风格化 + PBR
PBR 追求 物理正确,风格化 则天马行空,两个本来不搭边的东西结合在一起,也可以实现出相当有趣的效果。
下图是我的新欢,异界锁链 的女主小姐姐:
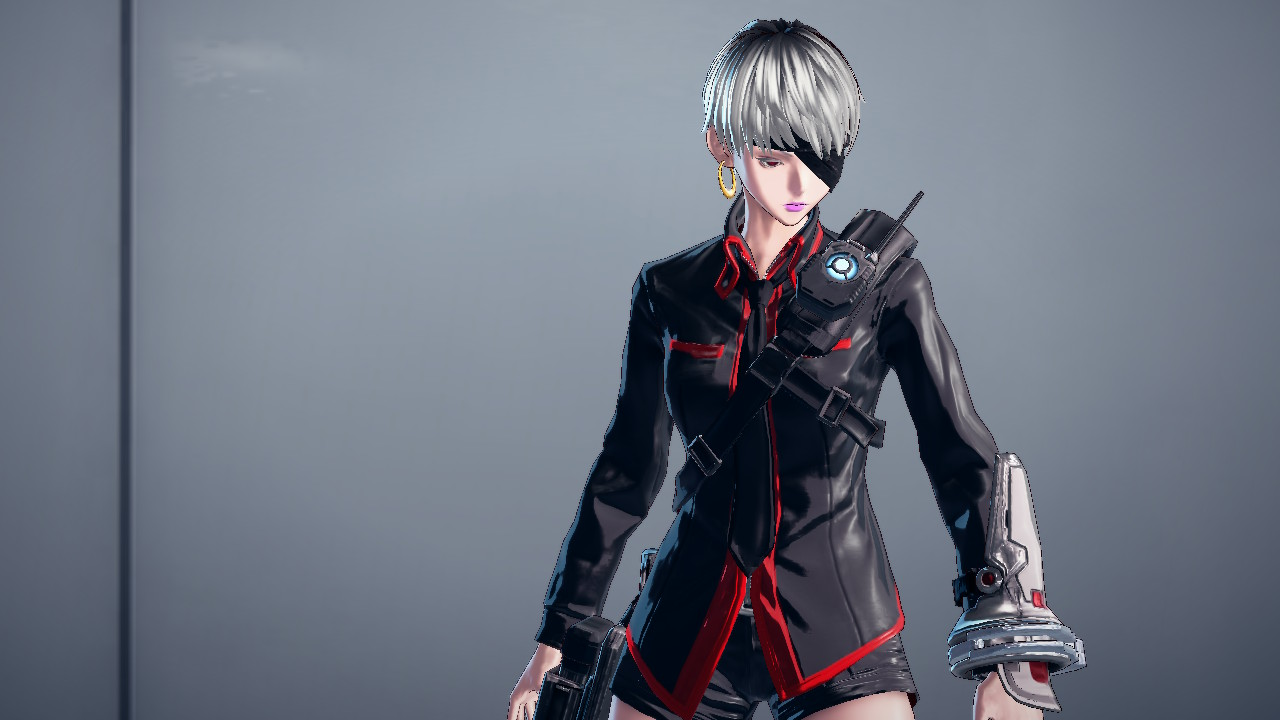
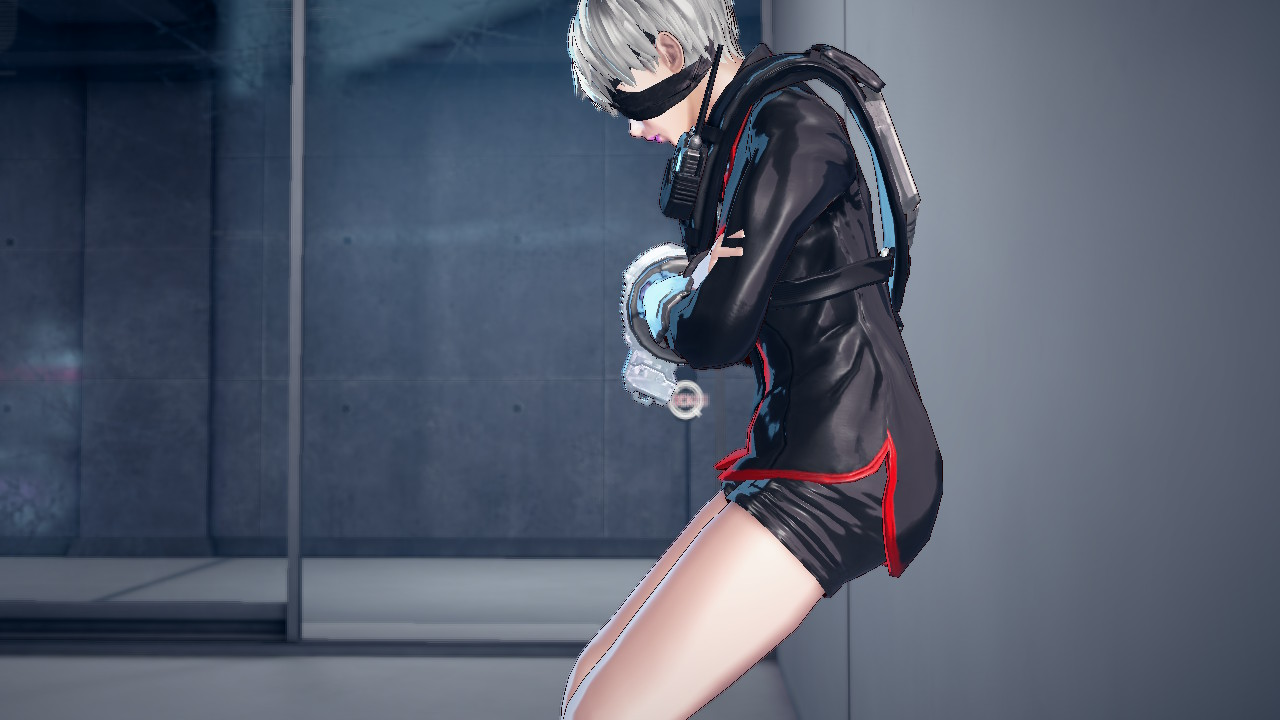
注意看女主的衣服:
-
漫反射部分,明暗过渡是比较典型的 卡通渲染 的方式,线条感很强。
-
高光部分,直接高光的拖尾疑似 GGX,间接高光也很明显,PBR的质感。
皮肤部分的明暗过渡比较平滑,暗部由红至黑的变化应该依靠 贴图映射 就可以模仿得出。
最后再搭配上 整体描边 以及左侧的 边缘光,既卡通又有光感的小姐姐就现身了。
当然,上述结论全凭肉眼,不一定准确。
本文介绍一款Unity插件 Toony Colors Pro,如果要模仿上图女主的渲染效果,这个插件可以给我们很多启示。
Stylized PBS的几个要素
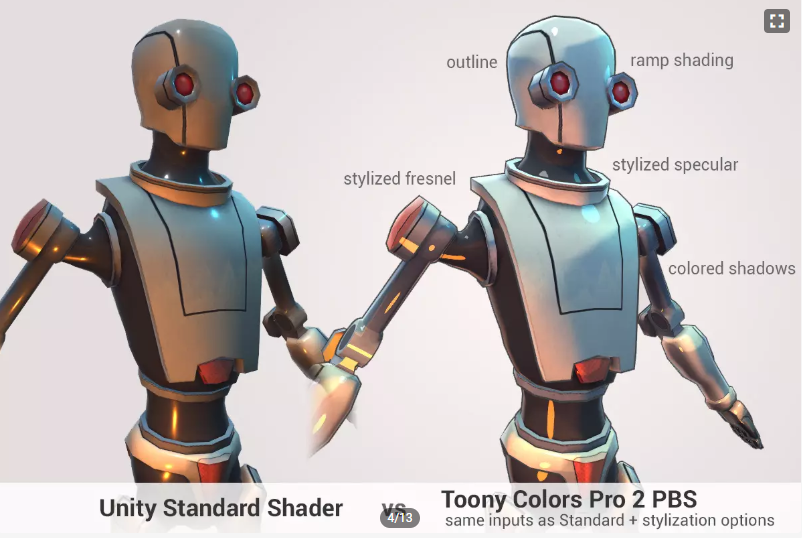
上图是作者在他的主页对 风格化的PBS 做的一些总结,主要元素包括以下几点:
-
Ramp Shading
-
明暗偏色
-
风格化高光
-
风格化菲涅尔
-
描边
本文主要介绍前4点,至于 描边,作者的做法比较常规,有空再写。
Ramp Shading
考虑一下最简单的 Lambert 光照计算公式:
inline fixed4 UnityLambertLight (SurfaceOutput s, UnityLight light)
{
    fixed diff = max (0, dot (s.Normal, light.dir));

    fixed4 c;
    c.rgb = s.Albedo * light.color * diff;
    c.a = s.Alpha;
    return c;
}
法线方向 和 灯光方向 的 点积 可以描述 漫反射 的强度,而 单位向量的点积 其实就是 向量夹角的cos值,考虑一下下图的 cos曲线:
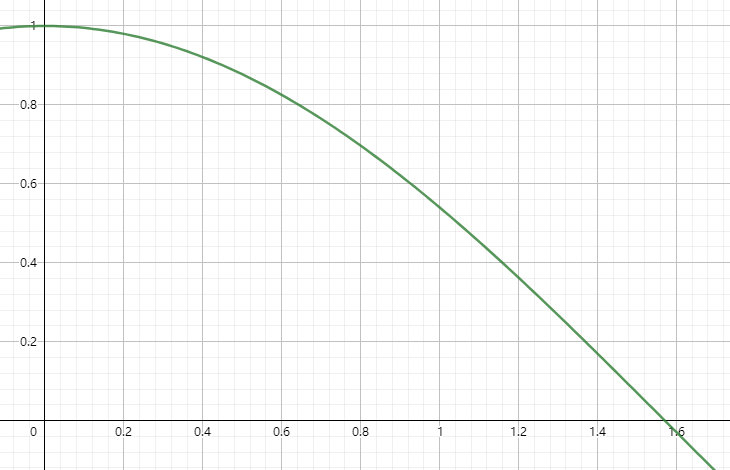
随着角度的变化,光强的变化是比较平滑的。
要实现 卡通渲染 那种明暗过渡的线条,我们可以对上面代码中的 diff 做一个映射处理,作者提供了如下两种映射方式:
-
smoothstep
-
Ramp贴图
smoothstep
先看一下 smoothstep 这个函数到底做了什么。
下面的代码摘自 wiki,用 c++ 描述了 smoothstep 的行为:
float smoothstep(float edge0, float edge1, float x) {
  // Scale, bias and saturate x to 0..1 range
  x = clamp((x - edge0) / (edge1 - edge0), 0.0, 1.0);
  // Evaluate polynomial
  return x * x * (3 - 2 * x);
}

float clamp(float x, float lowerlimit, float upperlimit) {
  if (x < lowerlimit)
    x = lowerlimit;
  if (x > upperlimit)
    x = upperlimit;
  return x;
}
考虑一下 y = smoothstep(edge0, edge1, x) 的输出结果:
-
若 x < edge0,则 y = 0
-
若 x > edge1,则 y = 1
-
若 edge0 <= x <= edge1,则 y = x * x * (3 - 2 * x)
让我们用 geogebra 绘制曲线感受下:
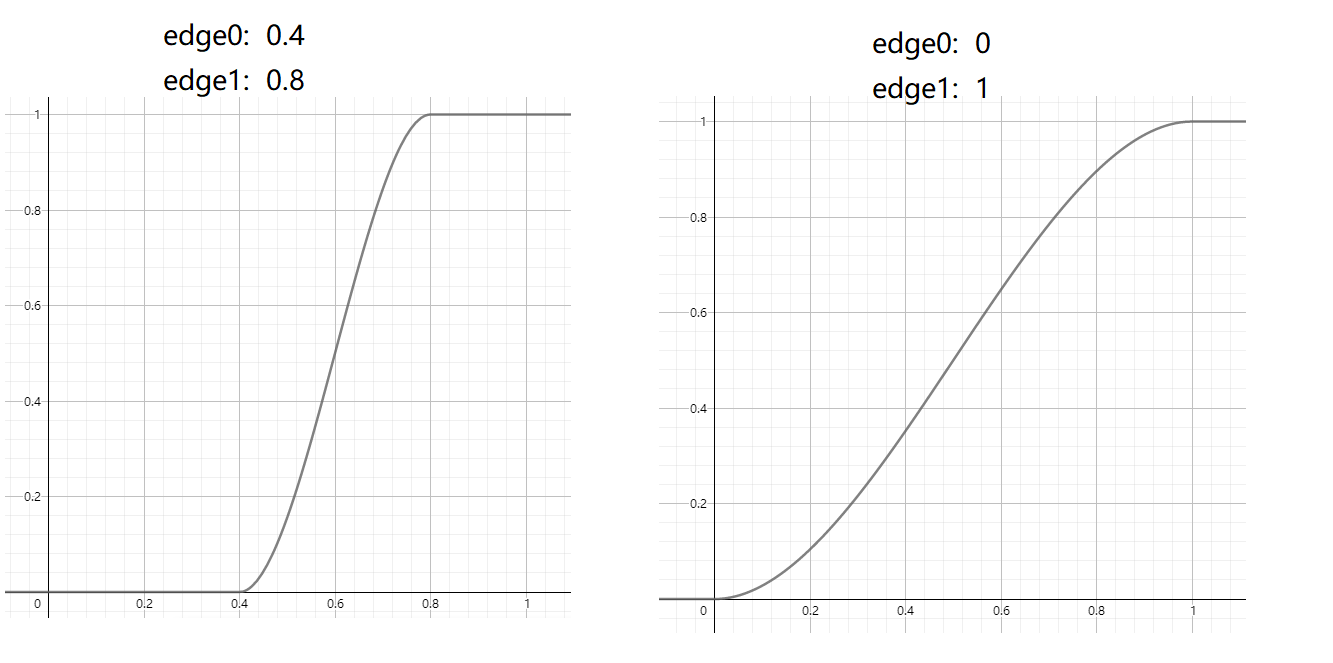
我们可以通过调整 edge0 和 edge1 来调整光强平滑过渡的区间,区间外的明暗是突变的,而区间的位置也决定了亮色和暗色的范围,这样就可以实现 卡通渲染 的线条感。
原理很简单,直接贴代码:
half nl = saturate(dot(normal, light.dir));

//TCP2 Ramp N.L
nl = WrapRampNL(nl, tcp2RampThreshold, tcp2RampSmoothness);
inline half WrapRampNL(half nl, fixed threshold, fixed smoothness)
{
    #ifndef TCP2_DISABLE_WRAPPED_LIGHT
    //TCP2 Note: disabling wrapped lighting to save 1 instruction, else the shader fails to compile on SM2
      #if SHADER_TARGET >= 30
        nl = nl * 0.5 + 0.5;
      #endif
    #endif
    #if TCP2_RAMPTEXT
        nl = tex2D(_Ramp, fixed2(nl, nl)).r;
    #else
        nl = smoothstep(threshold - smoothness*0.5, threshold + smoothness*0.5, nl);
    #endif

    return nl;
}
我们可以暂时忽略 WrapRampNL 函数中的 TCP2_DISABLE_WRAPPED_LIGHT 和 TCP2_RAMPTEXT 分支,这里其实就是对 nl 用 smoothstep 做一个映射:
-
threshold 越低,则亮色区域越大
-
smoothness 越低,则明暗过渡越快,线条感越强。
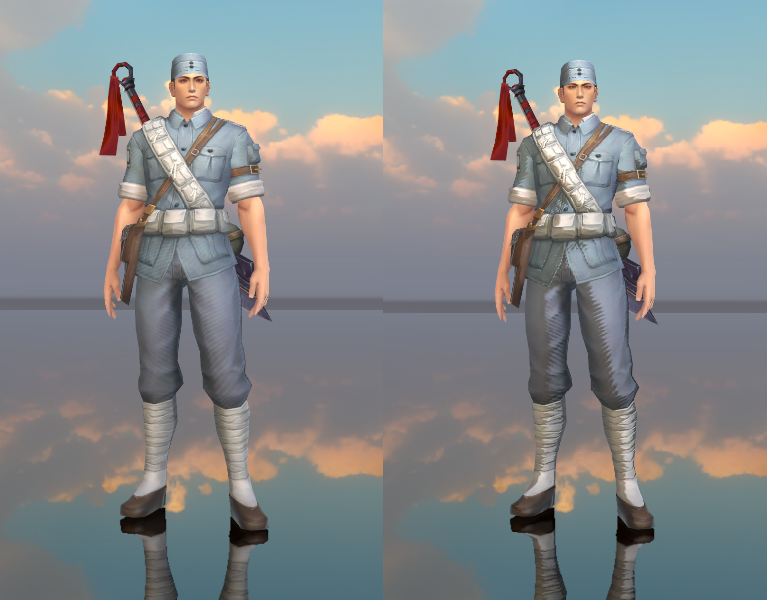
下图是 smoothstep 映射前后的对比,这里的 threshold设为0.6,smoothness设为0.17:
Ramp贴图
smoothstep 很好用,不过用它来做 多段映射 就不太方便了。
对于美术来说,更直接的方式是调贴图,作者提供了 Ramp贴图 的映射方式,这也是 卡通渲染 常用的方法。
涉及的代码就是上一节 WrapRamlNL 函数的 TCP2_RAMPTEXT 分支,直接拿 nl 作为 uv 坐标去采样 Ramp贴图,就完成了映射。
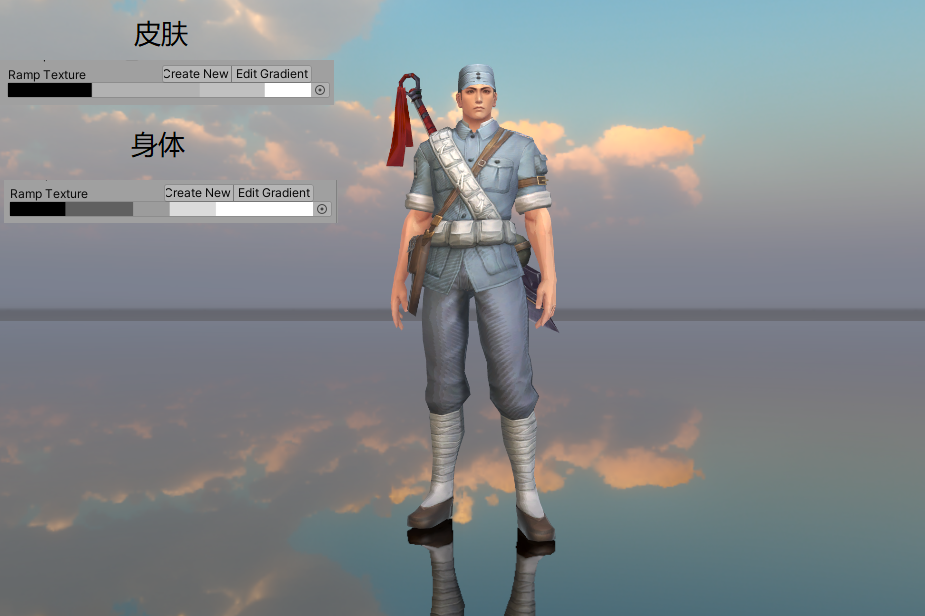
下图是把 smoothstep 换成 Ramp贴图 后的效果,这里我故意做了多段映射,可以看到明暗的 带状 过渡:
明暗偏色
Ramp Shading 可以重新调整光照的 明暗区域,此外我们还可以对 亮色 和 暗色 进行 偏色,以实现一些更风格化的效果。
下图是我对身体和皮肤的明暗分别偏色后的结果:
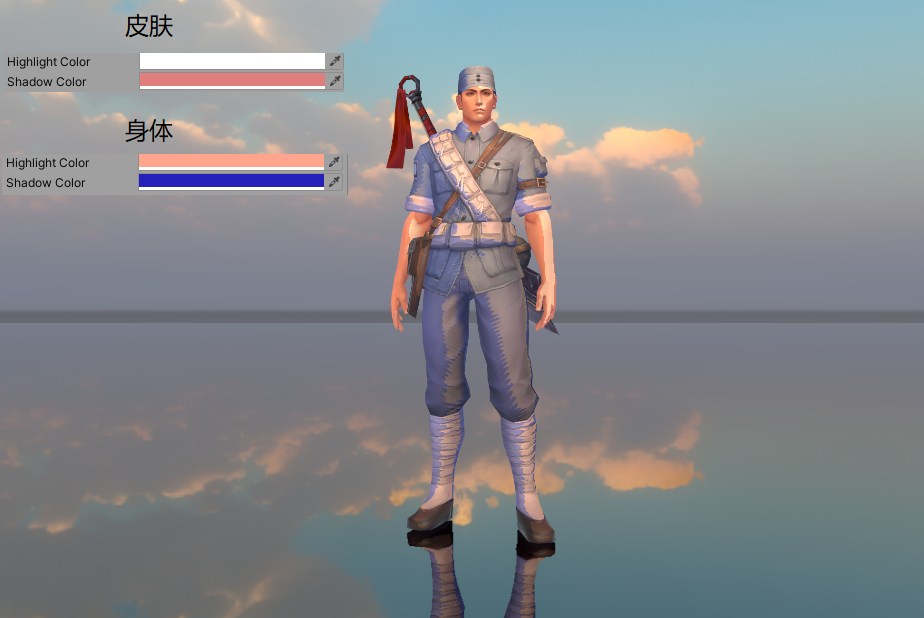
偏色的代码也很简单,就是用 diffuseTerm 对 亮色 和 暗色 进行插值,用插值的结果去计算 漫反射:
half3 diffuseTermRGB = lerp(tcp2ShadowColor.rgb, tcp2HighlightColor.rgb, diffuseTerm);
这里有一个细节需要注意,对 亮色 和 暗色 进行插值时要考虑 光衰减,Unity的源码会在 UnityGlobalIllumination 时把这个 衰减 乘到光颜色上,作者这里把这个 衰减 传入自己的 BRDF 函数,以便处理:
diffuseTerm *= atten;
half3 diffuseTermRGB = lerp(tcp2ShadowColor.rgb, tcp2HighlightColor.rgb, diffuseTerm);
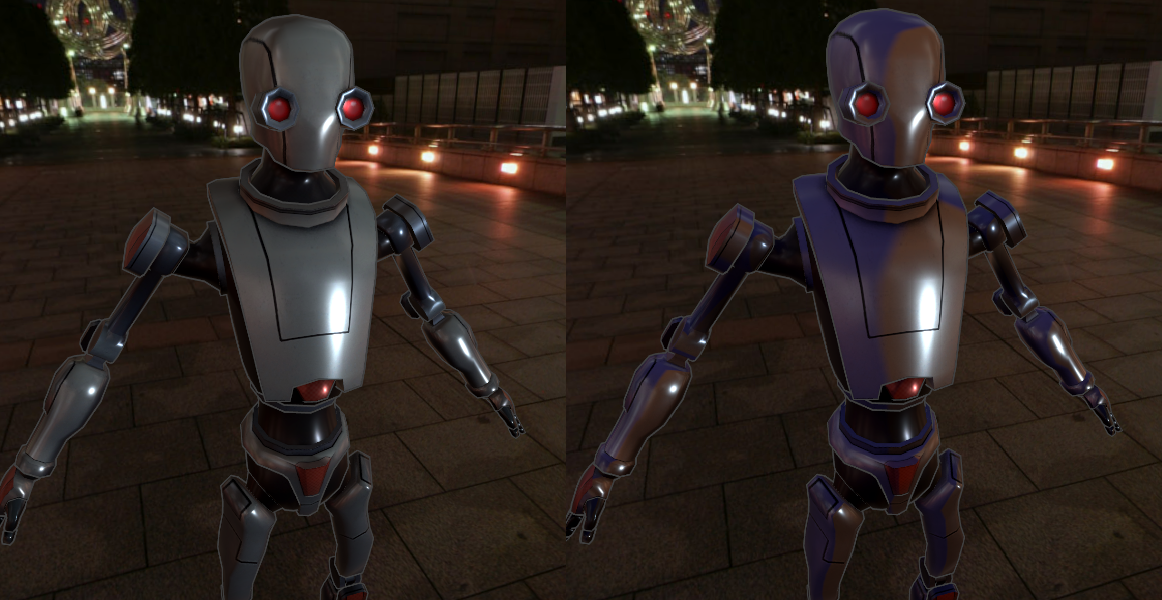
风格化高光
Ramp Shading 和 明暗偏色 主要影响的是 diffuseTerm。
至于高光的计算,虽然也依赖 nl,但是还有更为重要的 specularTerm 和 高光颜色。
以下图为例,左边是Unity Standard Shader 的效果,右边是 Ramp Shading 和 明暗偏色 后的效果,注意高光部分的表现,差别不大:
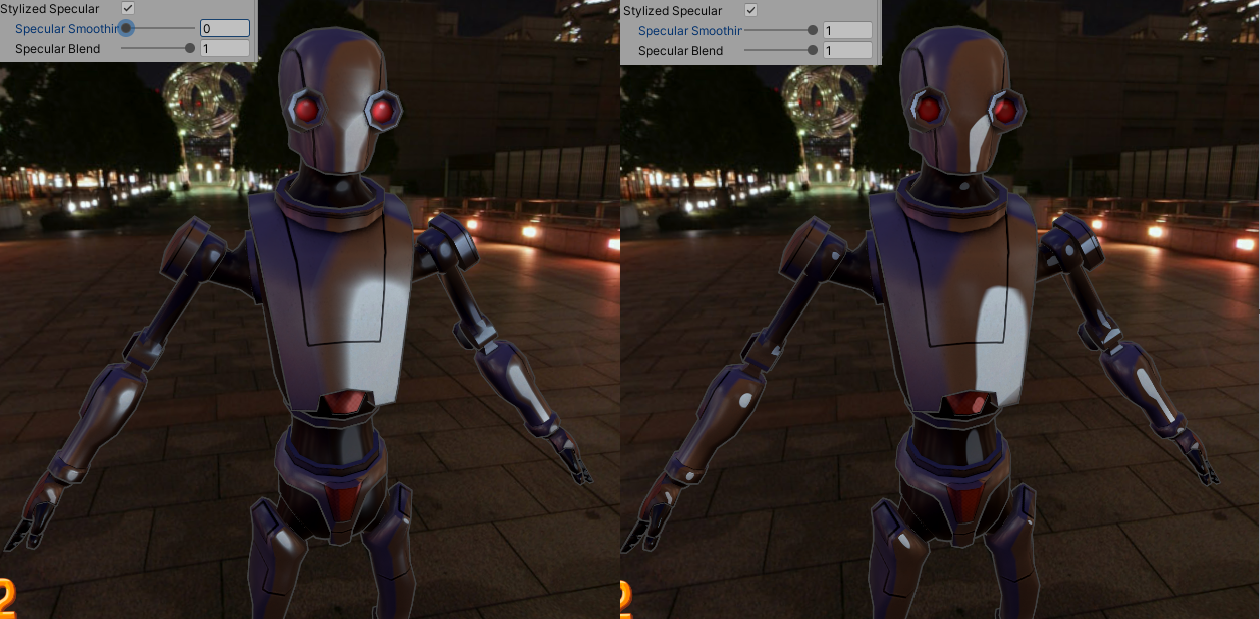
为了风格化高光,作者提供了高光项 specularTerm 的风格化处理方式,还是 smoothstep 大法,原理和前面类似,这里我直接贴代码:
#if TCP2_SPEC_TOON
    //TCP2 Stylized Specular
    half r = sqrt(roughness)*0.85;
    r += 1e-4h;
    specularTerm = lerp(specularTerm, StylizedSpecular(specularTerm, tcp2specSmooth) * (1/r), tcp2specBlend);
#endif
inline half StylizedSpecular(half specularTerm, fixed specSmoothness)
{
    return smoothstep(specSmoothness*0.5, 0.5 + specSmoothness*0.5, specularTerm);
}
StylizedSpecular 函数的 specSmoothness 参数控制高光拖尾的长度,这个值越大,高光拖尾越短,线条感越强,如下图:
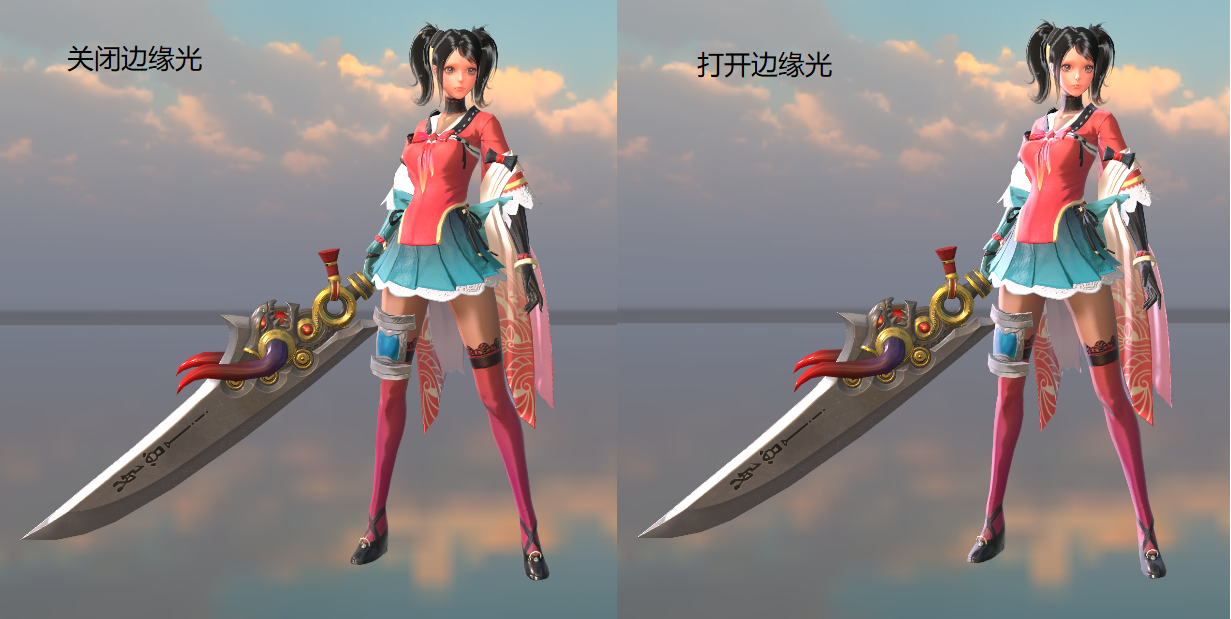
风格化菲涅尔
这里的 菲涅尔,指的并不是 BRDF 高光计算里的 菲涅尔项,而是额外的 边缘光 计算,代码如下:
half3 color =  diffuseTCP2
                + specularTerm * light.color * FresnelTerm (specColor, lh)
                + surfaceReduction * gi.specular * FresnelLerp (specColor, grazingTerm, nv);

#if TCP2_STYLIZED_FRESNEL
    //TCP2 Enhanced Rim/Fresnel
    color += StylizedFresnel(nv, roughness, light, normal, rimParams);
#endif
inline half3 StylizedFresnel(half nv, half roughness, UnityLight light, half3 normal, fixed3 rimParams)
{
    half rim = 1-nv;
    rim = smoothstep(rimParams.x, rimParams.y, rim) * rimParams.z * saturate(1.33-roughness);
    return rim * saturate(dot(normal, light.dir)) * light.color;
}
边缘光 的计算比较常见,很多游戏用 边缘光 来做 受击高亮。
边缘的计算主要依靠 法线向量 和 视线向量 的 点积,值越小,越边缘。
这里又是 点积,作者也理所当然的继续 smoothstep 大法,让边缘光的过渡也可以线条化。
最后上图,下图是 小甜甜 开关 边缘光 的效果对比:
结尾
关于 Toony Colors Pro 的 Stylized PBS 就介绍到这里。
可以看到,作者的风格化处理主要是针对 直接光照,间接光照 还是走Unity原先的流程。
此外,Toony Colors Pro 的内容远不止于此,还有很多有意思的效果,有空再写。
个人主页
本文的个人主页链接:baddogzz.github.io/2020/02/14/…。
好了,拜拜!
