导读:通过前面的章节我们在微服务层做了限流,并且集成了SpringCloud Gateway,本章主要内容是将限流功能从微服务迁移到网关层。
SpringCloud Gateway 原生限流
Springcloud Gateway 原生限流主要基于过滤器实现,我们可以直接使用内置的过滤器RequestRateLimiterGatewayFilterFactory,目前RequestRateLimiterGatewayFilterFactory的实现依赖于 Redis,所以我们还要引入spring-boot-starter-data-redis-reactive。
POM依赖
<dependency>
    <groupId>org.springframework.cloud</groupId>
    <artifactId>spring-cloud-starter-gateway</artifactId>
</dependency>

<dependency>
    <groupId>org.springframework.boot</groupId>
    <artifatId>spring-boot-starter-data-redis-reactive</artifactId>
</dependency>
限流配置
spring:
  cloud:
    gateway:
      routes:
      - id: account-service
        uri: lb://account-service
        order: 10000
        predicates:
        - Path=/account-service/**
        filters:
        - name: RequestRateLimiter
          args:
            redis-rate-limiter.replenishRate: 1
            redis-rate-limiter.burstCapacity: 3
            key-resolver: "#{@ipKeyResolver}"
主要是配置三个主要参数:
- redis-rate-limiter.replenishRate :
允许用户每秒处理多少个请求 - redis-rate-limiter.burstCapacity :
令牌桶的容量,允许在一秒钟内完成的最大请求数 - key-resolver :
用于限流的键的解析器的 Bean 对象的名字。它使用 SpEL 表达式根据#{@beanName}从 Spring 容器中获取 Bean 对象。
配置Bean
/**
* 自定义限流标志的key,多个维度可以从这里入手
* exchange对象中获取服务ID、请求信息,用户信息等
*/
@Bean
KeyResolver ipKeyResolver() {
    return exchange -> Mono.just(exchange.getRequest().getRemoteAddress().getHostName());
}
Sentinel 限流
我们之前的章节已经讲过Sentinel的使用方法,如果有不清楚的可以翻看之前的章节,这里主要说一下与SpringCloud gateway的整合。
Sentinel从 1.6.0 版本开始提供了 Spring Cloud Gateway 的适配模块,可以提供两种资源维度的限流:
- route 维度:即在 Spring 配置文件中配置的路由条目,资源名为对应的 routeId自定义
- API 维度:用户可以利用 Sentinel 提供的 API 来自定义一些 API 分组
下面是我们的整合步骤
POM依赖
<dependency>
	<groupId>com.alibaba.cloud</groupId>
	<artifactId>spring-cloud-alibaba-sentinel-gateway</artifactId>
</dependency>

<dependency>
	<groupId>com.alibaba.cloud</groupId>
	<artifactId>spring-cloud-starter-alibaba-sentinel</artifactId>
</dependency>

<dependency>
	<groupId>com.alibaba.csp</groupId>
	<artifactId>sentinel-datasource-nacos</artifactId>
</dependency>
由于需要使用 nacos作为sentinel的配置中心,所以也引入了sentinel-datasource-nacos
Bootstrap配置
...
spring:
  cloud:
    sentinel:
      transport:
        dashboard: 10.0.10.48:8858
      eager: true
      datasource:
        ds:
          nacos:
            server-addr: 10.0.10.48:8848
            data-id: gateway-sentinel-flow
            group-id: DEFAULT_GROUP
            rule-type: gw-flow
...
这里主要是sentinel的相关配置,从nacos配置中心获取 gateway-sentinel-flow 配置文件,限流类型是网关类型gw-flow。
限流配置
在nacos配置管理public页面建立 data-id 为 gateway-sentinel-flow 的配置文件(json格式),给account-service与product-service添加限流规则。
[
  {
    "resource": "account-service",
    "count": 5,
    "grade": 1,
    "paramItem": {
        "parseStrategy": 0
    }
  },
  {
    "resource": "product-service",
    "count": 2,
    "grade": 1,
    "paramItem": {
        "parseStrategy": 0
    }
  }
]
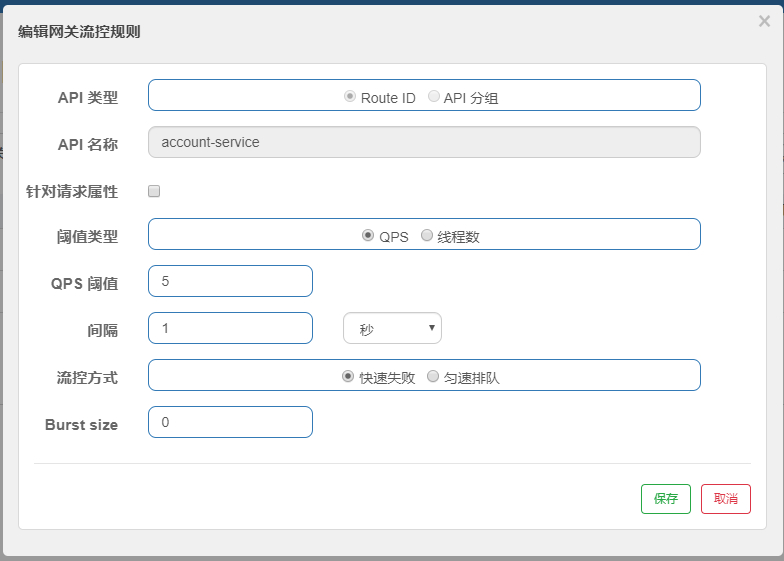
配置完成以后启动网关项目,登录sentinel控制台,查看限流规则:

配置说明:
以客户端IP作为限流因子
public static final int PARAM_PARSE_STRATEGY_CLIENT_IP = 0;
以客户端HOST作为限流因子
public static final int PARAM_PARSE_STRATEGY_HOST = 1;
以客户端HEADER参数作为限流因子
public static final int PARAM_PARSE_STRATEGY_HEADER = 2;
以客户端请求参数作为限流因子
public static final int PARAM_PARSE_STRATEGY_URL_PARAM = 3;
以客户端请求Cookie作为限流因子
public static final int PARAM_PARSE_STRATEGY_COOKIE = 4;
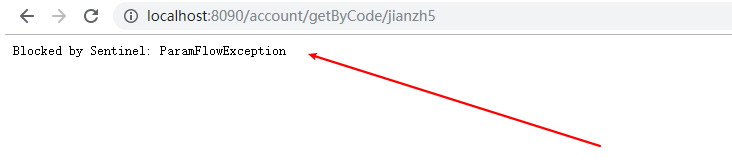
限流测试
多次通过网关访问account-service服务进行测试 http://localhost:8090/account/getByCode/javadaily 查看限流效果:
自定义响应异常
SpringCloud-gateway限流异常默认的实现逻辑为SentinelGatewayBlockExceptionHandler,可以查看源码发现异常响应的关键代码如下
由于服务后端都是返回JSON的响应格式,所以我们需要修改原异常响应,将其修改成ResultData类的响应格式。要实现这个功能只需要写个新的异常处理器然后在SpringCloud GateWay配置类中注入新的异常处理器即可。
- 自定义异常处理器
CustomGatewayBlockExceptionHandler
public class CustomGatewayBlockExceptionHandler implements WebExceptionHandler {
	...
    /**
     * 重写限流响应,改造成JSON格式的响应数据
     * @author javadaily
     * @date 2020/1/20 15:03
     */
    private Mono<Void> writeResponse(ServerResponse response, ServerWebExchange exchange) {
        ServerHttpResponse serverHttpResponse = exchange.getResponse();
        serverHttpResponse.getHeaders().add("Content-Type", "application/json;charset=UTF-8");
        ResultData<Object> resultData = ResultData.fail(ReturnCode.RC200.getCode(), ReturnCode.RC200.getMessage());
        String resultString = JSON.toJSONString(resultData);
        DataBuffer buffer = serverHttpResponse.bufferFactory().wrap(resultString.getBytes());
        return serverHttpResponse.writeWith(Mono.just(buffer));
    }

    @Override
    public Mono<Void> handle(ServerWebExchange exchange, Throwable ex) {
        if (exchange.getResponse().isCommitted()) {
            return Mono.error(ex);
        } else {
            return !BlockException.isBlockException(ex) ? Mono.error(ex) : this.handleBlockedRequest(exchange, ex).flatMap((response) -> this.writeResponse(response, exchange));
        }
    }
   ...
}
大家可以直接复制 SentinelGatewayBlockExceptionHandler 类,然后修改 writeResponse方法接口
- 修改Gateway配置类,注入
CustomGatewayBlockExceptionHandler
@Configuration
public class GatewayConfiguration {
	...
    /**
     * 注入自定义网关异常
     */
    @Bean
    @Order(Ordered.HIGHEST_PRECEDENCE)
    public CustomGatewayBlockExceptionHandler sentinelGatewayBlockExceptionHandler() {
        // Register the custom block exception handler .
        return new CustomGatewayBlockExceptionHandler(viewResolvers, serverCodecConfigurer);
    }
	...
}
- 在bootstrap.yml文件中新增配置
spring:
  main:
    allow-bean-definition-overriding: true
- 重新测试,限流响应结果如下
{
	"message": "服务开启限流保护,请稍后再试!",
	"status": 200,
	"success": false,
	"timestamp": 1579509123946
}
限流不生效
各位在使用过程中如果发现网关层限流不生效,可以以debug模式启动网关服务,然后对网关过滤器 SentinelGatewayFilter 中的filter方法进行调试,我发现sentinel获取到的网关id并不是我们配置的account-service,而是加了CompositeDiscoveryClient_前缀,如下图所示:
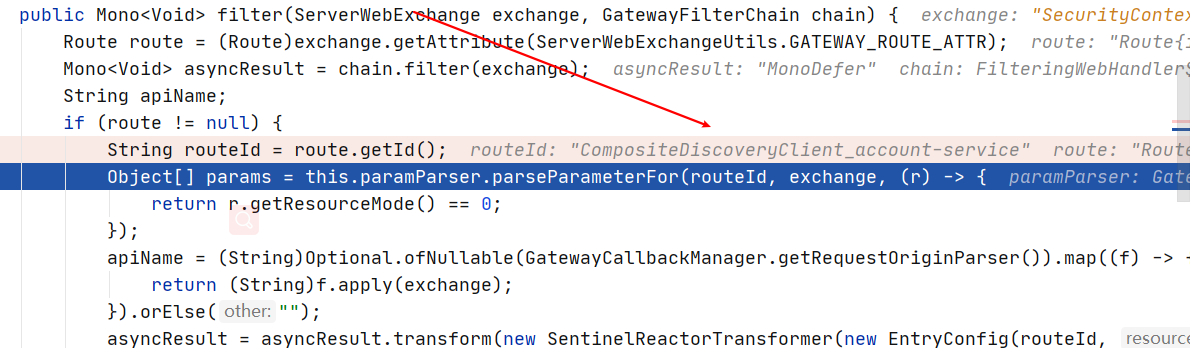
所以我们需要修改 gateway-sentinel-flow 的配置,给我们的resource 也加上前缀,修改完的配置如下:
[{
	"resource": "CompositeDiscoveryClient_account-service",
	"count": 5,
	"grade": 1,
	"paramItem": {
		"parseStrategy": 0
	}
}, {
	"resource": "CompositeDiscoveryClient_product-service",
	"count": 2,
	"grade": 1,
	"paramItem": {
		"parseStrategy": 0
	}
}]
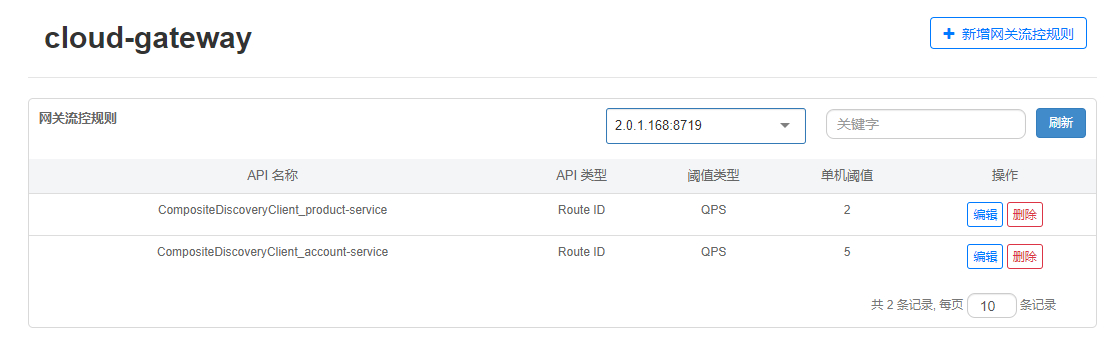
通过使用jemter对接口进行测试,发现网关能正常限流
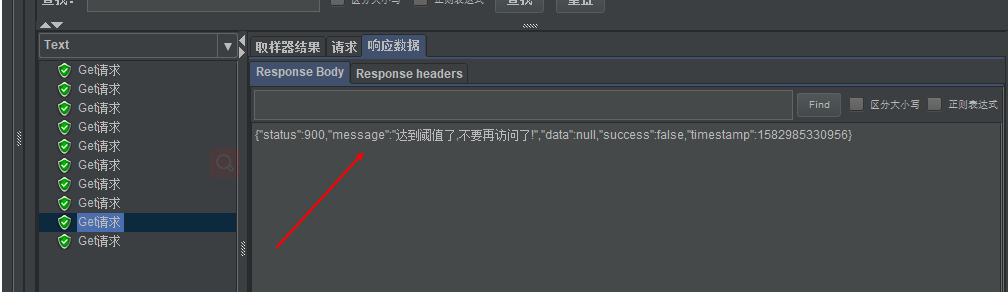
经过以上几步,我们可以将后端微服务层的限流配置去掉,让网关层承担限流的功能。
好了,各位朋友们,本期的内容到此就全部结束啦,能看到这里的同学都是优秀的同学,下一个升职加薪的就是你了! 如果觉得这篇文章对你有所帮助的话请扫描下面二维码加个关注。
"转发" 加 "在看",养成好习惯!咱们下期再见!
SpringCloud Alibaba 系列文章