

一、概述
接着前面的一篇 Android Application 启动流程分析及其源码调用探究,从 Activity 启动,到正式开始绘制流程,整个过程如下图所示:
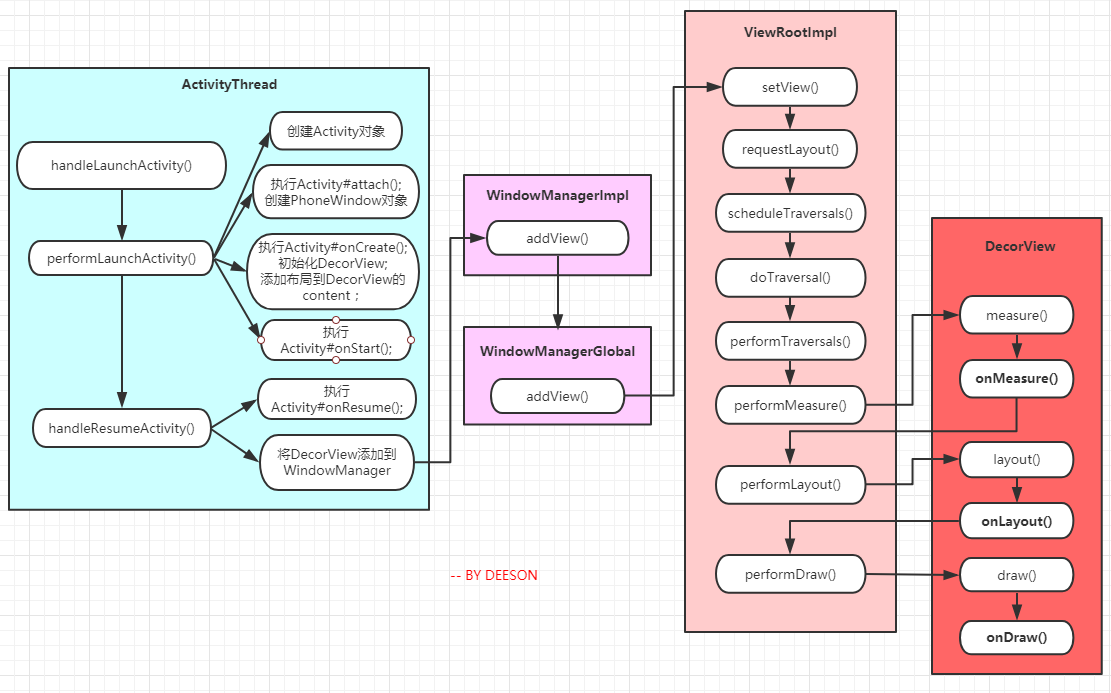
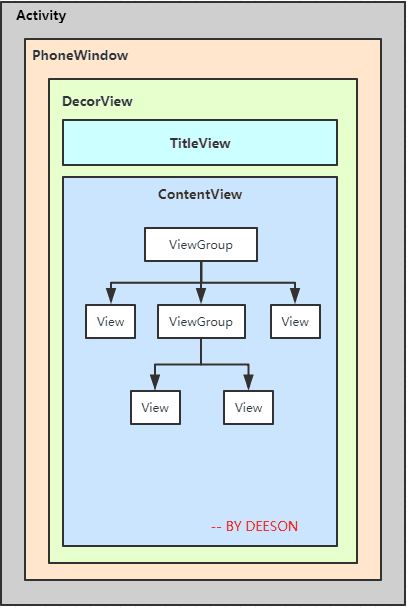
- 上图中我列出了重要的几个方法步骤,可以看到,里面包含了 PhoneWindow 的创建时机和 DecorView 的初始化时机。因为 Android 视图层次结构中,PhoneWindow 和 DecorView 扮演着很重要的角色,请看下图,了解这两者的创建初始化时机,对整个 View 的绘制流程会有更好的理解。
- PhoneWindow 是 Android 系统中最基本的窗口系统,每个 Activity 会创建一个,是视图真正的控制者。DecorView 本质上是一个 FrameLayout,是 Activity 中所有 View 的祖先,即当前 Activity 视图树根节点。
二、View 绘制起源源码追踪
从上一篇 Android Application 启动流程分析及其源码调用探究 的最后一步 STEP 14 中,我们看到主线程收到 H.LAUNCH_ACTIVITY 消息,交由 ActivityThread#handleLaunchActivity() 方法处理。该方法接着调用了 performLaunchActivity() 和 handleResumeActivity() 这两个方法,下面分别讲一下。
ActivityThread.java
    private void handleLaunchActivity(ActivityClientRecord r, Intent customIntent, String reason) {
        ···
        Activity a = performLaunchActivity(r, customIntent);

        if (a != null) {
            ···
            handleResumeActivity(r.token, false, r.isForward,
                    !r.activity.mFinished && !r.startsNotResumed, r.lastProcessedSeq, reason);
            ···
            }
        } else {
            ···
        }
    }
2.1 performLaunchActivity()
performLaunchActivity() 方法里面执行了几个操作,创建 Activity 对象,调用 Activity#attach(),
创建 PhoneWindow 对象,调用 Activity#onCreate(),初始化 DecorView ,添加布局到 DecorView 的 content ,调用 Activity#onStart() ;
    private Activity performLaunchActivity(ActivityClientRecord r, Intent customIntent) {
        ···
        Activity activity = null;
        try {
            ···
            //创建Activity对象
            activity = mInstrumentation.newActivity(
                    cl, component.getClassName(), r.intent);
            ···
        } catch (Exception e) {
            ···
        }

        try {
            ···
            if (activity != null) {
                ···
                //调用 Activity#attach(),创建 PhoneWindow 对象
                activity.attach(appContext, this, getInstrumentation(), r.token,
                        r.ident, app, r.intent, r.activityInfo, title, r.parent,
                        r.embeddedID, r.lastNonConfigurationInstances, config,
                        r.referrer, r.voiceInteractor, window, r.configCallback);

                ···
                //调用Activity#onCreate(),初始化DecorView,添加布局到DecorView的content
                if (r.isPersistable()) {
                    mInstrumentation.callActivityOnCreate(activity, r.state, r.persistentState);
                } else {
                    mInstrumentation.callActivityOnCreate(activity, r.state);
                }
                ···
                if (!r.activity.mFinished) {
                    //调用 Activity#onStart()
                    activity.performStart();
                    ···
                }
                ···
            }
            ···
        } catch (SuperNotCalledException e) {
           ···
        } catch (Exception e) {
            ···
        }
        return activity;
    }
PhoneWindow 对象的创建时机在 activity 执行 attach() 方法里面,下面看看源码:
Activity.java
    final void attach(Context context, ActivityThread aThread,
            Instrumentation instr, IBinder token, int ident,
            Application application, Intent intent, ActivityInfo info,
            CharSequence title, Activity parent, String id,
            NonConfigurationInstances lastNonConfigurationInstances,
            Configuration config, String referrer, IVoiceInteractor voiceInteractor,
            Window window, ActivityConfigCallback activityConfigCallback) {
        ···
        //创建 PhoneWindow 对象
        mWindow = new PhoneWindow(this, window, activityConfigCallback);
        ···
        //为 PhoneWindow 设置 WindowManager
        mWindow.setWindowManager(
                (WindowManager)context.getSystemService(Context.WINDOW_SERVICE),
                mToken, mComponent.flattenToString(),
                (info.flags & ActivityInfo.FLAG_HARDWARE_ACCELERATED) != 0);
        ···
        //将 PhoneWindow 关联到 Activity
        mWindowManager = mWindow.getWindowManager();
        ···
    }
接下来,ActivityThread 调用 Activity#onCreate() 方法,我们知道 Activity 执行
onCreate() 方法会调用 setContentView(),而 Activity 的 setContentView() 实际的实现来自 PhoneWindow,可以看下 getWindow() 方法返回的其实就是上面 attach() 方法中赋值的 mWindow 对象。
Activity.java
    public void setContentView(@LayoutRes int layoutResID) {
        getWindow().setContentView(layoutResID);
        initWindowDecorActionBar();
    }
我们继续看看 PhoneWindow 里面:
PhoneWindow.java
    @Override
    public void setContentView(int layoutResID) {

        if (mContentParent == null) {
            //初始化 DecorView
            installDecor();
        } else if (!hasFeature(FEATURE_CONTENT_TRANSITIONS)) {
            ···
        }

        if (hasFeature(FEATURE_CONTENT_TRANSITIONS)) {
            ···
        } else {
            //添加布局到 DecorView 的 content
            mLayoutInflater.inflate(layoutResID, mContentParent);
        }
        ···
    }

    private void installDecor() {
        ···
        if (mDecor == null) {
            //创建 DecorView 对象
            mDecor = generateDecor(-1);
            ···
        } else {
            ···
        }
        if (mContentParent == null) {
            //为 DecorView 的 ContentView 设置布局
            mContentParent = generateLayout(mDecor);
            ···
        }
    }
上面的 mContentParent 就是 Activity 中 setContentView 中设置的 layout.xml 布局文件中的最外层父布局, DecroView 里面 ContentView 对应的布局部分。
2.2 handleResumeActivity()
handleResumeActivity() 方法里面执行了2个操作,调用 Activity#onResume(),将 DecorView 添加到 WindowManager。
ActivityThread.java
    final void handleResumeActivity(IBinder token,
            boolean clearHide, boolean isForward, boolean reallyResume, int seq, String reason) {
        ···
        //调用 Activity#onResume()
        r = performResumeActivity(token, clearHide, reason);

        if (r != null) {
            ···
            if (r.window == null && !a.mFinished && willBeVisible) {
                ···
                if (a.mVisibleFromClient) {
                    if (!a.mWindowAdded) {
                        a.mWindowAdded = true;
                        //将 DecorView 添加到 WindowManager,
                        //WindowManager 的实现类是 WindowManagerImpl,
                        //所以实际调用的是 WindowManagerImpl 的 addView 方法
                        wm.addView(decor, l);
                    } else {
                        ···
                    }
                }
            } else if (!willBeVisible) {
                ···
            }
            ···
        } else {
            ···
        }
    }
WindowManagerImpl.java
    @Override
    public void addView(@NonNull View view, @NonNull ViewGroup.LayoutParams params) {
        applyDefaultToken(params);
        mGlobal.addView(view, params, mContext.getDisplay(), mParentWindow);
    }
- 我们先来了解下,ViewParent 和 DecorView 的概念。ViewParent 对应于 ViewRootImpl 类,它是连接 WindowManager 和 DecorView 的纽带,View 绘制的三大流程均是通过 ViewParent 来完成的。在 ActivityThread 中,当 Activity 对象被创建完毕后,会将 DecorView 添加到 Window 中,同时会创建 ViewRootImpl 对象,并将 ViewRootImpl 对象和 DecorView 建立关联,将 DecorView 实例对象交给 ViewRootImpl 用以绘制 View 。最后调用 ViewRootImpl 类中的
performTraversals(),从而实现视图的绘制。我们看看 WindowManagerGlobal 的addView()方法。
WindowManagerGlobal.java
    public void addView(View view, ViewGroup.LayoutParams params,
            Display display, Window parentWindow) {
        ···
        synchronized (mLock) {
            ···
            //创建 ViewRootImpl 对象
            root = new ViewRootImpl(view.getContext(), display);
            ···
            try {
                //把 DecorView 加载到 Window 中
                root.setView(view, wparams, panelParentView);
            } catch (RuntimeException e) {
                ···
            }
        }
    }
接着,我们进入到 ViewRootImpl 的源码中,继续追踪:
ViewRootImpl.java
    public void setView(View view, WindowManager.LayoutParams attrs, View panelParentView) {
        synchronized (this) {
            if (mView == null) {
                mView = view;
                ···
                // Schedule the first layout -before- adding to the window
                // manager, to make sure we do the relayout before receiving
                // any other events from the system.
                requestLayout();
                ···
                //将 ViewRootImpl 对象和 DecorView 建立关联
                view.assignParent(this);
                ···
            }
        }
    }

    @Override
    public void requestLayout() {
        if (!mHandlingLayoutInLayoutRequest) {
            ···
            scheduleTraversals();
        }
    }

    void scheduleTraversals() {
        if (!mTraversalScheduled) {
            ···
            mChoreographer.postCallback(
                    Choreographer.CALLBACK_TRAVERSAL, mTraversalRunnable, null);
            ···
        }
    }

    final class TraversalRunnable implements Runnable {
        @Override
        public void run() {
            doTraversal();
        }
    }
    final TraversalRunnable mTraversalRunnable = new TraversalRunnable();

    void doTraversal() {
        if (mTraversalScheduled) {
            ···
            //
            performTraversals();
            ···
        }
    }
整个 View 树的绘图流程是在 ViewRootImpl 类的 performTraversals() 方法开始的,它把控着整个绘制的流程。该函数做的执行过程主要是根据之前设置的状态,判断是否重新计算视图大小、是否重新放置视图的位置、以及是否重绘,从上到下遍历整个视图树,每个 View 控件负责绘制自己,而 ViewGroup 还需要负责通知自己的子 View 进行绘制操作。
下面,我们以 performTraversals() 为起点,来分析 View 的整个绘制流程。
三、View 的绘制流程
ViewRootImpl.java
    private void performTraversals() {
        final View host = mView;
        ···
        int childWidthMeasureSpec = getRootMeasureSpec(mWidth, lp.width);
        int childHeightMeasureSpec = getRootMeasureSpec(mHeight, lp.height);
         // Ask host how big it wants to be
        performMeasure(childWidthMeasureSpec, childHeightMeasureSpec);
        ···
        performLayout(lp, mWidth, mHeight);
        ···
        performDraw();
        ···
    }
- performMeasure():此阶段的目的是计算出 View 树中的各个控件要显示其内容的话,需要多大尺寸。
- performLayout():此阶段的基本思想也是由根 View 开始,递归地完成整个 View 树的布局工作。
- performDraw():此阶段也是从根节点向下遍历 View 树,完成所有 ViewGroup 和 View 的绘制工作,根据布局过程计算出的显示区域,将所有 View 的当前需显示的内容画到屏幕上。
我们都知道,每一个视图的绘制过程都必须经历三个最主要的阶段,即onMeasure()、onLayout() 和 onDraw(),特别是我们进行自定义 View 的时候,可以明显地看出来,这三个方法分别对应到上面 ViewRootImpl 类中源码的三个 performXXX() 方法。下面我们逐一来看看。
3.1 performMeasure
ViewRootImpl.java
    private void performMeasure(int childWidthMeasureSpec, int childHeightMeasureSpec) {
        ···
        try {
            mView.measure(childWidthMeasureSpec, childHeightMeasureSpec);
        } finally {
            ···
        }
    }
上面的 mView 正是之前分析过的 DecorView ,另外,我们可以看得到 measure() 这个方法是 final 的,因此我们无法在子类中去重写这个方法,说明 Android 是不允许我们改变 View 的 measure 框架。
我们来看 View 的 measure() 方法:
View.java
    public final void measure(int widthMeasureSpec, int heightMeasureSpec) {
        ···
        if (forceLayout || needsLayout) {
            ···
            int cacheIndex = forceLayout ? -1 : mMeasureCache.indexOfKey(key);
            if (cacheIndex < 0 || sIgnoreMeasureCache) {
                // measure ourselves, this should set the measured dimension flag back
                onMeasure(widthMeasureSpec, heightMeasureSpec);
                ···
            } else {
                ···
            }
            ···
        }
        ···
    }
measure 阶段是最复杂的,在这里我们删繁就简,省去 MeasureSpec 相关的分析。
前面说了,measure() 这个方法是 final 的,所以 View 子类只能通过重载 onMeasure() 来实现自己的测量逻辑。而且这里还会先判断是否满足重新绘制的条件才会进行实际的测量工作,即 forceLayout (表示强制重新布局,可以通过 View.requestLayout() 来实现)或者 needsLayout (表示本次传入的 MeasureSpec 与上次传入的不同)为 true。
View.java
    protected void onMeasure(int widthMeasureSpec, int heightMeasureSpec) {
        setMeasuredDimension(getDefaultSize(getSuggestedMinimumWidth(), widthMeasureSpec),
                getDefaultSize(getSuggestedMinimumHeight(), heightMeasureSpec));
    }
这里简单总结一下:
- 测量该 View 以及它的内容来决定测量的宽度和高度。该方法被
measure(int,int)调用,并且应该被子类重写来提供准确而且有效的对它们的内容的测量。- 当重写该方法时,您必须调用
setMeasuredDimension(int,int)来存储该 view 测量出的宽和高。如果不这样做将会触发 IllegalStateException,由measure(int,int)抛出。- 测量的基类实现默认为背景的尺寸,除非 MeasureSpec 允许使用更大的尺寸。子类应该重写
onMeasure(int,int)方法来提供对内容更好的测量。- 如果该方法被重写,子类负责确保测量的高和宽至少是该 View 的 最小高度和最小宽度值。
- 对于非 ViewGroup 的 View 而言,通过调用上面默认的
onMeasure()即可完成 View 的测量(当然你也可以重载onMeasure()并调用setMeasuredDimension()来设置任意大小的布局,这里就可以根据实际需求来决定,也就是说,如果你不想使用系统默认的测量方式,可以按照自己的意愿进行定制)。- 当通过
setMeasuredDimension()方法最终设置完成 View 的 measure 之后 View 的 mMeasuredWidth 和 mMeasuredHeight 成员变量才会有具体的数值,在setMeasuredDimension()方法调用之后,我们才能使用getMeasuredWidth()和getMeasuredHeight()来获取视图测量出的宽高,以此之前调用这两个方法得到的值都会是 0。- 一个布局中一般都会包含多个子视图,每个视图都需要经历一次 measure 过程。ViewGroup 中定义了一个
measureChildren()、measureChild()、measureChildWithMargins()方法来去测量子视图的大小,三个方法最终都是调用子视图的measure()方法。measureChildren()内部实质上是循环调用measureChild(),而measureChild()和measureChildWithMargins()的区别是在于是否把 margin 和 padding 也作为子视图的大小。(见下面源码)
ViewGroup.java
    protected void measureChildren(int widthMeasureSpec, int heightMeasureSpec) {
        final int size = mChildrenCount;
        final View[] children = mChildren;
        for (int i = 0; i < size; ++i) {
            final View child = children[i];
            if ((child.mViewFlags & VISIBILITY_MASK) != GONE) {
                measureChild(child, widthMeasureSpec, heightMeasureSpec);
            }
        }
    }

    protected void measureChild(View child, int parentWidthMeasureSpec,
            int parentHeightMeasureSpec) {
        final LayoutParams lp = child.getLayoutParams();

        final int childWidthMeasureSpec = getChildMeasureSpec(parentWidthMeasureSpec,
                mPaddingLeft + mPaddingRight, lp.width);
        final int childHeightMeasureSpec = getChildMeasureSpec(parentHeightMeasureSpec,
                mPaddingTop + mPaddingBottom, lp.height);

        child.measure(childWidthMeasureSpec, childHeightMeasureSpec);
    }

    protected void measureChildWithMargins(View child,
            int parentWidthMeasureSpec, int widthUsed,
            int parentHeightMeasureSpec, int heightUsed) {
        final MarginLayoutParams lp = (MarginLayoutParams) child.getLayoutParams();

        final int childWidthMeasureSpec = getChildMeasureSpec(parentWidthMeasureSpec,
                mPaddingLeft + mPaddingRight + lp.leftMargin + lp.rightMargin
                        + widthUsed, lp.width);
        final int childHeightMeasureSpec = getChildMeasureSpec(parentHeightMeasureSpec,
                mPaddingTop + mPaddingBottom + lp.topMargin + lp.bottomMargin
                        + heightUsed, lp.height);

        child.measure(childWidthMeasureSpec, childHeightMeasureSpec);
    }
3.2 performLayout
当 measure 过程完成后,接下来就会进行 layout 阶段,即布局阶段。layout 的作用是根据前面测量的尺寸以及设置的其它属性值,共同来确定 View 的位置。
ViewRootImpl.java
    private void performLayout(WindowManager.LayoutParams lp, int desiredWindowWidth,
            int desiredWindowHeight) {
        ···
        final View host = mView;
        ···
        try {
            host.layout(0, 0, host.getMeasuredWidth(), host.getMeasuredHeight());
            ···
            if (numViewsRequestingLayout > 0) {
                ···
                if (validLayoutRequesters != null) {
                    ···
                    host.layout(0, 0, host.getMeasuredWidth(), host.getMeasuredHeight());
                    ···
                }
            }
        } finally {
            ···
        }
        ···
    }
上面的 host 就是 DecorView ,DecorView 继承了 FrameLayout ,我们来看看 ViewGroup 的 layout() 方法:
ViewGroup.java
    @Override
    public final void layout(int l, int t, int r, int b) {
        if (!mSuppressLayout && (mTransition == null || !mTransition.isChangingLayout())) {
            ···
            super.layout(l, t, r, b);
        } else {
            ···
        }
    }
我们可以看得到,跟 measure() 方法类似,ViewGroup 的 layout() 方法是被 final 修饰的,可见 Android 是不允许自定义的 ViewGroup 子类改变 ViewGroup 的 layout 框架的。这里面直接调用了 View 的 layout() 方法,我们来看看 View 的 layout() 方法。
View.java
    public void layout(int l, int t, int r, int b) {
        ···
        boolean changed = isLayoutModeOptical(mParent) ?
                setOpticalFrame(l, t, r, b) : setFrame(l, t, r, b);

        if (changed || (mPrivateFlags & PFLAG_LAYOUT_REQUIRED) == PFLAG_LAYOUT_REQUIRED) {
            onLayout(changed, l, t, r, b);
            ···
        }
        ···
    }
layout()方法会调用setFrame()方法,setFrame()方法是真正执行布局任务的步骤,至于setOpticalFrame()方法,其中也是调用setFrame()方法,通过设置 View 的 mLeft、mTop、mRight 和 mBottom 四个参数来执行布局,对应描述了 View 相对其父 View 的位置。- 在
setFrame()方法中会判断 View 的位置是否发生了改变,以确定有没有必要对当前的视图进行重绘。- 而对子 View 的局部是通过
onLayout()方法实现的,由于非 ViewGroup 视图不含子 View,所以 View 类的onLayout()方法为空,正因为 layout 过程是父布局容器布局子 View 的过程,onLayout()方法对叶子 View 没有意义,只有 ViewGroup 才有用。
接下来我们看看 ViewGroup 的 onLayout() 方法:
ViewGroup.java
    @Override
    protected abstract void onLayout(boolean changed,
            int l, int t, int r, int b);
可以看到,ViewGroup 中的 onLayout() 方法是一个抽象方法,这就意味着所有 ViewGroup 的子类(FrameLayout 、LinearLayout、RelativeLayout)都必须重写这个方法,然后在内部按照各自的规则对子视图进行布局。这里我们以 DecorView 来分析一下,DecerView 继承自 FrameLayout ,我们直接来看 FrameLayout 的 onLayout() 方法。
FrameLayout.java
    @Override
    protected void onLayout(boolean changed, int left, int top, int right, int bottom) {
        layoutChildren(left, top, right, bottom, false /* no force left gravity */);
    }

    void layoutChildren(int left, int top, int right, int bottom, boolean forceLeftGravity) {
        final int count = getChildCount();
        ···
        for (int i = 0; i < count; i++) {
            final View child = getChildAt(i);
            if (child.getVisibility() != GONE) {
                ···
                final int width = child.getMeasuredWidth();
                final int height = child.getMeasuredHeight();
                ···
                child.layout(childLeft, childTop, childLeft + width, childTop + height);
            }
        }
    }
- 可以看得到,这里面也是对每一个子视图调用
layout()方法的。如果该子视图仍然是父布局,会继续递归下去;如果是叶子 view,则会走到 view 的onLayout()空方法,该叶子view布局流程走完。- width 和 height 分别来源于measure阶段存储的测量值,如果这里通过其它渠道赋给 width 和 height 值,那么 measure 阶段的测量就显得没有意义了。
- 在
onLayout()过程结束后,我们就可以调用getWidth()方法和getHeight()方法来获取视图的宽高值。getWidth()方法和getMeasureWidth()方法的区别:getMeasureWidth()方法在measure()阶段结束后就可以获取到值,而getWidth()方法要在layout()阶段结束后才能获取到。另外,getMeasureWidth()方法中的值是通过setMeasuredDimension()方法来进行设置的,而getWidth()方法中的值则是通过视图右边的坐标减去左边的坐标计算出来的。
在自定义 View 里面,如果在 onLayout() 方法中给子视图的 layout() 方法传入的四个参数是 0, 0, childView.getMeasuredWidth(), childView.getMeasuredHeight(),那么 getWidth() 方法和 getMeasuredWidth() 得到的值就是相同的;如果传入的四个参数是别的自定义的值,那么 getWidth() 方法和 getMeasuredWidth() 得到的值就不会再相同(这里不建议这么操作)。
到这里,layout 阶段的大致流程我们就分析完了,这个阶段主要就是根据上一阶段得到的 View 的测量宽高来确定 View 的最终显示位置。
3.3 performDraw
ViewRootImpl.java
    private void performDraw() {
        ···
        try {
            draw(fullRedrawNeeded);
        } finally {
            ···
        }
        ···
    }

    private void draw(boolean fullRedrawNeeded) {
        ···
        if (!dirty.isEmpty() || mIsAnimating || accessibilityFocusDirty) {
            if (mAttachInfo.mThreadedRenderer != null && mAttachInfo.mThreadedRenderer.isEnabled()) {
                ···
            } else {
                ···
                if (!drawSoftware(surface, mAttachInfo, xOffset, yOffset, scalingRequired, dirty)) {
                    return;
                }
            }
        }
        ···
    }

    private boolean drawSoftware(Surface surface, AttachInfo attachInfo, int xoff, int yoff,
            boolean scalingRequired, Rect dirty) {
        ···
        ···
        try {
            ···
            try {
                ···
                mView.draw(canvas);
                ···
            } finally {
                ···
            }
        } finally {
            ···
        }
        ···
    }
我们跟踪代码,会发现,从 performDraw() 方法开始,最后会调用 mView.draw(canvas); ,而这个 mView 就是我们之前分析过的 DecorView:
DecorView.java
    @Override
    public void draw(Canvas canvas) {
        super.draw(canvas);

        if (mMenuBackground != null) {
            mMenuBackground.draw(canvas);
        }
    }
这里,DecorView 直接调用了父类的 draw() 方法,后面继续绘制了菜单背景,我们重点来看父类的方法,跟踪进去发现,直接就到了 View 类里面,说明 FrameLayout 和 ViewGroup 都没有重写 draw() 方法。
View.java
    @CallSuper
    public void draw(Canvas canvas) {
        ···
        /*
         * Draw traversal performs several drawing steps which must be executed
         * in the appropriate order:
         *
         *      1. Draw the background
         *      2. If necessary, save the canvas' layers to prepare for fading
         *      3. Draw view's content
         *      4. Draw children
         *      5. If necessary, draw the fading edges and restore layers
         *      6. Draw decorations (scrollbars for instance)
         */

        // Step 1, draw the background, if needed
        int saveCount;

        if (!dirtyOpaque) {
            drawBackground(canvas);
        }

        // skip step 2 & 5 if possible (common case)
        final int viewFlags = mViewFlags;
        boolean horizontalEdges = (viewFlags & FADING_EDGE_HORIZONTAL) != 0;
        boolean verticalEdges = (viewFlags & FADING_EDGE_VERTICAL) != 0;
        if (!verticalEdges && !horizontalEdges) {
            // Step 3, draw the content
            if (!dirtyOpaque) onDraw(canvas);

            // Step 4, draw the children
            dispatchDraw(canvas);

            drawAutofilledHighlight(canvas);

            // Overlay is part of the content and draws beneath Foreground
            if (mOverlay != null && !mOverlay.isEmpty()) {
                mOverlay.getOverlayView().dispatchDraw(canvas);
            }

            // Step 6, draw decorations (foreground, scrollbars)
            onDrawForeground(canvas);

            // Step 7, draw the default focus highlight
            drawDefaultFocusHighlight(canvas);

            if (debugDraw()) {
                debugDrawFocus(canvas);
            }

            // we're done...
            return;
        }
        ···
    }
到了 Draw 阶段,源码里面注释也比较清晰明了,这里总共执行了 7 步,其中第 2 步和第 5 步 通常来说都是忽略不执行的,这里同样化繁就简,只分析其他 5 步。
Step 1. 绘制背景; Step 2. 忽略跳过; Step 3. 绘制内容; Step 4. 绘制子视图; Step 5. 忽略跳过; Step 6. 绘制装饰(前景,滚动条); Step 7. 绘制默认焦点高光。
这里我们重点分析 Step 3 和 Step 4 。
Step 3 这里调用了我们熟悉的 onDraw() 方法:
View.java
    /**
     * Implement this to do your drawing.
     *
     * @param canvas the canvas on which the background will be drawn
     */
    protected void onDraw(Canvas canvas) {
    }
这个方法里面什么都没做,但是注释讲得很清楚,重写该方法以完成你想要的绘制。因为每个 View 的内容部分是各不相同的,所以需要由子类去实现具体逻辑。以 DecorView 为例,这里 ViewGroup 和 FrameLayout 都没有重写 onDraw() 方法,只有 DecorView 重写了该方法。DecorView 重写 onDraw() 在里面实现自己需要的绘制。
DecorView.java
    @Override
    public void onDraw(Canvas c) {
        super.onDraw(c);

        // When we are resizing, we need the fallback background to cover the area where we have our
        // system bar background views as the navigation bar will be hidden during resizing.
        mBackgroundFallback.draw(isResizing() ? this : mContentRoot, mContentRoot, c,
                mWindow.mContentParent);
    }
绘制完自己的需求,接着来到 Step 4 的 dispatchDraw():
View.java
    /**
     * Called by draw to draw the child views. This may be overridden
     * by derived classes to gain control just before its children are drawn
     * (but after its own view has been drawn).
     * @param canvas the canvas on which to draw the view
     */
    protected void dispatchDraw(Canvas canvas) {

    }
View 的 dispatchDraw() 方法是一个空方法,但是注释说明了如果 View 包含子类需要重写该方法,实际上对于叶子 View 来说,该方法没有什么意义,因为它没有子 View 需要画了,而对于 ViewGroup 来说,就需要重写该方法来画它的子 View。但是我们可以发现,我们熟悉的 RelativeLayout、LinearLayout、DecorView 之类的布局并没有重写 dispatchDraw() 方法,那我们就直接来看 ViewGroup 里面:
ViewGroup.java
    @Override
    protected void dispatchDraw(Canvas canvas) {
        ···
        for (int i = 0; i < childrenCount; i++) {
            ···
                if ((transientChild.mViewFlags & VISIBILITY_MASK) == VISIBLE ||
                        transientChild.getAnimation() != null) {
                    more |= drawChild(canvas, transientChild, drawingTime);
                }
            ···
            if ((child.mViewFlags & VISIBILITY_MASK) == VISIBLE || child.getAnimation() != null) {
                more |= drawChild(canvas, child, drawingTime);
            }
        }
        while (transientIndex >= 0) {
            // there may be additional transient views after the normal views
            ···
                more |= drawChild(canvas, transientChild, drawingTime);
            ···
        }
        ···
        // Draw any disappearing views that have animations
        if (mDisappearingChildren != null) {
            ···
            for (int i = disappearingCount; i >= 0; i--) {
                ···
                more |= drawChild(canvas, child, drawingTime);
            }
        }
        ···
    }
大体可以看得出来,这里面就是遍历子 View ,调用 drawChild(),以绘制每个子视图:
    /**
     * Draw one child of this View Group. This method is responsible for getting
     * the canvas in the right state. This includes clipping, translating so
     * that the child's scrolled origin is at 0, 0, and applying any animation
     * transformations.
     *
     * @param canvas The canvas on which to draw the child
     * @param child Who to draw
     * @param drawingTime The time at which draw is occurring
     * @return True if an invalidate() was issued
     */
    protected boolean drawChild(Canvas canvas, View child, long drawingTime) {
        return child.draw(canvas, this, drawingTime);
    }
drawChild() 方法里面直接就只有调用子 View 的 draw() 方法,非常明了。同样的,如果该子 View 还有子视图,也会继续遍历下去调用 drawChild() 方法,继续绘制子 View,直到叶子 View 为止,这样不断递归下去,直到画完整棵 DecorView 树。
- 通过上面的分析,我们知道,View 是不会帮我们绘制内容部分的,因此需要每个视图根据想要展示的内容来自行绘制。就是我们自定义 View 过程中重写
onDraw()方法。- 如果该 View 是一个 ViewGroup,则需要递归绘制其所包含的所有子 View。
- 绘制的方式主要是借助 Canvas 这个类,它会作为参数传入到
onDraw()方法中,供给每个视图使用。Canvas 这个类的用法非常丰富,基本可以把它当成一块画布,在上面绘制任意的东西。- 在获取画布剪切区(每个 View 的
draw()方法中传入的 Canvas)时会自动处理掉padding,子 View 获取 Canvas 不用关注这些逻辑,只用关心如何绘制即可。- 默认情况下子 View 的
ViewGroup.drawChild()绘制顺序和子 View 被添加的顺序一致,但是你也可以重载ViewGroup.getChildDrawingOrder()方法提供不同顺序。
- 至此,从 Activity 实例创建开始,我们分析完了整个源码调用流程,到 View 的实际绘制流程。
- 以 Activity 的 DecorView 为例,整个 View 体系就是一棵以 DecorView 为根的 View 树,依次通过遍历来完成 measure、layout 和 draw 过程。
- 在自定义 View 中,每一个视图的绘制过程都必须经历三个最主要的阶段,即通过重写
onMeasure(),onLayout(),onDraw()来完成要自定义的部分。
