非宁静无以致远 非淡泊无以明志
Android中动画分为视图动画与属性动画
视图动画
视图动画分为补间动画Tween Animation与逐帧动画Frame Animation
官方对于视图动画的说明 传送门
You can use the view animation system to perform tweened animation on Views. Tween animation calculates the animation with information such as the start point, end point, size, rotation, and other common aspects of an animation
可以使用视图动画系统在视图上执行补间动画。补间动画使用诸如起点,终点,大小,旋转以及动画的其他常见方面之类的信息来计算动画
AnimationUtils.loadAnimation(this, R.anim.hyperspace_jump).also { hyperspaceJumpAnimation ->
    findViewById<ImageView>(R.id.spaceshipImage).startAnimation(hyperspaceJumpAnimation)
}
在上方这个官方示例中,使用AnimationUtils的loadAnimation方法来加载资源目录下的动画资源,同时控件通过startAnimation方法来使用这个动画。
Another disadvantage of the view animation system is that it only modified where the View was drawn, and not the actual View itself.
视图动画系统的缺点是它只在视图被绘制的地方修改,而不是实际的视图本身。
接下来让我们来仔细地一探究竟
1. 补间动画
下方是补间动画的四种动画以及组合动画集
alpha 渐变透明度动画效果
scale 渐变尺寸伸缩动画效果
rotate 画面旋转转移动画效果
rotate 画面变换位置移动滑动动画效果
set 定义动画集
1.1 Scale动画
同样可以使用代码的形式来创建动画,ScaleAnimation的构造函数如下
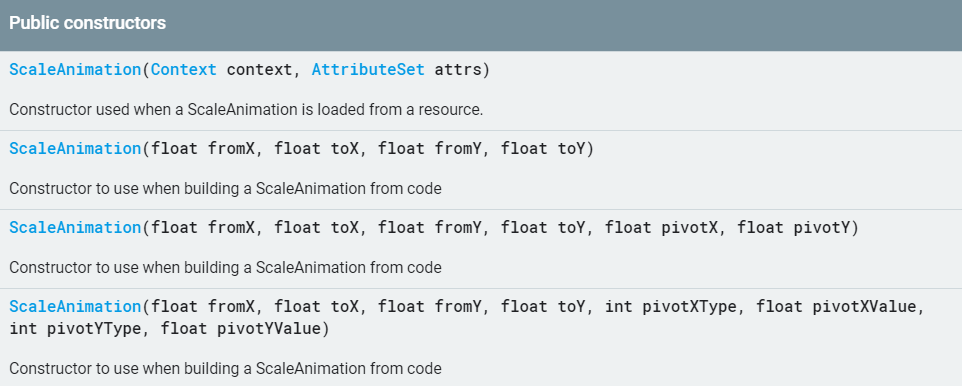
fromX 动画起始时自身的X轴缩放度 toX 动画结束时自身X轴缩放度 fromY同理
起始点默认为View的左上角 pivotX为动画起始点在X轴上的偏移量 pivotY同理
pivotXType不同取值样式时 pivotX的意义不同 pivotYType同理
pivotXType Animation.ABSOLUTE
传入具体的数值,假设pivotX=50, 则动画起始点在X轴上偏移50
pivotXType Animation.RELATIVE_TO_SELF
传入百分比数值,假设pivotX=50%,则动画起始点在X轴上偏移自身相对宽度的50%
pivotXType Animation.RELATIVE_TO_PARENT
传入百分比数值p,假设pivotX=50%p,则动画起始点在X轴上父容器相对宽度的50%
<scale xmlns:android="http://schemas.android.com/apk/res/android"
    android:fromXScale="0.5"
    android:toXScale="1.4"
    android:fromYScale="0.5"
    android:toYScale="1.4"
    android:pivotX="50%"
    android:pivotY="50%"/>
val scaleAnimation = ScaleAnimation(0.5f,1.04f,0.5f,1.4f,Animation.RELATIVE_TO_SELF,0.5f,Animation.RELATIVE_TO_SELF,0.5f)
动画开始时,X轴和Y轴同时缩小0.5倍,动画起始点为View自身的中心,动画结束时X轴和Y轴同时放大1.4倍,俩种声明方式实现了相同的动画效果。
1.2 Alpha动画
AlphaAnimation相对来说简单一些 构造函数如下

fromAlpha 动画起始时透明度 toAlpha 动画结束时透明度 透明度[0,1] 0为完全透明
<alpha xmlns:android="http://schemas.android.com/apk/res/android"
    android:fromAlpha="0.5"
    android:toAlpha="0.1"/>
val alphaAnimation = AlphaAnimation(0.5f,0.1f)
动画开始时0.5的透明度 动画结束时0.1的透明度
1.3 Rotate动画
RotateAnimation的构造函数如下
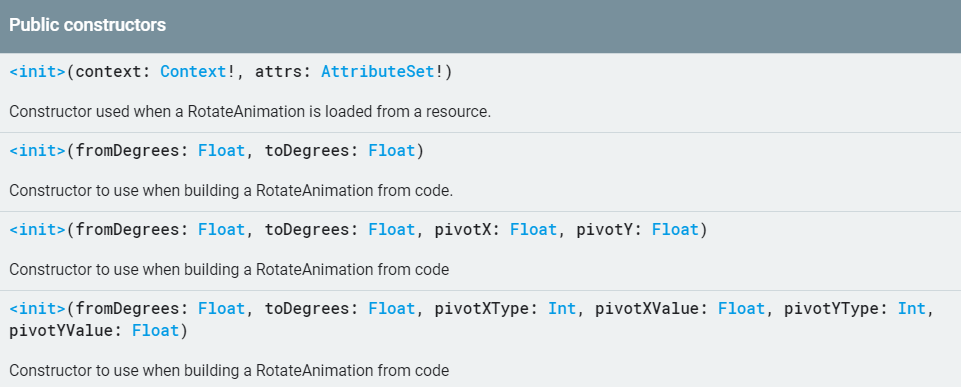
fromDegress 动画开始时的旋转角度 toDegress动画结束时的旋转角度
负数表示逆时针方向,povitX与povitXType用来表示动画中心旋转点的偏移量
<rotate xmlns:android="http://schemas.android.com/apk/res/android"
    android:fromDegrees="0"
    android:toDegrees="-650"
    android:pivotY="50%"
    android:pivotX="50%"/>
val rotateAnimation = RotateAnimation(0f,-650f,Animation.RELATIVE_TO_SELF,0.5f,Animation.RELATIVE_TO_SELF,0.5f)
动画开始角度为0° 中心旋转点为自身中心 动画结束角度为逆时针650°
1.4 Translate动画
TranslateAnimation的构造函数如下
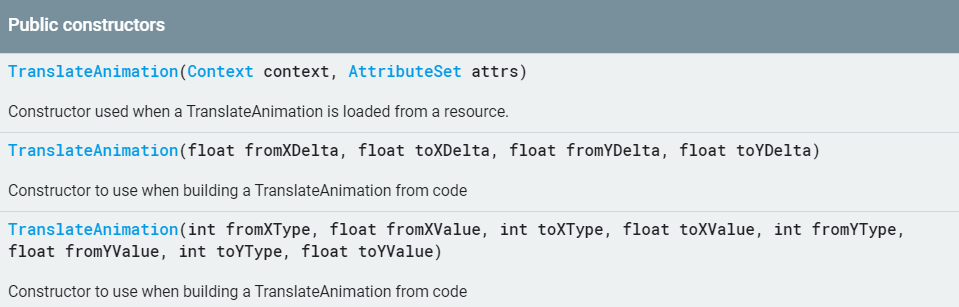
fromXDelta 动画起始时X轴坐标 toXDelta 动画结束时X轴坐标 fromYDelta同理
fromXType 上面已经讲过 类似于povitXType
<translate xmlns:android="http://schemas.android.com/apk/res/android"
    android:fromXDelta="0"
    android:fromYDelta="0"
    android:toXDelta="0"
    android:toYDelta="400"/>
val TranslateAnimation = TranslateAnimation(0f,0f,0f,400f)
动画开始时位置不动,动画结束时Y轴向下移动400
1.5 Set动画集
AnimationSet类构造函数如下
 第二个构造函数
 shareInterpolator为True时使用共享的插值器
<set xmlns:android="http://schemas.android.com/apk/res/android"
android:duration="2000" //动画的持续时间
android:startOffset="600" //动画开始的延迟时间
android:fillAfter="true" //是否保持动画结束时状态
android:fillEnabled="false" //是否保持动画开始时状态
android:fillBefore="false" //同fillEnabled
android:repeatMode="restart" //动画重复的模式
android:repeatCount="1" //动画重复的次数 无效设置
android:shareInterpolator="true" >
<rotate
android:repeatCount="infinite" //有效设置
android:fromDegrees="0"
android:toDegrees="-650"
android:pivotY="50%"
android:pivotX="50%"/>
<translate
android:fromXDelta="0"
android:fromYDelta="0"
android:toXDelta="0"
android:toYDelta="400"/>
<alpha
android:fromAlpha="0.5"
android:toAlpha="0.1"/>
<scale
android:fromXScale="0.5"
android:toXScale="1.4"
android:fromYScale="0.5"
android:toYScale="1.4"
android:pivotX="50%"
android:pivotY="50%"/>
</set>
val alphaAnimation = AlphaAnimation(0.5f,0.1f)
val scaleAnimation = ScaleAnimation(0.5f,1.04f,0.5f,1.4f,Animation.RELATIVE_TO_SELF,0.5f,Animation.RELATIVE_TO_SELF,0.5f)
val rotateAnimation =RotateAnimation(0f,-650f,Animation.RELATIVE_TO_SELF,0.5f,Animation.RELATIVE_TO_SELF,0.5f)
val TranslateAnimation = TranslateAnimation(0f,0f,0f,400f)
val animationSet = AnimationSet(false).also {
    it.addAnimation(scaleAnimation)
    it.addAnimation(scaleAnimation)
    it.addAnimation(alphaAnimation)
    it.addAnimation(translateAnimation)
    it.addAnimation(rotateAnimation)
    it.duration = 2000
    it.startOffset = 600
    it.fillAfter = true
    it.repeatCount = Animation.INFINITE
    it.repeatMode = Animation.RESTART
}
Animation类的相关属性请在xml代码中了解,这里就不再赘述了
值得一提的是,直接设置给Set设置repeatCount是无效,每个动画单独设置才会有效
2. 逐帧动画
逐帧动画比较简单 照搬官网ing~
<animation-list android:id="@+id/selected" android:oneshot="false">
    <item android:drawable="@drawable/wheel0" android:duration="50" />
    <item android:drawable="@drawable/wheel1" android:duration="50" />
    <item android:drawable="@drawable/wheel2" android:duration="50" />
    <item android:drawable="@drawable/wheel3" android:duration="50" />
    <item android:drawable="@drawable/wheel4" android:duration="50" />
    <item android:drawable="@drawable/wheel5" android:duration="50" />
</animation-list>
   ImageView img = (ImageView)findViewById(R.id.spinning_wheel_image);
   img.setBackgroundResource(R.drawable.spin_animation);
   AnimationDrawable frameAnimation = (AnimationDrawable) img.getBackground();
   frameAnimation.start();
android:oneshot 设置为true表示只运行一次 否则无限循环
还可以通过AnimationDrawable类的addFrame方法创建逐帧动画

frame_image.setOnClickListener {
    val animationDrawable = AnimationDrawable()
    animationDrawable.addFrame(resources.getDrawable(R.drawable.ic_1,null),1000)
    animationDrawable.addFrame(resources.getDrawable(R.drawable.ic_2,null),1000)
    animationDrawable.addFrame(resources.getDrawable(R.drawable.ic_3,null),1000)
    animationDrawable.addFrame(resources.getDrawable(R.drawable.ic_4,null),1000)
    animationDrawable.addFrame(resources.getDrawable(R.drawable.ic_5,null),1000)
    animationDrawable.addFrame(resources.getDrawable(R.drawable.ic_6,null),1000)
    animationDrawable.isOneShot = true
    frame_image.background = animationDrawable
    animationDrawable.start()
}
关于视图动画只讲这么多啦,各位朋友可以自行深入探索
插值器
时间插值器用来定义动画的变换率,允许其做非线性运行,例如加速和减速运行。
public interface TimeInterpolator {
    float getInterpolation(float input);
}
float getInterpolation(float input)
iuput动画当前点,0表示开始,1表示结束,允许返回区间外数值,用于实现更多的效果。
接下来看看它的各种不同的实现类
1. 加速插值器Acceleratelnterpolator
public float getInterpolation(float input) {
    if (mFactor == 1.0f) {  //mFactor默认值为1.0f
        return input * input;
    } else {
        return (float)Math.pow(input, mDoubleFactor);
    }
}
当mFactor=1.0f,动画的变化曲线将在y=input^2这条直线上
当mFactor>=1.0f,动画曲线会在y=input^mDoubleFactor 开始更慢 结束更快
在动画开始时改变速率很慢 然后逐渐开始加速
2. 减速插值器Deceleratelntepolator
public float getInterpolation(float input) {
    float result;
    if (mFactor == 1.0f) {
        result = (float)(1.0f - (1.0f - input) * (1.0f - input));
    } else {
        result = (float)(1.0f - Math.pow((1.0f - input), 2 * mFactor));
    }
    return result;
}
它内部的实现与加速插值器相识,一瞬间加大速率,然后缓慢减速
3. 加速减速插值器AccelerateDeceleratelnterpolator
public float getInterpolation(float input) {
    return (float)(Math.cos((input + 1) * Math.PI) / 2.0f) + 0.5f;
}
综合了加速插值器与减速插值器
4. 弹跳插值器Bouncelnterpolator
private static float bounce(float t) {
    return t * t * 8.0f;
}
public float getInterpolation(float t) {
    t *= 1.1226f;
    if (t < 0.3535f) return bounce(t);
    else if (t < 0.7408f) return bounce(t - 0.54719f) + 0.7f;
    else if (t < 0.9644f) return bounce(t - 0.8526f) + 0.9f;
    else return bounce(t - 1.0435f) + 0.95f;
}
动画开始时,速率快速增大,动画结束时,回弹一段距离 dangdangdang~~~
5. 初始偏移插值器Anticipatelnterpolator
public float getInterpolation(float t) {
    return t * t * ((mTension + 1) * t - mTension); //mTension默认值为2.0f
}
动画开始时,反向运动一段距离
6. 结束偏移插值器Overshootlnterpolator
public float getInterpolation(float t) {
    t -= 1.0f;
    return t * t * ((mTension + 1) * t + mTension) + 1.0f;
}
动画结束后,继续运动一段距离
7. AnticipateOvershootlnterpolator
public float getInterpolation(float t) {
    if (t < 0.5f) return 0.5f * a(t * 2.0f, mTension);
    else return 0.5f * (o(t * 2.0f - 2.0f, mTension) + 2.0f);
}
上方俩个插值器的结合体 初始时反向运动一段距离 结束时继续运动一段距离
8. 循环插值器Cyclelnterpolator
public CycleInterpolator(float cycles) {
    mCycles = cycles;
}
public float getInterpolation(float input) {
    return (float)(Math.sin(2 * mCycles * Math.PI * input));
}
循环运动传入参数次数
属性动画
属性动画分为ValueAnimator和ObjectAnimator以及动画集AnimatorSet 官网传送门

The property animation system is a robust framework that allows you to animate almost anything. You can define an animation to change any object property over time, regardless of whether it draws to the screen or not. A property animation changes a property's (a field in an object) value over a specified length of time.
属性动画,顾名思义,在指定的时间长度内更改属性(对象中的字段)的值,可以定义动画以随时间更改任何对象属性,而不管它是否绘制在屏幕上。
How property animation works
照搬官网ing
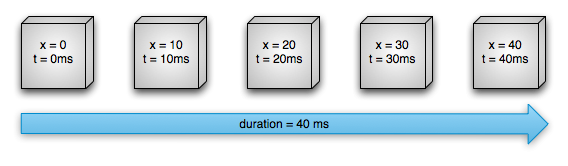 图1描述了一个假想的对象,该对象使用其x属性进行动画处理,该属性表示其在屏幕上的水平位置。动画的持续时间设置为40毫秒,移动距离为40像素。每10毫秒,即默认的帧刷新率,该对象水平移动10个像素。在40ms结束时,动画停止,对象在水平位置40结束。这是一个线性插值动画的例子,意思是物体以恒定的速度移动。

属性动画同视图动画一样,可以使用插值器,指定动画具有非线性插值。
图2演示了一个假想的对象,该对象在动画开始时加速,在动画结束时减速。该对象仍然在40毫秒内移动40个像素,但不是线性的。在开始时,这个动画加速到中途点,然后从中途点减速到动画结束。如图2所示,动画开始和结束的距离小于中间的距离。
1. ValueAnimator
<animator xmlns:android="http://schemas.android.com/apk/res/android"
    android:duration="1000" //动画持续时间
    android:valueFrom="1" //动画开始值
    android:valueTo="0" //动画结束值
    android:valueType="floatType" //参数类型
    android:repeatCount="1" //动画重复次数
    android:repeatMode="reverse"/> //动画重复类型
xml方式构造 这些属性上面已经讲过,不过多阐述了,直奔构造函数
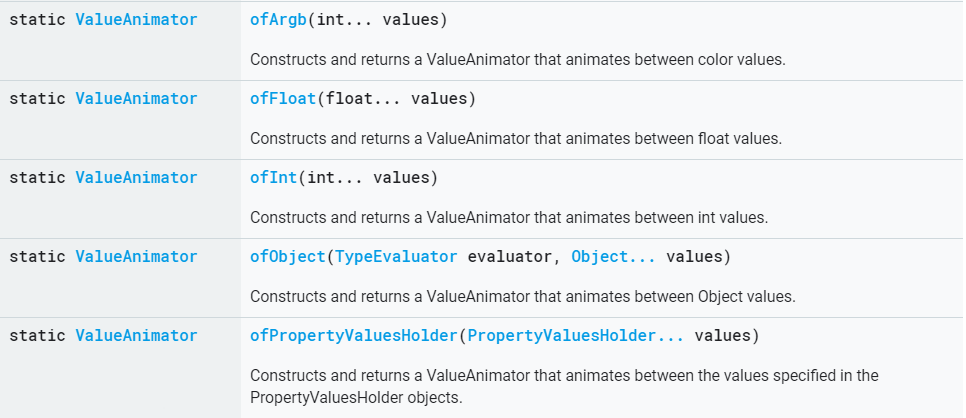
ofArgb``ofFloat``ofInt通过传入对应的数组完成动画的创建,下面讲解ofObject
ofObject
利用自定义TypeEvaluator和自定义属性来创建ValueAnimator
如何自定义TypeEvaluator
首先来看看TypeEvaluator是什么 以及官方对它的实现
public interface TypeEvaluator<T> {
    public T evaluate(float fraction, T startValue, T endValue);
}
public class IntEvaluator implements TypeEvaluator<Integer> {
    public Integer evaluate(float fraction, Integer startValue, Integer endValue) {
        int startInt = startValue;
        return (int)(startInt + fraction * (endValue - startInt));
    }
}
fraction动画的进度值 startValue起始值 endValue 结束值
TypeEvaluator本质是一个转换器,将插值器返回的进度值换算成具体的数值返回给监听器 假设动画区间[startValue,endValue]为[100,400],当前fraction为0.2,那么当前的数值应该是100+(400 - 100)*0.2。
那么可以通过自定义TypeEvaluator来修改返回数值的计算逻辑,从而更改数值。
private class ReserveEvaluator : TypeEvaluator<Int> {
    override fun evaluate(fraction: Float, startValue: Int, endValue: Int): Int {
        return (endValue - (endValue - startValue) * fraction).toInt()
    }
}
这里实现反转进度,从而使用动画从最远处到开始位置的移动,达到reserve的效果
这里需要注意的是,TypeEvaluator实现类型应同传入的数值区间参数类型一致
具体使用
尽管官方已经提供ofInt ofFloat ofArgb 三个方法,其实还是远远不够的。
此时ofObject方法便有了用武之地,可以通过传入任何变量的参数来实现更多的效果
实操1 实现小球的移动
小球的位置由X,Y坐标确定,这里我们通过Point对象来返回球的位置
class FallingBallEvaluator : TypeEvaluator<Point> {
    private val point = Point()
    override fun evaluate(fraction: Float, startValue: Point, endValue:Point): Point {
        point.x = (startValue.x + fraction * (endValue.x - startValue.x)).toInt()
        if(fraction * 2 <= 1) { // 0 - 0.5
            point.y = (startValue.y + fraction * 2 * (endValue.y - startValue.y)).toInt()
        }else { // 0.5 - 1
            point.y = endValue.y
        }
        return point
    }
}
动画进度区间在[0,0.5]时,返回值*2,加速小球在y轴的移动速度
private inline fun ValueAnimator.addListener(crossinline onUpdate : (animator : ValueAnimator) -> Unit = {}) : ValueAnimator.AnimatorUpdateListener{
    val listener = ValueAnimator.AnimatorUpdateListener { animation -> onUpdate(animation) }
    addUpdateListener(listener)
    return listener
} // 典型的没事找事干
private fun doAnimation() {
    val animator = ValueAnimator.ofObject(FallingBallEvaluator(),Point(0,0),Point(500,500))
    animator.addListener(onUpdate = { //瞎操作一波
        val mPoint = animator.animatedValue as Point
        circle_image.layout(mPoint.x,mPoint.y,mPoint.x + circle_image.width,mPoint.y + circle_image.height)
    })
    animator.duration = 2000
    animator.start()
}
这里我们通过监听获取到当前动画进度,通过layout方法改变小球的位置
2. ObjectAnimator
<objectAnimator xmlns:android="http://schemas.android.com/apk/res/android"
    android:propertyName="TranslationX"
    android:duration="2000"
    android:valueFrom="0.0"
    android:valueTo="400.0"
    android:repeatCount="1"
    android:repeatMode="reverse"
    android:startOffset="2000"
    android:interpolator="@android:anim/accelerate_interpolator"
    android:valueType="floatType"/>
ObjectAnimator派生于ValueAnimator,细心的朋友可以看到上方的xml中多了一个android:propertyName属性 声明的属性,会通过反射来调用对应的set函数从而实现动画
val objectAnimator = ObjectAnimator.ofFloat(circle_image,"TranslateX",0f,400f)
objectAnimator.duration = 2000
objectAnimator.startDelay = 2000
objectAnimator.repeatCount = 1
objectAnimator.repeatMode = Animation.REVERSE
objectAnimator.interpolator = AccelerateInterpolator()
objectAnimator.start()
ObjectAnimator的使用方法没有和ValueAnimator有太大差别,它重写了ofFloat这些方法,需要在构造函数中传入动画的指定对象,以及对应的属性名
实操2 实现小球的移动(翻版)
class MyImageView : AppCompatImageView {

    fun setFalling(pos : Point){ layout(pos.x,pos.y,pos.x+width,pos.y+height)}

    constructor(context: Context) : super(context)
    constructor(context: Context, attributeSet: AttributeSet) : super(context,attributeSet)
    constructor(context: Context, attributeSet: AttributeSet, defStyle : Int) : super(context,attributeSet,defStyle)
}

val animator = ObjectAnimator.ofObject(falling_image,"falling",FallingBallEvaluator(),Point(0,0),Point(500,500))
animator.duration = 2000
animator.start()
传入自定义属性,会自动通过反射寻找对应的set函数,从而实现与实操1同样的效果
还可以通过传入Path的方法来构建动画

if (Build.VERSION.SDK_INT >= Build.VERSION_CODES.LOLLIPOP) {
    val path = Path().apply {
        arcTo(0f, 0f, 1000f, 1000f, 270f, -180f, true)
    }
    val animator = ObjectAnimator.ofFloat(view, View.X, View.Y, path).apply {
        duration = 2000
        start()
    }
} else {
    // Create animator without using curved path
}
PathInterpolator
使用PathInterpolator来实现曲线运动
if (Build.VERSION.SDK_INT >= Build.VERSION_CODES.LOLLIPOP) {
    val path = Path().apply {
        arcTo(0f, 0f, 1000f, 1000f, 270f, -180f, true)
    }
    val pathInterpolator = PathInterpolator(path)
}
同时可以通过XML的方式
<pathInterpolator xmlns:android="http://schemas.android.com/apk/res/android"
    android:controlX1="0.4"
    android:controlY1="0"
    android:controlX2="1"
    android:controlY2="1"/>
只需要将插值器设置为pathInterpolator 直接使用
val animation = ObjectAnimator.ofFloat(view, "translationX", 100f).apply {
    interpolator = pathInterpolator
    start()
}
3. AnimatorSet
属性动画同样可以实现视图一样的动画集,那就是AnimatorSet
val bouncer = AnimatorSet().apply {
    play(bounceAnim).before(squashAnim1)
    play(squashAnim1).with(squashAnim2)
    play(squashAnim1).with(stretchAnim1)
    play(squashAnim1).with(stretchAnim2)
    play(bounceBackAnim).after(stretchAnim2)
}
val fadeAnim = ObjectAnimator.ofFloat(newBall, "alpha", 1f, 0f).apply {
    duration = 250
}
AnimatorSet().apply {
    play(bouncer).before(fadeAnim)
    start()
}
AnimatorSet采取的是Builder设计模式 可以更加地灵活构建组合动画
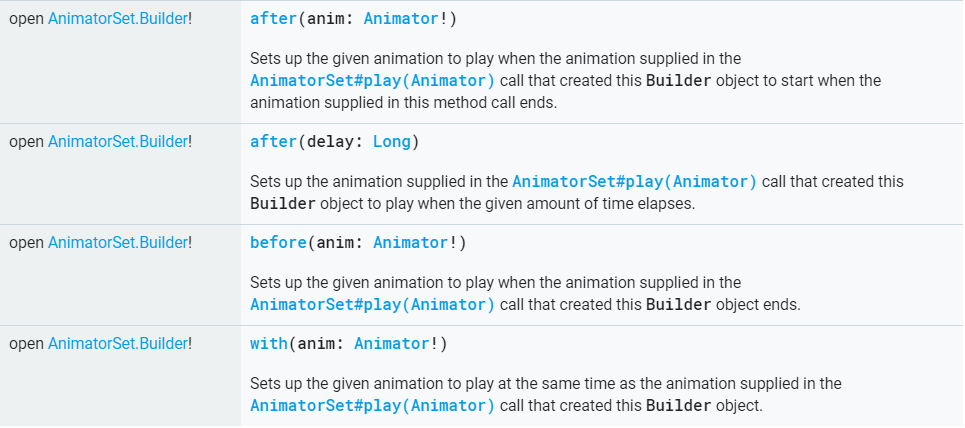
with 同时播放 before 在该动画之前播放 after 在该动画之后播放
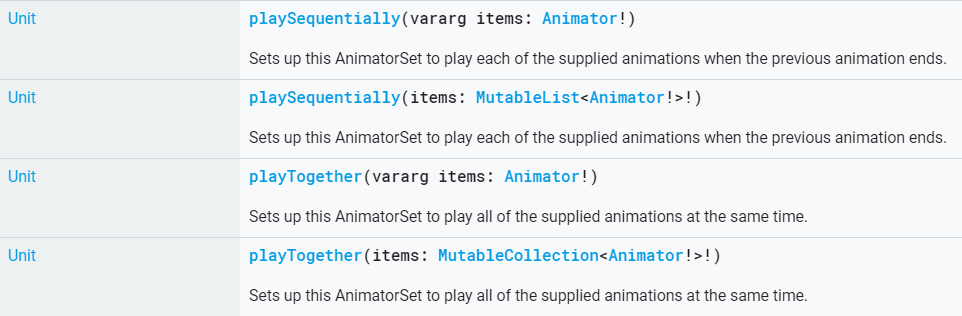
同时也可以用playSequentially和playTogether方法来组合动画
需要值得注意的是,AnimatorSet的setStartDelay方法不会覆盖单个动画的延时
实操3 组合动画实现可伸缩菜单
下面给出关键代码和效果图
private fun doAnimateOpen(view : View,index : Int,total : Int,radius : Int) {
    if(view.visibility != View.VISIBLE) view.visibility = View.VISIBLE
    val degree = Math.toRadians(90.0) * index / (total - 1)
    val translateX = - radius * sin(degree)
    val translateY = - radius * cos(degree)
    val set = AnimatorSet()
    set.playTogether(ObjectAnimator.ofFloat(view,"translationX",0f,translateX.toFloat()),
        ObjectAnimator.ofFloat(view,"translationY",0f,translateY.toFloat()),
        ObjectAnimator.ofFloat(view,"scaleX",0f,1f),
        ObjectAnimator.ofFloat(view,"scaleY",0f,1f),
        ObjectAnimator.ofFloat(view,"alpha",0f,1f))
    set.interpolator = AccelerateInterpolator()
    set.setDuration(500).start()
    IntEvaluator()
}

private fun doAnimateClose(view : View,index: Int,total: Int,radius: Int) {
    if(view.visibility != View.VISIBLE) view.visibility = View.VISIBLE
    val degree = Math.toRadians(90.0) * index / (total - 1)
    val translateX = - radius * sin(degree)
    val translateY = - radius * cos(degree)
    val set = AnimatorSet()
    set.playTogether(ObjectAnimator.ofFloat(view,"translationX",translateX.toFloat(),0f),
    ObjectAnimator.ofFloat(view,"translationY",translateY.toFloat(),0f),
        ObjectAnimator.ofFloat(view,"scaleX",1f,0.1f),
        ObjectAnimator.ofFloat(view,"scaleY",1f,0.1f),
        ObjectAnimator.ofFloat(view,"alpha",1f,0f))
    set.setDuration(500).start()
}
 按钮隐藏在页面的右下角,点击菜单按钮时,同时展开。怎么计算菜单展开时,每个按钮运动的距离,整个动画的角度为90°,计算每个Item与Y轴产生的夹角α,
由三角函数可知,sin(α)=斜边/对边,cos(α)=斜边/邻边,90°一分为三,可知道第二个Item与Y轴的夹角为45°,再使用Math.toRadius方法获得对应角度的正弦值,便可以得到每个Item的translate值
4. PropertyValuesHolder
话不多说,直接上代码就完事了
<objectAnimator xmlns:android="http://schemas.android.com/apk/res/android"
    android:duration="1000"
    android:repeatCount="1"
    android:repeatMode="reverse">
    <propertyValuesHolder android:propertyName="x" android:valueTo="400"/>
    <propertyValuesHolder android:propertyName="y" android:valueTo="200"/>
</objectAnimator>
直接通过在标签中添加属性来改变动画的效果
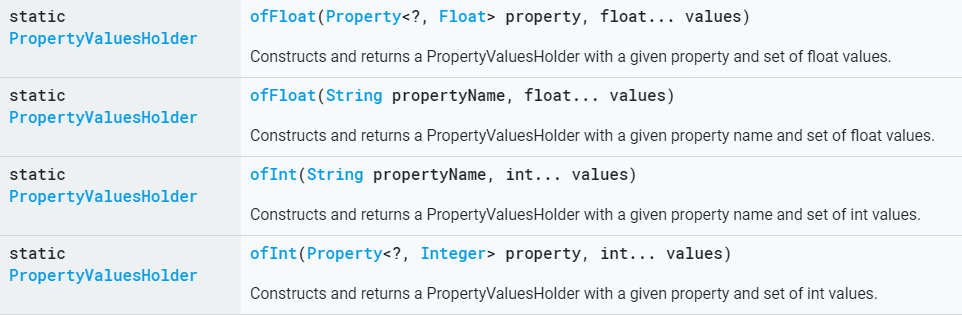 也可以通过构造函数来实现,给属性传入一个值的区域,就像下面这样
val mLeft = PropertyValuesHolder.ofInt("left",0,0)
val mTop = PropertyValuesHolder.ofInt("top",0,0)
val mScaleX = PropertyValuesHolder.ofFloat("scaleX",1f,0f,1f)
val animator = ObjectAnimator.ofPropertyValuesHolder(btn_layout,mLeft,mTop,mScaleX)
类似于ObjectAnimator的ofObject方法,这里就不过多讲解了

Keyframe
前面已经讲过可以使用AnimationDrawable的addFrame方法添加每一帧的资源实现逐帧动画,PropertyValuesHolder同样可以通过ofKeyFrame方法来达到同样的目的
 同样也有xml方式
<propertyValuesHolder android:propertyName="x" >
    <keyframe android:fraction="0" android:value="800" />
    <keyframe android:fraction=".2"
              android:interpolator="@android:anim/accelerate_interpolator"
              android:value="1000" />
    <keyframe android:fraction="1"
              android:interpolator="@android:anim/accelerate_interpolator"
              android:value="400" />
</propertyValuesHolder>
<propertyValuesHolder android:propertyName="y" >
    <keyframe/>
    <keyframe android:fraction=".2"
              android:interpolator="@android:anim/accelerate_interpolator"
              android:value="300"/>
    <keyframe android:interpolator="@android:anim/accelerate_interpolator"
              android:value="1000" />
</propertyValuesHolder>
同样具有ofObject方法,可以自行探索
public static Keyframe ofObject(float fraction, Object value) {
    return new ObjectKeyframe(fraction, value);
}
val kf0 = Keyframe.ofFloat(0f, 0f)
val kf1 = Keyframe.ofFloat(.5f, 360f)
val kf2 = Keyframe.ofFloat(1f, 0f)
val pvhRotation = PropertyValuesHolder.ofKeyframe("rotation", kf0, kf1, kf2)
ObjectAnimator.ofPropertyValuesHolder(target, pvhRotation).apply {
    duration = 5000
}
通过PropertyValuesHolder添加每个关键帧
ViewPropertyAnimator
采用了Builder的设计模式,更加舒服的声明方式 官网传送门
5. Animate layout changes to ViewGroup objects
对ViewGroup对象进行动态布局更改
开启默认动画
animateLayoutChanges属性设置为True 开启ViewGoup的默认动画
<LinearLayout
    android:orientation="vertical"
    android:layout_width="wrap_content"
    android:layout_height="match_parent"
    android:id="@+id/verticalContainer"
    android:animateLayoutChanges="true" />
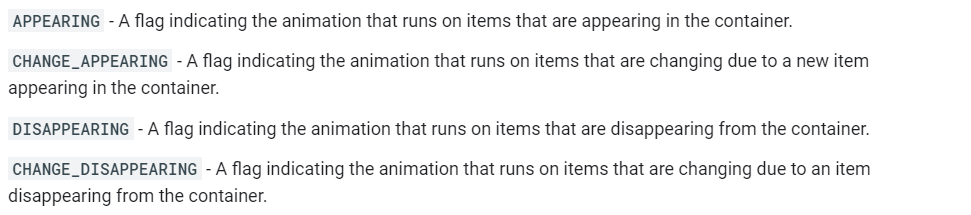
LayoutTransition
实现ViewGroup添加或删除控件显示指定动画 链接
6. Animate view state changes using StateListAnimator
StateListAnimator类允许您定义在视图状态改变时运行的动画器。此对象充当Animator对象的包装器,每当指定的视图状态发生更改时,就调用该动画。
<?xml version="1.0" encoding="utf-8"?>
<selector xmlns:android="http://schemas.android.com/apk/res/android">
    <item android:state_pressed="true">
        <set>
            <objectAnimator android:propertyName="scaleX"
                android:duration="@android:integer/config_shortAnimTime"
                android:valueTo="1.5"
                android:valueType="floatType"/>
            <objectAnimator android:propertyName="scaleY"
                android:duration="@android:integer/config_shortAnimTime"
                android:valueTo="1.5"
                android:valueType="floatType"/>
        </set>
    </item>
    <item android:state_pressed="false">
        <set>
            <objectAnimator android:propertyName="scaleX"
                android:duration="@android:integer/config_shortAnimTime"
                android:valueTo="1"
                android:valueType="floatType"/>
            <objectAnimator android:propertyName="scaleY"
                android:duration="@android:integer/config_shortAnimTime"
                android:valueTo="1"
                android:valueType="floatType"/>
        </set>
    </item>
</selector>
<Button
        android:gravity="center"
        android:text="@string/button"
        android:id="@+id/button"
        android:layout_width="120dp"
        android:layout_height="50dp"
        android:stateListAnimator="@xml/animate_scale" //应用StateListAnimator
        android:textColor="@android:color/white"
        android:background="@android:color/darker_gray"
        android:layout_centerInParent="true"/>
点击Button时,XY轴同时缩放到1.5倍
感谢各位的阅读 谢谢