

多线程开发是日常开发任务中不可缺少的一部分,在iOS开发中常用到的多线程开发技术有
GCD、NSOperation、NSThread,本文主要讲解多线系列文章中关于NSOperation的相关知识和使用详解。
1、GCD简介
GCD对于iOS开发者来说并不陌生,在实际开发中我们会经常用到GCD进行多线程的处理,那么GCD是什么呢?
Grand Central Dispatch(GCD) 是 Apple 开发的一个多核编程的较新的解决方法。它主要用于优化应用程序以支持多核处理器以及其他对称多处理系统。它是一个在线程池模式的基础上执行的并发任务。在 Mac OS X 10.6 雪豹中首次推出,也可在 iOS 4 及以上版本使用。
GCD有着很明显的优势,正是这些优势才使得GCD在处理多线程问题有着举足轻重的地位。
- GCD是apple为多核的并行运算提出的解决方案。
- GCD能较好的利用CPU内核资源。
- GCD不需要开发者去管理线程的生命周期。
- 使用简便,开发者只需要告诉GCD执行什么任务,并不需要编写任何线程管理代码。
2、GCD任务和队列
相信很多初级开发者会对GCD任务和队列之间的关系理解含糊不清,实际上队列只是提供了保存任务的容器。为了更好的理解GCD,很有必要先了解任务和队列的概念。
2.1 GCD任务
任务就是需要执行的操作,是GCD中放在block中在线程中执行的那段代码。任务的执行的方式有同步执行和异步执行两中执行方式。两者的主要区别是是否等待队列的任务执行结束,以及是否具备开启新线程的能力。
- 同步执行(sync):同步添加任务到队列中,在队列之前的任务执行结束之前会一直等待;同步执行的任务只能在当前线程中执行,不具备开启新线程的能力。
- 异步执行(async):异步添加任务到队列中,并需要理会队列中其他的任务,添加即执行;异步执行可以在新的线程中执行,具备开启新的线程的能力。
2.2 GCD的队列
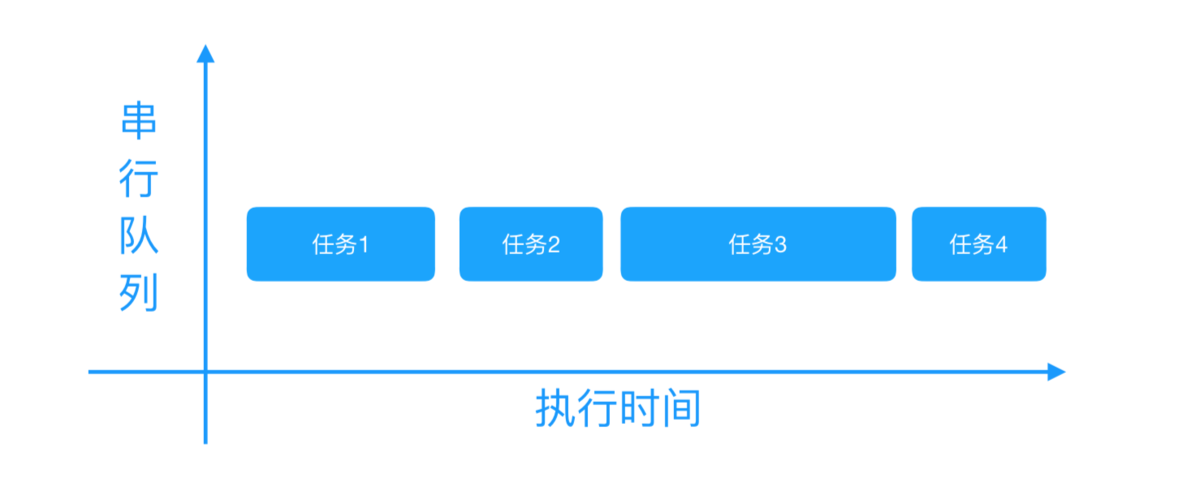
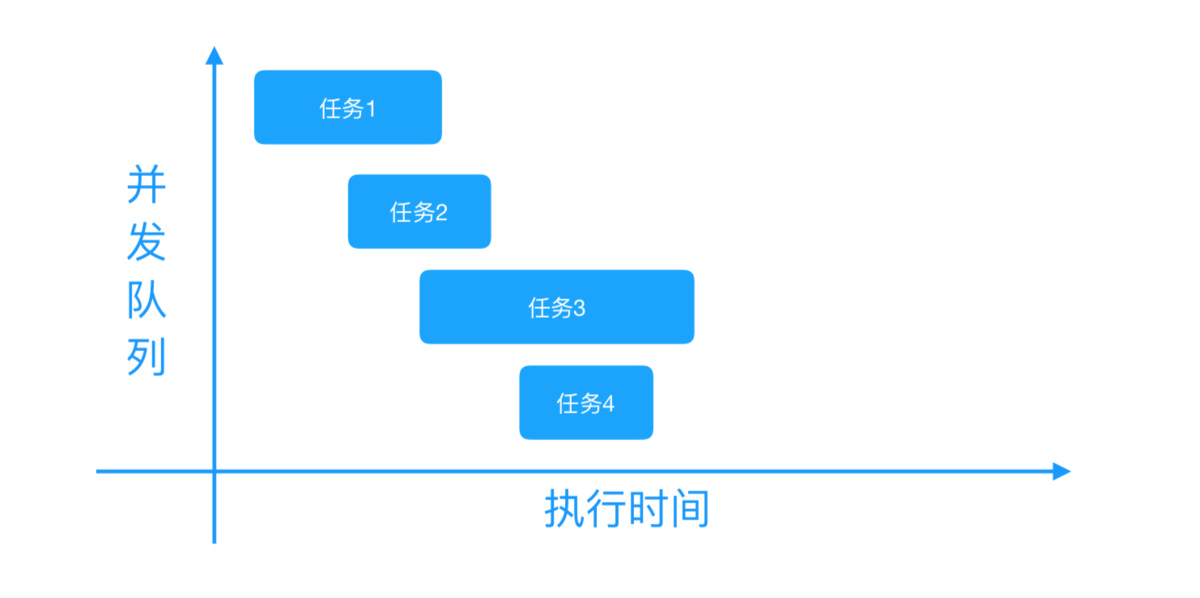
队列:队列是一种特殊的线性表,队列中允许插入操作的一端称为队尾,允许删除操作的一端称为队头,是一种先进先出的结构。在GCD里面队列是指执行任务的等待队列,是用来存放任务的。按照队列的结构特性,新任务总是插入在队列的末尾,而任务的执行总是从队列的对头输出,每读取一个任务,则从队列中释放一个任务。GCD的队列分为串行队列和并发队列两种,两者都符合 FIFO(先进先出)的原则。两者的主要区别是:执行顺序不同,以及开启线程数不同。
- 串行队列:只开启一个线程,每次只能有一个任务执行,等待执行完毕后才会执行下一个任务。
- 并发队列:可以让对个任务同时执行,也就是开启多个线程,让多个任务同时执行。
两者之间区别如下图所示:
3、GCD基本使用
GCD的使用很简单,首先创建一个队列,然后向队列中追加任务,系统会根据任务的类型执行任务。
3.1、队列的创建
- 队列的创建很简单,只需要调用
dispatch_queue_create方法传入相对应的参数便可。这个方法有两个参数:
- 第一个参数表示队列的唯一标识,可以传空。
- 第二个参数用来识别是串行队列还是并发队列。
DISPATCH_QUEUE_SERIAL表示串行队列,DISPATCH_QUEUE_CONCURRENT表示并发队列。
// 创建串行队列
dispatch_queue_t queue = dispatch_queue_create("com.shen.thread.demo", DISPATCH_QUEUE_SERIAL);
// 创建并发队列
dispatch_queue_t queue = dispatch_queue_create("com.shen.thread.demo", DISPATCH_QUEUE_CONCURRENT);
- GCD默认提供一种全局并发队列,调用
dispatch_get_global_queue方法来获取全局并发队列。这个方法需要传入两个参数。
- 第一个参数是一个长整型类型的参数,表示队列优先级,有
DISPATCH_QUEUE_PRIORITY_HIGH、DISPATCH_QUEUE_PRIORITY_LOW、DISPATCH_QUEUE_PRIORITY_BACKGROUND、DISPATCH_QUEUE_PRIORITY_DEFAULT四个选项,一般用DISPATCH_QUEUE_PRIORITY_DEFAULT。 - 第二个参数暂时没用,用 0 即可。
// 获取全局并发队列
dispatch_queue_t globalQueue = dispatch_get_global_queue(DISPATCH_QUEUE_PRIORITY_DEFAULT, 0);
- GCD默认提供了主队列,调用
dispatch_get_main_queue方法获取,所有放在主队列中的任务都会在主线程中执行。主队列是一种串行队列。
// 主队
dispatch_queue_t mainQueue = dispatch_get_main_queue();
3.2、创建任务
GCD调用dispatch_sync创建同步任务,调用dispatch_async创建异步任务。任务的内容都是在block代码块中。
//异步任务
dispatch_async(queue, ^{
   //异步执行的代码
});

//同步任务
dispatch_sync(queue, ^{
   //同步执行的代码
});
3.3、任务和队列的组合
创建的任务需要放在队列中去执行,同时考虑到主队列的特殊性,那么在不考虑嵌套任务的情况下就会存在同步任务+串行队列、同步任务+并发队列、异步任务+串行队列、异步任务+并发队列、主队列+同步任务、主队列+异步任务六种组合,下面我们来分析下这几种组合。
- 同步任务+串行队列:同步任务不会开启新的线程,任务串行执行。
- 同步任务+并发队列:同步任务不会开启新的线程,虽然任务在并发队列中,但是系统只默认开启了一个主线程,没有开启子线程,所以任务串行执行。
- 异步任务+串行队列:异步任务有开启新的线程,任务串行执行。
- 异步任务+并发队列:异步任务有开启新的线程,任务并发执行。
- 主队列+同步任务:主队列是一种串行队列,任务在主线程中串行执行,将同步任务添加到主队列中会造成追加的同步任务和主线程中的任务相互等待阻塞主线程,导致死锁。
- 主队列+异步任务:主队列是一种串行队列,任务在主线程中串行执行,即使是追加的异步任务也不会开启新的线程,任务串行执行。
下面我们来看看各种组合之间的使用。
3.4、GCD的基础使用
3.4.1、同步任务+串行队列
- (void)syncTaskWithSerial {
    NSLog(@"currentThread:%@", [NSThread currentThread]);
    dispatch_queue_t queue = dispatch_queue_create("com.shen.thread.demo", DISPATCH_QUEUE_SERIAL);
    dispatch_sync(queue, ^{
        NSLog(@"currentThread-1:%@", [NSThread currentThread]);
    });
    dispatch_sync(queue, ^{
        NSLog(@"currentThread-2:%@", [NSThread currentThread]);
    });
    dispatch_sync(queue, ^{
        NSLog(@"currentThread-3:%@", [NSThread currentThread]);
    });
}
打印结果:
2020-03-12 21:34:25.807965+0800 ThreadDemo[51144:6948582] currentThread:<NSThread: 0x600001739100>{number = 1, name = main}
2020-03-12 21:34:25.808231+0800 ThreadDemo[51144:6948582] currentThread-1:<NSThread: 0x600001739100>{number = 1, name = main}
2020-03-12 21:34:25.808467+0800 ThreadDemo[51144:6948582] currentThread-2:<NSThread: 0x600001739100>{number = 1, name = main}
2020-03-12 21:34:25.808669+0800 ThreadDemo[51144:6948582] currentThread-3:<NSThread: 0x600001739100>{number = 1, name = main}
从上面代码运行的结果可以看出,并没有开启新的线程,任务是按顺序执行的。
3.4.2、同步任务+并发队列
- (void)syncTaskWithConcurrent {
    NSLog(@"current thread:%@", [NSThread currentThread]);
    dispatch_queue_t queue = dispatch_queue_create("com.shen.thread.demo", DISPATCH_QUEUE_CONCURRENT);
    dispatch_sync(queue, ^{
        NSLog(@"current thread-1:%@", [NSThread currentThread]);
    });
    dispatch_sync(queue, ^{
        NSLog(@"current thread-2:%@", [NSThread currentThread]);
    });
    dispatch_sync(queue, ^{
        NSLog(@"current thread-3:%@", [NSThread currentThread]);
    });
}
打印结果:
2020-03-12 21:39:45.931001+0800 ThreadDemo[51225:6953218] current thread:<NSThread: 0x600002abe0c0>{number = 1, name = main}
2020-03-12 21:39:45.931259+0800 ThreadDemo[51225:6953218] current thread-1:<NSThread: 0x600002abe0c0>{number = 1, name = main}
2020-03-12 21:39:45.931442+0800 ThreadDemo[51225:6953218] current thread-2:<NSThread: 0x600002abe0c0>{number = 1, name = main}
2020-03-12 21:39:45.931606+0800 ThreadDemo[51225:6953218] current thread-3:<NSThread: 0x600002abe0c0>{number = 1, name = main}
从上面代码运行的结果可以看出,同步任务不会开启新的线程,虽然任务在并发队列中,但是系统只默认开启了一个主线程,没有开启子线程,所以任务串行执行。
3.4.3、异步任务+串行队列
- (void)asyncTaskWithSeria{
    NSLog(@"current thread:%@", [NSThread currentThread]);
    dispatch_queue_t queue = dispatch_queue_create("com.shen.thread.demo", DISPATCH_QUEUE_SERIAL);
    dispatch_async(queue, ^{
        NSLog(@"current thread-1:%@", [NSThread currentThread]);
    });
    dispatch_async(queue, ^{
        NSLog(@"current thread-2:%@", [NSThread currentThread]);
    });
    dispatch_async(queue, ^{
        NSLog(@"current thread-3:%@", [NSThread currentThread]);
    });
    NSLog(@"4");
}
打印结果:
2020-03-12 21:44:22.369058+0800 ThreadDemo[51283:6957598] current thread:<NSThread: 0x6000031891c0>{number = 1, name = main}
2020-03-12 21:44:22.369279+0800 ThreadDemo[51283:6957598] 4
2020-03-12 21:44:22.369346+0800 ThreadDemo[51283:6958684] current thread-1:<NSThread: 0x6000031acb80>{number = 7, name = (null)}
2020-03-12 21:44:22.369511+0800 ThreadDemo[51283:6958684] current thread-2:<NSThread: 0x6000031acb80>{number = 7, name = (null)}
2020-03-12 21:44:22.369675+0800 ThreadDemo[51283:6958684] current thread-3:<NSThread: 0x6000031acb80>{number = 7, name = (null)}
从上面代码运行的结果可以看出,开启了一个新的线程,说明异步任务具备开启新的线程的能力,但是由于任务是在串行队列中执行的,所以任务是顺序执行的。
3.4.4、异步任务+并发队列
- (void)asyncTaskWithConcurrent{
    NSLog(@"current thread:%@", [NSThread currentThread]);
    dispatch_queue_t queue = dispatch_queue_create("com.shen.thread.demo", DISPATCH_QUEUE_CONCURRENT);
    dispatch_async(queue, ^{
        NSLog(@"current thread-1:%@", [NSThread currentThread]);
    });
    dispatch_async(queue, ^{
        NSLog(@"current thread-2:%@", [NSThread currentThread]);
    });
    dispatch_async(queue, ^{
        NSLog(@"current thread-3:%@", [NSThread currentThread]);
    });
    dispatch_async(queue, ^{
        NSLog(@"current thread-4:%@", [NSThread currentThread]);
    });
}
打印结果:
2020-03-12 21:59:36.511770+0800 ThreadDemo[51635:6976397] current thread:<NSThread: 0x60000024ed00>{number = 1, name = main}
2020-03-12 21:59:36.512015+0800 ThreadDemo[51635:6976575] current thread-2:<NSThread: 0x600000214ec0>{number = 5, name = (null)}
2020-03-12 21:59:36.512011+0800 ThreadDemo[51635:6976577] current thread-1:<NSThread: 0x600000215700>{number = 4, name = (null)}
2020-03-12 21:59:36.512028+0800 ThreadDemo[51635:6976580] current thread-3:<NSThread: 0x60000021f2c0>{number = 6, name = (null)}
2020-03-12 21:59:36.512035+0800 ThreadDemo[51635:6976578] current thread-4:<NSThread: 0x60000023b340>{number = 7, name = (null)}
从上面代码的运行结果可以看出,生成了多个线程,并且任务是随机执行(并发执行)的。
3.4.5、主队列+同步任务
-(void)syncTaskWithMain{
    NSLog(@"currentThread---%@",[NSThread currentThread]);
    dispatch_queue_t queue = dispatch_get_main_queue();
    dispatch_sync(queue, ^{
        NSLog(@"1---%@",[NSThread currentThread]);
    });

    dispatch_sync(queue, ^{
        NSLog(@"2---%@",[NSThread currentThread]);
    });

    dispatch_sync(queue, ^{
        NSLog(@"3---%@",[NSThread currentThread]);
    });

    NSLog(@"4");
}
打印结果:
2020-03-12 22:05:01.689594+0800 ThreadDemo[51754:6982402] currentThread---<NSThread: 0x600003eaed00>{number = 1, name = main}
(lldb)
很明显上面这段代码运行崩溃了,这是因为我们在主线程中执行 syncTaskWithMain 方法,相当于把 syncTaskWithMain 任务放到了主线程的队列中。而 同步执行会等待当前队列中的任务执行完毕,才会接着执行。那么当我们把 任务 1 追加到主队列中,任务 1 就在等待主线程处理完 syncTaskWithMain 任务。而syncMain 任务需要等待任务 1 执行完毕,这样就形成了相互等待的情况,产生了死锁。
3.4.6、主队列+异步任务
-(void)asyncTaskWithMain{
    NSLog(@"currentThread---%@",[NSThread currentThread]);
    dispatch_queue_t queue = dispatch_get_main_queue();
    dispatch_async(queue, ^{
        NSLog(@"1---%@",[NSThread currentThread]);
    });

    dispatch_async(queue, ^{
        NSLog(@"2---%@",[NSThread currentThread]);
    });

    dispatch_async(queue, ^{
        NSLog(@"3---%@",[NSThread currentThread]);
    });

    NSLog(@"4");
}
打印结果:
2020-03-12 22:09:49.285203+0800 ThreadDemo[51832:6986908] currentThread---<NSThread: 0x600000aff3c0>{number = 1, name = main}
2020-03-12 22:09:49.285539+0800 ThreadDemo[51832:6986908] 4
2020-03-12 22:09:49.326310+0800 ThreadDemo[51832:6986908] 1---<NSThread: 0x600000aff3c0>{number = 1, name = main}
2020-03-12 22:09:49.326749+0800 ThreadDemo[51832:6986908] 2---<NSThread: 0x600000aff3c0>{number = 1, name = main}
2020-03-12 22:09:49.326988+0800 ThreadDemo[51832:6986908] 3---<NSThread: 0x600000aff3c0>{number = 1, name = main}\
从上面代码的运行结果可以看出,虽然是异步任务,但是并没有开启新的线程,任然是在主线程中执行,并且任务是顺序执行的。
3.5、任务嵌套使用
关于任务的嵌套使用有多种情况,这里做一个简单的总结,
| 区别 | 『异步执行+并发队列』嵌套『同一个并发队列』 | 『同步执行+并发队列』嵌套『同一个并发队列』 | 『异步执行+串行队列』嵌套『同一个串行队列』 | 『同步执行+串行队列』嵌套『同一个串行队列』 |
|---|---|---|---|---|
| 同步 | 没有开启新的线程,串行执行任务 | 没有开启新线程,串行执行任务 | 死锁卡住不执行 | 死锁卡住不执行 |
| 异步 | 有开启新线程,并发执行任务 | 有开启新线程,并发执行任务 | 有开启新线程(1 条),串行执行任务 | 有开启新线程(1 条),串行执行任务 |
对于『异步执行+串行队列』嵌套『同一个串行队列』造成死锁的情况请看如下代码:
dispatch_queue_t queue = dispatch_queue_create("com.shen.thread.demo", DISPATCH_QUEUE_SERIAL);
//异步任务A
dispatch_async(queue, ^{
    //同步任务B
    dispatch_sync(queue, ^{
        NSLog(@"任务C---%@",[NSThread currentThread]);
    });
});
首先异步任务A进入到队列中,同步任务B对于异步任务A来说是代码执行部分,C对于同步任务B来说是代码执行部分,因为是在串行队列中,任务是串行执行的,根据队列先进先出原则,首先需要把任务A取出执行,即执行B的部分,但是B依赖C的执行,而C等待着B执行完成后执行,这样就形成了一个相互等待,造成死锁卡死。
『同步执行+串行队列』嵌套『同一个串行队列』造成死锁的情况同理分析。
4、GCD线程间的通信
在 iOS 开发过程中,我们在主线程进行UI刷新,把图片下载、文件上传、网络请求等一些耗时的操作放在其他的线程,当这些耗时的操作完成后需要将数据同步给UI,就需要回到主线程刷新UI,那么就要用到线程之间的通讯。GCD提供了非常简便的方法进行线程间的通讯。
- (void)communication {
    dispatch_queue_t queue = dispatch_queue_create("com.shen.thread.demo", DISPATCH_QUEUE_CONCURRENT);
    dispatch_async(queue, ^{
        NSLog(@"1---%@",[NSThread currentThread]);
        // 模拟耗时操作
        sleep(2);
        // 回到主线程
        dispatch_async(dispatch_get_main_queue(), ^{
            NSLog(@"2---%@",[NSThread currentThread]);      // 打印当前线程
        });
    });
}
打印结果:
2020-03-13 00:06:07.632014+0800 ThreadDemo[53480:7074047] 1---<NSThread: 0x60000063e480>{number = 5, name = (null)}
2020-03-13 00:06:09.633041+0800 ThreadDemo[53480:7073841] 2---<NSThread: 0x60000061a180>{number = 1, name = main}\
从上面代码运行的结果可以看出,1是在子线程中执行的,隔2秒后打印2,2是在主线程中执行的。
5、GCD中的函数方法
GCD中提供了诸多的函数方法供开发者调用,我们一起来看下这些方法的使用。
5.1、栅栏方法
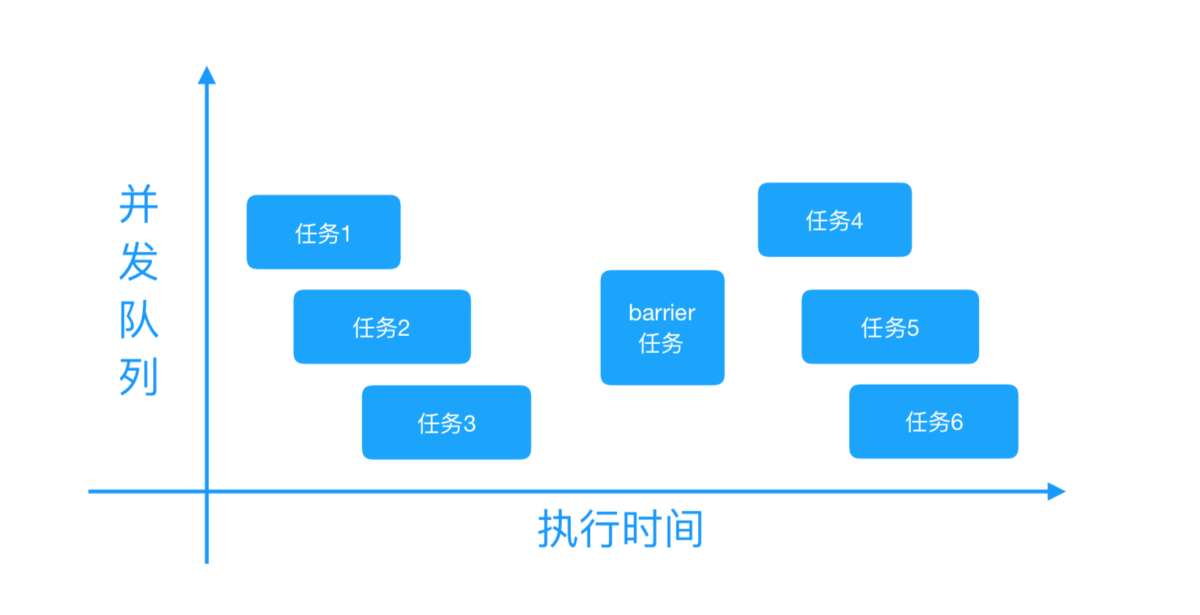
有的时候我们需要异步执行两组操作,等待第一组执行完成后才回去执行第二组操作,这个时候栅栏方法就起作用了。
栅栏方法(dispatch_barrier_async或dispatch_barrier_sync)会等前边追加到队列中的任务执行完毕后,再将制定的任务追加到队列中,然后等到dispatch_barrier_async或dispatch_barrier_sync方法追加的任务执行完毕后才会去执行后边追加到队列中的任务,简单来说dispatch_barrier_async或dispatch_barrier_sync将异步任务分成了两个组,执行完第一组后,再执行自己,然后执行队列中剩余的任务。唯一不同的是dispatch_barrier_async不会阻塞线程。
看如下代码:
- (void)barrierTask {
    dispatch_queue_t queue = dispatch_queue_create("com.shen.thread.demo", DISPATCH_QUEUE_CONCURRENT);
    NSLog(@"start");
    dispatch_async(queue, ^{
        NSLog(@"currentThread-1:%@", [NSThread currentThread]);
    });
    dispatch_barrier_async(queue, ^{
        NSLog(@"currentThread-2:%@", [NSThread currentThread]);
        [NSThread sleepForTimeInterval:2];
    });
    NSLog(@"pause");
    dispatch_async(queue, ^{
        NSLog(@"currentThread-3:%@", [NSThread currentThread]);
    });
    NSLog(@"end");
}
打印结果:
2020-03-13 00:31:53.247514+0800 ThreadDemo[54101:7100220] start
2020-03-13 00:31:53.247730+0800 ThreadDemo[54101:7100220] pause
2020-03-13 00:31:53.247809+0800 ThreadDemo[54101:7100396] currentThread-1:<NSThread: 0x600003b8db00>{number = 5, name = (null)}
2020-03-13 00:31:53.247883+0800 ThreadDemo[54101:7100220] end
2020-03-13 00:31:53.247991+0800 ThreadDemo[54101:7100396] currentThread-2:<NSThread: 0x600003b8db00>{number = 5, name = (null)}
2020-03-13 00:31:55.250622+0800 ThreadDemo[54101:7100396] currentThread-3:<NSThread: 0x600003b8db00>{number = 5, name = (null)}
从上面的代码运行结果可以看出,start、pause、end都是在2执行答应的,说明dispatch_barrier_async并没有阻塞线程,3是在2打印两秒后打印的。
如果把dispatch_barrier_async换成dispatch_barrier_sync打印结果会是怎么样呢?
- (void)barrierTask {
    dispatch_queue_t queue = dispatch_queue_create("com.shen.thread.demo", DISPATCH_QUEUE_CONCURRENT);
    NSLog(@"start");
    dispatch_async(queue, ^{
        NSLog(@"currentThread-1:%@", [NSThread currentThread]);
    });
    dispatch_barrier_sync(queue, ^{
        NSLog(@"currentThread-2:%@", [NSThread currentThread]);
        [NSThread sleepForTimeInterval:2];
    });
    NSLog(@"pause");
    dispatch_async(queue, ^{
        NSLog(@"currentThread-3:%@", [NSThread currentThread]);
    });
    NSLog(@"end");
}
打印结果:
2020-03-13 00:35:01.460109+0800 ThreadDemo[54171:7103212] start
2020-03-13 00:35:01.460408+0800 ThreadDemo[54171:7103379] currentThread-1:<NSThread: 0x600002508540>{number = 6, name = (null)}
2020-03-13 00:35:01.460588+0800 ThreadDemo[54171:7103212] currentThread-2:<NSThread: 0x600002570880>{number = 1, name = main}
2020-03-13 00:35:03.461678+0800 ThreadDemo[54171:7103212] pause
2020-03-13 00:35:03.462012+0800 ThreadDemo[54171:7103212] end
2020-03-13 00:35:03.462145+0800 ThreadDemo[54171:7103379] currentThread-3:<NSThread: 0x600002508540>{number = 6, name = (null)}
从上面代码运行的结果可以看出,pause和end是在2之后打印的,说明dispatch_barrier_sync阻塞了线程,需要等待dispatch_barrier_sync执行完成后才会往后执行。
5.2、延时执行方法-dispatch_after
延时执行任务相信对于iOS开发者来说并不陌生,我们经常遇到需要在延后指定之间后执行某个操作的需求,那么这种需求用GCD来实现是很方便的。GCD的延时执行的函数是dispatch_after。需要注意的是:dispatch_after 方法并不是在指定时间之后才开始执行处理,而是在指定时间之后将任务追加到主队列中。严格来说,这个时间并不是绝对准确的,但想要大致延迟执行任务,dispatch_after 方法是很有效的。
-(void)afterTask{
    NSLog(@"begin");
    dispatch_after(dispatch_time(DISPATCH_TIME_NOW, (int64_t)(3.0*NSEC_PER_SEC)), dispatch_get_main_queue(), ^{
        NSLog(@"after---%@",[NSThread currentThread]);
    });
}
打印结果:
2020-03-13 00:43:47.787769+0800 ThreadDemo[54378:7111012] begin
2020-03-13 00:43:50.788086+0800 ThreadDemo[54378:7111012] after---<NSThread: 0x60000042ddc0>{number = 1, name = main}
从上面代码的运行结果可以看出afer是在begin打印后3秒才打印的。
5.3、一次性代码-dispatch_once
GCD提供了只执行一次的方法dispatch_once,这个方法在我们创建单例的时候回经常用到。dispatch_once方法可以保证一段代码在程序运行过程中只被调用一次,而且在多线程环境下可以保证线程安全。
+ (instancetype)shareInstance{
    static Test *instance = nil;
    static dispatch_once_t onceToken;
    dispatch_once(&onceToken, ^{
        instance = [Test alloc]init];
    });
    return instance;
}
5.5、调度组
调度组简单来说就是把异步执行的任务进行分组,等待所有的分组任务都执行完毕后再回到指定的线程执行任务。调用组使用dispatch_group_create来创建一个分组,dispatch_group_async方法先把任务添加到队列中,然后将队列方到调度组中,或者也可以使用dispatch_group_enter和dispatch_group_leave捉对实现将队列添加到调度组。调用dispatch_group_notify方法回到指定线程执行任务,或者调用dispatch_group_wait阻塞当前线程。
- (void)groupNotifyTest{
    NSLog(@"current thread:%@", [NSThread currentThread]);
    dispatch_group_t group = dispatch_group_create();
    dispatch_group_async(group, dispatch_get_global_queue(0, 0), ^{
        [NSThread sleepForTimeInterval:2];
        NSLog(@"thread-1:%@", [NSThread currentThread]);
    });

    dispatch_group_async(group, dispatch_get_global_queue(0, 0), ^{
        [NSThread sleepForTimeInterval:2];
        NSLog(@"thread-2:%@", [NSThread currentThread]);
    });

    dispatch_group_notify(group, dispatch_get_main_queue(), ^{
        [NSThread sleepForTimeInterval:2];
        NSLog(@"thread-3:%@", [NSThread currentThread]);
        NSLog(@"group-end");
    });

    //会阻塞线程,
    dispatch_group_wait(group, DISPATCH_TIME_FOREVER);
    NSLog(@"dispatch_group_wait后继续执行任务");
}
打印结果:
2020-03-14 23:58:09.871023+0800 ThreadDemo[77370:8259501] current thread:<NSThread: 0x6000019fe480>{number = 1, name = main}
2020-03-14 23:58:11.874345+0800 ThreadDemo[77370:8260290] thread-2:<NSThread: 0x600001996e80>{number = 7, name = (null)}
2020-03-14 23:58:11.874343+0800 ThreadDemo[77370:8259684] thread-1:<NSThread: 0x6000019a55c0>{number = 5, name = (null)}
2020-03-14 23:58:11.874672+0800 ThreadDemo[77370:8259501] dispatch_group_wait后继续执行任务
2020-03-14 23:58:13.877077+0800 ThreadDemo[77370:8259501] thread-3:<NSThread: 0x6000019fe480>{number = 1, name = main}
2020-03-14 23:58:13.877365+0800 ThreadDemo[77370:8259501] group-end
在这里需要说明的一点是
dispatch_group_wait,该方法需要传入两个参数,第一个参数是group即调度组,第二个参数是timerout即指定等待的时间。一旦调用dispatch_group_wait函数,该函数就处理调用的状态而不返回值,只有当函数的currentThread停止,或到达wait函数指定的等待的时间,或Dispatch Group中的操作全部执行完毕之前,执行该函数的线程停止。当指定timeout为DISPATCH_TIME_FOREVER时就意味着永久等待;当指定timeout为DISPATCH_TIME_NOW时就意味不用任何等待即可判定属于Dispatch Group的处理是否全部执行结束。如果dispatch_group_wait函数返回值不为0,就意味着虽然经过了指定的时间,但Dispatch Group中的操作并未全部执行完毕。如果dispatch_group_wait函数返回值为0,就意味着Dispatch Group中的操作全部执行完毕。
下面看dispatch_group_enter和dispatch_group_leave捉对实现将队列添加到调度组的情况。dispatch_group_enter 标志着在group的任务数+1,dispatch_group_leave 标志着在group中的任务数-1,表示已经完成了一个任务。
- (void)groupEnterTest {
    dispatch_group_t group = dispatch_group_create();
    dispatch_queue_t queue = dispatch_get_global_queue(0, 0);
    dispatch_group_enter(group);

    dispatch_async(queue, ^{
        [NSThread sleepForTimeInterval:2];
        NSLog(@"thread_1:%@", [NSThread currentThread]);
        dispatch_group_leave(group);
    });

    dispatch_group_enter(group);
    dispatch_async(queue, ^{
        [NSThread sleepForTimeInterval:2];
        NSLog(@"thread_2:%@", [NSThread currentThread]);
        dispatch_group_leave(group);
    });

    dispatch_group_notify(group, dispatch_get_main_queue(), ^{
        [NSThread sleepForTimeInterval:2];
        NSLog(@"thread_3:%@", [NSThread currentThread]);
        NSLog(@"group_end");
    });
}
打印结果:
2020-03-15 00:07:17.293333+0800 ThreadDemo[77525:8269621] thread_2:<NSThread: 0x600002434ac0>{number = 7, name = (null)}
2020-03-15 00:07:17.293320+0800 ThreadDemo[77525:8269427] thread_1:<NSThread: 0x60000241b9c0>{number = 3, name = (null)}
2020-03-15 00:07:19.294186+0800 ThreadDemo[77525:8269235] thread_3:<NSThread: 0x600002450b80>{number = 1, name = main}
2020-03-15 00:07:19.294485+0800 ThreadDemo[77525:8269235] group_end
需要注意的是`dispatch_group_enter `和`dispatch_group_leave `捉对出现的。
5.6、信号量
GCD中的信号量是指的Dispatch Semaphore,是持有计数的信号。当信号量小于0时就会一直等待即阻塞所在线程,否则就可以正常执行。信号量可以保持线程的同步,将异步执行任务转换成同步任务执行, 同时保持线程的安全。
Dispatch Semaphore提供了三个方法:
dispatch_semaphore_create:创建一个 Semaphore 并初始化信号的总量dispatch_semaphore_signal:发送一个信号,让信号总量加 1dispatch_semaphore_wait:可以使总信号量减 1,信号总量小于 0 时就会一直等待(阻塞所在线程),否则就可以正常执行。
- (void)semaphoreTest {
   dispatch_semaphore_t semaphore = dispatch_semaphore_create(0);
    __block int a = 0;
    while (a < 5) {
        dispatch_async(dispatch_get_global_queue(0, 0), ^{
            NSLog(@"里面的a的值:%d-----%@", a, [NSThread currentThread]);
            dispatch_semaphore_signal(semaphore);
            a++;
        });
        dispatch_semaphore_wait(semaphore, DISPATCH_TIME_FOREVER);
    }
    NSLog(@"外面的a的值:%d", a);
}
打印结果:
2020-03-15 00:44:53.005899+0800 ThreadDemo[78303:8318841] 里面的a的值:0-----<NSThread: 0x600003c222c0>{number = 3, name = (null)}
2020-03-15 00:44:53.006161+0800 ThreadDemo[78303:8318841] 里面的a的值:1-----<NSThread: 0x600003c222c0>{number = 3, name = (null)}
2020-03-15 00:44:53.006354+0800 ThreadDemo[78303:8318841] 里面的a的值:2-----<NSThread: 0x600003c222c0>{number = 3, name = (null)}
2020-03-15 00:44:53.006551+0800 ThreadDemo[78303:8318841] 里面的a的值:3-----<NSThread: 0x600003c222c0>{number = 3, name = (null)}
2020-03-15 00:44:53.006727+0800 ThreadDemo[78303:8318841] 里面的a的值:4-----<NSThread: 0x600003c222c0>{number = 3, name = (null)}
2020-03-15 00:44:53.006862+0800 ThreadDemo[78303:8318672] 外面的a的值:5
5.7、调度源-Dispatch_source
调度源是协调特殊低级别系统事件处理的基本数据类型。GCD支持诸如定时器调度源、信号调度源、描述符调度源、进程调度源、端口调度源、自定义调度源等。调度源有这一系列的成熟API,在这里就不多做描述,详细可以查阅官方的文档Dispatch Sources。
