

前言
在笔者的上一篇文章(基于react的前后端渲染实例讲解)中,对react下前后端渲染的流程进行了一个介绍。对前后端渲染的相关概念和原理不太了解的可以移步那篇文章。同时留下了一个引子:如何优雅地实现前后端渲染的样式同构。由此我们引出了公共库isomorphic-style-loader,在这篇文章中,笔者将结合实例介绍该库在项目中的应用以及对其原理进行分析。
项目实战
这里我们以上一篇文章中的测试项目为基础,借助isomorphic-style-loader来实现前后端渲染的样式同构。仓库地址附在文末。项目的主干部分不变,具体的区别在于前端和后端渲染的入口文件以及业务组件。
业务组件
业务组件代码(entry/component/index.js)如下:
import React from 'react';
import s from './color.css';
import withStyles from 'isomorphic-style-loader/withStyles';
import useStyles from 'isomorphic-style-loader/useStyles';
//  传统写法 class式组件亦可
function ShowComponent(props, context) {
    return <div className={s.color}>英雄的中国人民万岁!</div>
}
export default withStyles(s)(ShowComponent);
这里主要是借助库内提供的withStyles对我们的原始组件进行处理,后续样式标签的自动添加和删除都会通过库来实现。isomorphic-style-loader对react的hooks特性也进行了兼容,使用hooks组件的写法如下:
//  省略部分依赖引用
//  react hooks 写法
const ShowComponent = () => {
    useStyles(s);
    return <div className={s.color}>英雄的中国人民万岁万岁!</div>
}
export default ShowComponent;
前端渲染入口
在前端渲染的入口文件(entry/index.js)也要进行对应的处理:
import React from 'react';
import ReactDom from 'react-dom';
import Com from './component';
import StyleContext from 'isomorphic-style-loader/StyleContext';

const insertCss = (...styles) => {
    const removeCss = styles.map(style => style._insertCss())
    return () => removeCss.forEach(dispose => dispose())
}
//  挂载组件
const mountNode = document.getElementById('main');

//  原始前端渲染 在html的节点上挂载组件
// ReactDom.render((
//     <Com />
// ),mountNode);

ReactDom.hydrate(
    <StyleContext.Provider value={{ insertCss }}>
      <Com />
    </StyleContext.Provider>,
    mountNode
);
这里通过react的context语法,给我们的入口组件包裹一个StyleContext,便于后续子组件调用insertCss方法。insertCss遍历所有的css文件,并执行内置的_insertCss(源码分析中会做分析)方法,该方法负责实时在html文件中插入style标签以便跟新样式,该方法同时返回一个函数,用于在组件移除时同步删除样式标签。
后端渲染入口
后端渲染的入口文件也要做类似处理:
import React from 'react';
import ServerEntry from './component/index';
import ReactSSR from 'react-dom/server';
import StyleContext from 'isomorphic-style-loader/StyleContext';

function serverRender(res, template) {
  const css = new Set();
  const insertCss = (...styles) => styles.forEach(style => css.add(style._getCss()))
  const appString = ReactSSR.renderToString(
      <StyleContext.Provider value={{ insertCss }}>
        <ServerEntry />
      </StyleContext.Provider>
    );
  //    返回模板被替换后的内容,这里将app标签替换成组件,style标签替换成所需的样式
  res.send(template.replace('<app></app>',appString).replace('<style></style>', `<style>${[...css].join('')}</style>`));
}
export default serverRender;
这里的不同主要是在调用insertCss时,最后使用内置的_getCss来处理样式,同时定义了一个css Set,将后端渲染所需的所有样式搜集起来,最后在生成的html字符串中插入对应的style标签。
打包配置调整
之后我们的项目打包文件也要有对应的调整,客户端打包配置webpack.config.js:
...
module.exports = {
    //  省略入口和相关配置
    ...

    // plugins: [
    //     new MiniCssExtractPlugin({      //对css进行打包,webpack4推荐语法
    //         filename: "[name].css",
    //         chunkFilename: "[name].css"
    //     })
    // ],
    module: {
        rules: [
            //  省略对js的处理和babel配置
            ...
            {
                test: /\.(css|scss)$/,
                use: [
                    'isomorphic-style-loader',
                    //  MiniCssExtractPlugin.loader,  //自动提取出css并转成单独的文件 这里要注释掉
                    'css-loader?modules&localIdentName=[name]__[local]--[hash:base64:5]',

                ]
            },
        ]
    },
    //  mode:"development",
    mode:"production",
}
这里要补充下,如果使用isomorphic-style-loader的话就不要对css文件使用类似于MiniCssExtractPlugin这类具有文件提取功能的库了,否则会导致isomorphic-style-loader无法找到样式文件从而样式加载失败。isomorphic-style-loader server端的打包配置文件也类似,这里不再赘述。
实现效果
之后我们运行项目,查看效果:
前端渲染:
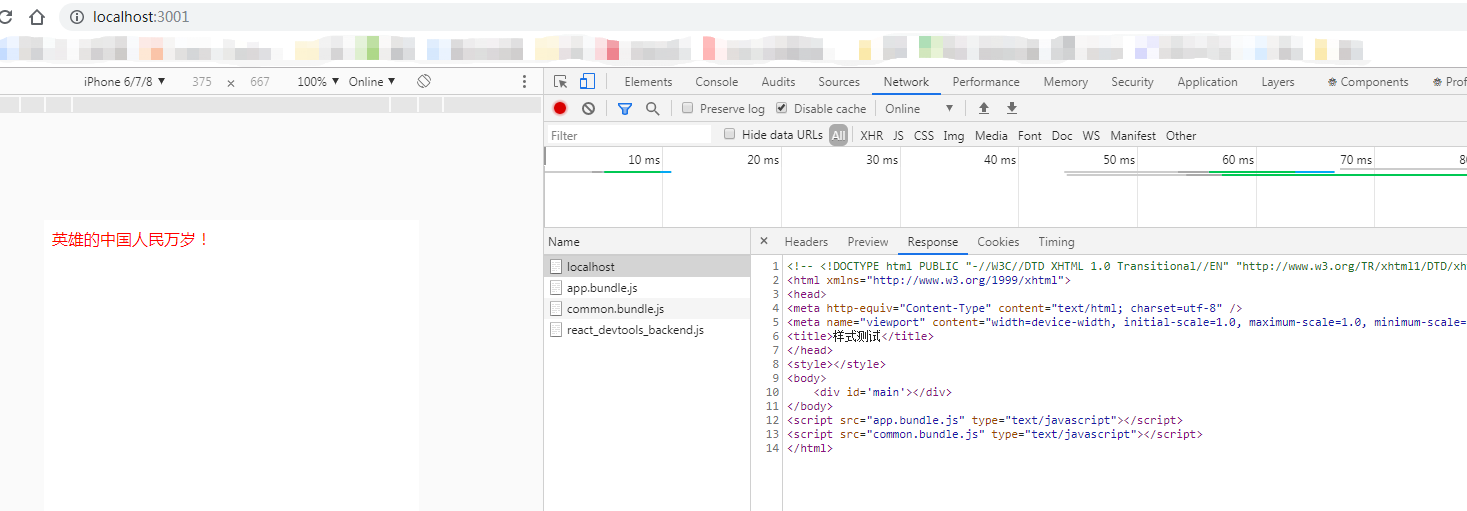
后端渲染:
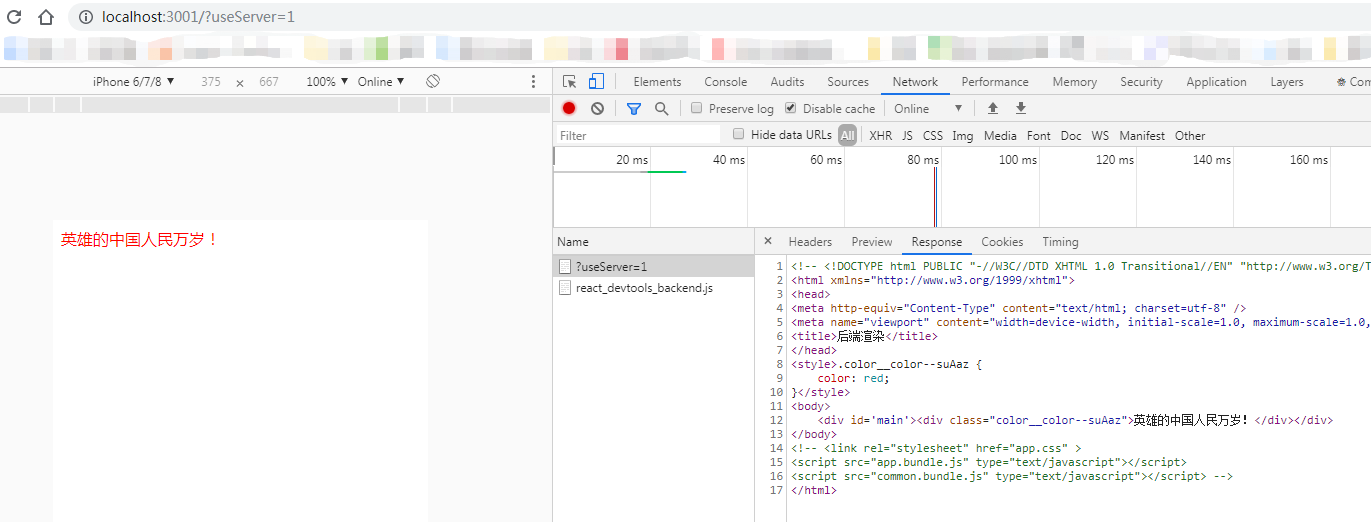
后端渲染时样式直出,符合预期。
isomorphic-style-loader 源码分析
isomorphic-style-loader是如何实现样式的同构的呢?我们先从前端渲染入口文件的这段代码入手:
const insertCss = (...styles) => {
    const removeCss = styles.map(style => style._insertCss())
    return () => removeCss.forEach(dispose => dispose())
}
样式标签插入 insertCss
其中的_insertCss即对应的源码中的insertCss.js文件:
//  全局的给各个样式引用次数计数的obj
const inserted = {}

//  组件卸载时的样式标签移除
function removeCss(ids) {
  ids.forEach((id) => {
    //  通过inserted的对应id来计数,如果不再有引用就移除节点
    if (--inserted[id] <= 0) {
      const elem = document.getElementById(id)
      if (elem) {
        elem.parentNode.removeChild(elem)
      }
    }
  })
}

/**
 * Example:
 *   // Insert CSS styles object generated by `css-loader` into DOM
 *   var removeCss = insertCss([[1, 'body { color: red; }']]);
 *
 *   // Remove it from the DOM
 *   removeCss();
 */
 // 插入样式
function insertCss(styles, { replace = false, prepend = false, prefix = 's' } = {}) {
  const ids = []
  for (let i = 0; i < styles.length; i++) {
    const [moduleId, css, media, sourceMap] = styles[i]
    //  生成唯一样式id
    const id = `${prefix}${moduleId}-${i}`

    ids.push(id)
    //  如果用同id的样式且不启用replace(即启用同名样式替换)选项,则增加该id样式的引用次数
    if (inserted[id]) {
      if (!replace) {
        inserted[id]++
        continue
      }
    }
    //  如果启用replace,计数置1
    inserted[id] = 1

    let elem = document.getElementById(id)
    let create = false

    //  如果没有对应的节点,则创建一个新的节点
    if (!elem) {
      create = true
      //    创建一个style标签,并且设置type和id
      elem = document.createElement('style')
      elem.setAttribute('type', 'text/css')
      elem.id = id

      if (media) {
        elem.setAttribute('media', media)
      }
    }

    let cssText = css
    //  sourceMap相关,支持调试
    if (sourceMap && typeof btoa === 'function') {
      // skip IE9 and below, see http://caniuse.com/atob-btoa
      cssText += `\n/*# sourceMappingURL=data:application/json;base64,${b64EncodeUnicode(
        JSON.stringify(sourceMap),
      )}*/`
      cssText += `\n/*# sourceURL=${sourceMap.file}?${id}*/`
    }

    //  给标签插入样式内容,如果是老IE浏览器,则使用styleSheet.cssText来注册样式,常规情况使用textContent属性
    if ('textContent' in elem) {
      elem.textContent = cssText
    } else {
      elem.styleSheet.cssText = cssText
    }

    // 在HTML文件中挂载标签
    if (create) {
      //    如果使用prepend(前置),则将标签挂载在第一个元素
      if (prepend) {
        document.head.insertBefore(elem, document.head.childNodes[0])
      } else {
        document.head.appendChild(elem)
      }
    }
  }
  //  返回卸载样式的函数
  return removeCss.bind(null, ids)
}
客户端insertCss的原理并不复杂,简单来说就是读取其他样式loader对源文件进行处理之后的结果,通过一个全局对象inserted来维护每一条样式的引用次数,每一条新样式都会生成一个独一无二的id,并且创建一个新的style标签来记录其中的内容,挂载在html文件的head标签下,从而使样式生效。如果一条样式以前引用过,则会根据replace配置来选择将计数加1或者至今生成新的标签并覆盖。最后返回一个函数,用于在组件注销时销毁生成的标签。更多细节详见注释。
通过context传递参数 StyleContext
该库通过react的context来为所有的子组件传递insertCss函数,StyleContext.js内容如下:
import React from 'react'
const StyleContext = React.createContext({
  insertCss: null,
})
export default StyleContext
这个没啥好讲的,基础的context的使用。
业务组件处理函数 withStyles
为了配合insertCss,对我们的业务组件需要使用withStyles进行处理,这个针对的是传统的组件写法(类和函数型组件,hooks有另外的方法useStyles),代码如下withStyles.js:
import React from 'react'
//  这个库是为了将属于react的属性过滤掉,将其他属性提升到目标组件上,各种react库的常用辅助库
import hoistStatics from 'hoist-non-react-statics'

import StyleContext from './StyleContext'

function withStyles(...styles) {
  //    返回一个处理后的组件
  return function wrapWithStyles(ComposedComponent) {
    //  定义一个类
    class WithStyles extends React.PureComponent {
      constructor(props, context) {
        super(props, context)
        //  定义移除样式的实例方法
        this.removeCss = context.insertCss(...styles)
      }
      //    组件卸载时移除样式
      componentWillUnmount() {
        if (this.removeCss) {
          setTimeout(this.removeCss, 0)
        }
      }
      //    渲染原始的组件
      render() {
        return <ComposedComponent {...this.props} />
      }
    }

    const displayName = ComposedComponent.displayName || ComposedComponent.name || 'Component'
    //  配置属性
    WithStyles.displayName = `WithStyles(${displayName})`
    WithStyles.contextType = StyleContext
    WithStyles.ComposedComponent = ComposedComponent
    //  将原先ComposedComponent上的属性提升到我们处理过的WithStyles上,本质上是返回一个高阶组件
    return hoistStatics(WithStyles, ComposedComponent)
  }
}

export default withStyles
withStyles的本质是返回一个高阶组件,在该组件实例化的过程中完成在html中插入样式的工作,同时给组件注册卸载时运行的函数,这个函数负责将不使用的样式标签移除,更多细节详见代码注释。
Hook兼容写法 useStyles
针对react的hooks api,也有对应的自定义hook:
import { useContext, useEffect } from 'react'
import StyleContext from './StyleContext'

// To detect if it's in SSR process or in browser. Wrapping with
// the function makes rollup's replacement of "this" avoidable
// eslint-disable-next-line func-names
const isBrowser = (function() {
  return this && typeof this.window === 'object'
})()

function useStyles(...styles) {
  //    获取context传递的insertCss
  const { insertCss } = useContext(StyleContext)
  if (!insertCss) throw new Error('Please provide "insertCss" function by StyleContext.Provider')
  const runEffect = () => {
    const removeCss = insertCss(...styles)
    //  这里返回的是组件卸载时的回调,详见react hooks相关api
    return () => {
      setTimeout(removeCss, 0)
    }
  }
  if (isBrowser) {
    //  空数组作为第二个参数,表示不依赖任何参数,只在组件初始化时运行一次
    useEffect(runEffect, [])
  } else {
    //  如果不是浏览器环境,不需要注册卸载回调
    runEffect()
  }
}

export default useStyles
hooks的实现相对简洁很多,逻辑清晰,组件初始化的时候调用runEffect, 运行insertCss, 将样式标签插入html,组件卸载时运行useEffect的回调。细节详见注释。
以上的页码解释了isomorphic-style-loader如何在client完成样式管理,那么在server端是如何处理的?我们在入口文件中调用的是style._insertCss()(客户端)或style._getCss()(服务器端),这又是如何调用库里的相关函数的?要解答这些问题,我们还需要分析代码库的index.js文件,即loader相关处理逻辑。
loader处理逻辑
包的index.js文件如下:
import { stringifyRequest } from 'loader-utils'

module.exports = function loader() {}
module.exports.pitch = function pitch(request) {
  if (this.cacheable) {
    this.cacheable()
  }

  const insertCss = require.resolve('./insertCss.js')
  return `
    var refs = 0;
    var css = require(${stringifyRequest(this, `!!${request}`)});
    var insertCss = require(${stringifyRequest(this, `!${insertCss}`)});
    var content = typeof css === 'string' ? [[module.id, css, '']] : css;

    exports = module.exports = css.locals || {};
    exports._getContent = function() { return content; };
    exports._getCss = function() { return '' + css; };
    exports._insertCss = function(options) { return insertCss(content, options) };

    // Hot Module Replacement
    // https://webpack.github.io/docs/hot-module-replacement
    // Only activated in browser context
    if (module.hot && typeof window !== 'undefined' && window.document) {
      var removeCss = function() {};
      module.hot.accept(${stringifyRequest(this, `!!${request}`)}, function() {
        css = require(${stringifyRequest(this, `!!${request}`)});
        content = typeof css === 'string' ? [[module.id, css, '']] : css;
        removeCss = insertCss(content, { replace: true });
      });
      module.hot.dispose(function() { removeCss(); });
    }
  `
}
为了回答之前的问题,需要简要介绍下webpack的loader机制。我们的浏览器本身能处理的文件类型非常有限,对于很多浏览器不能直接解析或者需要对能够解析的资源进行某些操作时,就需要一个辅助工具进行处理,这个工具就是loader。loader的处理顺序是从右到左的,即use对应的数组排列越靠后的loader越先处理,处理完后的文件将传递给后一个loader,以此类推。在index.js文件中我们看到其loader函数是空的,反而定义了pitch方法,在webpack中,pitch方法的处理顺序与loader方法的正好相反,越靠前的loader的pitch方法越先处理,所有的loader的pitch执行完毕后再会执行相关的loader方法,这里引用webpack官网的例子,假设有如下的loader:
use: [
  'a-loader',
  'b-loader',
  'c-loader'
]
那么其loader的执行顺序为:
|- a-loader `pitch`
  |- b-loader `pitch`
    |- c-loader `pitch`
      |- requested module is picked up as a dependency
    |- c-loader normal execution
  |- b-loader normal execution
|- a-loader normal execution
如果有某个loader的pitch返回了内容,那么将会跳过剩下的pitch和loader执行,从其上一级的loader开始执行,假设b-loader的pitch方法返回了具体内容,那么执行逻辑如下:
|- a-loader `pitch`
  |- b-loader `pitch` returns a module
|- a-loader normal execution
那么有部分读者可能会有疑问了,按照官方文档的逻辑,isomorphic-style-loader的pitch直接返回了内容,那岂不是直接跳过了后续css-loader的所有处理逻辑?pitch返回的字符串内容最终将会被用来生成js文件,如果其中含有require方法,那么require引用的文件将会走完之前被跳过的loader逻辑,由此者两部分的逻辑衔接起来。在返回的字符串中,我们看到其定义了_getCss和_insertCss等方法,这也就是在相关源码中定义的内置方法。在执行服务端渲染时,其后端渲染将用到的css代码直接返回,以便我们在后端渲染的入口文件中执行插入样式的逻辑。至此整个isomorphic-style-loader的逻辑完全走通。
