


文/甄子
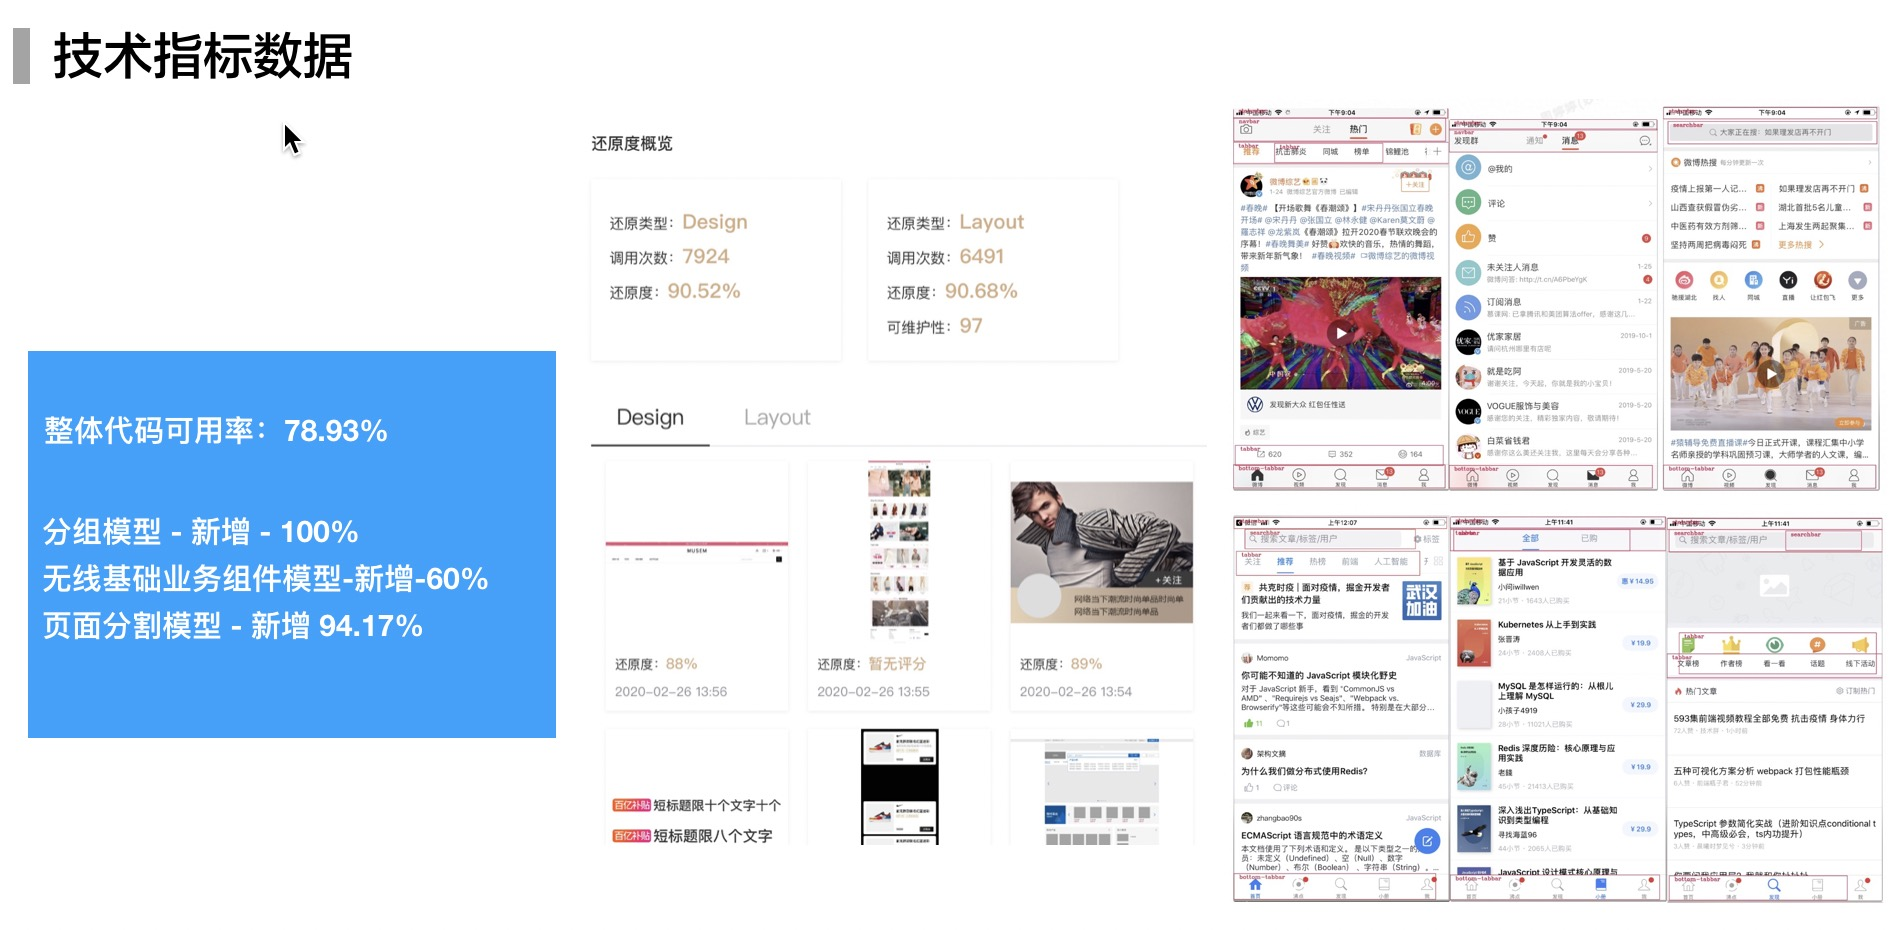
在 imgcook.com 发布之后,我们在掘金、知乎、微信朋友圈和公众号发表了很多文章,收获最多的反馈是:前端要失业了。按照现在的趋势来看,对 P5 左右前端工程师的需求将大幅度降低。imgcook.com 官网底部有统计,从数据分析智能生成UI和逻辑代码的情况,imgcook 已经可以替代 P5 前端工程师完成工作的 80%。无论趋势还是数据,都能看到传统前端低技术价值、高重复的工作正走向消亡。
如马云先生在香港对年轻人传授创业经验时讲到的,蒸汽机和电力解放了人类的体力,人工智能和机器学习解放了人类的脑力。马云先生在评价蒸汽机和电力带来的失业问题时讲到,人类在科技进步下从繁重的体力劳动中解放出来,逐步向脑力劳动过渡,这是人类社会的进步。今天前端从重复劳动的施工队里解放出来,逐步向智能化的高技术含量工作过渡,这是前端技术的进步。
综上所述,今天已经无法绕过智能化命题了,就像当今社会回不去刀耕火种的年代。预见到未来如此来临,我们推出了 github.com/alibaba/pipcook 项目,试图帮助前端零成本进入智能化,联合Google的Tensorflow.js团队,用这个框架轻松打通智能化的任督二脉:连接前端技术生态、复用Python技术生态。
因此,后文将在Pipcook框架的基础上,从概念到方法、从方法到实践、从工具到应用的方式,和大家分享:前端的那些工作会被智能化取代?如何在工作中应用这种智能化方法?前端工程师如何借助 pipcook 和 AI 协同工作?最后,用imgcook详细设计实现作为案例,对实践进行系统的讲解。
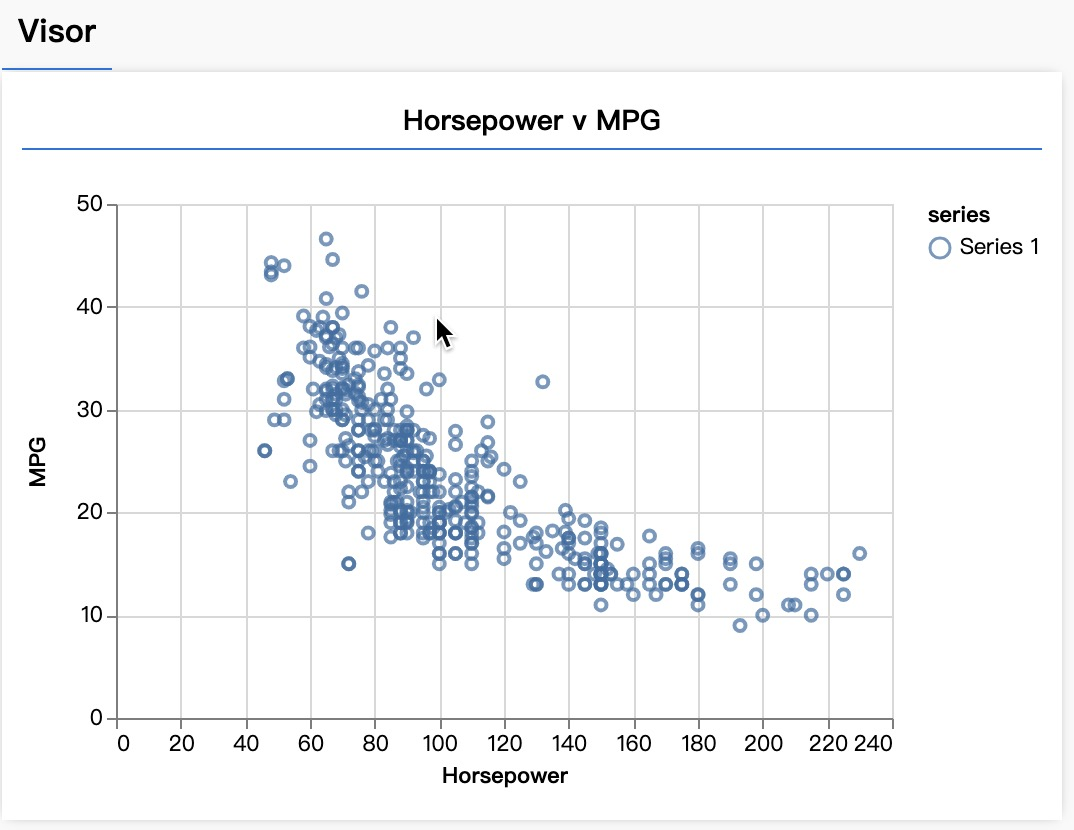
除了去 imgcook.com 体验,这里带来一个 tensorflow.js 官方的示例,来看看智能化离我们的距离。首先是定义问题:很多人都很困惑发动机马力和行驶里程的关系是怎样的?是否可以根据发动机马力预测未来的这个车是否省油呢?传统统计分析的方法是定义模式,用模型计算分析,人和计算机是下指令和执行的主仆关系。机器学习的方法是通过数据学习模式,用模型学到的模式进行分析,人和计算机是提供数据和理解数据的协同关系。下面用代码展示这种协同怎么在Javascript里实现:
环境准备:
index.html
<!DOCTYPE html>
<html>
<head>
  <title>TensorFlow.js Tutorial</title>

  <!-- Import TensorFlow.js -->
  <script src="https://cdn.jsdelivr.net/npm/@tensorflow/tfjs@1.0.0/dist/tf.min.js"></script>
  <!-- Import tfjs-vis -->
  <script src="https://cdn.jsdelivr.net/npm/@tensorflow/tfjs-vis@1.0.2/dist/tfjs-vis.umd.min.js"></script>

  <!-- Import the main script file -->
  <script src="script.js"></script>

</head>

<body>
</body>
</html>
这里Tensorflow.js就是谷歌官方的前端机器学习基础库,tfjs-vis是可视化工具用于显示数据、模型等信息,script.js就是示例的代码。
script.js
示例的代码主要由四个部分构成:提供数据、定义模型、训练模型、模型预测,此外就是执行逻辑的 run 函数。下面针对这四个部分详细介绍一下。
提供数据:
提供数据分为:获取数据、分析数据、处理数据三个阶段。获取数据可以理解为从现有的日志、云对象存储等数据源获取原始数据。分析数据则是对数据进行观察,寻找数据的问题:平均么?平凡么?符合现实场景么?对于我们定义的问题来说描述充分么?处理数据是根据分析的结果对数据进行校准,然后针对模型的训练要求进行格式化。
获取数据:
async function getData() {
  const carsDataReq = await fetch(
    "https://storage.googleapis.com/tfjs-tutorials/carsData.json"
  );
  const carsData = await carsDataReq.json();
  return carsData;
}
分析数据:
async function run() {
  // Load and plot the original input data that we are going to train on.
  const data = await getData();
  const values = data.map((d) => ({
    x: d.horsepower,
    y: d.mpg,
  }));

  tfvis.render.scatterplot(
    { name: "Horsepower v MPG" },
    { values },
    {
      xLabel: "Horsepower",
      yLabel: "MPG",
      height: 300,
    }
  );
}

document.addEventListener("DOMContentLoaded", run);
处理数据:
洗菜:先对原始数据做一些清洗:
function cleaned(data){
  const cleaned = carsData
      .map((car) => ({
        mpg: car.Miles_per_Gallon,
        horsepower: car.Horsepower,
      }))
      .filter((car) => car.mpg != null && car.horsepower != null);

  return cleaned;
}
炒菜:再把数据加工成模型可以吃的样子:
function convertToTensor(data) {
  // Wrapping these calculations in a tidy will dispose any
  // intermediate tensors.

  return tf.tidy(() => {
    // Step 1. Shuffle the data
    tf.util.shuffle(data);

    // Step 2. Convert data to Tensor
    const inputs = data.map((d) => d.horsepower);
    const labels = data.map((d) => d.mpg);

    const inputTensor = tf.tensor2d(inputs, [inputs.length, 1]);
    const labelTensor = tf.tensor2d(labels, [labels.length, 1]);

    //Step 3. Normalize the data to the range 0 - 1 using min-max scaling
    const inputMax = inputTensor.max();
    const inputMin = inputTensor.min();
    const labelMax = labelTensor.max();
    const labelMin = labelTensor.min();

    const normalizedInputs = inputTensor
      .sub(inputMin)
      .div(inputMax.sub(inputMin));
    const normalizedLabels = labelTensor
      .sub(labelMin)
      .div(labelMax.sub(labelMin));

    return {
      inputs: normalizedInputs,
      labels: normalizedLabels,
      // Return the min/max bounds so we can use them later.
      inputMax,
      inputMin,
      labelMax,
      labelMin,
    };
  });
}
对于Tensor(张量)这个词不用在意,只要理解为像 Json 一样的数据组织格式就好了。这里唯一需要理解的就是“归一化”,因为数据可能有各种取值范围,如何把数据统一到一个取值范围内?上述代码把数据在 0 - 1 的范围内,借助极大值和极小值的约束对数据缩放,保证数据的本质并没发生改变只是表达方式变了。
另一个概念就是Label(标签),这个很好理解,每种马力就是一个标签,数据是每加仑行驶的里程,示例加载的数据就是一个个每加仑行驶里程的数据和这条数据对应的发动机马力标签。
...
{
  "mpg":15, //数据:每加仑行驶的里程
  "horsepower":165, //标签:发动机马力
},
{
  "mpg":18, //数据:每加仑行驶的里程
  "horsepower":150, //标签:发动机马力
},
{
  "mpg":16, //数据:每加仑行驶的里程
  "horsepower":150, //标签:发动机马力
},
...
用这样标注好的样本数据:菜,洗菜、炒菜之后喂给模型,模型吃了就能消化理解数据背后的模式和规律。
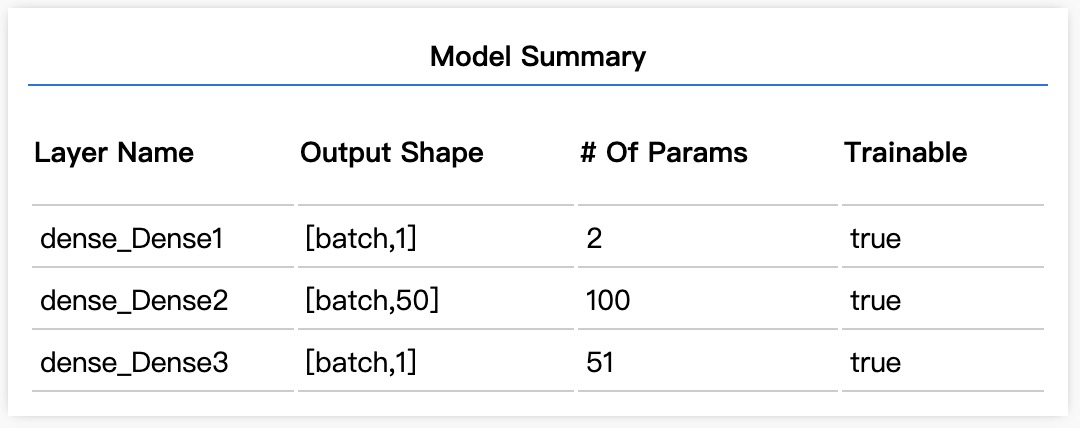
定义模型
其实,除了研究机构和资深的学者外,真正能定义模型的人很少,算法工程师经历调参工程师、数据工程师后,仍然离定义模型很远,大部分时间连算法工程师都只是在应用而已。因此,去用就好了,定义模型只需要按照行业最流行、效果最好的模型抄作业即可。
/**
 * Define Model
 */
function createModel() {
  // Create a sequential model
  const model = tf.sequential();

  // Add a single input layer
  model.add(tf.layers.dense({ inputShape: [1], units: 1, useBias: true }));
  model.add(tf.layers.dense({ units: 50, activation: "sigmoid" }));
  // Add an output layer
  model.add(tf.layers.dense({ units: 1, useBias: true }));

  return model;
}
如果你使用 github.com/alibaba/pipcook 连抄都省了,因为常用的模型我们和社区生态会提前抄好(移植好)。如果你需要抄一个,很简单,这里 tf 就是 tensorflow 的官方库名,函数定义和参数定义和 Python 里是一致的(语言特性造成的书写差异还需要具体修改),只要把 Tensorflow 官网提供的模型里的定义抄过来就好了。
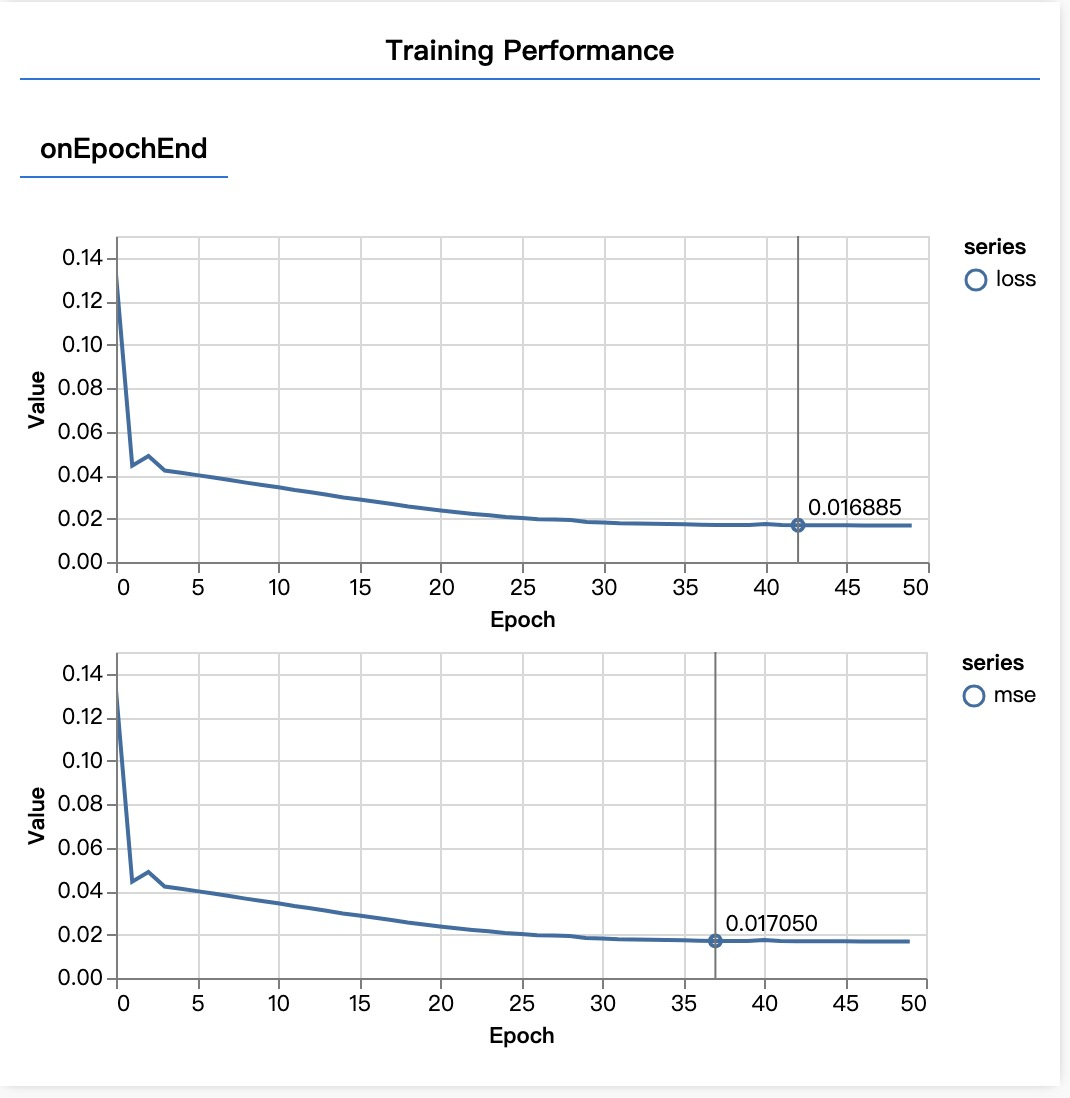
训练模型
不同于人和人之间的协作,机器学习的模型在训练之前是个小白,吃了我们炒的菜:标注数据 后,模型才有可能学会这些数据背后的模式和规律:
async function trainModel(model, inputs, labels) {
  // Prepare the model for training.
  model.compile({
    optimizer: tf.train.adam(),
    loss: tf.losses.meanSquaredError,
    metrics: ["mse"],
  });

  const batchSize = 32;
  const epochs = 50;

  return await model.fit(inputs, labels, {
    batchSize,
    epochs,
    shuffle: true,
    callbacks: tfvis.show.fitCallbacks(
      { name: "Training Performance" },
      ["loss", "mse"],
      { height: 200, callbacks: ["onEpochEnd"] }
    ),
  });
}
你没看错 model.fit 真的是喂 ta 唷,这里的 batchSize 和 epochs 就是超参数,而前文提到算法工程师是调参工程师就源于此, 他们大部分时间就真的是在调整这两个参数。这两个参数的意思很简单,batchSize 告诉模型一口吃多少?epochs告诉模型一次吃几口?老的模型一般怕吃多了噎着,或者不同任务下吃法不对,就像为了下饭可能会一口饭一口菜的吃,为了记住一种美味可能会连吃几口……
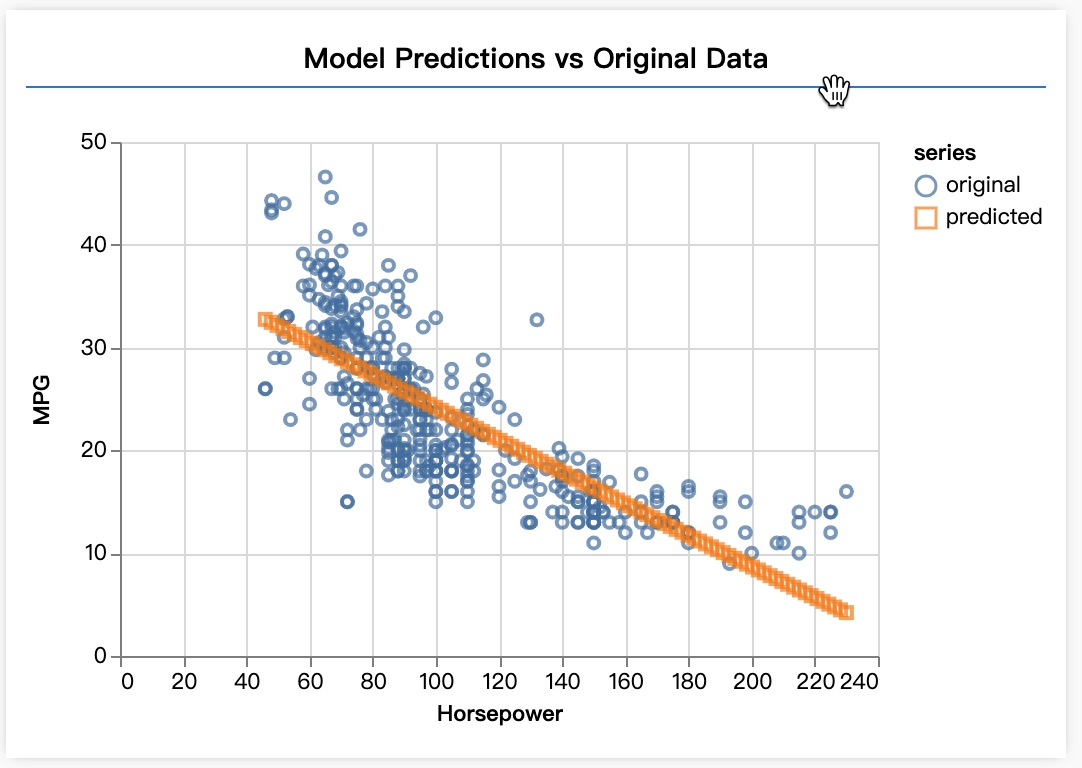
模型预测
吃完了标注数据这道菜,只要吃法正确,模型就能够记住这些数据背后的模式和规律,下一步自然是拉模型跟我们协作了:
function testModel(model, inputData, normalizationData) {
  const { inputMax, inputMin, labelMin, labelMax } = normalizationData;

  // Generate predictions for a uniform range of numbers between 0 and 1;
  // We un-normalize the data by doing the inverse of the min-max scaling
  // that we did earlier.
  const [xs, preds] = tf.tidy(() => {
    const xs = tf.linspace(0, 1, 100);
    const preds = model.predict(xs.reshape([100, 1]));

    const unNormXs = xs.mul(inputMax.sub(inputMin)).add(inputMin);

    const unNormPreds = preds.mul(labelMax.sub(labelMin)).add(labelMin);

    // Un-normalize the data
    return [unNormXs.dataSync(), unNormPreds.dataSync()];
  });
这里的 model.predict 就是让模型对 tf.linspace 生成的随机数据进行预测,输出就是这数据大概是多少马力的发动机?因此,告诉模型每加仑行驶里程的数据,模型就能告诉我们这大概是多少马力的发动机,哒哒!协作完成。
完整代码
/**
 * Get the car data reduced to just the variables we are interested
 * and cleaned of missing data.
 */
async function getData() {
  const carsDataReq = await fetch(
    "https://storage.googleapis.com/tfjs-tutorials/carsData.json"
  );
  const carsData = await carsDataReq.json();
  const cleaned = carsData
    .map((car) => ({
      mpg: car.Miles_per_Gallon,
      horsepower: car.Horsepower,
    }))
    .filter((car) => car.mpg != null && car.horsepower != null);

  return cleaned;
}

/**
 * Define Model
 */
function createModel() {
  // Create a sequential model
  const model = tf.sequential();

  // Add a single input layer
  model.add(tf.layers.dense({ inputShape: [1], units: 1, useBias: true }));
  model.add(tf.layers.dense({ units: 50, activation: "sigmoid" }));
  // Add an output layer
  model.add(tf.layers.dense({ units: 1, useBias: true }));

  return model;
}

/**
 * Convert the input data to tensors that we can use for machine
 * learning. We will also do the important best practices of _shuffling_
 * the data and _normalizing_ the data
 * MPG on the y-axis.
 */
function convertToTensor(data) {
  // Wrapping these calculations in a tidy will dispose any
  // intermediate tensors.

  return tf.tidy(() => {
    // Step 1. Shuffle the data
    tf.util.shuffle(data);

    // Step 2. Convert data to Tensor
    const inputs = data.map((d) => d.horsepower);
    const labels = data.map((d) => d.mpg);

    const inputTensor = tf.tensor2d(inputs, [inputs.length, 1]);
    const labelTensor = tf.tensor2d(labels, [labels.length, 1]);

    //Step 3. Normalize the data to the range 0 - 1 using min-max scaling
    const inputMax = inputTensor.max();
    const inputMin = inputTensor.min();
    const labelMax = labelTensor.max();
    const labelMin = labelTensor.min();

    const normalizedInputs = inputTensor
      .sub(inputMin)
      .div(inputMax.sub(inputMin));
    const normalizedLabels = labelTensor
      .sub(labelMin)
      .div(labelMax.sub(labelMin));

    return {
      inputs: normalizedInputs,
      labels: normalizedLabels,
      // Return the min/max bounds so we can use them later.
      inputMax,
      inputMin,
      labelMax,
      labelMin,
    };
  });
}

async function trainModel(model, inputs, labels) {
  // Prepare the model for training.
  model.compile({
    optimizer: tf.train.adam(),
    loss: tf.losses.meanSquaredError,
    metrics: ["mse"],
  });

  const batchSize = 32;
  const epochs = 50;

  return await model.fit(inputs, labels, {
    batchSize,
    epochs,
    shuffle: true,
    callbacks: tfvis.show.fitCallbacks(
      { name: "Training Performance" },
      ["loss", "mse"],
      { height: 200, callbacks: ["onEpochEnd"] }
    ),
  });
}

function testModel(model, inputData, normalizationData) {
  const { inputMax, inputMin, labelMin, labelMax } = normalizationData;

  // Generate predictions for a uniform range of numbers between 0 and 1;
  // We un-normalize the data by doing the inverse of the min-max scaling
  // that we did earlier.
  const [xs, preds] = tf.tidy(() => {
    const xs = tf.linspace(0, 1, 100);
    const preds = model.predict(xs.reshape([100, 1]));

    const unNormXs = xs.mul(inputMax.sub(inputMin)).add(inputMin);

    const unNormPreds = preds.mul(labelMax.sub(labelMin)).add(labelMin);

    // Un-normalize the data
    return [unNormXs.dataSync(), unNormPreds.dataSync()];
  });

  const predictedPoints = Array.from(xs).map((val, i) => {
    return { x: val, y: preds[i] };
  });

  const originalPoints = inputData.map((d) => ({
    x: d.horsepower,
    y: d.mpg,
  }));

  tfvis.render.scatterplot(
    { name: "Model Predictions vs Original Data" },
    {
      values: [originalPoints, predictedPoints],
      series: ["original", "predicted"],
    },
    {
      xLabel: "Horsepower",
      yLabel: "MPG",
      height: 300,
    }
  );
}

async function run() {
  // Load and plot the original input data that we are going to train on.
  const data = await getData();
  const values = data.map((d) => ({
    x: d.horsepower,
    y: d.mpg,
  }));

  tfvis.render.scatterplot(
    { name: "Horsepower v MPG" },
    { values },
    {
      xLabel: "Horsepower",
      yLabel: "MPG",
      height: 300,
    }
  );

  // More code will be added below
  // Create the model
  const model = createModel();
  tfvis.show.modelSummary({ name: "Model Summary" }, model);

  // Convert the data to a form we can use for training.
  const tensorData = convertToTensor(data);
  const { inputs, labels } = tensorData;

  // Train the model
  await trainModel(model, inputs, labels);
  console.log("Done Training");

  // Make some predictions using the model and compare them to the
  // original data
  testModel(model, data, tensorData);
}

document.addEventListener("DOMContentLoaded", run);
这就完成了整个买菜(获取数据)、洗菜(处理数据)、炒菜(处理数据)、猎头(寻找/抄/定义模型)、投食(训练模型)、协作(模型预测)的过程,全部都是在浏览器内完成(Tensorflow.js 已经加入了WASM的加速能力,未来会支持 WebNN 的加速能力),全部都是前端技术,你说前端智能化是否已经到来?
What`s next
- 还在发布上线的时候盯屏看各种指标?把 日志和指标 组织成示例中 每加仑行驶里程和发动机马力 的格式,拿上面的代码训练个模型,写个Chrome插件来盯屏吧。
- 把后续看完,系统学习智能化,在前端领域进行人机协同的编程。
- 用本系列介绍的原理方法,去 www.tensorflow.org/resources/m… 抄更多模型。
