

ARouter是一个很经典的开源项目,本次我们剖析它的主体功能之一:实现跨module数据传递。
一、跨module数据传递 (提出问题)
ARouter的场景:
//基础公共库定义了IHelloService接口
    public interface IHelloService extends IProvider {
       void sayHello();
    }
// B Moudle定义了这个接口实现类:
    @Route(path = "/service/hello")
    public class HelloServiceImpl implements IHelloService{
        @Override
        public void sayHello() {
           xxxx
       }
    }
}
// A Moudle要获取HelloService接口实现类的实例对象:
   //两种方式
   ARouter.getInstance().build("/service/hello").navgation();
   ARouter.getInstance().navigation(IHelloService.class);
A module与B module没有依赖关系,那A module要拿到B module的HelloServiceImpl实例对象,怎么处理?
二、分析跨module数据传递 (分析问题)
如同上一篇,跨模块的页面跳转,获取要跳转页面的class一样,源码阶段,A、B module不存在耦合,靠编译期生成中间类,这个类作为A 、B 通信的桥梁,实现A、B module通信。
你需要处理的子问题:
1.生成这个中间类,寻找指定的注解Route,注解生成这个类。
2.它承担的任务:创建HelloServiceImpl实例对象,并通过key_value保存起来。
     ARouter.getInstance().navigation(HelloService.class).sayHello("mike");
     ARouter.getInstance().build("/xxx/hello").navigation().sayHello("mike");
那这个实例对象的key可以是HelloService.class.getName(),可以是"/xxx/hello",value当然就是HelloServiceImpl实例对象了。
ARouter的主体就是这样,简单而又粗暴,碍于ARouter作为一个库,肯定有库的规范在,ARouter类对开发者暴露,实际处理逻辑的类是_ARouter;LogisticsCenter(物流中心)承担处理对象任务,比如反射创建空参构造的实例对象;WareHouse作为仓库保存数据。符合单一职责原则。
三、实现跨module数据传递 (解决问题)
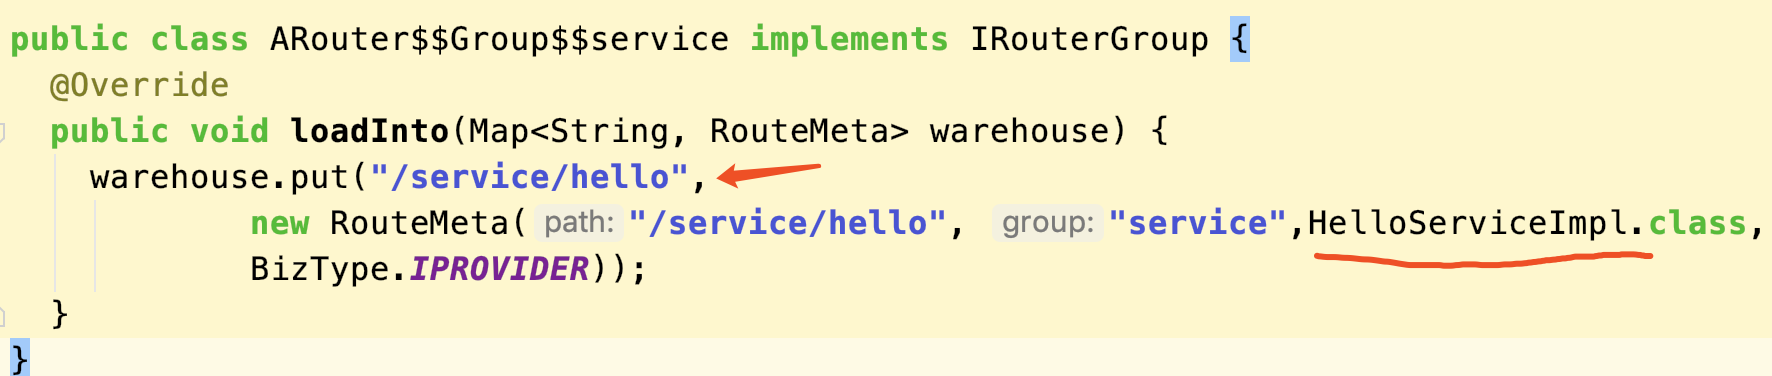
1. 注解生成的类如下:
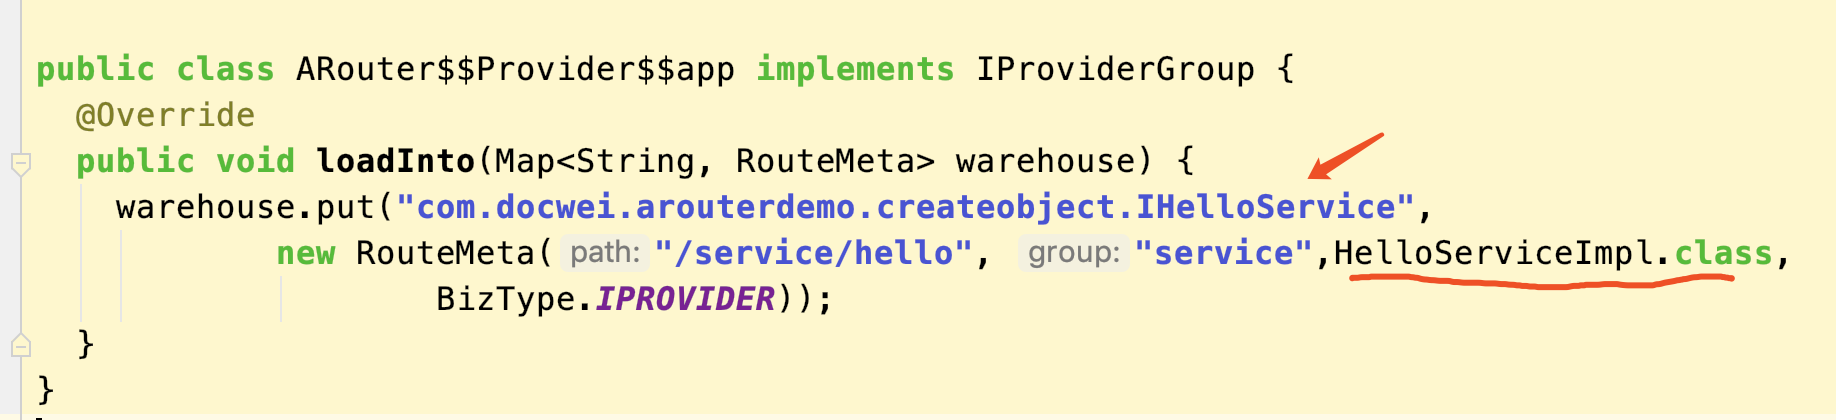
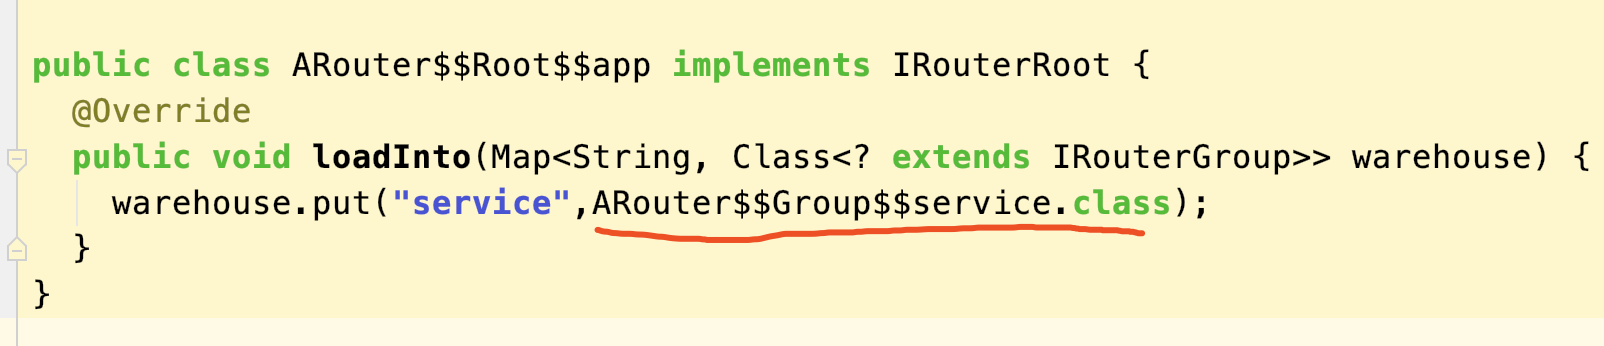
2. 找到这两个(ARouter?Provider?app 和 ARouter?Root?app)新生成的类,然后反射创建对象,并调用loadInto方法,将数据保存到仓库WareHouse。
怎么找:
方式一:初始化(运行时)耗时遍历base.apk,扫描到这个两个类,就直接反射创建。
方式二:auto-register,自定义插件(编译期利用ASM操作transforms文件夹下的字节码)实现。
//方式一:
public static void init(Context context, ThreadPoolExecutor executor) {
    final Set<String> fileNames = new HashSet<>();
    ApplicationInfo applicationInfo = context.getApplicationInfo();
    final String path = applicationInfo.sourceDir;
    //因为5.0以上直接就是一个apk的路径,所以不考虑多个路径
    //耗时大概1s左右,这个是Arouter耗时的关键
    DexFile dexFile = null;
    try {
        dexFile = new DexFile(path);
        Enumeration<String> entries = dexFile.entries();
        while (entries.hasMoreElements()) {
            String element = entries.nextElement();
            //去找含有这个com.docwei.arouter.routes路径的文件名
            if (element.contains(Consts.PACKAGE_OF_GENERATE_FILE)) {
                fileNames.add(element);
            }
        }
    } catch (IOException e) {
        e.printStackTrace();
    }
    for (String fileName : fileNames) {
        //反射去创建这个类对象,然后保存到仓库
         if (fileName.startsWith(Consts.PACKAGE_OF_GENERATE_FILE + "." + "ARouter$$Root")) {
                    ((IRouterRoot) (Class.forName(fileName).getConstructor().newInstance()))
                    .loadInto(WareHouse.sGroups);
           }
        if (fileName.startsWith(Consts.PACKAGE_OF_GENERATE_FILE + "." + "ARouter$$Provider")) {
            ((IProviderGroup) (Class.forName(fileName).getConstructor().newInstance()))
            .loadInto(WareHouse.sProviders);
        }
    }
方式二:
public class LogisticsCenter {
    static boolean sAutoRegister;
    static Context sContext;
    public static void init(Context context, ThreadPoolExecutor executor) {
        loadRouteMap();
        if (sAutoRegister) {
            return;
        }else{
            //走方式一
            xxx
        }
    }
    public static void loadRouteMap() {
        sAutoRegister = false;
        //这个方法将被ASM修改,添加对应的代码
        //register("com.docwei.arouter.routes.ARouter$$Root$$app);
    }
    public static void register(String name) {
        if (!TextUtils.isEmpty(name)) {
            Object obj = Class.forName(name).getConstructor().newInstance();
            if (obj instanceof IRouterRoot) {
                ((IRouterRoot) obj).loadInto(WareHouse.sGroups);
            }
            if (obj instanceof IProviderGroup) {
                ((IProviderGroup) (Class.forName(name).getConstructor().newInstance()))
                        .loadInto(WareHouse.sProviders);
            }
            sAutoRegister = true;
        }
    }
方式二在编译期去操作字节码,找到LogisticsCenter这个class所在的jar,找到注解生成的类ARouter?Root?app、ARouter?Provider?app的全路径,然后定位到loadRouteMap,插入如下代码:
  public static void loadRouteMap() {
        sAutoRegister = false;
        register("com.docwei.arouter.routes.ARouter$$Root$$app");
        register("com.docwei.arouter.routes.ARouter$$Provider$$app");
    }
最后在初始化的调用这个loadRouteMap方法。
无论是注解生成新类,还是利用ASM修改字节码的方法体内容,在ARouter源码里面都有,如果你嫌源码复杂,可以看最后精简的ARouterDemo。
3. 最后根据用户传入的path或者接口类class找实例对象。
//通过接口名获取接口实例对象
public Object navgation(Class service) {
    RouteMeta routeMeta = WareHouse.sProviders.get(service.getName());
    if (routeMeta == null) {
        return null;
    }
    PostCard postCard = new PostCard(routeMeta.getPath(), routeMeta.getGroup(), routeMeta.destination, routeMeta.type);
    LogisticsCenter.completePostCard(postCard);
    return postCard.getProvider();
}
//通过path去获取实例
public static void completePostCard(PostCard postCard) {
    RouteMeta routeMeta = WareHouse.sRoutes.get(postCard.getPath());
    if (routeMeta == null) {
        Class<? extends IRouterGroup> iRouterGroup = WareHouse.sGroups.get(postCard.getGroup());
        if (iRouterGroup == null) {
            Log.e("myRouter", "completePostCard: " + "path map page not found");
            return;
        }
        IRouterGroup routerGroup = iRouterGroup.getConstructor().newInstance();
            routerGroup.loadInto(WareHouse.sRoutes);
            completePostCard(postCard);

    } else {
        postCard.destination = routeMeta.destination;
        postCard.type = routeMeta.getType();
        //获取对象实例
        if (postCard.getType() == BizType.IPROVIDER) {
            IProvider iProvider = WareHouse.sProviderObjects.get(postCard.destination);
            if (iProvider == null) {
                    iProvider = (IProvider) postCard.getDestination().getConstructor()
                    .newInstance();
                    postCard.setProvider(iProvider)
                    iProvider.init(sContext);

            }
        }
    }
}

}
四、拦截器与AutoWird实现原理
拦截器
先看下用户定义的拦截器
@Interceptor(priority = 9)
public class MyInterceptor implements IInterceptor { xxx }
public interface IInterceptor extends IProvider {
    void process(PostCard postCard,IInterceptorCallback iInterceptorCallback);
}
看到没有,继承的是IProvider接口,源码对多个拦截器的处理,是在初始化ARouter后,反射创建所有的拦截器对象来获取多个拦截器实例对象。
 //所有的拦截器都加入了仓库
for (Map.Entry<Integer, Class<? extends IInterceptor>> entry : WareHouse.sInterceptors.entrySet()) {
    IInterceptor interceptor = entry.getValue().getConstructor().newInstance();
    interceptor.init(context);
    WareHouse.sInterceptorObjects.add(interceptor);
}
在页面跳转时,依次走完所有的拦截器process方法,如果中间有拦截器拦截了操作,那就中断页面跳转。 以下代码经过等效改写。(子线程里面走完所有的拦截器process方法,但是源码还用到了CountDownLatch,感觉多此一举,因为子线程的run方法本身就是顺序执行的,拦截器也都按照优先级遍历执行。)
@Override
public void doInterceptor(final PostCard postcard, final IInterceptorCallback callback) {
final int size = WareHouse.sInterceptorObjects.size();
if (size > 0) {
    _ARouter.sExecutor.execute(new Runnable() {
        @Override
        public void run() {
            try {
                mCountDownLatch = new CountDownLatch(size);
                executeInterceptor(0, postcard, callback, size);
                mCountDownLatch.await();
            } catch (InterruptedException e) {
                e.printStackTrace();
            }
        }
    });

 }
}

private void executeInterceptor(final int index, final PostCard postcard, final IInterceptorCallback callback, final int size) {
if (index < size) {
    WareHouse.sInterceptorObjects.get(index).process(postcard, new IInterceptorCallback() {
        @Override
        public void continuing(PostCard postCard) {
            executeInterceptor(index + 1, postcard, callback, size);
            mCountDownLatch.countDown();
            if (index + 1 == size) {
                callback.continuing(postCard);
            }
        }
        @Override
        public void interrupted(Throwable throwable) {
            callback.interrupted(throwable);
            int n = index;
            while (n + 1 <= size) {
                mCountDownLatch.countDown();
                n++;
            }
        }
    });
 }
}
AutoWird 注解自动给字段赋值
先看下用户使用autowird注解
public class SecondActivity extends AppCompatActivity {
    @AutoWird
    public String name;
    @AutoWird
    public long price;
    @AutoWird
    public MyTestSerializableBean mSerializableBean;
    @AutoWird
    public MyTestParcelBean mMyTestParcelBean;
    @AutoWird
    public int score;
    @AutoWird
    public double goal;
    @Override
    protected void onCreate(Bundle savedInstanceState) {
        super.onCreate(savedInstanceState);
        setContentView(R.layout.activity_second);
        ARouter.getInstance().inject(this);
        TextView textView = findViewById(R.id.tv);
        textView.setText(name + "---" + mMyTestParcelBean.desk
                + "---" + mSerializableBean.book + "---" +
                price + "---" + score + "---" + goal);

    }

}
ARouter.getInstance().inject(this);
 //做的操作就是:由这个类去完成
public class ARouter$$SecondActivity$$AutoWird implements IAutoWird {
  @Override
  public void inject(Object target) {
    SecondActivity  substitute= (SecondActivity) target;;
    Intent intent=substitute.getIntent();
    substitute.mSerializableBean = (MyTestSerializableBean) intent.getSerializableExtra("mSerializableBean");
    substitute.price = intent.getLongExtra("price",0);
    substitute.goal = intent.getDoubleExtra("goal",0);
    substitute.name = intent.getStringExtra("name");
    substitute.score = intent.getIntExtra("score",0);
    substitute.mMyTestParcelBean = intent.getParcelableExtra("mMyTestParcelBean");
  }
}
这个IAutoWird是什么?
 public interface IAutoWird {
    void inject(Object target);
 }
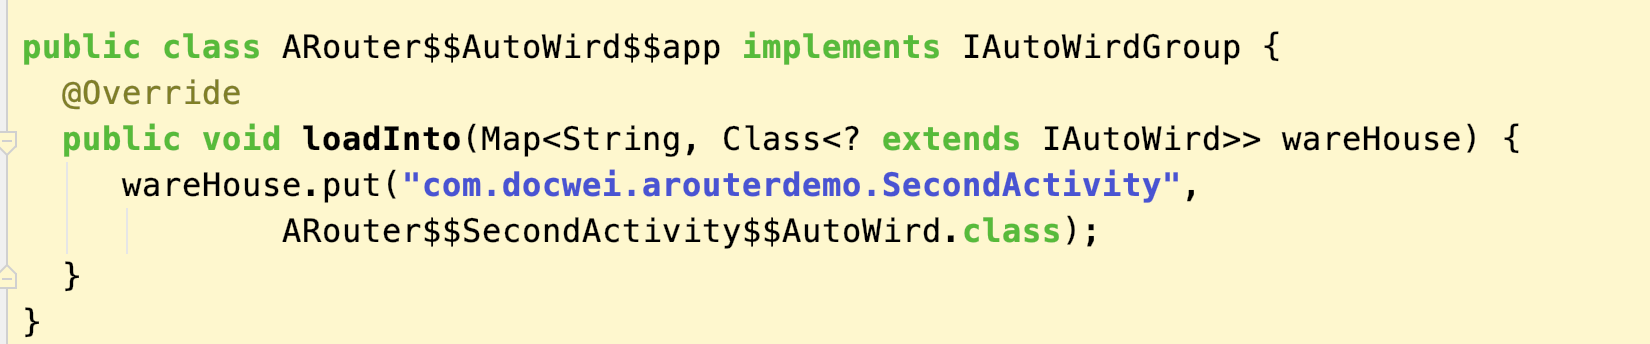
注解生成这个类,初始化ARouter后创建这个ARouter?AutoWird?app对象,等到用户调用ARouter.getInstance().inject(this); 那就再反射创建这个ARouter?SecondActivity?AutoWird对象,调用其inject方法。
五、你学到什么了?
无论拦截器、autowird、页面跳转、获取实例对象,他们的实现原理都一样,一套原理贯穿整个ARouter的所有功能。这个原理也被很多组件化框架吸收套用,确实值得一看。
but 讲真,看完你学不到了啥,可能你啥都没学到,因为没走过源码的逻辑,你不知道作者在写的时候解决了哪些坑,需要哪些技能点。
如果觉得源码复杂,那就看看精简过后的吧。 诚意奉上精简的ARouterDemo
