

欢迎阅读iOS探索系列(按序阅读食用效果更加)
- iOS探索 alloc流程
- iOS探索 内存对齐&malloc源码
- iOS探索 isa初始化&指向分析
- iOS探索 类的结构分析
- iOS探索 cache_t分析
- iOS探索 方法的本质和方法查找流程
- iOS探索 动态方法解析和消息转发机制
- iOS探索 浅尝辄止dyld加载流程
- iOS探索 类的加载过程
- iOS探索 分类、类拓展的加载过程
- iOS探索 isa面试题分析
- iOS探索 runtime面试题分析
- iOS探索 KVC原理及自定义
- iOS探索 KVO原理及自定义
- iOS探索 多线程原理
- iOS探索 多线程之GCD应用
- iOS探索 多线程之GCD底层分析
- iOS探索 多线程之NSOperation
- iOS探索 多线程面试题分析
- iOS探索 细数iOS中的那些锁
- iOS探索 全方位解读Block
写在前面
与GCD一样,NSOperation也是我们日常开发中经常用到的多线程技术。本文将会介绍NSOperation的基本使用、添加依赖、自定义
一、初次使用
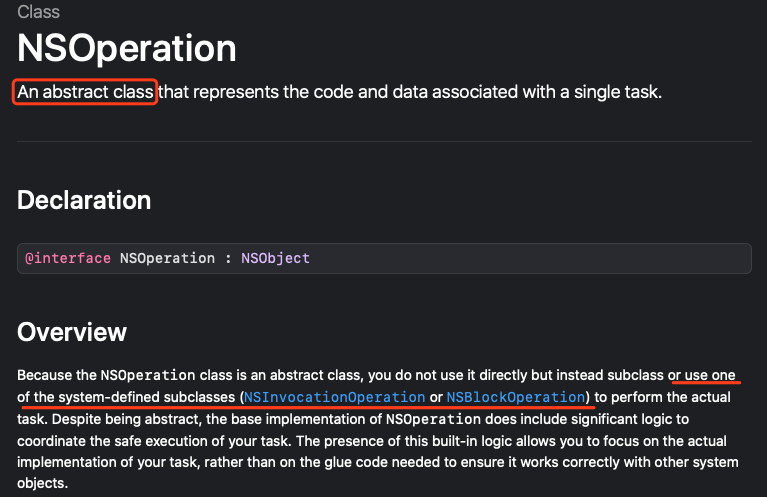
NSOperation是个抽象类,依赖于子类NSInvocationOperation、NSBlockOperation去实现
下面是开发者文档上对NSOperation的一段描述
1.NSInvocationOperation
- 基本使用
- (void)test {
    // 处理事务
    NSInvocationOperation *op = [[NSInvocationOperation alloc] initWithTarget:self
    selector:@selector(handleInvocation:) object:@"Felix"];
    // 创建队列
    NSOperationQueue *queue = [[NSOperationQueue alloc] init];
    // 操作加入队列
    [queue addOperation:op];
}

- (void)handleInvocation:(id)operation {
    NSLog(@"%@ --- %@",op, [NSThread currentThread]);
}
--------------------输出结果:-------------------
Felix --- <NSThread: 0x6000000422c0>{number = 3, name = (null)}
--------------------输出结果:-------------------
- 直接处理事务,不添加隐性队列
- (void)test {
    NSInvocationOperation *op = [[NSInvocationOperation alloc] initWithTarget:self selector:@selector(handleInvocation:) object:@"Felix"];
    [op start];
}
接下来就会引申出下面一段错误使用代码
- (void)test {
    NSInvocationOperation *op = [[NSInvocationOperation alloc] initWithTarget:self selector:@selector(handleInvocation:) object:@"Felix"];
    NSOperationQueue *queue = [[NSOperationQueue alloc] init];
    [queue addOperation:op];
    [op start];
}
--------------------错误日志:-------------------
something is trying to start the receiver simultaneously from more than one thread'
--------------------错误日志:-------------------
上述代码之所以会崩溃,是因为线程生命周期:
queue addOperation:op已经将处理事务的操作任务加入到队列中,并让线程运行op start将已经运行的线程再次运行会造成线程混乱
2.NSBlockOperation
NSInvocationOperation和NSBlockOperation两者的区别在于:
- 前者类似
target形式 - 后者类似
block形式——函数式编程,业务逻辑代码可读性更高
- (void)test {
    // 初始化添加事务
    NSBlockOperation *bo = [NSBlockOperation blockOperationWithBlock:^{
        NSLog(@"任务1————%@",[NSThread currentThread]);
    }];
    // 添加事务
    [bo addExecutionBlock:^{
        NSLog(@"任务2————%@",[NSThread currentThread]);
    }];
    // 回调监听
    bo.completionBlock = ^{
        NSLog(@"完成了!!!");
    };

    NSOperationQueue *queue = [[NSOperationQueue alloc] init];
    [queue addOperation:bo];
    NSLog(@"事务添加进了NSOperationQueue");
}

--------------------输出结果:-------------------
事务添加进了NSOperationQueue
任务1————<NSThread: 0x6000032dc1c0>{number = 5, name = (null)}
任务2————<NSThread: 0x6000032a1880>{number = 4, name = (null)}
完成了!!!
--------------------输出结果:-------------------
NSOperationQueue是异步执行的,所以任务一、任务二的完成顺序不确定
3.执行顺序
下列代码可以证明操作与队列的执行效果是异步并发的
- (void)test {
    NSOperationQueue *queue = [[NSOperationQueue alloc] init];
    for (int i = 0; i < 5; i++) {
        [queue addOperationWithBlock:^{
            NSLog(@"%@---%d", [NSThread currentThread], i);
        }];
    }
}
--------------------输出结果:-------------------
<NSThread: 0x600002771600>{number = 3, name = (null)}---0
<NSThread: 0x60000277ac80>{number = 7, name = (null)}---3
<NSThread: 0x600002774840>{number = 6, name = (null)}---2
<NSThread: 0x600002776a80>{number = 8, name = (null)}---4
<NSThread: 0x60000270c540>{number = 5, name = (null)}---1
--------------------输出结果:-------------------
4.设置优先级
- (void)test {
    NSBlockOperation *bo1 = [NSBlockOperation blockOperationWithBlock:^{
        for (int i = 0; i < 5; i++) {
            //sleep(1);
            NSLog(@"第一个操作 %d --- %@", i, [NSThread currentThread]);
        }
    }];
    // 设置最高优先级
    bo1.qualityOfService = NSQualityOfServiceUserInteractive;

    NSBlockOperation *bo2 = [NSBlockOperation blockOperationWithBlock:^{
        for (int i = 0; i < 5; i++) {
            NSLog(@"第二个操作 %d --- %@", i, [NSThread currentThread]);
        }
    }];
    // 设置最低优先级
    bo2.qualityOfService = NSQualityOfServiceBackground;

    NSOperationQueue *queue = [[NSOperationQueue alloc] init];
    [queue addOperation:bo1];
    [queue addOperation:bo2];
}
NSOperation设置优先级只会让CPU有更高的几率调用,不是说设置高就一定全部先完成
- 不使用
sleep——高优先级的任务一先于低优先级的任务二
第一个操作 0 --- <NSThread: 0x600002254280>{number = 6, name = (null)}
第一个操作 1 --- <NSThread: 0x600002254280>{number = 6, name = (null)}
第一个操作 2 --- <NSThread: 0x600002254280>{number = 6, name = (null)}
第一个操作 3 --- <NSThread: 0x600002254280>{number = 6, name = (null)}
第一个操作 4 --- <NSThread: 0x600002254280>{number = 6, name = (null)}
第二个操作 0 --- <NSThread: 0x600002240340>{number = 7, name = (null)}
第二个操作 1 --- <NSThread: 0x600002240340>{number = 7, name = (null)}
第二个操作 2 --- <NSThread: 0x600002240340>{number = 7, name = (null)}
第二个操作 3 --- <NSThread: 0x600002240340>{number = 7, name = (null)}
第二个操作 4 --- <NSThread: 0x600002240340>{number = 7, name = (null)}
- 使用
sleep进行延时——高优先级的任务一慢于低优先级的任务二
第二个操作 0 --- <NSThread: 0x600002b35840>{number = 7, name = (null)}
第二个操作 1 --- <NSThread: 0x600002b35840>{number = 7, name = (null)}
第二个操作 2 --- <NSThread: 0x600002b35840>{number = 7, name = (null)}
第二个操作 3 --- <NSThread: 0x600002b35840>{number = 7, name = (null)}
第二个操作 4 --- <NSThread: 0x600002b35840>{number = 7, name = (null)}
第一个操作 0 --- <NSThread: 0x600002b3c700>{number = 5, name = (null)}
第一个操作 1 --- <NSThread: 0x600002b3c700>{number = 5, name = (null)}
第一个操作 2 --- <NSThread: 0x600002b3c700>{number = 5, name = (null)}
第一个操作 3 --- <NSThread: 0x600002b3c700>{number = 5, name = (null)}
第一个操作 4 --- <NSThread: 0x600002b3c700>{number = 5, name = (null)}
5.线程间通讯
- 在
GCD中使用异步进行网络请求,然后回到主线程刷新UI NSOperation中也有类似在线程间通讯的操作
- (void)test {
    NSOperationQueue *queue = [[NSOperationQueue alloc] init];
    queue.name = @"Felix";
    [queue addOperationWithBlock:^{
        NSLog(@"请求网络%@--%@", [NSOperationQueue currentQueue], [NSThread currentThread]);

        [[NSOperationQueue mainQueue] addOperationWithBlock:^{
            NSLog(@"刷新UI%@--%@", [NSOperationQueue currentQueue], [NSThread currentThread]);
        }];
    }];
}
--------------------输出结果:-------------------
请求网络<NSOperationQueue: 0x7ff4a240bae0>{name = 'Felix'}--<NSThread: 0x6000007dcf00>{number = 5, name = (null)}
刷新UI<NSOperationQueue: 0x7ff4a24087d0>{name = 'NSOperationQueue Main Queue'}--<NSThread: 0x60000078c8c0>{number = 1, name = main}
--------------------输出结果:-------------------
6.设置并发数
- 在
GCD中只能使用信号量来设置并发数 - 而
NSOperation轻易就能设置并发数- 通过设置
maxConcurrentOperationCount来控制单次出队列去执行的任务数
- 通过设置
- (void)test {
    NSOperationQueue *queue = [[NSOperationQueue alloc] init];
    queue.name = @"Felix";
    queue.maxConcurrentOperationCount = 2;

    for (int i = 0; i < 5; i++) {
        [queue addOperationWithBlock:^{ // 一个任务
            [NSThread sleepForTimeInterval:2];
            NSLog(@"%d-%@",i,[NSThread currentThread]);
        }];
    }
}
--------------------输出结果:-------------------
1-<NSThread: 0x6000009290c0>{number = 5, name = (null)}
0-<NSThread: 0x6000009348c0>{number = 8, name = (null)}
3-<NSThread: 0x6000009290c0>{number = 5, name = (null)}
2-<NSThread: 0x60000094b0c0>{number = 7, name = (null)}
4-<NSThread: 0x6000009348c0>{number = 8, name = (null)}
--------------------输出结果:-------------------
7.添加依赖
在NSOperation中添加依赖能很好的控制任务执行的先后顺序
- (void)test {
    NSOperationQueue *queue = [[NSOperationQueue alloc] init];
    NSBlockOperation *bo1 = [NSBlockOperation blockOperationWithBlock:^{
        [NSThread sleepForTimeInterval:0.5];
        NSLog(@"请求token");
    }];

    NSBlockOperation *bo2 = [NSBlockOperation blockOperationWithBlock:^{
        [NSThread sleepForTimeInterval:0.5];
        NSLog(@"拿着token,请求数据1");
    }];

    NSBlockOperation *bo3 = [NSBlockOperation blockOperationWithBlock:^{
        [NSThread sleepForTimeInterval:0.5];
        NSLog(@"拿着数据1,请求数据2");
    }];

    [bo2 addDependency:bo1];
    [bo3 addDependency:bo2];

    [self.queue addOperations:@[bo1,bo2,bo3] waitUntilFinished:YES];

    NSLog(@"执行完了?我要干其他事");
}

--------------------输出结果:-------------------
请求token
拿着token,请求数据1
拿着数据1,请求数据2
执行完了?我要干其他事
--------------------输出结果:-------------------
注意不要添加依赖导致循环运用,会导致依赖无效并会在控制台打印出"XPC connection interrupted"
8.任务的挂起、继续、取消
// 挂起
queue.suspended = YES;
// 继续
queue.suspended = NO;
// 取消
[queue cancelAllOperations];
但是使用中经常会遇到一些匪夷所思的问题——明明已经挂起了任务,可还是继续执行了几个任务才停止执行
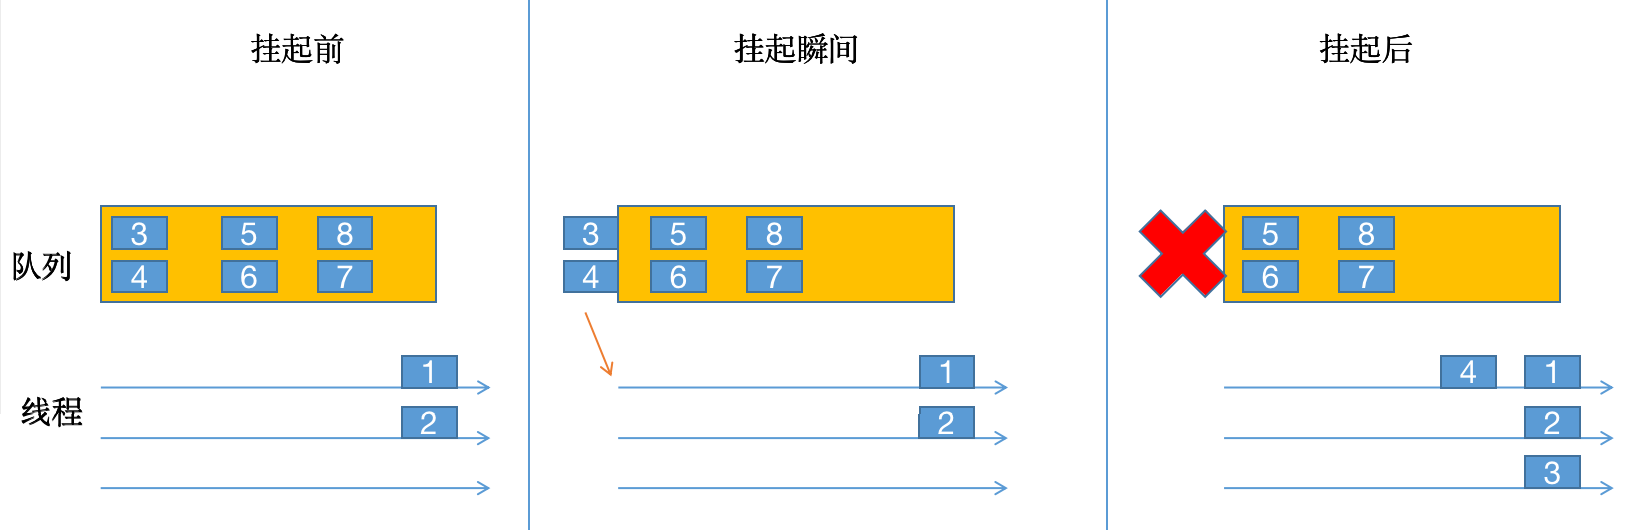
- 挂起前:
任务3、任务4等待被调度 - 挂起瞬间:
任务3、任务4已经被调度出队列,准备执行,此时它们是无法挂起的 - 挂起后:
任务3、任务4被线程执行,而原来的队列被挂起不能被调度
二、自定义NSOperation缓存机制
我们日常开发中经常用SDWebImage去加载网络图片,其中又是什么原理呢?如果要我们自己来实现又该怎么去做呢?
NSURL   *imageURL     = [NSURL URLWithString:model.imageUrl];
[cell.imageView sd_setImageWithURL:imageURL placeholderImage:[UIImage imageNamed:@"Felix"]];
return cell;
1.下载图片
使用图片地址去下载NSData数据,再转成相应的UIImage图片
cell.imageView.image = [UIImage imageWithData:[NSData dataWithContentsOfURL:imageURL]];
Q1:主线程使用NSData转UIImage会造成卡顿,必须要解决这个问题
2.NSOperation异步处理
使用NSBlockOperation去异步处理数据,然后在主线程刷新UI,从而解决了卡顿的问题
NSBlockOperation *bo = [NSBlockOperation blockOperationWithBlock:^{
    NSLog(@"去下载图片:%@", model.title);
    // 延迟
    NSData *data   = [NSData dataWithContentsOfURL:imageURL];
    UIImage *image = [UIImage imageWithData:data];

    // 更新UI
    [[NSOperationQueue mainQueue] addOperationWithBlock:^{
        cell.imageView.image = image;
    }];
}];

[self.queue addOperation:bo];
return cell;
Q2:由于cell的缓存机制,图片每次都要去下载会造成浪费,所以要想办法存起来
3.模型缓存
- 如果
模型中有数据,则从模型中取出图片加载,节约内存消耗 - 如果都没有就异步下载把图片数据存到
模型中
if (model.image) {
    NSLog(@"从模型获取图片:%@",model.title);
    cell.imageView.image = model.image;
    return cell;
}

NSBlockOperation *bo = [NSBlockOperation blockOperationWithBlock:^{
    NSLog(@"去下载图片:%@", model.title);
    // 延迟
    NSData *data   = [NSData dataWithContentsOfURL:imageURL];
    UIImage *image = [UIImage imageWithData:data];

    // 更新UI
    [[NSOperationQueue mainQueue] addOperationWithBlock:^{
        cell.imageView.image = image;
    }];
}];

[self.queue addOperation:bo];
return cell;
Q3:但是存到model里会导致内存暴涨,此时只能清理model,但model中不只有图片数据,所以得另辟蹊径处理缓存问题
4.内存缓存
- 如果
内存中有数据,则从内存中取出图片加载,节约内存消耗 - 如果都没有就异步下载把图片数据存到
全局可变字典(内存)中
UIImage *cacheImage = self.imageCacheDict[model.imageUrl];
if (cacheImage) {
    NSLog(@"从内存获取图片:%@", model.title);
    cell.imageView.image = cacheImage;
    return cell;
}

NSBlockOperation *bo = [NSBlockOperation blockOperationWithBlock:^{
    NSLog(@"去下载图片:%@", model.title);
    // 延迟
    NSData *data   = [NSData dataWithContentsOfURL:imageURL];
    UIImage *image = [UIImage imageWithData:data];
    [self.imageCacheDict setValue:image forKey:model.imageUrl];

    // 更新UI
    [[NSOperationQueue mainQueue] addOperationWithBlock:^{
        cell.imageView.image = image;
    }];
}];

[self.queue addOperation:bo];
return cell;
Q4:但是内存会在App关闭时回收内存,导致每次重启都要重新下载图片
5.本地缓存
- 第一次异步下载把图片数据写到
本地缓存中 - 第二次加载图片时直接可以加载
本地缓存中的数据,节约性能消耗
// 这里对路径进行了封装处理,并进行了md5处理
UIImage *diskImage = [UIImage imageWithContentsOfFile:[model.imageUrl getDowloadImagePath]];
if (diskImage) {
    NSLog(@"从沙盒获取图片:%@",model.title);
    cell.imageView.image = diskImage;
    return cell;
}

NSBlockOperation *bo = [NSBlockOperation blockOperationWithBlock:^{
    NSLog(@"去下载图片:%@", model.title);
    // 延迟
    NSData *data   = [NSData dataWithContentsOfURL:imageURL];
    UIImage *image = [UIImage imageWithData:data];
    // 存内存
    [data writeToFile:[model.imageUrl getDowloadImagePath] atomically:YES];

    // 更新UI
    [[NSOperationQueue mainQueue] addOperationWithBlock:^{
        cell.imageView.image = image;
    }];
}];

[self.queue addOperation:bo];
return cell;
Q5:沙盒的效率没有内存高,所以还得进行优化
6.本地缓存+内存缓存
- 如果
内存中有数据,则从内存中取出图片来展示 - 如果
沙盒中有数据,则从沙盒中取出图片来展示并存一份到内存中 - 如果都没有就异步下载把图片数据写到
本地缓存和内存缓存中
UIImage *cacheImage = self.imageCacheDict[model.imageUrl];
if (cacheImage) {
    NSLog(@"从内存获取图片:%@", model.title);
    cell.imageView.image = cacheImage;
    return cell;
}

UIImage *diskImage = [UIImage imageWithContentsOfFile:[model.imageUrl getDowloadImagePath]];
if (diskImage) {
    NSLog(@"从沙盒获取image:%@",model.title);
    cell.imageView.image = diskImage;
    [self.imageCacheDict setValue:diskImage forKey:model.imageUrl];
    return cell;
}

NSBlockOperation *bo = [NSBlockOperation blockOperationWithBlock:^{
    NSLog(@"去下载图片:%@", model.title);
    // 延迟
    NSData *data   = [NSData dataWithContentsOfURL:imageURL];
    UIImage *image = [UIImage imageWithData:data];
    // 存内存
    [self.imageCacheDict setValue:image forKey:model.imageUrl];
    [data writeToFile:[model.imageUrl getDowloadImagePath] atomically:YES];

    // 更新UI
    [[NSOperationQueue mainQueue] addOperationWithBlock:^{
        cell.imageView.image = image;
    }];
}];

[self.queue addOperation:bo];
return cell;
这就是
SDWebImage最简易的步骤
写在后面
笔者将文中内容封装成一个Demo,有兴趣可以下载看看
