

章节文章课程简介:
任何事情都需要时间的沉淀,技术也不例外,今天编写Vue3.0系列的章节文章,只是希望能够比别人更早的去尝鲜一些新的技术,毕竟Vue3.0已经Beta版本了,所以里正式版本也不远了,提前去学习和了解,我们就会比别人有更多的时间去充分理解Vue3.0的特性,只有当你真正理解一门技术的时候,才能够正确的判定它是否合适、是否应该运用到你当前的实际项目当中去。
- 第一天:浅谈vue3.0、初始化项目之:Hello World Vue3.0
- 第二天:Api实战之:vue-composition 我是api调用工程师
- 第三天:vue3如何实现逻辑复用
- 第四天:实战之:高解耦式mock api的设计与订单列表查询
- 第五天:如何实现代码优化
今天是第二天:Api实战之:vue-composition 我是api调用工程师
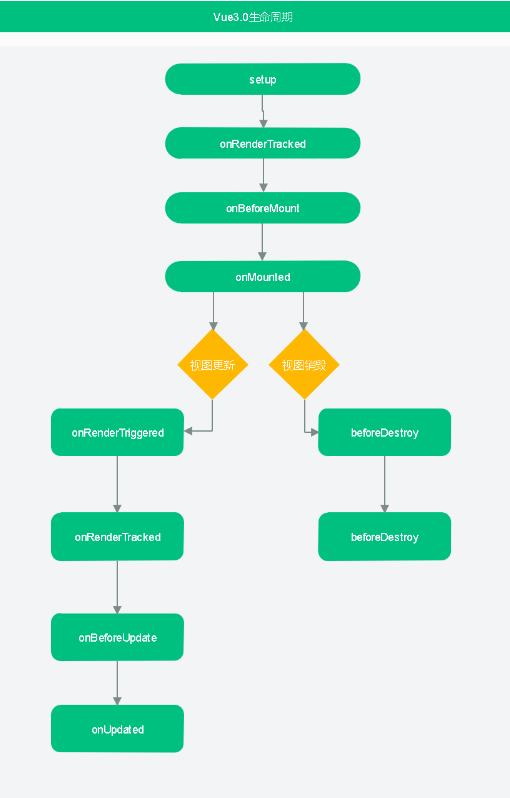
学习任何框架之前,首先肯定要学习的是它的生命周期,Vue3.0的所有生命周期函数都是在setup函数中定义,具体包含生命周期机器定义如下:
import {
  onBeforeMount,
  onMounted,
  onBeforeUpdate,
  onUpdated,
  onBeforeUnmount,
  onUnmounted,
  onErrorCaptured,
  onRenderTracked,
  onRenderTriggered,
} from "vue";
export default {
  setup() {
    console.log("setup");
    onRenderTracked(() => {
      console.log("onRenderTracked");
    });
    onRenderTriggered((event) => {
      console.log('onRenderTriggered')
    });
    onBeforeMount(() => {
      console.log("onBeforeMount");
    });
    onMounted(() => {
      console.log("onMounted");
    });
    onBeforeUpdate(() => {
      console.log("onBeforeUpdate");
    });
    onUpdated(() => {
      console.log("onUpdated");
    });
    onBeforeUnmount(() => {
      console.log("beforeDestroy");
    });
    onUnmounted(() => {
      console.log("onUnmounted");
    });
    onErrorCaptured(() => {
      console.log("onErrorCaptured");
    });
    return {
    };
  },
};
Vue3.0组件生命周期图
Vue3.0 vue-composition Api的使用
- (1) setup() setup() 函数是 vue3 中统一的入口函数,所有生命周期函数定义都是需要定义在次函数下才生效,setup 函数中无法访问到 this,所有的组件参数都是通过,setup函数中包含props和context参数,props参数默认是响应式的
首先我们先创建一个组件如下:
export default {
  setup() {
      console.log("组件入口函数");
  }
}
components/user,vue
<template>
  <section>
    <h2>我是:{{ userName }}</h2>
  </section>
</template>
export default {
  props: {
  userName: String
 },
  setup(props,context) {
    // context.attrs
    // context.slots
    // context.parent
    // context.root
    // context.emit
    // context.refs
      console.log(`组件传递props${props.userName}`);
      console.log(`组件的上下文对象${context}`);
  },
};
然后在App.vue页面中使用它
src/App,vue
<template>
  <section>
    <h2>Hello World Vue3.0</h2>
    <com-user :userName="'虎克小哥哥'"/>
    <br/>
  </section>
</template>
import ComUser from "./components/user.vue"
export default {
  components:{
    ComUser
  },
  setup() {
    return {
    };
  },
};
- (2) reactive() 函数接收一个普通对象,返回一个响应式的数据对象,支持Map、Set、WeakSet、WeakMap数据结构
<template>
  <section>
    <h2>Hello World Vue3.0</h2>
    <h3>我是:{{userInfo.userName}}</h3>
    <br/>
  </section>
</template>
import { reactive } from "vue";
export default {
  setup() {
    const userInfo=reactive({userName:"虎克小哥哥"});
    return {
      userInfo
    };
  },
};
-
(3) ref() 函数用来根据给定的值创建一个响应式的数据对象,ref() 函数调用的返回值是一个对象,这个对象上只包含一个 .value 属性。
<template>
  <section>
    <h2>Hello World Vue3.0</h2>
    <h3>我叫虎克小哥哥,来自:{{city}}</h3>
    <button @click="getUserCity">你来自哪里?</button>
    <br/>
  </section>
</template>
import { ref } from "vue"; export default { setup() { const city=ref(""); const getUserCity=()=>{ city.value="上海"; } return { city }; }, }; -
(4) isRef() 用来判断某个值是否为 ref() 创建出来的对象。 isProxy、isReactive、isReadonly都大同小异
 <template>
   <section>
     <h2>Hello World Vue3.0</h2>
     <h3>{{Msg}}</h3>
     <button @click="getUserInfo">你来自哪里?</button>
     <br/>
   </section>
 </template>
import { isRef } from "vue";
export default {
  setup() {
    const userName=ref("虎克小哥哥");
    const city=ref("上海");
    const Msg=ref("");
    const getUserInfo=()=>{
      if(isRef(userName)){
        Msg.value=`我叫:${userName.value},來自${city.value}`
      }else{
        Msg.value=`我叫:${userName.value}`
      }
    }
    return {
      Msg,
      getUserInfo
    };
  },
};
- (5) toRefs() 函数可以将 reactive() 创建出来的响应式对象,转换为普通的对象,就是可以將reactive多层对象类型的响应对象,转化为普通类型的响应数据
<template>
  <section>
    <h2>Hello World Vue3.0</h2>
    <h3>转换reactive类型数据{{userInfo.userName}}</h3>
    <h3>转换reactive类型数据{{code}}</h3>
    <br/>
  </section>
</template>
import { reactive,toRefs } from "vue";
export default {
  setup() {
    const data=reactive({
      userInfo:{
        userName:"虎克小哥哥"
      },
       code:200
    });
   }
    return {
       ...toRefs(data),
    };
  },
};
- (6) computed() 计算属性 传入一个 function 函数,可以得到一个只读的计算属性 传入一个对象可以自定义get set函数 返回一个响的应式ref对象
<template>
  <section>
    <h2>Hello World Vue3.0</h2>
    请输入年龄:<input type="text" v-model="age">
    <br/><br/>
    我的年龄是:{{userMsg}}
    <br/>
  </section>
</template>
import { ref,computed } from "vue";
export default {
  setup() {
    const age = ref("");
    //传入函数的方式
    const userMsg = computed(() =>{
      return `我的年龄是:`+age.value
    })

    //传入对象自定义get set的形式
    const userMsg = computed({
    get(){
      return `我的年龄是:`+age.value
    },
    set(val){
      age.value=val;
    }
   })
  // 返回的userMsg是一个响应式的ref对象
   userMsg.value="";
    return {
      age,
      userMsg
    };
  },
};
- (7) watch() 监听函数
<template>
  <section>
    <h2>Hello World Vue3.0</h2>
    请输入地址:<input type="text" v-model="city">
    请输入年龄:<input type="text" v-model="age">
     <button @click="stop">不想给你知道我的年龄</button>
    <br/>
  </section>
</template>
import { ref,watch } from "vue";
export default {
  setup() {
     const city=ref("上海");
        //定义方式1 内部的响应对象改变就触发监听,默认会触发深度监听,
        //初始化的时候会执行一次
        //返回一个监听实例函数
       const stop = watch(() => {
          console.log("我的年龄在增长:",age.value)
        },{
            lazy: false // 是否触发深度监听
       })
       //调用监听实例函数,可以停止监听
       //stop()

        //监听某个响应对象
       const stop =  watch(
          () => age.value,
          (age, prevAge) => {
             console.log("age:",age,"prevAge",prevAge)
          }
        )
        //监听多个响应对象
        const stop = watch(
          [
          () => age.value,
          () => city.value,
          ],
          (
            [age, city],
            [prevage, prevcity],
          ) => {
            console.log("age:",age,"prevage",prevage)
            console.log("city:",city,"prevcity",prevcity)
          },
          {
            lazy: true // 是否触发深度监听
          }
      )
    return {
       stop
    };
  },
};
- (8) provide & inject 共享普通数据,轻轻松松垮多级组件的数据传递(不限层级,可以说是优点也可以说是缺点,因为命名规则稍有不规范就会显得数据维护性降低bug满天飞,层级过深的时候也不是很直观) provide() 和 inject() 可以实现嵌套组件之间的数据传递。父级组件中使用 provide() 函数向下传递数据;子级组件中使用 inject() 获取上层传递过来的数据
1 (父组件传值子、孙子组件)
Achild.vue 孙子组件
 <template>
  <section>
   <div>孙子组件</div>
   <img style="width:50px;height:50px" :src="pic"/>
  </section>
</template>

<script>
import { inject } from 'vue'
export default {
  setup() {
    //A组件获取父组件传递过来的帅气头像数据
    const pic = inject('pic')
    return {pic}
  },
};
</script>
A.vue 子组件
<template>
<section>
 <div>子组件</div>
 <com-achild/>
</section>
</template>

<script>
import ComAchild from "./components/Achild.vue";
export default {
 components:{
  ComAchild,
},
};
</script>
App.vue 根组件
<template>
  <section>
   <com-a/>
  </section>
</template>

import ComA from "./components/A.vue";
import {provide,ref} from "vue";
const pic='https://dss3.bdstatic.com/70cFv8Sh_Q1YnxGkpoWK1HF6hhy/it/u=1461286262,427682797&fm=26&gp=0.jpg'
export default {
   components:{
    ComA,
  },
  setup() {
    //父组件冒泡共享数据pic
    provide('pic',pic )
    //也支持传递响应式数据
    const pic = ref('pic');
    provide('pic',pic)
  },
};
- (9) ref 组件实例获取
App.vue
<template>
  <section>
    <com-a ref="comRef"/>
  </section>
</template>
import { ref,onMounted } from "vue";
import ComA from "./components/A.vue";
export default {
 components:{
  ComA,
 },
  setup() {
     const comRef = ref(null);
    //需要在domx渲染类型的生命周期后使用
    onMounted(() => {
      //获取子组件实例,调用其内部函数
      console.log(comRef.value.getName())
    })
    return {
      comRef
    };
   },
};
子组件A.vue
<template>
<section>
  我是子组件
</section>
</template>

export default {
    setup(){
        //子组件中的函数
        const getName=()=>{
            return "我是测试数据"
        }
        return{
            getName
        }
    }
};
- (10) 高级反应性API customRef: 这个是真的香,创建一个可以控制其get set触发更新的引用对象,返回一个响应式的ref对象 markRaw:标记一个对象,使其永远不会转换为代理。返回对象本身
App.vue
<template>
  <section>
    轻轻松松实现防抖
    {{text}}
    <input v-model="text"/>
  </section>
</template>
import { customRef } from "vue";
//只需要返回一个响应Ref对象,可自定义其get set
const useDebounce=(value, delay = 10000)=>{//10000秒之后才会更新text的值
  return customRef((track, trigger) => {
    let timeout
    return {
      get() {
        track()//必须调用次函数才会触发更新
        return value
      },
      set(newValue) {
        clearTimeout(timeout)
        timeout = setTimeout(() => {
          value = newValue
          trigger()//必须调用次函数才会触发更新
        }, delay)
      }
    }
 })
}
export default {
  setup() {
    return {
      text:useDebounce()
    };
   },
};
- (11) 高级反应性API
markRaw:标记一个对象,使其永远不会转换为代理。返回对象本身 shallowRef:创建一个引用来跟踪其自身的.value突变,但不会使其值具有反应性(意思就是)
App.vue
<template>
  <section></section>
</template>
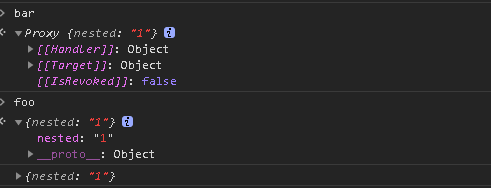
import { markRaw } from "vue";
export default {
  setup() {
    const foo = markRaw({
     nested:true
    })
    const bar = reactive({
      nested: foo.nested
    })
    console.log(bar)
    console.log(foo)
   },
};
foo对象未被代理,最常见的运用场景就是大数据的列表页面,列表数据不会纯展示性质的,不会涉及到修改,也就没必要去深度代理了。其实和冻结对象差不多,明白其意思根据具体场景使用即可,跳过代理转换可以提高性能
第一天:浅谈vue3.0、初始化项目之:Hello World Vue3.0
🎨 原创不易,支持请点赞、转发
