

ps 最近总结的东西比较多,下面只是摘出来的一部分第四阶段部分。东西多了难免出现差错望指正
下面代码均放在github上了
第四阶段 vue原理及其基本实现
不能手写一个vue,你拿什么和小白装x?

4.1 从响应式入手
首先初始化状态
class myVue {
    constructor(options) {
        // 初始化
        this._init(options)
    }

    // 初始化
    _init(options) {
        this.$options = options;

        // 初始化状态
        initstate(this)

        // 初始化渲染页面
        if (this.$options.el) {
            this.$mount()
        }
    }
实现数据代理和数据监听
基本思路:数据代理即把vm._data上的数据代理到vm上,数据监听则需要在属性get和set中做些相应的逻辑处理
实现方法:vue2.x 的主要使用方法Object.defineProperty
下面代码中将对对象的监听交予Observe实例处理
import Observe from './observe'


export function initstate(vm) {
    let opts = vm.$options
    if (opts.data) {
        initData(vm)
    }
    if (opts.computed) {}
    if (opts.watch) {}

}
// 初始化data
function initData(vm) {
    // 获取data
    let data = vm.$options.data
    data = vm._data = typeof data === 'function' ? data.call(vm) : data || {}

    // 实现代理
    for (let key in data) {
        proxy(vm, '_data', key)
    }
    // 实现数据监听
    observe(data)
}

// 数据监听
export function observe(data) {
    // 判断类型
    if (typeof data !== 'object' || data === null) return
    return new Observe(data)
}

// 数据代理
function proxy(obj, tar, key) {
    Object.defineProperty(obj, key, {
        get() {
            return obj[tar][key]
        },
        set(newValue) {
            obj[tar][key] = newValue
        }
    })
}
Observe类代码
目前这里只是实现了对个个对象属性的监听,为保证可以深度监听,我们要不断判断进入defineReactive方法中的value的类型,若其仍为对象我们需要“递归”处理(相似于递归)
还要注意一点的是,我们在set一个新值时,新值的类型也可能为一个对象故仍需判断
class Observe {

    constructor(data) {

        this.walk(data)


    }
    walk(data) {
        let keys = Object.keys(data)

        for (let i = 0; i < keys.length; i++) {
            let key = keys[i]
            let value = data[key]
            defineReactive(data, key, value)
        }
    }
}

function defineReactive(obj, key, value) {
    // 观察value是不是一个对象
    if (typeof value === 'object') {
        childOb = observe(value)
    }
    Object.defineProperty(obj, key, {
        get() {
            console.log('获取了数据')
            return value
        },
        set(newValue) {
            if (newValue == value) return
            if (typeof newValue === 'object') {
                observe(newValue)
            }
            console.log('设置了数据')
            value = newValue

        }
    })


}
扩展数组方法
上面已经完成了对对象属性的监听,但是Object.defineProperty是监听不到数组操作的。故下面需要扩展数组的方法
需要扩展的数组方法['push', 'pop', 'push', 'unshift', 'reverse', 'sort', 'splice'](在vue2.x中只重写了这几个数组的方法)
这里运用AOP的思想,在原型链中间进行拦截扩展
像push,unshift操作可能像数组中推进去了一个对象属性,故我们仍需对这个新增属性实现监听
// 监听数组
const methods = ['push', 'pop', 'shift', 'unshift', 'reverse', 'sort', 'splice']

// AOP的思想扩展数组
const oldMethods = Array.prototype
export let arrayMethods = Object.create(oldMethods)
methods.forEach((methods) => {
    arrayMethods[methods] = function(...args) {
        let res = oldMethods[methods].apply(this, args)
        console.log('监听逻辑')

        // 获取新增属性
        let insert
        switch (methods) {
            case 'push':
            case 'unshift':
                insert = args
                break;
            case 'splice':
                insert = args.slice(2)
                break
        }
        // 新增属性的监听
        if (insert) {
            observeArray(insert)
        }
         return res
    }
})

// 新增属性的监听
export function observeArray(insert) {
    for (let i = 0; i < insert.length; i++) {
        observe(insert[i])
    }
}
Observe类中相应判断data类型
class Observe {

    constructor(data) {

        if (Array.isArray(data)) {
            // 扩展数组方法
            data.__proto__ = arrayMethods

            // 监听数组元素
            observeArray(data)

        } else {
            this.walk(data)
        }

    }
    walk(data) {
        let keys = Object.keys(data)

        for (let i = 0; i < keys.length; i++) {
            let key = keys[i]
            let value = data[key]
            defineReactive(data, key, value)
        }
    }
}
}
挂载和页面渲染
主要思想:根据选项所传的el拿到所要挂载的节点及其表达式{{demo}}等,然后进行数据与表达式的替换。页面渲染所需的更新方法其核心算法是diff,diff将在4.2中总结。这里只实现数据和模板的替换
// 初始化
    _init(options) {
        this.$options = options;

        // 初始化状态
        initstate(this)

        // 初始化渲染页面
        if (this.$options.el) {
            this.$mount()
        }
    }

    $mount() {
        // 拿到节点
        let vm = this
        let el = this.$options.el
        el = this.$el = query(el)
        const updataComponent = () => {
            console.log('更新和渲染的实现')
            vm._update()
        }

        // 渲染节点
        new Watch(this, updataComponent)
    }
    _update() {
        let vm = this
        let el = vm.$el

        let node = document.createDocumentFragment()
        let firstChild
        while (firstChild = el.firstChild) {
            node.appendChild(firstChild)
        }

        // 文本替换
        compiler(node, vm)

        //最终挂载
        el.appendChild(node)

    }
}

function query(el) {
    if (typeof el !== 'string') return
    return document.querySelector(el)
}
文本替换中核心代码
思想:取得当前elDOM下的文本节点,即各种表达式。然后进行文本的替换
const util = {
    getval: function(vm, expr) {
        // 可能是msg.foo.name.age,故需要一层一层的取
        let keys = expr.split('.')
        return keys.reduce((pre, next) => {
            pre = pre[next]
            return pre
        }, vm)
    },
    compilerText: function(node, vm) {
        if (!node.expr) {
            node.expr = node.textContent
        }
        node.textContent = node.expr.replace(/\{\{((?:.|\r?\n)+?)\}\}/g, function(...args) {

            return util.getval(vm, args[1])

        })
    }
}

export function compiler(node, vm) {
    let childNodes = node.childNodes;

    [...childNodes].forEach(child => {
        if (child.nodeType === 1) {
            compiler(child, vm)
        }
        if (child.nodeType === 3) {
            util.compilerText(child, vm)
        }
    })
}
vue中,干活的一般均是watcher。上面的更新操作也是交予watcher去完成的。
上面现阶段watcher类的代码
let id = 0
class Watch {
    constructor(vm, exprs, cb = () => {}, opts) {
        this.vm = vm
        this.exprs = exprs
        this.cb = cb
        this.id = id++;


        if (typeof exprs === 'function') {
            this.getter = exprs
        }

        this.get()
    }
    get() {
        this.getter()
    }

}
依赖收集和派发更新
上面我们实现了数据的监听,接下来开始实现依赖的收集和派发更新。以保证监听到数据的变化,页面可以响应式的进行更新
首先编写dep类,用于收集watcher
watcher栈存在的目的即保证只有一个全局watcher
dep类的代码
let id = 0

class Dep {
    constructor() {
        this.subs = []
        this.id=id++
    }

    // 订阅
    addSub(watcher) {
        this.subs.push(watcher)
    }

    // 发布
    notify() {
        this.subs.forEach(watcher => {
            watcher.update()
        })
    }

    //实现与watcher关联
    depend() {
        if (Dep.target) {
            Dep.target.addDep(this)
        }
    }

}

let stack = []

export function pushTarget(wacher) {
    stack.push(wacher)
    Dep.target = wacher
}

export function popTarget() {
    stack.pop()
    Dep.target = stack[stack.length]
}

export default Dep
get时进行依赖收集,set是进行派发更新
function defineReactive(obj, key, value) {
    // 观察value是不是一个对象

    if (typeof value === 'object') {
         observe(value)
    }
    let dep = new Dep()
    Object.defineProperty(obj, key, {
        get() {

            // 进行依赖收集
            if (Dep.target) {
                dep.depend()
            }
            console.log('获取了数据')
            return value
        },
        set(newValue) {
            if (newValue == value) return
            if (typeof newValue === 'object') {
                observe(newValue)
            }
            console.log('设置了数据')
            value = newValue

            // 进行派发更新
            dep.notify()
        }
    })
注意上面代码中,依赖收集我们使用的方法是dep.depend()但是Dep类中我们明明可以直接使用addSub。为什么要这么做?
我们要清楚dep和watcher的关系
每一属性一一对应一个watcher,而一个watcher则会对应多个dep。
此时的watcher类中的代码
上面依赖收集是调用了Dep.target.addDep(this),Dep.target指的是此时的全局watcher,即此时调用了全局watcher的addDep.并将此时的dep实例带了过去
注意dep的去重,这里用了set结构去重更为方便
同时在addDep中也需要将这个watcher再加到dep中
import { pushTarget, popTarget } from './dep'

let id = 0
class Watch {
    constructor(vm, exprs, cb = () => {}, opts) {
        this.vm = vm
        this.exprs = exprs
        this.cb = cb
        this.id = id++;
        this.deps = []
        this.depsId = new Set()

        if (typeof exprs === 'function') {
            this.getter = exprs
        }

        this.get()
    }
    get() {
        pushTarget(this)
        this.getter()
        popTarget()
    }
  	update() {
         this.get()
    }
    addDep(dep) {
        let id = dep.id
        if (!this.depsId.has(id)) {
            this.depsId.add(id)
            this.deps.push(dep)
            dep.addSub(this)
        }
    }

}
派发更新就不用管了,直接在set时调用dep的notify通知watcher去更新即可
实现异步更新
我们都知道vue中的组件更新是异步执行的,即我们不断的设置vm.age=1,vm.age=2,vm,age=3,到最后其实它只做了一次更新渲染的操作。
实现改写watcher中的update
即利用宏或微任务,将更新操作放到异步队列中执行,同时因为可能会存在多个watcher,故需要保存到一个数组中去注意去重。注意去重
import { pushTarget, popTarget } from './dep'

let id = 0
class Watch {
    constructor(vm, exprs, cb = () => {}, opts) {
        this.vm = vm
        this.exprs = exprs
        this.cb = cb
        this.id = id++;
        this.deps = []
        this.depsId = new Set()

        if (typeof exprs === 'function') {
            this.getter = exprs
        }

        this.get()
    }
    get() {
        pushTarget(this)
        this.getter()
        popTarget()
    }
    update() {
        // 实现异步更新
        // this.get()
        queneWatcher(this)

    }
    run() {
        this.get()
    }
    addDep(dep) {
        let id = dep.id
        if (!this.depsId.has(id)) {
            this.depsId.add(id)
            this.deps.push(dep)
            dep.addSub(this)
        }
    }

}

//异步更新
let has = {}
let queue = []

function queneWatcher(watcher) {
    let id = watcher.id
    if (has[id] == null) {
        has[id] = true
        queue.push(watcher)
    }
    nextTick(fluqueue)

}

function fluqueue() {
    queue.forEach(watcher => {
        watcher.run()
    })
    has = {}
    queue = []
}


function nextTick(fluqueue) {
    setTimeout(fluqueue, 0)
}
export default Watch
完成数组的依赖收集和派发更新
上述对数组的操作仅完成了对数组方法和属性的监听,还没完善监听到之后的处理。
主要处理思想:为所有需要监听的对象或数组增加一个属性,此属性保存的是其对应的dep。然后再有dep进行依赖收集和派发更新。进行依赖收集的位置不做改变
更新observe类代码如下:
class Observe {
    constructor(data){ // data就是我们定义的data vm._data实例
        // 将用户的数据使用defineProperty定义
        // 创建数组专用 的dep
        this.dep = new Dep()
        // 给我们的对象包括我们的数组添加一个属性__ob__ (这个属性即当前的observe)
        Object.defineProperty(data,'__ob__',{
            get:() => this
        })
        if (Array.isArray(data)){
            data.__proto__ = arrayMethods
            observerArray(data)
        }else {
            this.walk(data)
        }
    }
    walk(data){
        let keys = Object.keys(data)
        for (let i = 0;i<keys.length;i++){
            let key  = keys[i]; // 所有的key
            let value = data[keys[i]] //所有的value
            defineReactive(data,key,value)
        }
    }
}
export function defineReactive(data,key,value) {
    // 观察value是不是对象,是的话需要监听它的属性。
    let childOb = observe(value)
    let dep = new Dep()
    Object.defineProperty(data,key,{
        get(){
            if (Dep.target){
                dep.depend() //让dep保存watcher,也让watcher保存这个dep

                if (childOb){
                    childOb.dep.depend()
                    dependArray(value) //收集儿子的依赖
                }
            }
            return value
        },
        set(newValue){
            if (newValue === value) return
            value = newValue
            observe(value)

            // 当设置属性的时候,实现更新
            dep.notify()

        }
    })
}


export default Observe
在数组相应方法中进行派发更新
即处理完数组扩展的相应操作之后,进行派发更新this.__ob__.dep.notify()
methods.forEach(method=>{
    arrayMethods[method] = function (...arg) {
        // 不光要返回新的数组方法,还要执行监听
        let res = oldArrayPrototypeMethods[method].apply(this,arg)
        // 实现新增属性的监听
        console.log("我是{}对象中的push,我在这里实现监听");
        // 实现新增属性的监听
        let inserted
        switch (method) {
            case 'push':
            case 'unshift':
                inserted = arg
                break
            case 'splice':
                inserted = arg.slice(2)
                break
            default:
                break
        }
        // 实现新增属性的监听
        if (inserted){
            observerArray(inserted)
        }
        this.__ob__.dep.notify()
        return res
    }
4.2 来看DIFF
所谓虚拟Dom也就是用js对象来描述真实的DOM,使用虚拟DOM的原因即减少对真实DOM操作的开支,众所周知对DOM的操作是十分消耗性能的。下面开始从创建虚拟DOM开始到手写react和vue中的两种diff算法
虚拟DOM
希望得到的结果:
   tag: 'div',
        data: { id: 'app' },
        children: [{
            tag: 'p',
            data: {
                class: 'demo'
            }
        }]
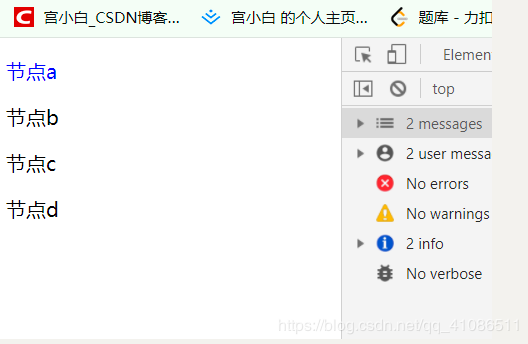
index.js中要创建的VNode
const prevVNode = createElement('div', null, [
    createElement('p', { key: 'a', style: { color: 'blue' } }, '节点a'),
    createElement('p', { key: 'b', '@click': () => { alert('呵呵') } }, '节点b'),
    createElement('p', { key: 'c' }, '节点c'),
    createElement('p', { key: 'd' }, '节点d'),
])
createElement函数,这里将函数的第三个参数作为文本或孩子节点,若参数类型是一个数组则表示传过来的是孩子节点否则是文本节点。即孩子标记位为SINGLE的,代表其是一个子文本
export const vnodeType = {
     HTML: 'HTML',
     TEXT: 'TEXT'
 }
 export const childrenType = {
     EMPTY: 'EMPTY',
     SINGLE: 'SINGLE', //代表文本节点
     MANY: 'MANY'
 }

 export default function createElement(tag, data, children = null) {
     let flag, childrenFlag
     typeof tag === 'string' ? flag = vnodeType.HTML : flag = vnodeType.TEXT


     if (children == null) {
         childrenFlag = childrenType.EMPTY

     } else if (Array.isArray(children)) {

         if (children.length == 0) {
             childrenFlag = childrenType.EMPTY
         } else {
             childrenFlag = childrenType.MANY
         }
     }
     //  如果children不是一个数组,则代表它是一个文本节点
     else if (typeof children === 'string') {

         childrenFlag = childrenType.SINGLE
         children = createTextVnode(children + "")
     }

     return {
         flag, //表示vnode的类型
         tag,
         data,
         key: data && data.key,
         childrenFlag,
         children,
         el: null
     }
 }

 function createTextVnode(text) {
     return {
         flag: vnodeType.TEXT,
         tag: null,
         data: null,
         childrenFlag: childrenType.EMPTY,
         children: text,

     }
 }
此时创建的结果:
![\[外链图片转存失败,源站可能有防盗链机制,建议将图片保存下来直接上传(img-9sSwH3Z7-1593230471144)(C:\Users\T540P\AppData\Roaming\Typora\typora-user-images\1593222372229.png)\]](https://p1-jj.byteimg.com/tos-cn-i-t2oaga2asx/gold-user-assets/2020/6/28/172f870fb43ad73d~tplv-t2oaga2asx-jj-mark:3024:0:0:0:q75.png)
渲染虚拟DOM
虚拟DOM已经生成,下面开始渲染。渲染分为首次和再次。首次比较简单直接将此虚拟DOM挂载到真实DOM即可,再次则需要新老节点的patch
render函数
import { mount } from './mount'
import { patch } from './patch'
export function render(vnode, container) {

    if (container.vnode) {
        // 再次渲染 需要diff
        patch(container.vnode, vnode, container)

    } else {
        // 首次渲染 直接mount
        mount(vnode, container)
    }
    // 保存vnode以供下次diff
    container.vnode = vnode

}
再来看mount函数
mount里面也十分简单,就是挂载一下元素,挂载一下属性,挂载文本,挂载孩子
import { vnodeType, childrenType } from './createElement'
import { patchData } from './patch'
export function mount(vnode, container, refNode) {
    let { flag } = vnode
    if (flag == vnodeType.HTML) {
        mountElement(vnode, container, refNode)
    } else if (flag == vnodeType.TEXT) {
        mountText(vnode, container)
    }
}

// 挂载元素节点
function mountElement(vnode, container, refNode) {
    const dom = document.createElement(vnode.tag)
    vnode.el = dom
    const { data, children, childrenFlag } = vnode

    // 挂载属性
    if (data) {
        for (let key in data) {
            patchData(dom, key, null, data[key])
        }
    }
    // 挂载子元素

    if (childrenFlag !== childrenType.EMPTY) {
        // 挂载文本子节点
        if (childrenFlag === childrenType.SINGLE) {
            mount(children, dom)
        }
        //挂载元素子节点
        else if (childrenFlag === childrenType.MANY) {
            for (let i = 0; i < children.length; i++) {
                mount(children[i], dom)
            }
        }
    }
    refNode ? container.insertBefore(dom, refNode) : container.appendChild(dom)
}

// 挂载文本节点
function mountText(vnode, container) {
    const dom = document.createTextNode(vnode.children)
    vnode.el = dom
    container.appendChild(dom)
}
patchData函数:现在要做的只是把此节点的data中遍历一下,一次挂到它的真实dom上
export function patchData(el, key, pre, next) {

    switch (key) {
        case 'style':
            for (let k in next) {
                el.style[k] = next[k]
            }
            break
        case 'class':
            el.className = next
            break
        default:
            if (key[0] === '@') {
                el.addEventListener(key.slice(1), next)
            } else {
                el.setAttribute(key, next)
            }


    }
}
此时页面便已经被渲染出来了
新老节点的对比
开始逐步进入重点咯
![\[外链图片转存失败,源站可能有防盗链机制,建议将图片保存下来直接上传(img-SbraH93V-1593230471154)(C:\Users\T540P\AppData\Roaming\Typora\typora-user-images\1593223160153.png)\]](https://p1-jj.byteimg.com/tos-cn-i-t2oaga2asx/gold-user-assets/2020/6/28/172f870fb5c10f02~tplv-t2oaga2asx-jj-mark:3024:0:0:0:q75.png)
当页面发生变动,render被再次调用,patch就要来了。
放心这里还仍然没有到核心部分(滑稽),故相对来言也就是按照逻辑往下走。
首先我们在VNode创建的时候写了两个标记位,一个是标记的Vnode的类型,一个是孩子的类型。接下来我们就可以根据他们进行判断了。即标记位不一样的没有比较的价值直接替换
export function patch(pre, next, container) {
    const { flag: preFlag } = pre
    const { flag: nextFlag } = next


    // 新老虚拟节点类型不一致,直接替换
    if (preFlag !== nextFlag) {
        replaceVnode(pre, next, container)
    } else if (nextFlag === vnodeType.HTML) {
        patchElement(pre, next, container)
    } else if (nextFlag === vnodeType.TEXT) {
        patchText(pre, next, container)
    }
}
patchText函数:直接将DOM上的文本换成新的即可
function patchText(pre, next, ) {
    let el = next.el = pre.el


    if (el.children != pre.children) {
        el.nodeValue = next.children
    }
}
patchElement函数,比较两个元素。先看标签tag是否相同。不相同也没有比较的价值直接替换即可,tag一样则开始比较data,再比较孩子
function patchElement(pre, next, container) {
    // 先查看tag是否一样,直接把老的虚拟节点换成新的
    if (pre.tag !== next.tag) {
        replaceVnode(pre, next, container)
    } else {
        // tag一样开始diff属性
        let el = next.el = pre.el
        let preData = pre.data
        let nextData = next.data

        // data里面键一样的拿去更新
        if (nextData) {
            for (let k in nextData) {
                let nextVal = nextData[k]
                patchData(el, k, null, nextVal)
            }
        }

        // 老的有新的没有
        if (preData) {
            for (let k in preData) {
                let preVal = preData[k]
                if (preVal && !nextData.hasOwnProperty(k)) {
                    patchData(el, k, preVal, null)
                }
            }
        }

        //属性diff完成后,patch子节点
        patchChildren(pre.childrenFlag, next.childrenFlag, pre.children, next.children, el)
    }
}
替换节点replaceVnode:即新的搞进去老的移出
function replaceVnode(pre, next, container) {
    container.removeChild(pre.el)
    mount(next, container)
}
patchData:即先将新属性全部放上去,再把老的有新的没有的全部干掉。事件的话老的全部移出,新的监听上去就ok了
export function patchData(el, key, pre, next) {
    // 宗旨:新的全覆盖,老的有新的没有直接干掉
    switch (key) {
        case 'style':
            for (let k in next) {
                el.style[k] = next[k]
            }
            // 老的有,新的没有的属性直接删除
            for (let k in pre) {
                if (!next.hasOwnProperty(k)) {
                    el.style[k] = ''
                }
            }
            break
        case 'class':
            el.className = next
            break
        default:
            if (key[0] === '@') {
                //先把老的事件清除
                if (pre) {
                    el.removeEventListener(key.slice(1), pre)
                }
                el.addEventListener(key.slice(1), next)
            } else {
                el.setAttribute(key, next)
            }


    }
}
下面便来看patchChildren了,比较孩子还是先利用孩子的标记位。这里需要考虑9种情况。不要嫌多,前八种的逻辑均是非常简单的。先来看
即老的孩子flag为SINGLE,这时新的为空即只需把老的干掉;新的也为SINGLE则直接patch;新的为MANY,则老的干掉,新的循环挂上去
下面同理,只有最后一情况多对多复杂一些下面再讨论
function patchChildren(preChildrenFlag, nextChildrenFlag, preChildren, nextChildren, container) {
    switch (preChildrenFlag) {
        case childrenType.SINGLE:
            switch (nextChildrenFlag) {

                case childrenType.SINGLE:
                    patch(preChildren, nextChildren, container)
                    break;

                case childrenType.EMPTY:
                    container.removeChild(preChildren)
                    break;

                case childrenType.MANY:
                    container.removeChild(preChildren)
                    nextChildren.forEach(children => mount(children, container))
                    break;
            }
            break;

        case childrenType.EMPTY:
            switch (nextChildrenFlag) {

                case childrenType.SINGLE:
                    mount(nextChildren, container)
                    break;

                case childrenType.EMPTY:
                    break;

                case childrenType.MANY:
                    nextChildren.forEach(children => mount(children, container))
                    break;
            }
            break;
        case childrenType.MANY:
            switch (nextChildrenFlag) {

                case childrenType.SINGLE:
                    preChildren.forEach(children => container.removeChild(children))
                    mount(nextChildren, container)
                    break;

                case childrenType.EMPTY:
                    preChildren.forEach(children => container.removeChild(children))
                    break;

                case childrenType.MANY:
                    // 重点
                    // reactDiffChild(preChildren, nextChildren, container)
                    vueDiffChild(preChildren, nextChildren, container)
                    break;
            }
            break;
    }
}
终于来到diff的绝对核心了
![\[外链图片转存失败,源站可能有防盗链机制,建议将图片保存下来直接上传(img-A0EBKN1g-1593230471157)(C:\Users\T540P\AppData\Roaming\Typora\typora-user-images\1593224344679.png)\]](https://p1-jj.byteimg.com/tos-cn-i-t2oaga2asx/gold-user-assets/2020/6/28/172f870fb6db19b7~tplv-t2oaga2asx-jj-mark:3024:0:0:0:q75.png)
这里的情况及oldVnode和newVnode均有多个孩子,这里情况比较复杂点。比上面单纯照着逻辑走的就稍微不是那么好写一点。当前也就是复杂点的逻辑而已,不比困难的力扣
这里又要分情况了,react和vue针对这里的diff处理逻辑是不一样的,因为这里是diff算法的核心,我下面会总结的文字稍微多那么一点哈
react中的处理思想一对指针
先来看简单的:react中的处理
react中只使用了一组指针。
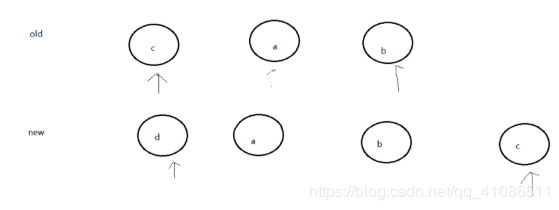
看图:首先new里面拿出指针指的第一个c去old里面找,c在old的位置为2,在新的为0,老的中大即不需要移动位置,new中指针后移
![\[外链图片转存失败,源站可能有防盗链机制,建议将图片保存下来直接上传(img-9L8VDaTt-1593230471159)(C:\Users\T540P\AppData\Roaming\Typora\typora-user-images\1593225181097.png)\]](https://p1-jj.byteimg.com/tos-cn-i-t2oaga2asx/gold-user-assets/2020/6/28/172f870fd9b217dd~tplv-t2oaga2asx-jj-mark:3024:0:0:0:q75.png)
接下来即new中的a,去old里面找,找到了位置在old里面为0,在new里面为1,old里面的小则需要移动,移动到哪呢,看图也知道是old里面c的后面。怎么表示呢?不要忘了上面我们保存了一些一个index,它就是old中c的位置。即插到c的下一个兄弟之前
![\[外链图片转存失败,源站可能有防盗链机制,建议将图片保存下来直接上传(img-uFfDnLkz-1593230471162)(C:\Users\T540P\AppData\Roaming\Typora\typora-user-images\1593225497801.png)\]](https://p1-jj.byteimg.com/tos-cn-i-t2oaga2asx/gold-user-assets/2020/6/28/172f870fdf966f2d~tplv-t2oaga2asx-jj-mark:3024:0:0:0:q75.png)
指针再后移,到b了,显然b也是要移动位置的,即
![\[外链图片转存失败,源站可能有防盗链机制,建议将图片保存下来直接上传(img-kw2v0TGP-1593230471164)(C:\Users\T540P\AppData\Roaming\Typora\typora-user-images\1593225616626.png)\]](https://p1-jj.byteimg.com/tos-cn-i-t2oaga2asx/gold-user-assets/2020/6/28/172f870fda507369~tplv-t2oaga2asx-jj-mark:3024:0:0:0:q75.png)
下面new中该e了,e去老的里面没有找到。则此时该新挂一个节点了,新挂到哪呢?b的后面啊
![\[外链图片转存失败,源站可能有防盗链机制,建议将图片保存下来直接上传(img-1LbGkVx8-1593230471166)(C:\Users\T540P\AppData\Roaming\Typora\typora-user-images\1593225841051.png)\]](https://p1-jj.byteimg.com/tos-cn-i-t2oaga2asx/gold-user-assets/2020/6/28/172f870fe0db7f60~tplv-t2oaga2asx-jj-mark:3024:0:0:0:q75.png)
此时new的指针已经走完,我们需要做的操作只需把此时老的里面有新的没有的节点干掉即可,大功告成编写代码
![\[外链图片转存失败,源站可能有防盗链机制,建议将图片保存下来直接上传(img-hNaZbMvB-1593230471167)(C:\Users\T540P\AppData\Roaming\Typora\typora-user-images\1593225924447.png)\]](https://p1-jj.byteimg.com/tos-cn-i-t2oaga2asx/gold-user-assets/2020/6/28/172f870fe6339846~tplv-t2oaga2asx-jj-mark:3024:0:0:0:q75.png)
代码实现
//react中diff核心的处理方法,较为简单但是缺点很大
function reactDiffChild(prevChildren, nextChildren, container) {
    let lastIndex = 0
    for (let i = 0; i < nextChildren.length; i++) {
        const nextVNode = nextChildren[i]
        let j = 0,
            find = false
        for (j; j < prevChildren.length; j++) {
            const prevVNode = prevChildren[j]
            if (nextVNode.key === prevVNode.key) {
                find = true

                // 去更新一下内部
                patch(prevVNode, nextVNode, container)

                if (j < lastIndex) {
                    // 老节点需要移动
                    const refNode = nextChildren[i - 1].el.nextSibling
                    container.insertBefore(prevVNode.el, refNode)
                    break
                } else {
                    // 更新 lastIndex
                    lastIndex = j
                }
            }
        }
        if (!find) {
            // 挂载新节点
            const refNode =
                // 判断一下是不是首节点
                i - 1 < 0 ?
                prevChildren[0].el :
                nextChildren[i - 1].el.nextSibling

            mount(nextVNode, container, refNode)
        }
    }
    // 移除已经不存在的节点
    for (let i = 0; i < prevChildren.length; i++) {
        const prevVNode = prevChildren[i]
        const has = nextChildren.find(
            nextVNode => nextVNode.key === prevVNode.key
        )
        if (!has) {
            // 移除
            container.removeChild(prevVNode.el)
        }
    }
}
vue中的处理思想两队指针
相比于react,vue便更为复杂一些了。当然复杂有复杂的好处,react的那种处理有很大的缺陷(比如新的头和老的尾k一样,那么old中除了开始的尾其余的均需要移动)。
vue这里有两队指针,故需要考虑5种情况。
1 先来看最为简单的
![\[外链图片转存失败,源站可能有防盗链机制,建议将图片保存下来直接上传(img-3LuebY9T-1593230471168)(C:\Users\T540P\AppData\Roaming\Typora\typora-user-images\1593226307493.png)\]](https://p1-jj.byteimg.com/tos-cn-i-t2oaga2asx/gold-user-assets/2020/6/28/172f870fe97c9b0d~tplv-t2oaga2asx-jj-mark:3024:0:0:0:q75.png)
old和new的头匹配到了,则直接两头指针后移。循环以最短的为主,即最后
![\[外链图片转存失败,源站可能有防盗链机制,建议将图片保存下来直接上传(img-Jg9AB3Bw-1593230471170)(C:\Users\T540P\AppData\Roaming\Typora\typora-user-images\1593226620314.png)\]](https://p1-jj.byteimg.com/tos-cn-i-t2oaga2asx/gold-user-assets/2020/6/28/172f870ff88203e7~tplv-t2oaga2asx-jj-mark:3024:0:0:0:q75.png)
这时发现new中有剩余,我们的操作只需把剩余的挂到后面即可
2 与1类似,尾尾匹配,即从尾部往前找即可
![\[外链图片转存失败,源站可能有防盗链机制,建议将图片保存下来直接上传(img-olrwEG9e-1593230471172)(C:\Users\T540P\AppData\Roaming\Typora\typora-user-images\1593226718797.png)\]](https://p1-jj.byteimg.com/tos-cn-i-t2oaga2asx/gold-user-assets/2020/6/28/172f870ffba34d45~tplv-t2oaga2asx-jj-mark:3024:0:0:0:q75.png)
3 新尾老头匹配
4 新头老尾匹配
![\[外链图片转存失败,源站可能有防盗链机制,建议将图片保存下来直接上传(img-dbz9aFlD-1593230471173)(C:\Users\T540P\AppData\Roaming\Typora\typora-user-images\1593226795862.png)\]](https://p1-jj.byteimg.com/tos-cn-i-t2oaga2asx/gold-user-assets/2020/6/28/172f87100159c8e3~tplv-t2oaga2asx-jj-mark:3024:0:0:0:q75.png)
5 都不匹配
![\[外链图片转存失败,源站可能有防盗链机制,建议将图片保存下来直接上传(img-JgtVICZD-1593230471175)(C:\Users\T540P\AppData\Roaming\Typora\typora-user-images\1593226881781.png)\]](https://p1-jj.byteimg.com/tos-cn-i-t2oaga2asx/gold-user-assets/2020/6/28/172f871005d581ff~tplv-t2oaga2asx-jj-mark:3024:0:0:0:q75.png)
直接拿我代码中的栗子来举例吧
开始如图:
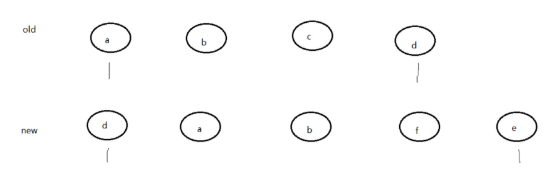
新头老尾匹配,则老尾移动到前面去,指针向中间移动
![\[外链图片转存失败,源站可能有防盗链机制,建议将图片保存下来直接上传(img-gk78KJXu-1593230471180)(C:\Users\T540P\AppData\Roaming\Typora\typora-user-images\1593227364120.png)\]](https://p1-jj.byteimg.com/tos-cn-i-t2oaga2asx/gold-user-assets/2020/6/28/172f871011dfc387~tplv-t2oaga2asx-jj-mark:3024:0:0:0:q75.png)
此时再观察发现头头匹配,指针后移
![\[外链图片转存失败,源站可能有防盗链机制,建议将图片保存下来直接上传(img-On3c21D3-1593230471181)(C:\Users\T540P\AppData\Roaming\Typora\typora-user-images\1593227412731.png)\]](https://p1-jj.byteimg.com/tos-cn-i-t2oaga2asx/gold-user-assets/2020/6/28/172f87101787a966~tplv-t2oaga2asx-jj-mark:3024:0:0:0:q75.png)
还是头头,再后移
![\[外链图片转存失败,源站可能有防盗链机制,建议将图片保存下来直接上传(img-u7lERdjO-1593230471183)(C:\Users\T540P\AppData\Roaming\Typora\typora-user-images\1593227435740.png)\]](https://p1-jj.byteimg.com/tos-cn-i-t2oaga2asx/gold-user-assets/2020/6/28/172f87101d9029ce~tplv-t2oaga2asx-jj-mark:3024:0:0:0:q75.png)
此时均不能匹配,则拿new里的f去看old里有没有,没有则挂到此时old的startIndex之前的位置,指针后移
![\[外链图片转存失败,源站可能有防盗链机制,建议将图片保存下来直接上传(img-C4euWMHK-1593230471184)(C:\Users\T540P\AppData\Roaming\Typora\typora-user-images\1593229742448.png)\]](https://p1-jj.byteimg.com/tos-cn-i-t2oaga2asx/gold-user-assets/2020/6/28/172f8710233a082f~tplv-t2oaga2asx-jj-mark:3024:0:0:0:q75.png)
同理e也没找到,则像上面一样挂到startIndex之前
![\[外链图片转存失败,源站可能有防盗链机制,建议将图片保存下来直接上传(img-zqw6HNto-1593230471185)(C:\Users\T540P\AppData\Roaming\Typora\typora-user-images\1593229847900.png)\]](https://p1-jj.byteimg.com/tos-cn-i-t2oaga2asx/gold-user-assets/2020/6/28/172f871027ec268b~tplv-t2oaga2asx-jj-mark:3024:0:0:0:q75.png)
此时new中遍历走完,old中只需干掉后面的即可
代码实现
//vue中的diff核心处理方法,较为复杂,优于react
function vueDiffChild(prevChildren, nextChildren, container) {
    let oldStartIndex = 0
    let oldEndIndex = prevChildren.length - 1
    let oldStartVnode = prevChildren[0]
    let oldEndVnode = prevChildren[oldEndIndex]

    let newStartIndex = 0
    let newEndIndex = nextChildren.length - 1
    let newStartVnode = nextChildren[0]
    let newEndVnode = nextChildren[newEndIndex]

    // 五种情况:头头,尾尾,头尾,尾头,暴力循环
    while (oldStartIndex <= oldEndIndex && newStartIndex <= newEndIndex) {
        //头头匹配
        if (oldStartVnode.key === newStartVnode.key) {
            // 更新内部
            patch(oldStartVnode, newStartVnode, container)

            // 指针后移
            oldStartVnode = prevChildren[++oldStartIndex]
            newStartVnode = nextChildren[++newStartIndex]
        }
        // 尾尾匹配
        else if (oldEndVnode.key === newEndVnode.key) {
            // 更新内部
            patch(oldEndVnode, newEndVnode, container)

            // 指针前移
            oldEndVnode = prevChildren[--oldEndIndex]
            newEndVnode = nextChildren[--newEndIndex]
        }
        // 新尾老头匹配
        else if (newEndVnode.key === oldStartVnode.key) {

            patch(oldStartVnode, newEndVnode, container)

            // 将老的头整到最后
            container.appendChild(oldStartVnode.el)

            // 新指针前移,老指针后移

            oldStartVnode = prevChildren[++oldStartIndex]
            newEndVnode = nextChildren[--newEndIndex]
        }
        // 新头老尾匹配
        else if (newStartVnode.key === oldEndVnode.key) {

            patch(oldEndVnode, newStartVnode, container)

            // 将老的尾整到前面去
            container.insertBefore(oldEndVnode.el, oldStartVnode.el)

            //新指针后移,老指针前移
            newStartVnode = nextChildren[++newStartIndex]
            oldEndVnode = prevChildren[--oldEndIndex]


        }
        // 均不能匹配
        else {
            let index;
            let map = keyMapByIndex(prevChildren)
            if (map.hasOwnProperty(newStartVnode.key)) {
                index = map[newStartVnode.key]
                    // 找到了,则开始移动
                let toMoveNode = prevChildren[index]
                patch(toMoveNode, newEndVnode, container)
                container.insertBefore(toMoveNode, oldStartIndex)
            } else {
                // 没有找到即挂到新指针之前的位置
                mount(newStartVnode, container, oldStartVnode.el)
            }

            // 后移指针
            newStartVnode = nextChildren[++newStartIndex]
        }


    }


    // 创建一个映射表
    // {a:0,b:1}
    function keyMapByIndex(prevChildren) {
        let map = {}
        for (let i = 0; i < prevChildren; i++) {
            let current = prevChildren[i]
            if (current.key) {
                map[current.key] = i
            }
        }
        return map
    }

    // 将多余的放进去
    if (newStartIndex <= newEndIndex) {
        for (let i = newStartIndex; i <= newEndIndex; i++) {

            let beforeElement = nextChildren[newEndIndex + 1] == null ? null : nextChildren[newEndIndex + 1].el
            if (beforeElement == null) {
                // 从前往后匹配剩余

                container.appendChild(nextChildren[i])

            } else {
                // 从后往前匹配剩余
                // 开始插
                container.insertBefore(nextChildren[i], beforeElement.el)

            }

        }
    }
    // 如果老的还有循环完,即剩下的是要删除的
    if (oldStartIndex <= oldEndIndex) {
        for (let i = oldStartIndex; i <= oldEndIndex; i++) {
            container.removeChild(prevChildren[i].el)
        }
    }
}
