

最开始我在学习自定义LayoutManager的时候,也是网上搜文章,看博客,以及一些公众号的推文。刚开始看的时候觉得还是那么回事,但是在慢慢的深入LayoutManager源码才发现很多的文章其实都是不合格,乃至可以说是很误导人的,所以我才想自己写一篇关于自定义LayoutManager的文章,希望能帮助到一部分人能入门自定义LayoutManager吧。
一些自定义LayoutManager优秀文章推荐
前面虽然说有很多博客是不合格的,但是同样还是有一些优秀的作者的博客对在下启发很大,特别是Dave大神building-a-recyclerview-layoutmanager-part的系列的文章,真的是讲得不能再棒了!虽然已经是14年的文章,但是放在当下来看,依然是自定义LayoutManager相关文章的顶峰,虽然文章是英文,但是还是强烈推荐阅读!
Building a RecyclerView LayoutManager – Part 1
Building a RecyclerView LayoutManager – Part 2
Building a RecyclerView LayoutManager – Part 3
无意中发现了有B站大佬翻译了Dave大神讲解自定义LayoutManager的培训视频,这简直是宝藏,建议收藏多次观看。
Mastering RecyclerView Layouts
其次就是张旭童在CSDN发布掌握自定义LayoutManager相关博客,特别是文章中的常见误区和注意事项,建议多次阅读。
特别是这句话道出了自定义LayoutManager的真谛:一个合格的LayoutManager,childCount数量不应大于屏幕上显示的Item数量,而scrapCache缓存区域的Item数量应该是0,这里建议多读几遍,加深理解。
最后就是陈小媛的Android自定义LayoutManager第十一式之飞龙在天,这么大佬的思路总是那么奇特,逻辑总是那么清晰。
先讲讲自定义LayoutManager的常规套路
- 继承
RecyclerView.LayoutManager并实现generateDefaultLayoutParams()方法。 - 按需,重写
onMeasure()或isAutoMeasureEnabled()方法。 - 重写
onLayoutChildren()开始第一次填充itemView。 - 重写
canScrollHorizontally()和canScrollVertically()方法支持滑动。 - 重写
scrollHorizontallyBy()和scrollVerticallyBy()方法在滑动的时候填充和回收itemView。 - 重写
scrollToPosition()和smoothScrollToPosition()方法支持。 - 解决软键盘弹出或收起导致
onLayoutChildren()方法被重新调用的问题。
再说说自定义LayoutManager容易进入的误区
- 使用
RecyclerView或者说继承了LayoutManager就自带了复用机制和视图回收 - 未正确的重写
onMeasure()或isAutoMeasureEnabled()方法 onLayoutChildren()时直接加载了全部itemView- 未支持
scrollToPosition()或smoothScrollToPosition()方法 - 未解决软键盘弹出或收起
onLayoutChildren()方法重新调用的问题。
使用RecyclerView或者说继承了LayoutManager就自带了复用机制和视图回收?
我发现很多人把RecyclerView想得太完美了,认为RecyclerView天生就自带了复用机制和视图回收,只要使用RecyclerView根本不用关心加载item的数量。其实不用很仔细的阅读RecyclerView的源码也能发现,RecyclerView只不过是一个提供了多级缓存的超级ViewGroup而已。并且RecyclerView只是将自己的onLayout方法完全委托给了LayoutManager,所以继承LayoutManager也不会自带复用机制和视图回收。
用LinearLayoutManager举例,在LinearLayoutManager源码中有一个recycleByLayoutState()方法,它在滚动填充itemView时调用,用来回收超出屏幕的itemView,所以我们在自定义LayoutManager的时候一定要注意,什么时候该回收itemView是由我们开发者自己决定!
    @Override
    public int scrollHorizontallyBy(int dx, RecyclerView.Recycler recycler,
            RecyclerView.State state) {
				...
        return scrollBy(dx, recycler, state);
    }

    int scrollBy(int delta, RecyclerView.Recycler recycler, RecyclerView.State state) {
      ...
        fill(recycler, mLayoutState, state, false);
      ...
    }

		int fill(RecyclerView.Recycler recycler, LayoutState layoutState,
            RecyclerView.State state, boolean stopOnFocusable) {
      recycleByLayoutState(recycler, layoutState);
      ...
      layoutChunk()
      ...
      recycleByLayoutState(recycler, layoutState);
    }

		 void recycleByLayoutState(){
       ...
       if (layoutState.mLayoutDirection == LayoutState.LAYOUT_START) {
            recycleViewsFromEnd(recycler, scrollingOffset, noRecycleSpace);
        } else {
            recycleViewsFromStart(recycler, scrollingOffset, noRecycleSpace);
        }
     }
未正确的重写onMeasure()或isAutoMeasureEnabled()方法
上面常规套路中我写的是按需重写onMeasure()和isAutoMeasureEnabled()方法,为什么是按需呢?因为LayoutManger的onMeasure()有默认实现,并且isAutoMeasureEnabled()默认返回的false。这也是为啥有些博客或者Github的源码这两个方法都没有重写却依然没有问题的原因所在,因为他们直接把RecyclerView的width和height都设置成了match_parent。当然如果你能确定你的LayoutManager只支持宽高同时要match_parent才能正常使用,也可以这么搞。
那么问题又来了,什么时候重写onMeasure(),什么时候重写isAutoMeasureEnabled(),或者有没有情况同时重写两个方法呢?这里在我阅读了大量源码和源码注释得出的结论就是:不要同时重写两个方法,因为它们是互斥的,看源码你就懂了。重写onMeasure()的情况也极少,除非像我那个PickerLayoutManger一样,要设置一个绝对的高度给LayoutManager。isAutoMeasureEnabled()是自测量模式,给RecyclerView的wrap_content的用的,如果你的LayoutManager要支持wrap_content那就必须重写。
onLayoutChildren()时直接加载了全部itemView
网上博客以及Github上有一些Demo,普遍存在下面这种写法:
 for (int i = 0; i < getItemCount(); i++) {
            View view = recycler.getViewForPosition(i);
            addView(view);
            ......
 }
有一说一,能写出这种写法的人真的不是在搞笑吗?在onLayoutChildren的时候直接遍历itemCount然后addView,这真的不是在作死吗?就算有缓存第一次遍历还是会全部走一遍onCreateViewHolder啊,自己就不能把itemCount设个大点的数试试会不会卡死UI渲染吗!当我有这种想法,而且还想去评论区讨教讨教的时候,我又发现了上面那种写法的变种,罢了罢了,这喷子不当也罢😏😏😏。
 for (int i = 0; i < getItemCount(); i++) {
            View view = recycler.getViewForPosition(i);
            addView(view);
            ......
              记录一些item的宽高,位置等信息
            .....
            recyler.recycleView(view)
 }
最简单的测试方法就是把itemCount设置为Int.MAX_VALUE,没有异常发生就算OK。
未支持scrollToPosition()或smoothScrollToPosition()方法
这个问题严谨的来讲也不算什么大问题,但是私以为一个合格的LayoutManager的还是应该去适配这两个方法,毕竟RecyclerView的scrollToPosition()和smoothScrollToPosition()只是对LayoutManager这两个方法的封装,特别是一些发布到Github上的开源库更应该去适配这两个方法。
未解决软键盘弹出或收起onLayoutChildren()方法重新调用的问题
这个问题我发现大多数的人都没注意到,而且有一些开源库也是存在这个问题的。问题出现的根源就是在当EditText获取到焦点导致软键盘弹起或者收起的时候,LayoutManager会重新回调onLayoutChildren()方法。如果一个LayoutManager的onLayoutChildren方法写得不够合理,就会给使用的人带来困扰,详细的内容会放在下面开始自定义LayoutManager再讲。
话说到这里,我在看LinearLayoutManager源码又一次对Google工程师深深的折服,在LinearLayoutManager的onLayoutChildren方法中有一段代码就是对这种问题的处理,并且还是升级版。
 final View focused = getFocusedChild()
 ...
 else if (focused != null && (mOrientationHelper.getDecoratedStart(focused)
                        >= mOrientationHelper.getEndAfterPadding()
                || mOrientationHelper.getDecoratedEnd(focused)
                <= mOrientationHelper.getStartAfterPadding())) {
      mAnchorInfo.assignFromViewAndKeepVisibleRect(focused, getPosition(focused));
}
assignFromViewAndKeepVisibleRect方法是关键,有兴趣的可以自己去看看源码。大概逻辑就是:获取到RecyclerView中获取到焦点的那个itemView和它的position,并开始计算其位置,让它保持在软键盘上面的可见范围内。
一些有用的Api
在开始自定义LayoutManager前,先解释一些Api的用法,这样可以更快的进入主题。
获取一个View
val view = recycler.getViewForPosition(position)
这个方法会从Recycler中获取到一个不会为null的View,如果position超过itemCount或小于0,就会直接抛出异常。内部代码逻辑就是从不同的缓存中拿View,有就直接返回这个View,没有就用onCreateViewHolder创建并返回。
Recycler类可以简单理解为一个回收管理站,需要View时就向它要,不需要时就丢给它。
将View添加到RecyclerView中
addDisappearingView(View child)
addDisappearingView(View child, int index)

addView(View child)
addView(View child, int index)
addDisappearingView方法主要用于支持预测动画,例如:notifyItemRemoved时的删除动画
addView方法更常用,只要是添加View都需要用到它。
测量View
measureChild(@NonNull View child, int widthUsed, int heightUsed)
measureChildWithMargins(@NonNull View child, int widthUsed, int heightUsed)
两个方法都是用来测量View的相关信息,从名字我们也能看出,一个方法是会带上margin计算,另外一个则不会。
widthUsed和heightUsed也能从名称看出端倪,一般传0就可以了,跟着LinearLayoutManager写就对了。
**注意:**测量View也不一定要使用这两个方法,在特殊的情况下,也可以自己写测量的方法,比如在StaggeredGridLayoutManager中就是自己重写的测量方法measureChildWithDecorationsAndMargin(),以及我的一个开源库PickerLayoutManager中在onMeasure中直接使用了view.measure()这种原生方法。
摆放View
layoutDecorated(@NonNull View child, int left, int top, int right, int bottom)
layoutDecoratedWithMargins(@NonNull View child, int left, int top, int right,
                int bottom) {
这两个方法没啥好说的,就是对view.layout()的封装,只要写过自定义ViewGroup的人应该也不会陌生。
获取View的相关信息
int getPosition(@NonNull View view)
获取View的layout position,这个方法十分有用,也没啥人讲到过。
int getDecoratedMeasuredWidth(@NonNull View child)
int getDecoratedMeasuredHeight(@NonNull View child)
获取View的宽高,并且是包含了ItemDecoration的占比。
int getDecoratedTop(@NonNull View child)
int getDecoratedLeft(@NonNull View child)
int getDecoratedRight(@NonNull View child)
int getDecoratedBottom(@NonNull View child)
获取View的left,top,right,bottom距离RecyclerView边缘的距离,同样包含了了ItemDecoration的占比。
移动View
offsetChildrenHorizontal(@Px int dx)
offsetChildrenVertical(@Px int dy)
水平或垂直方向的移动全部子View,看源码得知其实就是遍历调用了子View的offsetTopAndBottom或offsetLeftAndRight方法,这两个方法在自定义ViewGroup移动子View时也经常用到。
回收View
detachAndScrapAttachedViews(@NonNull Recycler recycler)
detachAndScrapView(@NonNull View child, @NonNull Recycler recycler)
detachAndScrapViewAt(int index, @NonNull Recycler recycler)

removeAndRecycleAllViews(@NonNull Recycler recycler)
removeAndRecycleView(@NonNull View child, @NonNull Recycler recycler)
removeAndRecycleViewAt(int index, @NonNull Recycler recycler)
上面几个方法只要记住是detachAndScrap开头的就是轻量级的回收View,马上又要添加View回来。removeAndRecycle开头的就是加强版的回收View,当再次添加View回来时会执行onBindViewHolder方法。
我看网上没啥博客真正讲清楚什么时候该用哪个方法来回收View的,这里有个简单的办法区分什么时候该用哪一个回收View的方法,那就是:
-
在
onLayoutChildren回收View使用detachAndScrap的系列方法,因为onLayoutChildren方法会连续多次调用,detachAndScrap系列的方法就是用在这时候。 -
在
滚动发生后要回收超出屏幕不可见的View时用removeAndRecycle的系列方法。
别问我为啥知道,因为我看LinearLayoutManager和StaggeredGridLayoutManager也是这么用的,嘻嘻!read the fucking source code~
OrientationHelper帮助类

这个帮助类值得好好夸赞,这也是我在阅读LinearLayoutManager源码时发现的,OrientationHelper是一个抽象类,抽象了大量便利的方法,并且提供了两个静态方法createHorizontalHelper和createVerticalHelper用来创建相应方向的帮助类供开发者使用。使用OrientationHelper可以大大减少如下我在StackLayoutManager的样板代码。
    /**
     * 移动所有子view
     */
    private fun offsetChildren(amount: Int) {
        if (orientation == HORIZONTAL) {
            offsetChildrenHorizontal(amount)
        } else {
            offsetChildrenVertical(amount)
        }
    }
...
    private fun getTotalSpace(): Int {
        return if (orientation == HORIZONTAL) {
            width - paddingLeft - paddingRight
        } else {
            height - paddingTop - paddingBottom
        }
    }
正式开始自定义LayoutManager
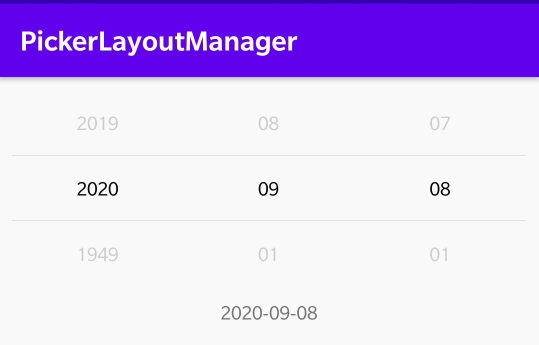
现在我们开始正式讲解如何自定义一个LayoutManager,大概步骤就是如上面自定义LayoutManager的常规套路一样,并且我会用我写的两个开源库PickerLayoutManager和StackLayoutManager来讲解,喜欢的可以star一下。
| github.com/simplepeng/… | github.com/simplepeng/… |
|---|---|
 |  |
继承LayoutManager并实现generateDefaultLayoutParams()方法
这没啥好说的,generateDefaultLayoutParams是抽象方法,继承LayoutManager就必须实现,你自定义的LayoutManager的itemView支持啥LayoutParams就写哪种,比如我写的PickerLayoutManager和StackLayoutManager就是不同的实现。
class PickerLayoutManager:: RecyclerView.LayoutManager(){
      override fun generateDefaultLayoutParams(): RecyclerView.LayoutParams {
        return if (orientation == HORIZONTAL) {
            RecyclerView.LayoutParams(
                RecyclerView.LayoutParams.WRAP_CONTENT,
                RecyclerView.LayoutParams.MATCH_PARENT
            )
        } else {
            RecyclerView.LayoutParams(
                RecyclerView.LayoutParams.MATCH_PARENT,
                RecyclerView.LayoutParams.WRAP_CONTENT
            )
        }
    }
}
class StackLayoutManager: RecyclerView.LayoutManager(){
      override fun generateDefaultLayoutParams(): RecyclerView.LayoutParams {
        return RecyclerView.LayoutParams(
            ViewGroup.LayoutParams.WRAP_CONTENT,
            ViewGroup.LayoutParams.WRAP_CONTENT
        )
    }
}
重写onMeasure()或isAutoMeasureEnabled()方法。
class PickerLayoutManager:: RecyclerView.LayoutManager(){
      override fun onMeasure(
        recycler: RecyclerView.Recycler,
        state: RecyclerView.State,
        widthSpec: Int,
        heightSpec: Int
    ) {
        if (state.itemCount == 0) {
            super.onMeasure(recycler, state, widthSpec, heightSpec)
            return
        }
        if (state.isPreLayout) return

        //假定每个item的宽高一直,所以用第一个view计算宽高,
        //这种方式可能不太好
        val itemView = recycler.getViewForPosition(0)
        addView(itemView)
        //这里不能用measureChild方法,具体看内部源码实现,内部getWidth默认为0
//        measureChildWithMargins(itemView, 0, 0)
        itemView.measure(widthSpec, heightSpec)
        mItemWidth = getDecoratedMeasuredWidth(itemView)
        mItemHeight = getDecoratedMeasuredHeight(itemView)
        //回收这个View
        detachAndScrapView(itemView, recycler)

        //设置宽高
        setWidthAndHeight(mItemWidth, mItemHeight)
    }

      private fun setWidthAndHeight(
        width: Int,
        height: Int
    ) {
        if (orientation == HORIZONTAL) {
            setMeasuredDimension(width * visibleCount, height)
        } else {
            setMeasuredDimension(width, height * visibleCount)
        }
    }
}
class StackLayoutManager: RecyclerView.LayoutManager(){
      override fun isAutoMeasureEnabled(): Boolean {
        return true
    }
}
从上面代码可以看出,PickerLayoutManager重写了onMeasure(),StackLayoutManager重写了isAutoMeasureEnabled()方法,跟上面常见误区中的讲得一致。
重写onLayoutChildren()开始填充子View。
从这个方法开始,PickerLayoutManager和StackLayoutManager的套路都是一致的:计算剩余空间->addView()->measureView()->layoutView()。因为都是模仿LinearLayoutManager的写法,所以下面开始只用StackLayoutManager的伪代码作代码示例,特别的地方再用不同实现的代码做比较。
记住下面的大多数都是伪代码,不要直接复制运行,因为StackLayoutManager支持的属性很多,包括了如同LinearLayoutManager的reverseLayout和orientation等,并且下面的示例只会讲orientation==HORIZONTAL的代码实现,主要是怕代码逻辑太复杂不好理解,想看具体源码的可以点击上面的源码链接查看。
    override fun onLayoutChildren(recycler: RecyclerView.Recycler, state: RecyclerView.State) {

        //轻量级的将view移除屏幕
        detachAndScrapAttachedViews(recycler)
        //开始填充view

        var totalSpace = width - paddingRight
        var currentPosition = 0

        var left = 0
        var top = 0
        var right = 0
        var bottom = 0
        //模仿LinearLayoutManager的写法,当可用距离足够和要填充
        //的itemView的position在合法范围内才填充View
        while (totalSpace > 0 && currentPosition < state.itemCount) {
            val view = recycler.getViewForPosition(currentPosition)
            addView(view)
            measureChild(view, 0, 0)

            right = left + getDecoratedMeasuredWidth(view)
            bottom = top + getDecoratedMeasuredHeight(view)
            layoutDecorated(view, left, top, right, bottom)

            currentPosition++
            left += getDecoratedMeasuredWidth(view)
          	//关键点
            totalSpace -= getDecoratedMeasuredWidth(view)
        }
        //layout完成后输出相关信息
        logChildCount("onLayoutChildren", recycler)
    }
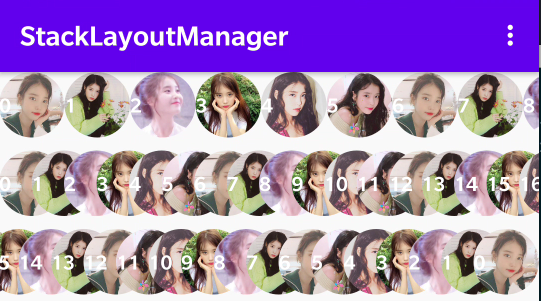
上面的代码很简单了,相信写过自定义ViewGroup的人都能看懂。上面代码很简单的实现了一个横向的LinearLayoutManager,如图所示:

并且在layout结束后,增加了一个输出childCount的方法。
    private fun logChildCount(tag: String, recycler: RecyclerView.Recycler) {
        Log.d(tag, "childCount = $childCount -- scrapSize = ${recycler.scrapList.size}")
    }
D/onLayoutChildren: childCount = 9 -- scrapSize = 0 D/onLayoutChildren: childCount = 9 -- scrapSize = 0 D/onLayoutChildren: childCount = 9 -- scrapSize = 0
从图中可以看出,我们摆放了position0-8的itemView,所以childCount=9,并且scrapSize=0,所以我们这个方法写得是合格的。因为我们用totalSpace > 0作了while表达式的判断,所以并不用关心itemCount有多大。
重写canScrollHorizontally()和canScrollVertically()方法支持滑动。
上面已经初始化摆放了一些itemView,但是RecyclerView还是不能滑动的,不信的可以试试。我们必须重写下面两个方法,RecyclerView才会将滑动的事件交给LayoutManager。
    override fun canScrollHorizontally(): Boolean {
        return orientation == HORIZONTAL
    }

    override fun canScrollVertically(): Boolean {
        return orientation == VERTICAL
    }
没啥好说的,想支持哪个方向的滑动,就返回true。同时返回true都可以,那就是同时支持上下左右滑动,类似Dave大神那种表格类型的LayoutManager。
重写scrollHorizontallyBy()和scrollVerticallyBy()方法在滑动的时候填充view和回收view。
override fun scrollHorizontallyBy(
    dx: Int,
    recycler: RecyclerView.Recycler,
    state: RecyclerView.State
): Int {
    return super.scrollHorizontallyBy(dx, recycler, state)
}
这里先讲一下scrollHorizontallyBy和scrollVerticallyBy两个滑动方法的概念:
- 我看一些博客下有些评论说:"实现这两个方法也不能滑动啊!",说是说这两个方法是滑动的方法,但是其实这两个方法只会返回手指在RecyclerView上的移动距离给我们,就是方法中对应的
dx和dy,dx>0就是手指从右滑向左,dy>0就是手指从下滑向上,同理dx,dy<0则反,真正移动View的事情还是要开发者自己实现,LinearLayoutManager中就简单的用offsetChildren方法实现的移动。或者也有的评论说:"LayoutManager封装的不够合理,滑动还要我们自己实现!",讲道理说这种话的小朋友还是世面见少了,他肯定没见过可以斜着拖的LayoutManager,或者在滑动的时候对itemView有种各种变换的LayoutManager,嘻嘻。 - 两个方法的
返回值同样也十分重要,返回值就是让RecyclerView知道LayoutManager真实的滑动距离,return 0时RecyclerView就会展示overScorll状态以及NestedScrolling的后续处理。关于NestedScrolling这点我也没发现有博客讲到,啥?overScorll你也不知道!告辞~
添加offsetChildrenHorizontal方法,支持水平方向的滑动。啥?为啥又是-dx,看看源码或者实验实验不就知道了。
    override fun scrollHorizontallyBy(
        dx: Int,
        recycler: RecyclerView.Recycler,
        state: RecyclerView.State
    ): Int {
        //移动View
        offsetChildrenHorizontal(-dx)
        return dx
    }

就这么简单,我们的LayoutManager已经可以滑动了。但是随之而来又发现一个问题:“滑动只是在已存在的这几个children间滑动”。这不是废话吗,我们都没写填充和回收View的方法,肯定没有新的itemView添加进来呀,超过屏幕的View也不会回收呀。下面开始增加填充View和回收View的代码块。
    override fun scrollHorizontallyBy(
        dx: Int,
        recycler: RecyclerView.Recycler,
        state: RecyclerView.State
    ): Int {

        //填充View
        fill(dx, recycler)
        //移动View
        offsetChildrenHorizontal(-dx)
        //回收View
        recycle(dx, recycler)

        //输出children
        logChildCount("scrollHorizontallyBy", recycler)
        return dx
    }
从上面的代码可以看出,在滑动的时候我们真正只做了三件事,填充View-移动View-回收View,一个合格的LayoutManager至少是应该做足这三件事的,并且顺序最好如上面代码一样先填充-再移动-最后回收,当然复杂的情况的LayoutManager可以多加一些条件检测和特殊处理,例如LinearLayoutManager就是先回收-再填充-再回收-最后移动。
这里我们先写回收的方法,因为逻辑相对简单点。
    private fun recycle(
        dx: Int,
        recycler: RecyclerView.Recycler
    ) {
        //要回收View的集合,暂存
        val recycleViews = hashSetOf<View>()

        //dx>0就是手指从右滑向左,所以要回收前面的children
        if (dx > 0) {
            for (i in 0 until childCount) {
                val child = getChildAt(i)!!
                val right = getDecoratedRight(child)
                //itemView的right<0就是要超出屏幕要回收View
                if (right > 0) break
                recycleViews.add(child)
            }
        }

        //dx<0就是手指从左滑向右,所以要回收后面的children
        if (dx < 0) {
            for (i in childCount - 1 downTo 0) {
                val child = getChildAt(i)!!
                val left = getDecoratedLeft(child)

                //itemView的left>recyclerView.width就是要超出屏幕要回收View
                if (left < width) break
                recycleViews.add(child)
            }
        }

        //真正把View移除掉
        for (view in recycleViews) {
            removeAndRecycleView(view, recycler)
        }
        recycleViews.clear()
    }

可以看到我们在拖动是时候,LayoutManager确实回收了超出屏幕的itemView,并且通过查看log可知childCount和scrapSize同样是合格的。
D/scrollHorizontallyBy: childCount = 2 -- scrapSize = 0
接下来才是重头戏,如何合理的填充View是一门学问。通过我阅读LinearLayoutManager的源码,也总结出一个套路,那就是:获取锚点View的position,计算新的锚点View的position和位置,然后和onLayoutChildren方法一样addView,measureView,layoutView。
    private fun fill(dx: Int, recycler: RecyclerView.Recycler): Int {
        //将要填充的position
        var fillPosition = RecyclerView.NO_POSITION
        //可用的空间,和onLayoutChildren中的totalSpace类似
        var availableSpace = abs(dx)
        //增加一个滑动距离的绝对值,方便计算
        val absDelta = abs(dx)

        //将要填充的View的左上右下
        var left = 0
        var top = 0
        var right = 0
        var bottom = 0

        //dx>0就是手指从右滑向左,所以就要填充尾部
        if (dx > 0) {
            val anchorView = getChildAt(childCount - 1)!!
            val anchorPosition = getPosition(anchorView)
            val anchorRight = getDecoratedRight(anchorView)

            left = anchorRight
            //填充尾部,那么下一个position就应该是+1
            fillPosition = anchorPosition + 1

            //如果要填充的position超过合理范围并且最后一个View的
            //right-移动的距离 < 右边缘(width)那就要修正真实能移动的距离
            if (fillPosition >= itemCount && anchorRight - absDelta < width) {
                val fixScrolled = anchorRight - width
                Log.d("scrollHorizontallyBy", "fill == $fixScrolled")
                return fixScrolled
            }

            //如果尾部的锚点位置减去dx还是在屏幕外,就不填充下一个View
            if (anchorRight - absDelta > width) {
                return dx
            }
        }

        //dx<0就是手指从左滑向右,所以就要填充头部
        if (dx < 0) {
            val anchorView = getChildAt(0)!!
            val anchorPosition = getPosition(anchorView)
            val anchorLeft = getDecoratedLeft(anchorView)

            right = anchorLeft
            //填充头部,那么上一个position就应该是-1
            fillPosition = anchorPosition - 1

            //如果要填充的position超过合理范围并且第一个View的
            //left+移动的距离 > 左边缘(0)那就要修正真实能移动的距离
            if (fillPosition < 0 && anchorLeft + absDelta > 0) {
                return anchorLeft
            }

            //如果头部的锚点位置加上dx还是在屏幕外,就不填充上一个View
            if (anchorLeft + absDelta < 0) {
                return dx
            }
        }

        //根据限定条件,不停地填充View进来
        while (availableSpace > 0 && (fillPosition in 0 until itemCount)) {
            val itemView = recycler.getViewForPosition(fillPosition)

            if (dx > 0) {
                addView(itemView)
            } else {
                addView(itemView, 0)
            }

            measureChild(itemView, 0, 0)

            if (dx > 0) {
                right = left + getDecoratedMeasuredWidth(itemView)
            } else {
                left = right - getDecoratedMeasuredWidth(itemView)
            }

            bottom = top + getDecoratedMeasuredHeight(itemView)
            layoutDecorated(itemView, left, top, right, bottom)

            if (dx > 0) {
                left += getDecoratedMeasuredWidth(itemView)
                fillPosition++
            } else {
                right -= getDecoratedMeasuredWidth(itemView)
                fillPosition--
            }

            if (fillPosition in 0 until itemCount) {
                availableSpace -= getDecoratedMeasuredWidth(itemView)
            }
        }

        return dx
    }
上面的代码我故意写得很啰嗦,应该很好理解了。而且聪明的宝宝应该发现了这个fill方法跟onLayoutChildren的方法是很耦合的,其实是可以合并成一个的,就像LinearLayoutManager的fill方法一样。还有就是再次记住上面的代码是用来讲解的伪代码,并不是StackLayoutManager的真实代码,为了容易理解,我删除了大量的检测方法,以及写的非常啰嗦。

D/scrollHorizontallyBy: childCount = 9 -- scrapSize = 0 D/scrollHorizontallyBy: childCount = 10 -- scrapSize = 0
现在我们的LayoutManager就以及支持了在滑动的时候填充View和回收View,并且childCount依然是合格的。
剩下的就是边界检测让其支持overScrollMode了,细心的小朋友已经发现fill方法其实有一个Int的返回值,那么现在offsetChildren和scrollHorizontallyBy的返回值都使用fill方法的返回值。
    override fun scrollHorizontallyBy(
        dx: Int,
        recycler: RecyclerView.Recycler,
        state: RecyclerView.State
    ): Int {

        //填充View,consumed就是修复后的移动值
        val consumed = fill(dx, recycler)
        //移动View
        offsetChildrenHorizontal(-consumed)
        //回收View
        recycle(consumed, recycler)

        //输出children
        logChildCount("scrollHorizontallyBy", recycler)
        return consumed
    }
就这样简单,边缘检测也完成了。
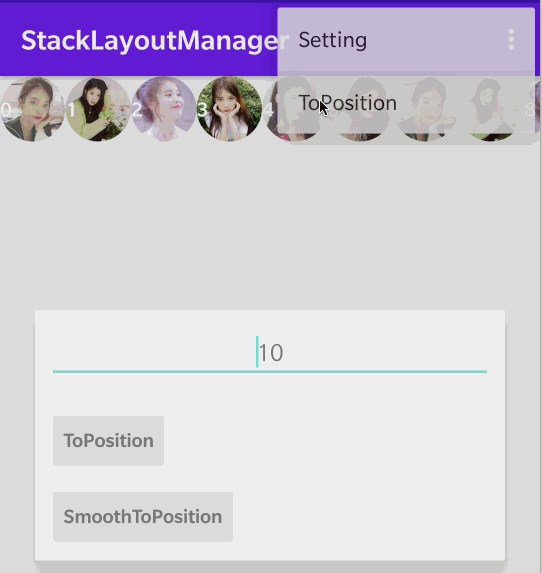
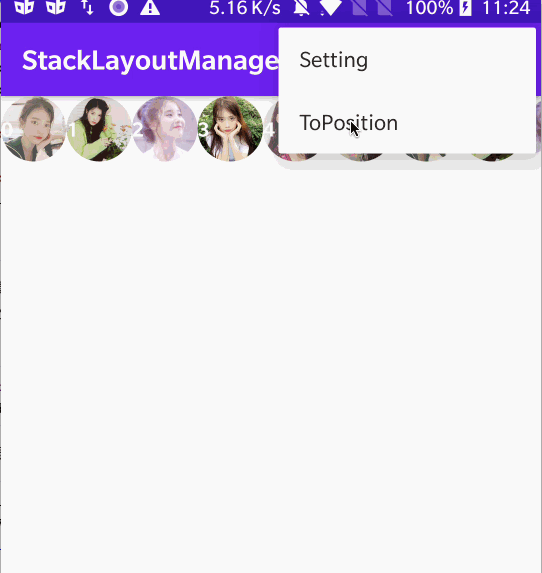
scrollToPosition()和smoothScrollToPosition()方法支持。
适配 scrollToPosition()
源码是最好的老师,我们看看LinearLayoutManager的scrollToPosition()是如何实现的。
    //LinearLayoutManager
		@Override
    public void scrollToPosition(int position) {
        mPendingScrollPosition = position;
        mPendingScrollPositionOffset = INVALID_OFFSET;
        if (mPendingSavedState != null) {
            mPendingSavedState.invalidateAnchor();
        }
        requestLayout();
    }
原来这么简单的吗?再看看mPendingScrollPosition是个啥。
    /**
     * When LayoutManager needs to scroll to a position, it sets this variable and requests a
     * layout which will check this variable and re-layout accordingly.
     */
    int mPendingScrollPosition = RecyclerView.NO_POSITION;
从英文注释的大概的意思就是mPendingScrollPosition是要scorll到的position,那我们继续找它是在哪里调用的。在一连串的搜索后,我发现了华点。
    private boolean updateAnchorFromPendingData(RecyclerView.State state, AnchorInfo anchorInfo) {
        if (state.isPreLayout() || mPendingScrollPosition == RecyclerView.NO_POSITION) {
            return false;
        }
        // validate scroll position
        if (mPendingScrollPosition < 0 || mPendingScrollPosition >= state.getItemCount()) {
            mPendingScrollPosition = RecyclerView.NO_POSITION;
            mPendingScrollPositionOffset = INVALID_OFFSET;
            if (DEBUG) {
                Log.e(TAG, "ignoring invalid scroll position " + mPendingScrollPosition);
            }
            return false;
        }

        // if child is visible, try to make it a reference child and ensure it is fully visible.
        // if child is not visible, align it depending on its virtual position.
        anchorInfo.mPosition = mPendingScrollPosition;
      ...
    }
这个updateAnchorFromPendingData()方法有多层调用栈,但是最终还是在onLayoutChildren()方法中调用的。还记得我们最开始在onLayuoutChildren()有个currentPosition = 0的变量吗,那个变量就相当于这里的anchorInfo.mPosition,就是锚点的position,那么现在我们就可以得出如何适配scrollToPosition的结论:增加mPendingScrollPosition变量,在scrollToPosition()方法中对其赋值,调用requestLayout()方法,然后onLayoutChildren()方法会再次回调,这时对锚点position重新赋值,记住一定做好position的合法校验。
 		private var mPendingPosition = RecyclerView.NO_POSITION

    override fun onLayoutChildren(recycler: RecyclerView.Recycler, state: RecyclerView.State) {
				...省略代码

        var currentPosition = 0
        if (mPendingPosition != RecyclerView.NO_POSITION){
            currentPosition = mPendingPosition
        }

        ...省略代码
    }

    override fun scrollToPosition(position: Int) {
        if (position < 0 || position >= itemCount) return
        mPendingPosition = position
        requestLayout()
    }
仔细看,我们的LayoutManager是不是可以scrollToPosition了。但是这还不是完整的实现,如果你仔细对比LinearLayuotManager的scrollToPosition就能发现差别所在,我这里只是抛砖引玉一下,能让大家知道如何适配scrollToPosition就行了,完整的实现大多数就是细节的处理,和套路无关,听懂掌声👏👏👏👏。
还有一点我看大多数的博客也没讲到,那就是onLayoutCompleted()这个方法其实挺有用的,为啥没人说呢?onLayoutCompleted会在LayoutManager调用完onLayoutChildren()后调用,可以用来做很多收尾的工作。例如:重置mPendingScrollPosition的值
    //LinearLayoutManager
		@Override
    public void onLayoutCompleted(RecyclerView.State state) {
        super.onLayoutCompleted(state);
        mPendingSavedState = null; // we don't need this anymore
        mPendingScrollPosition = RecyclerView.NO_POSITION;
        mPendingScrollPositionOffset = INVALID_OFFSET;
        mAnchorInfo.reset();
    }
适配smoothScrollToPosition()
继续扒LinearLayuotManager的smoothScrollToPosition的源码。
    //LinearLayuotManager
		@Override
    public void smoothScrollToPosition(RecyclerView recyclerView, RecyclerView.State state,
            int position) {
        LinearSmoothScroller linearSmoothScroller =
                new LinearSmoothScroller(recyclerView.getContext());
        linearSmoothScroller.setTargetPosition(position);
        startSmoothScroll(linearSmoothScroller);
    }
九折?不管了,直接复制,粘贴,再看效果,毕竟祖传CV工程师岂非浪得虚名。
    override fun smoothScrollToPosition(
        recyclerView: RecyclerView,
        state: RecyclerView.State,
        position: Int
    ) {
        val linearSmoothScroller =
            LinearSmoothScroller(recyclerView.context)
        linearSmoothScroller.targetPosition = position
        startSmoothScroll(linearSmoothScroller)
    }
咦!这不是scrollToPosition的效果吗?也不是我们smoothScroll的平滑效果呀。于是我继续看博客,翻源码,也还是看到了Dave大神的博客才找到了真正的重点computeScrollVectorForPosition(int targetPosition)这个方法。这个方法就在LinearLayoutManager的smoothScrollToPosition方法下面,但是没有注释,是真难让人猜。
    @Override
    public PointF computeScrollVectorForPosition(int targetPosition) {
        if (getChildCount() == 0) {
            return null;
        }
        final int firstChildPos = getPosition(getChildAt(0));
        final int direction = targetPosition < firstChildPos != mShouldReverseLayout ? -1 : 1;
        if (mOrientation == HORIZONTAL) {
            return new PointF(direction, 0);
        } else {
            return new PointF(0, direction);
        }
    }
这个computeScrollVectorForPosition方法是SmoothScroller类的一个方法。LinearSmoothScroller又是继承于SmoothScroller。
        @Nullable
        public PointF computeScrollVectorForPosition(int targetPosition) {
            LayoutManager layoutManager = getLayoutManager();
            if (layoutManager instanceof ScrollVectorProvider) {
                return ((ScrollVectorProvider) layoutManager)
                        .computeScrollVectorForPosition(targetPosition);
            }
            Log.w(TAG, "You should override computeScrollVectorForPosition when the LayoutManager"
                    + " does not implement " + ScrollVectorProvider.class.getCanonicalName());
            return null;
        }
从源码来看,又在判断LayoutManager是否是ScrollVectorProvider的子类。如果是就执行computeScrollVectorForPosition方法,那么这样来说的话LinearLayoutManager肯定实现了ScrollVectorProvider接口。
public class LinearLayoutManager extends RecyclerView.LayoutManager implements
        ItemTouchHelper.ViewDropHandler, RecyclerView.SmoothScroller.ScrollVectorProvider {
果然和我们猜想的一样,那么我们也继续模仿这种写法。
class BlogLayoutManager : RecyclerView.LayoutManager() ,RecyclerView.SmoothScroller.ScrollVectorProvider{
          override fun computeScrollVectorForPosition(targetPosition: Int): PointF? {
        if (childCount == 0) {
            return null
        }
        val firstChildPos = getPosition(getChildAt(0)!!)
        val direction = if (targetPosition < firstChildPos) -1 else 1
        return PointF(direction.toFloat(), 0f)
    }
}
细心的小朋友又发现了,我们平滑滚动到50这个position,但是50是靠后停止的,并不是滚动到前面边缘的位置停止。没错,正确的效果就是这样,包括LinearLayoutManager的smoothScrollToPosition的效果也是这样。所以前面我才会说scrollToPosition的实现不是完整效果,完整效果应该和smoothScrollToPosition一样,scrollToPosition到后面的position就是应该从后往前填充,scrollToPosition到前面的position才是从前往后填充。
接着我们讲讲computeScrollVectorForPosition这个方法里面的实现套路。
val firstChildPos = getPosition(getChildAt(0)!!)
val direction = if (targetPosition < firstChildPos) -1 else 1
return PointF(direction.toFloat(), 0f)
通过我阅读源码注释得知,重点就在这个PointF的返回值,源码注释中告诉我们向量的大小并不重要,重要的是targetPosition和向量的方向,PointF的x代表水平方向,y代表竖直方向。整数代表正向移动,负数代表反向移动,也就是上面代码中的direction。但是其实这个说法也不是全对,如果你需要而且能够算出精确的移动值,那就可以直接传递精确的值给PointF。
解决软键盘弹出或收起onLayoutChildren()方法重新调用的问题。
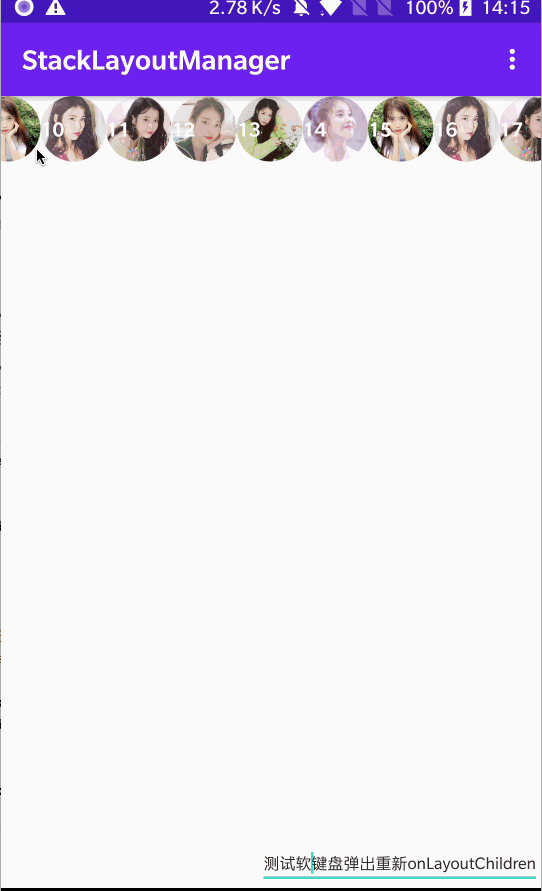
这个问题我也是无意中发现的。
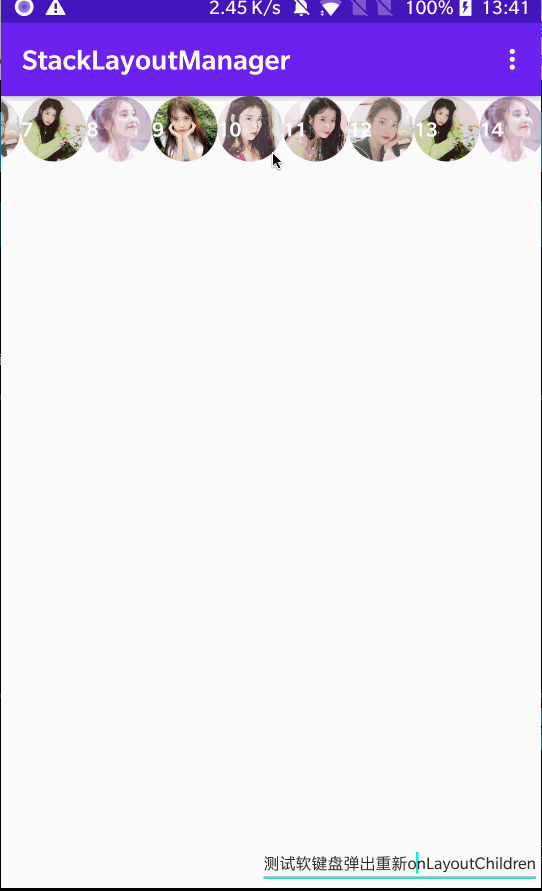
如图所示,我们在滚动一段距离后,让软键盘弹出,发现LayoutManager自动回到position=0那里,再滚动一段距离,软键盘收起,LayoutManager又自动回到position=0那里。分析原因可以知道是onLayoutChildren方法被重新调用导致,因为onLayoutChildren方法中我们的currentPosition=0,所以导致了LayoutManager从0开始重新布局。下面我们开始修正position为真实滚动后的值。
    override fun onLayoutChildren(recycler: RecyclerView.Recycler, state: RecyclerView.State) {

        var totalSpace = width - paddingRight

        var currentPosition = 0

        //当childCount != 0时,证明是已经填充过View的,因为有回收
        //所以直接赋值为第一个child的position就可以
        if (childCount != 0) {
            currentPosition = getPosition(getChildAt(0)!!)
        }

        if (mPendingPosition != RecyclerView.NO_POSITION) {
            currentPosition = mPendingPosition
        }

        //轻量级的将view移除屏幕
        detachAndScrapAttachedViews(recycler)

        //开始填充view
        var left = 0
      ...省略代码
    }
上面示例代码注意detachAndScrapAttachedViews(recycler)方法是在修正position方法的后面,因为先调用detachAndScrapAttachedViews后,childCount就会一直为0啊!
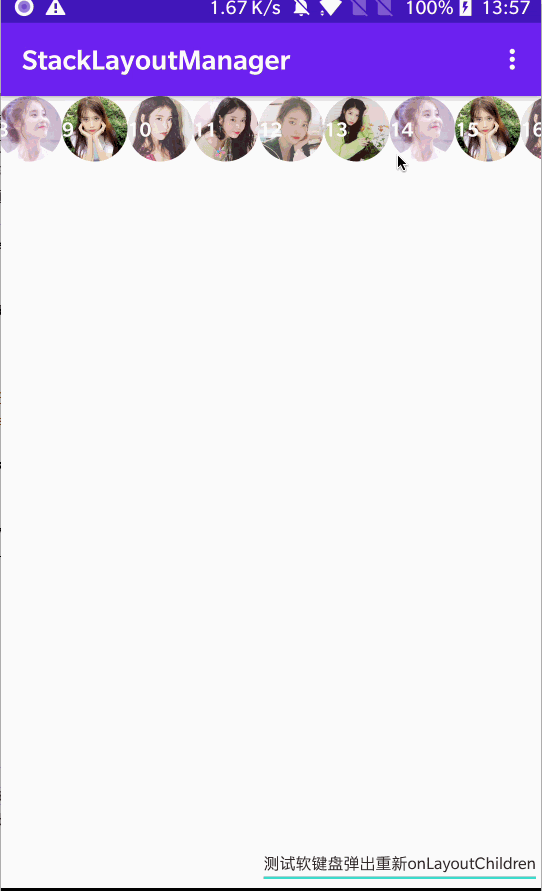
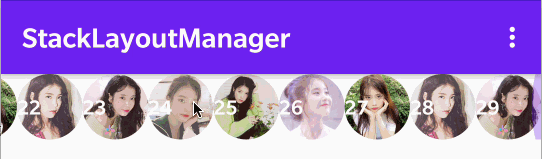
还是如图所示,我们拖动到了position=25的itemView那里,然后软键盘弹起onLayoutChildren调用,这次的确是从currentPosition=25开始重新布局。
但是现在这个方法也还是有瑕疵,仔细看图,我们发现position=25的itemView明明被拖动了一般的宽度到屏幕外,但是重新onLayoutChildren时,又是从屏幕左边缘开始layoutView了。那么怎么解决呢?我们还是可以学习LinearLayoutManager的解决办法,开始获取一个fixOffset的值,在重新layout结束去移动这个值的距离,LinearLayoutManager是将滑动,填充,回收封装成了一个scrollBy()方法,然后在layout结束调用scrollBy方法去修正偏移量,这么做可以解决偏移滑动的同时填充和回收View,我这里偷个懒,直接用offsetChildren去修正一下偏移量。
    override fun onLayoutChildren(recycler: RecyclerView.Recycler, state: RecyclerView.State) {

        var totalSpace = width - paddingRight

        var currentPosition = 0
        var fixOffset = 0

        //当childCount != 0时,证明是已经填充过View的,因为有回收
        //所以直接赋值为第一个child的position就可以
        if (childCount != 0) {
            currentPosition = getPosition(getChildAt(0)!!)
            fixOffset = getDecoratedLeft(getChildAt(0)!!)
        }
				//...省略代码
        offsetChildrenHorizontal(fixOffset)
    }
OK~,收工!啥?要实现的一个StackLayoutManager,为啥你这个是LinearLayoutManger!都看到这里了如果你还能有这种问题,证明我写了一篇水文,逃~
最后
学习自定义LayoutManager的收获挺多的,特别是一些逻辑上的处理,由衷的佩服RecyclerView的作者,真的啥情况都考虑到了。虽然说日常使用RecyclerView自带的那几个LayoutManager就够用了,但是学习一下自定义LayoutManager也不妨,而且深入了还可以同时加深对RecyclerView的理解,何乐而不为呢~
从开始学习自定义LayoutManager,到写了几个开源库,再到完成这篇文章,断断续续花了一个多月吧,如果你觉得这篇文章有帮助你,帮忙给文章点个赞或者给开源库一个star吧,让我知道付出还是会有收获的,谢谢~
